
How To Navigation and Audio :: Sirius Sportster 5 Install - 2008 MCS (R56)


2nd Gear
Joined: Mar 2010
Posts: 149
Likes: 0
So I guess I need another lighter female socket so I can use the TomTom lighter plug (which converts the 12 volt to what amperage the TomTom requires?), right? Which fuse number should I put the second add-a-circuit into?

1st Gear
Joined: Mar 2009
Posts: 47
Likes: 0
From: Campbell, CA
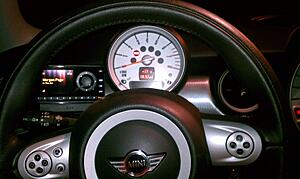
Another Sirius Mount
I liked Oakland Mini's great tutorial, but I didn't like the mounting position. I didn't want my controls behind the steering wheel, so I built a different mount out of .060 aluminum and mounted the Sirius Sportster just in front of the speedometer. Low enough that I can easily see the gas gauge, but high enough that it doesn't interfere with the CD player.
1st Gear
Joined: Mar 2009
Posts: 47
Likes: 0
From: Campbell, CA
More pictures
As you can see, I mounted the Sirius to the underside of the plastic ring surrounding the speedometer. I used two self-tapping #6 plastic screws (metal screws, but made for plastic) to mount the bracket. It is very sturdy, and a 'test removal' shows they are in such a place that if I remove the bracket permanently, only a curious child would notice the holes.
Two thin 3M "bump-on" pads protect the front of the speedometer ring from the metal bracket.
Two thin 3M "bump-on" pads protect the front of the speedometer ring from the metal bracket.

3rd Gear
Joined: Apr 2009
Posts: 151
Likes: 0
From: Lansing, MI
I'm curious if someone can tell me how the cigarette lighter steps down the input 12v to 5v 1.5 amp output? Anyone taken the ligher adapter apart to see what's inside? Might make it easier to wire directly to the fuse box rather use the extra adapter.
Dennis
Dennis
5th Gear
Joined: Jan 2006
Posts: 1,026
Likes: 2
From: Florida
Finished my install and thought that I would post a photo and some notes.
I started with a Sirius Starmate 8 and used the same wire and add-a-circuit, but I used the factory cigar lighter (removed when i permanently installed the USB charger in its location) added some pigtail wires, wrapped the whole thing in heat shrink, and grounded it to the fuse box mounting screw so that I did not have to drill any new holes in the body. I did not have the cover under the passenger seat, but the wire was easy enough to fish out using a wire coat hanger without cutting the carpet. The wires come out of the former mounting spot for the Aux In module which was moved in another mod, and the bracket is mounted to the removable panel below the switch bank.
I started with a Sirius Starmate 8 and used the same wire and add-a-circuit, but I used the factory cigar lighter (removed when i permanently installed the USB charger in its location) added some pigtail wires, wrapped the whole thing in heat shrink, and grounded it to the fuse box mounting screw so that I did not have to drill any new holes in the body. I did not have the cover under the passenger seat, but the wire was easy enough to fish out using a wire coat hanger without cutting the carpet. The wires come out of the former mounting spot for the Aux In module which was moved in another mod, and the bracket is mounted to the removable panel below the switch bank.

Thanks for the write up. I'm looking to do this on my 2007 MCS next week. I'll probably be buying the SiriusXM Onyx. Is the 5ft SMB cable long enough to reach the left side of the steering wheel?
I use my phone for GPS and wanted to mount the unit where Oakland Mini has his GPS. It seems like quite the stretch for 5 feet from the passengers seat. Thanks!
I use my phone for GPS and wanted to mount the unit where Oakland Mini has his GPS. It seems like quite the stretch for 5 feet from the passengers seat. Thanks!
Well, I'm back. Took about 2.5 hours for the whole thing. I had a few different steps added in between as well.
I wasn't able to find the metal you did for the ground wire. I couldn't see the wheel well at the bottom of the fuse box. Instead there was some sort of metal bracket above and to the left of the fuse box. I couldn't reach to drill but securely taped the ground wire to it. Everything seemed to power up fine.
I did not however use a cigarette lighter extension instead I used the stock power cable and a female cigarette lighter adapter I had that came with a circuit tester I had. Almost a huge mistake. I was about 6" short on the power cable to reach where I needed it though. I ended up pulling the adapters out of the fuse box and tucking them under the carpet by the firewall. Seems ok for now. I also had to work the power wire around a bit to optimize the length.
I fed everything though the steering wheel column and used a zip tie to neatly get everything to tuck away.
For the mounting of the XM Onyx I used a swivel pivot mount and zip tied the mount to the panel that popped off behind the tach. It was a lot quicker and let's face it, I don't have the patience, tools or skills necessary to fab up an awesome bracket like OaklandMini.
Thanks again for the post. I wouldn't have been able to get Sirius without you. It's been way too long. I HATE COMMERCIALS!


2nd Gear
Joined: Aug 2011
Posts: 61
Likes: 0
From: Canada
Portable Sirius Radio
Holay Molay!!! Great job on the install.  I don't think my husband would have the patience to do this so here is a silly question.. Would the portable install for Sirius be as complicated? If so what should we know? I have a 2007 MC.. This is my wishlist for xmas
I don't think my husband would have the patience to do this so here is a silly question.. Would the portable install for Sirius be as complicated? If so what should we know? I have a 2007 MC.. This is my wishlist for xmas

1st Gear
Joined: Aug 2012
Posts: 14
Likes: 0
From: Des Moines, Iowa
What a phenomenally helpful article! I came out of frustration at my Sirius shutting down while my radio stayed live and now have a whole different perspective on how I'm going to remount and power it. Thanks so much for sharing!

Dragging up this old thread to offer my recently removed items to any owner that could use them, just asking for $6 to cover shipping. I have the "MINI cable" from CDInt (the one that connects under the seat) along with an XM Onyx + power adapter. This article was extremely helpful to me when setting it up so I'd like to pay it forward and help get someone else working. The only thing you'll need is to figure out your own mount, I used a ProClip mount but it broke when I removed it from my R56. If you have the required under-seat connection you just need to plug in and call SiriusXM to activate the Onyx (ask for the half-off for a year rate!). Message me if you want it.

3rd Gear
Joined: Feb 2008
Posts: 212
Likes: 0
Wow - nice installation but way too much effort for me. I went the easy route and just bought the integrated cigarette lighter adapter with the small controller mounted on top. $25 and about 10 minutes later, I had Sirrus for my road trip.

Thread Starter
|
4th Gear
Joined: Apr 2009
Posts: 455
Likes: 6
From: Oakland, CA
Yup, that's an option. Just not a clean install at all that way and not integrated into the proper Sirius antenna on the roof of your car, thus, weaker reception too. To each his own.
3rd Gear
Joined: Feb 2008
Posts: 212
Likes: 0
Yea -actually I did install the antenna, that took about 9 of the 10 minutes. I placed it right above the front roof pillar on the passenger side. From there it was a quick route down the windshield frame and into the car, under the carpet and over to the console. It works, that is about all I can say about it - not pretty.

6th Gear
Joined: Mar 2008
Posts: 1,258
Likes: 5
From: Florida, South Gulf Coast
Know it's an old thread, but it's the best. Was looking back in NA for "add-a-line" refresh to add my third one to power my new Dash-Cam.
My intent here is to add a warning not seen on NA about what happened to me:
I began to detect moisture in passenger foot-well carpet. Dealer said I'd ruptured the A/C Drain Bellows and wanted a fortune to replace it.
Went to see the very best independent (Min Tech in Naples FL) and he had to order new Bellows. And he told me something the Dealer should have about how the moisture beneath that carpet/foam would damage very expensive components. He started me out by removing lower right door sill to access carpet removal. I went back home and pulled front seats and console so I could remove the entire carpet assembly and make sure everything was completely dry.
This problem had been caused by the power cord from my Garmin GPS (left of tach) that I had installed across and between the A/C and top of floor tunnel towards the fuse box. It's a fairly fat cable (the traffic reception version) and completely hidden in this area and so I had distorted the joint of the drain bellows with it causing a leakage of A/C drain water.
One other warning (especially for automatics) is to completely seal those little screws in bottom of cup holders (I used neoprene washers & a marine sealant). Spilled coffee or any liquid in cup-holder will seep through that screw hole and cause Very Expensive Damage to the shift control electronics in that exact location. No Warranty for that $2K+ replacement as coffee stain will show cause.
(BTW I had previously made my Sirus/XM antenna SMB connection through the 'slit' in carpet mentioned above in thread. I now had my antenna cable completely beneath carpet/padding all the way into below the console.)
Art
Last edited by pilotart; Jan 27, 2018 at 02:49 PM.

Thread
Thread Starter
Forum
Replies
Last Post
igzekyativ
MINIs & Minis for Sale
34
Jul 16, 2020 12:54 PM
squawSkiBum
MINI Parts for Sale
15
Oct 2, 2015 09:21 AM
Navigation & Audio Audio system power issues?
jeffbeckhudd
Navigation & Audio
1
Aug 29, 2015 09:11 PM