
How To Interior/Exterior :: Retrofit adjustable lumbar support to a sports seat


Moderator


Joined: May 2012
Posts: 1,788
Likes: 345
From: San Francisco Bay Area
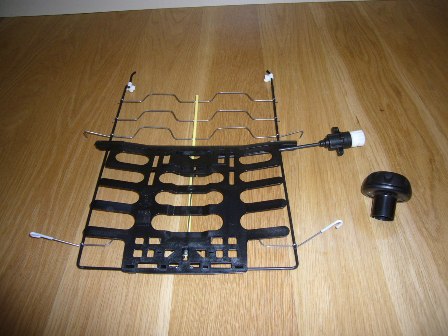
Pics of when it's done. Installing the new springs with lumbar support was easier than getting the original springs out - the two lower hooks are tough to release. The screws (Torx T-15) to hold the adjuster in place go in from the outside, you'll have to push the foam on the side of the seat out of the way.
With the cloth seats, I found that it it worked best to put the seat back together before making the hole for the adjuster ****, this made sure that the cover was stretched tight. I was able to feel the outline of the adjuster through the cloth - this may not work with other seat materials.
Thanks again to the OP for showing the way on this.
i would like to thank the op and everyone's advice on the installation. i was nervous at first but it was actually quite easy installing this mod. like others, i couldn't avoid getting scratches and cuts on my hands trying to get the hooks out - the bottom 2 hooks were the hardest/worst.
very cool, practical, and easy mod
very cool, practical, and easy mod

Neutral
Joined: Nov 2012
Posts: 2
Likes: 0
Just did this mod in prep for my 10 hour drive...was well worth it. I have leatherette seats so the zippers definitely made some things easier. There were three things that gave me the most trouble:
1.Removing the lower hooks (the ones with white insulation) from the anchors in order to get the original support out. The needle nose pliers came in handy as I used them to straighten the hooks a bit to get them out.
2. By far the most challenging was inserting the plastic horseshoe anchor into the metal frame. In fact, I had to trim down the bottom nibs so that I could squeeze it tightly enough to fit it in the slot. Once you get it in there, just release the pliers and the little horseshoe thingy will snap securely in place. Again, the needle-nose pliers were integral here. Oh, and a huge fear of mine during this procedure was the possibility of dropping the anchor behind the metal flange. I'm not sure there would be an easy way to get behind that metal bit. Thankfully, I didn't have to find out!
3. After the above step, I thought I'd pretty much be in the clear. Not quite. The last challenge for me was mounting the cylindrical cable housing (sorry, have no idea what that thing is really called) flange to the metal seat structure. Basically, you have to channel your inner zen / use the Force to feel around and find the tiny screw hole. Once you've done that (twice), you can truly sit back and relax....on your new lumbar support!
Last edited by Skydryv; Nov 10, 2012 at 10:37 PM. Reason: remove split infinitive
Neutral
Joined: Nov 2012
Posts: 2
Likes: 0
Here's the last thing I was talking about. It was difficult for me to find the screw holes without making too big a hole in the leatherette / foam. Of course, I'm well know for doing things the most difficult way possible. Such is probably the case here.

Thread Starter
|
4th Gear
Joined: Jul 2009
Posts: 560
Likes: 6
From: (Old) England
Skydryv, is there some reason with the leatherette* seats why you can't lift back the sides of the seat cover and just fit the horseshoe in from the outside? Or did you not undo the bottom rear rivets, and so you couldn't lift back the sides?
I've not seen the leatherette seat covers, which are not sold in Britain, so don't know how different they are.
* I still weep at the thought of all those cute little leatherettes that gave up their life for your seating pleasure. I guess that sort of sentimentality is why they don't sell those seats over here....


4th Gear
Joined: Aug 2008
Posts: 470
Likes: 1
From: Harleysville PA
Try this link: http://europartsdirect.net/parts/ind...&siteid=217812

OVERDRIVE
Joined: May 2005
Posts: 8,233
Likes: 128
From: San Francisco
Their online catalog lists the part for the left seat: http://parts.miniofsouthatlanta.com/...rm=52102752611
But oddly, not the right (52-10-2-752-612). If you contact them directly, I'm sure they can obtain it for you.
Way Motor Works and other vendors can also obtain OEM parts.
Note that the part numbers are different if your MINI is 9/2011 or newer (see the pdf in the first post).
But oddly, not the right (52-10-2-752-612). If you contact them directly, I'm sure they can obtain it for you.
Way Motor Works and other vendors can also obtain OEM parts.
Note that the part numbers are different if your MINI is 9/2011 or newer (see the pdf in the first post).

3rd Gear
Joined: Jan 2008
Posts: 232
Likes: 1
From: Israel
I contacted mini of south Atlanta, they says there is no kit 611/612 just separate parts (613,614 and the wheels).
The problem with 613,614 that I don't know if it includes the lumbar support or doesn't as it has the same part no. and it doesn't say anything online about lumbar.
The problem with 613,614 that I don't know if it includes the lumbar support or doesn't as it has the same part no. and it doesn't say anything online about lumbar.

2nd Gear
Joined: Jun 2012
Posts: 122
Likes: 0
From: Edgewater, MD
in this drawing
http://parts.miniofsouthatlanta.com/...ssembly=265015
The assembly labelled 3 looks like it has everything. And, assuming it's like my 2012, is able to be switched to the right (passenger) seat.
http://parts.miniofsouthatlanta.com/...ssembly=265015
The assembly labelled 3 looks like it has everything. And, assuming it's like my 2012, is able to be switched to the right (passenger) seat.
Thread Starter
|
4th Gear
Joined: Jul 2009
Posts: 560
Likes: 6
From: (Old) England
Folks have written earlier in this thread that assembly 3 now includes most fittings - which I think is because so many of you are making this modification.
But the handwheel 4 is also needed - it fits over the (white) stub that's part of assembly 3.
But the handwheel 4 is also needed - it fits over the (white) stub that's part of assembly 3.
3rd Gear
Joined: Jan 2008
Posts: 232
Likes: 1
From: Israel
The 612 is out of stock or not produced.
As I understand the 611 is the new design and is a kit (and includes the wheel ?).
Are you guys sure the 611 can be used for the passenger (right) side as well?
As I understand the 611 is the new design and is a kit (and includes the wheel ?).
Are you guys sure the 611 can be used for the passenger (right) side as well?
http://mini.sewellparts.com/index.php
Sewell will have what you're looking for. They are a sponsor here in NAM and are great MINI authorized dealer - look out for there discount coupon on top of their reduced price for NAM members

3rd Gear
Joined: Jan 2008
Posts: 232
Likes: 1
From: Israel
For my '08 sport seat, I used 52-10-2-752-611. ~$77 and included the **** and everything you need for one seat. It is reversible for the other side as well. sewellparts.com I ordered at the parts counter and they thought I was crazy. 40 minutes and feels pretty good on the lumbar.
http://mini.sewellparts.com/index.php
Sewell will have what you're looking for. They are a sponsor here in NAM and are great MINI authorized dealer - look out for there discount coupon on top of their reduced price for NAM members
Sewell will have what you're looking for. They are a sponsor here in NAM and are great MINI authorized dealer - look out for there discount coupon on top of their reduced price for NAM members
So which one will fit the 08 R56 (regular seats which seems to have the same support as the sport seats)? What's the difference between them all (941, 611/612 up to 2009 and from 2009, 613/614 up to 2009 and from 2009)?
Last edited by BXR; Feb 18, 2013 at 01:19 AM.

5th Gear
Joined: Jul 2012
Posts: 777
Likes: 1
From: Richardson, TX
So the 611 is reversible and will fit the 08 MINI cooper (regular seats)?
Seems like the 611 includes the handwheel?
Confused. Is it reversible or not?
Where can I find the coupon?
So which one will fit the 08 R56 (regular seats which seems to have the same support as the sport seats)? What's the difference between them all (941, 611/612 up to 2009 and from 2009, 613/614 up to 2009 and from 2009)?
5th Gear

Joined: Feb 2009
Posts: 974
Likes: 231
From: Pensacola, FL
newest part numbers
http://mini.sewellparts.com/index.php
Sewell will have what you're looking for. They are a sponsor here in NAM and are great MINI authorized dealer - look out for there discount coupon on top of their reduced price for NAM members
Sewell will have what you're looking for. They are a sponsor here in NAM and are great MINI authorized dealer - look out for there discount coupon on top of their reduced price for NAM members
Left: 52 10 2 752 611
Right: 52 10 20752 614
Getting a discount because I was a forum member was a nice surprise.


4th Gear
Joined: Jun 2010
Posts: 333
Likes: 7
Yep - that's what I have, and it worked just fine!

I wasnt able to find the one "521020752614". Did the 611 come with everything that was needed for the driver's seat?
I just finished the install on my stock, non sport, leatherette seat (only did drivers side). It was nice to just unclip the seat back, unzip the sides, remove the protector and go. It took me probably 30 minutes. The tools I used: Philips screw driver ( I replaced the stock plastic screws for the adjuster with steel ones), needle nose pliers, utility knife. I put the part in and then cut the X with it all zipped back up. It looks and feels great! I ordered the part from Sewell Mini. The had a great price, fast communications, and quick shipping! I only ordered one part,it came with spring mat, ****, hardware:
Spring mat, backrest left
52102752611
$62.71 1 $62.71
Spring mat, backrest left
52102752611
$62.71 1 $62.71