
How To Interior/Exterior :: Retrofit adjustable lumbar support to a sports seat


1st Gear
Joined: Dec 2009
Posts: 38
Likes: 0
From: Cairns, Australia.
For anyone that is interested. I did a google on one of the spring mat part numbers and got a link to this place. http://www.allminiparts.com/products...102752613.html The interesting part is the model applicability at the bottom, it appears that this mod will work on a non sport seat as well.

I just installed the lumbar support on my leatherette seats. What a difference! I should have done this a long time ago. Great write up Andrew. The only difference with leatherette is there are two zippers on the rear that can be unzipped after you unhook the bottom of the seat back fabric from where it joins to the part that tucks under the seat back.

I just installed the lumbar support on my leatherette seats. What a difference! I should have done this a long time ago. Great write up Andrew. The only difference with leatherette is there are two zippers on the rear that can be unzipped after you unhook the bottom of the seat back fabric from where it joins to the part that tucks under the seat back.
No. I have the sport seats. It looks like the insides are the same. So this may work for a non-sport seat also. Just the foam side bolsters are shaped different. I could see on the back side of the foam the word "Sport" imprinted on it.
Thanks! I just installed the support in my R56 justacooper with basic non-sport leatherette seats. Much easier. No need to remove the seat latch or headrest. Just had fish out the tucked in zippers to unzip the back on both sides, remove one clip at the right bottom, unfasten the bottom edge where it goes around and is "tucked" in, lift up the now free flap to expose the old support, squeeze out the old support straight out the back and in with the new. I cut an X after I put in the new support. Hardest thing was snapping in the darn handle ****. Also, the screws I used really didn't secure the base of the ****, well, but with the handle snapped in place it works okay. It feels so much more comfortable for my 6ft frame with long legs and heavy bottom. I usually can't drive for more than an hour straight without my back aching and thigh going numb. I'll report back after my next road trip.


Last edited by lacning74; Mar 13, 2010 at 12:25 PM.


2nd Gear
Joined: Mar 2003
Posts: 123
Likes: 0
Since I do not have the time, I had the dealer do this mod for me. They charged me around 3 hrs of labor for both front seats. It came out great! There is now proper lower back support as opposed to the hole that your back falls into without the lumbar support. For everyone with lower back problems, just do this mod! Thanks to the OP!!!

I have all the stuff for the passengers side if anyone is interested. 40 bucks plus shipping. I did the drivers side then traded in last week for a 2010 with real leather that already has the lumbar support on both seats. Shoot me a PM if interested.

4th Gear


Joined: Jun 2010
Posts: 333
Likes: 7
Thanks! I just installed the support in my R56 justacooper with basic non-sport leatherette seats. Much easier. No need to remove the seat latch or headrest. Just had fish out the tucked in zippers to unzip the back on both sides, remove one clip at the right bottom, unfasten the bottom edge where it goes around and is "tucked" in, lift up the now free flap to expose the old support, squeeze out the old support straight out the back and in with the new. I cut an X after I put in the new support. Hardest thing was snapping in the darn handle ****. Also, the screws I used really didn't secure the base of the ****, well, but with the handle snapped in place it works okay. It feels so much more comfortable for my 6ft frame with long legs and heavy bottom. I usually can't drive for more than an hour straight without my back aching and thigh going numb. I'll report back after my next road trip.

Thread Starter
|
4th Gear
Joined: Jul 2009
Posts: 560
Likes: 6
From: (Old) England
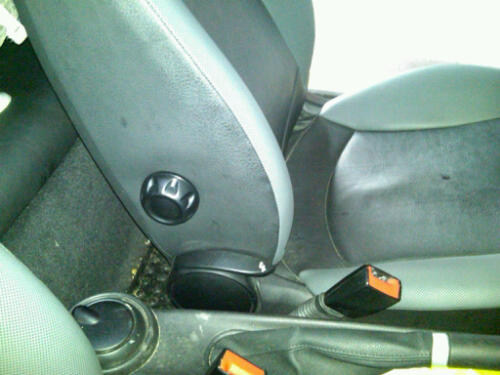
It sounds like you're describing this plastic piece on the seatback:

In which case, the guide in the first post in this thread will suit you perfectly. As you have non-sport seats, there may be some tiny differences in how things look but as far as I can tell, the only difference between sports and non-sports seats is the shape of the foam - what's underneath is identical.
In which case, the guide in the first post in this thread will suit you perfectly. As you have non-sport seats, there may be some tiny differences in how things look but as far as I can tell, the only difference between sports and non-sports seats is the shape of the foam - what's underneath is identical.
4th Gear
Joined: Jun 2010
Posts: 333
Likes: 7
It sounds like you're describing this plastic piece on the seatback:
In which case, the guide in the first post in this thread will suit you perfectly. As you have non-sport seats, there may be some tiny differences in how things look but as far as I can tell, the only difference between sports and non-sports seats is the shape of the foam - what's underneath is identical.
In which case, the guide in the first post in this thread will suit you perfectly. As you have non-sport seats, there may be some tiny differences in how things look but as far as I can tell, the only difference between sports and non-sports seats is the shape of the foam - what's underneath is identical.

Thanks!

5th Gear
Joined: Aug 2008
Posts: 637
Likes: 0
Angib, many thanks for the write up, with you directions I think it took about 30 minutes for both seats and that is with getting the wife to come try the fresh drivers seat before doing the passenger's.
On a side note, DO pry the headrest guides out, If you try to push it out from the bottom you WILL break the locking tabs.
To those that are fighting the urge.. DON'T this makes the car so much better for your back! I think my total cost at the local German dealer was 94 euro.
On a side note, DO pry the headrest guides out, If you try to push it out from the bottom you WILL break the locking tabs.
To those that are fighting the urge.. DON'T this makes the car so much better for your back! I think my total cost at the local German dealer was 94 euro.
Last edited by david in germany; Oct 16, 2010 at 09:55 AM.

2nd Gear
Joined: Jul 2010
Posts: 105
Likes: 3
From: SW Indiana
Adding adjustable lumbar to 2010 MCS Sport seats
I bought the adjustable inserts+***** from AllMiniParts.com in Atlanta.
The things to watch out for are:
-Go slow and print out the pictures and read the posts.
-The end of the zippers are 3in long and can be tucked uder the fabric very tight. I slipped a phillips head driver under the exposed edge and gradually
wiggged and pulled out the zipper with the pull at the end.
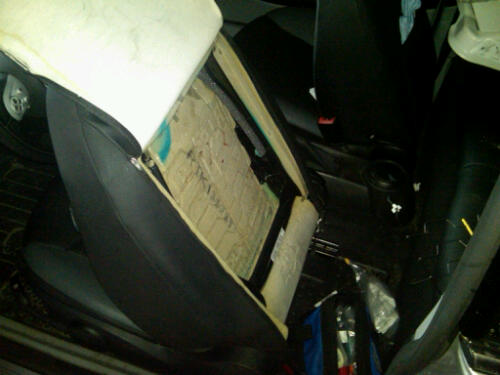
-The US Sport seats have a 12x15in BK plastic cover you have to release from the frame edges.
-The BK pin has a center pin you need to pull with a knife edge.
-Getting the leatherette cover loose to unzip the 2 zippers is tough. I sat in the back seat and clamped a vicegrip to the seat rail to hold it stationary to work on it.
-Take a >1.5 in wide putty spatula and push it into the folded seam and pull the back side BK plastic edge out of the front J-clip.
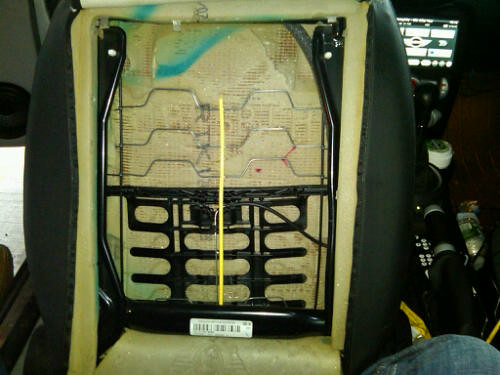
-Don't putz any with the bottom 2 wires with the white covers. Your going to throw the old wire frame away so you can abuse it.
-Take a visegrip or pointed pliers and bend the wire open and then shove a Lg wide flat screwdriver into the other side of the wire pushing it into the foam and forward.
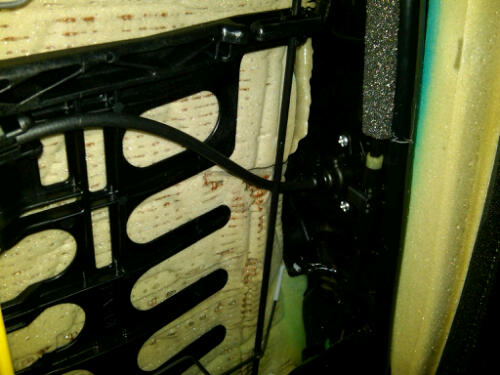
- I bought 2 #8x1in Stainless screws and pushed the fabric & foam forward
on the inside side support to handle getting the screws started manually. The foam won't tear and you can pull it back around when your ready to zip things up.
-Pull the fabric tight to the rear & feel the adjuster cylinder under the fabric. My cylinders were both low in the seat foam holes and that's why I had to pull the foam forward to insert the screws.
-Now slice an X in the fabric about 1x1in and push your finger thru. Enlarge as needed and then push the handle thru the hole and spin it until you feel it drop in and the hit it firmly with your hand and it will snap on.
-Put it all together and enjoy. To adjust the seat firmer you rotate the top edge of both seats forward.
The things to watch out for are:
-Go slow and print out the pictures and read the posts.
-The end of the zippers are 3in long and can be tucked uder the fabric very tight. I slipped a phillips head driver under the exposed edge and gradually
wiggged and pulled out the zipper with the pull at the end.
-The US Sport seats have a 12x15in BK plastic cover you have to release from the frame edges.
-The BK pin has a center pin you need to pull with a knife edge.
-Getting the leatherette cover loose to unzip the 2 zippers is tough. I sat in the back seat and clamped a vicegrip to the seat rail to hold it stationary to work on it.
-Take a >1.5 in wide putty spatula and push it into the folded seam and pull the back side BK plastic edge out of the front J-clip.
-Don't putz any with the bottom 2 wires with the white covers. Your going to throw the old wire frame away so you can abuse it.
-Take a visegrip or pointed pliers and bend the wire open and then shove a Lg wide flat screwdriver into the other side of the wire pushing it into the foam and forward.
- I bought 2 #8x1in Stainless screws and pushed the fabric & foam forward
on the inside side support to handle getting the screws started manually. The foam won't tear and you can pull it back around when your ready to zip things up.
-Pull the fabric tight to the rear & feel the adjuster cylinder under the fabric. My cylinders were both low in the seat foam holes and that's why I had to pull the foam forward to insert the screws.
-Now slice an X in the fabric about 1x1in and push your finger thru. Enlarge as needed and then push the handle thru the hole and spin it until you feel it drop in and the hit it firmly with your hand and it will snap on.
-Put it all together and enjoy. To adjust the seat firmer you rotate the top edge of both seats forward.

Neutral
Joined: Oct 2010
Posts: 1
Likes: 0
R55 Stock Leatherette Seats
I also want to thank everyone for their pictures and experiences. I was able to fit the lumbar support to the driver's seat in about an hour, taking things slowly.
There are two things that may be helpful to other owners that I want to pass along: I was surprised to see a white plastic panel under the leatherette of my Clubman with standard seats, but it popped out with a little bending. Also, the $9 I paid for the seat fasteners kit was well worth while, as I broke one of the expanding fasteners while removing it.
There are two things that may be helpful to other owners that I want to pass along: I was surprised to see a white plastic panel under the leatherette of my Clubman with standard seats, but it popped out with a little bending. Also, the $9 I paid for the seat fasteners kit was well worth while, as I broke one of the expanding fasteners while removing it.
