
How To Interior/Exterior :: Retrofit adjustable lumbar support to a sports seat


1st Gear
Joined: Oct 2009
Posts: 21
Likes: 0
I did this install on my Justa's the leatherette sport seat. Pretty straightforward. I did not have to remove the headrest or the release latch...I just unzipped and was able to work entirely from the bottom of the seat.
One thing possibly of note is that I special-ordered the new spring mat from my dealer's parts department, and was surprised to find that the box INCLUDED the **** (as well as some plastic pin doodads and a couple of omegas). The part number I ended up with is 52-10-2-752-611, which the dealer's computer showed as superseding the part number for the left side spring mat in the pdf instructions from the O.P. (Which reflects outstanding work, and thanks to all who went before).
My price paid at Mini of "Clear" Lake was $68.09, which included a pricematch of an earlier post in this thread plus a 10% NAM bonus discount.

Neutral
Joined: Jun 2011
Posts: 7
Likes: 0
From: Dallas
You guys are awesome! As a new member to the group, I ordered the parts from Allminiparts and it took about an hour on the drivers side. The one tricky part for me was screwing the adjuster mechanism to the frame-I need smaller fingers Am waiting for the passenger side since it was back ordered. Thanks guys! What a difference in seating comfort.
Am waiting for the passenger side since it was back ordered. Thanks guys! What a difference in seating comfort.

Neutral
Joined: Jul 2011
Posts: 1
Likes: 0
I just finished installing the lumbar supports on my 07 Cooper S with leatherette seats. WOW . Fantastic feel, no more back pain.
P.S. I did the driver seat first per the instructions and cut an "X" over the adjuster after everything was put back together (worked great). I did the passenger seat by only removing the back panel and worked everything from the backmuch faster and easier without messing with the rivets or the headrest.
Great write-up!!! Thanks.
. Fantastic feel, no more back pain.P.S. I did the driver seat first per the instructions and cut an "X" over the adjuster after everything was put back together (worked great). I did the passenger seat by only removing the back panel and worked everything from the back
much faster and easier without messing with the rivets or the headrest.Great write-up!!! Thanks.


Neutral
Joined: Oct 2009
Posts: 5
Likes: 0
Hints for easy install
If you gotten this far in the thread you have probably read all of the other posts and I don't have a whole lot to add with a few exceptions.
I have a 2010 Cooper with leatherette sport seats. It has the zippered back, not the lift off type as in the original pdf (excellent write up just the same). There is no reason to take off the headrest or the seat release handle. There is no reason to remove the plastic rivet that secures one lower corner.
The trickiest thing for me was getting the bottom edge of the back to release from the flap coming from the front of the seat, underneath the seat back. The flap coming underneath the seat back turns up at the rear and then folds forward so that its free end is now pointing downward. It has a rigid plasitc edge on it that runs the full width of the flap and engages a rigid plastic channel that is attached to the bottom of the rear flap (the one with the zippers). A previous poster had suggested using a putty knife to get it to release. That is what I did and it worked really well. No need to force the covering in one direction or another. Just insert the blade coming in from the top between the curled over flap coming from the bottom and the main rear panel. Give it a little pry and the flap will release.
There has been a lot of chatter about anxiety during the cutting of the **** opening. I used an Xacto knife from the inside of the seat and plunging towards the outside with just a small piercing. The metal frame helps give you the "real" center, not the center of the foam that has shifted around during this job. Once the seat cover is closed back up, you can refine where the X opening wants to be after the covering is resettled. When you are doing this the new adjuster mechanism (to which the **** attaches) will be in place and you can easily feel where the hole should be.
To attache the adjuster mechanism to the seat frame (without dropping the screws into the interior of the seat) I pulled the foam and seat cover away from the seat frame so that I could hold the screw in place with a pair of long-nosed needle nose pliers. Through the small preliminary opening in the seat cover I inserted a screw driver to drive the screw in while initially holding it in place with the pliers.
Final tip. The bottom two hooks on the back spring mat that engage the seat frame are tough to get out and back in. I tried pushing with a screw driver but it would slip off and plunge into the seat foam. I was concerned it would come through the other side so I took a thin piece of wood (like a paint stirring stick), tapered the width down to about 1/2" and then cut a notch in that narrow end. This stick was handy for pushing on the hook without fear of it slipping it off. I also considered putting a notch in the end of a flat bladed screw driver but this was easy and worked well enough.
On to parts ordering. The dealer I ordered from didn't know much. I ended up with the 52 10 2 752 611 for the drivers side and the 52 10 2 752 614 for the passenger side. Each was $75.65 list/$60.52 net. The driver's side came with a nice hardware kit that included a ****, some omega clips, two screws to hold the adjuster mechanism and some of the plastic rivets. The passenger side didn't have the hardware or ****. I had ordered two ***** (dealer said they don't come with the mechanism) so I ended up with an extra ****. I had also ordered one of the mounting parts set (52 10 2 757 282 for $25.19/$20.15) which was mainly the big screws that secure the seat to the chassis. I never opened that bag. The zippered backs are so easy to do that you won't need any of the parts in the mounting set. No reason to take the seat out of the car.
The first seat took an hour because I took off the head rest/seat release and struggled with the flap release. The second seat took twenty minutes.
Thanks to Angib for the original post and all of the follow on suggestions and comments. It certainly motivated me to get this very nice retrofit installed. I wouldn't have had the nerve to do this job without it even though I was mighty envious of the Mini owners that had the lumbar adjustment installed at the factory.
If you are on the fence about this mod, JUST DO IT! You won't regret it.
Happy Motoring
MamaPills
I have a 2010 Cooper with leatherette sport seats. It has the zippered back, not the lift off type as in the original pdf (excellent write up just the same). There is no reason to take off the headrest or the seat release handle. There is no reason to remove the plastic rivet that secures one lower corner.
The trickiest thing for me was getting the bottom edge of the back to release from the flap coming from the front of the seat, underneath the seat back. The flap coming underneath the seat back turns up at the rear and then folds forward so that its free end is now pointing downward. It has a rigid plasitc edge on it that runs the full width of the flap and engages a rigid plastic channel that is attached to the bottom of the rear flap (the one with the zippers). A previous poster had suggested using a putty knife to get it to release. That is what I did and it worked really well. No need to force the covering in one direction or another. Just insert the blade coming in from the top between the curled over flap coming from the bottom and the main rear panel. Give it a little pry and the flap will release.
There has been a lot of chatter about anxiety during the cutting of the **** opening. I used an Xacto knife from the inside of the seat and plunging towards the outside with just a small piercing. The metal frame helps give you the "real" center, not the center of the foam that has shifted around during this job. Once the seat cover is closed back up, you can refine where the X opening wants to be after the covering is resettled. When you are doing this the new adjuster mechanism (to which the **** attaches) will be in place and you can easily feel where the hole should be.
To attache the adjuster mechanism to the seat frame (without dropping the screws into the interior of the seat) I pulled the foam and seat cover away from the seat frame so that I could hold the screw in place with a pair of long-nosed needle nose pliers. Through the small preliminary opening in the seat cover I inserted a screw driver to drive the screw in while initially holding it in place with the pliers.
Final tip. The bottom two hooks on the back spring mat that engage the seat frame are tough to get out and back in. I tried pushing with a screw driver but it would slip off and plunge into the seat foam. I was concerned it would come through the other side so I took a thin piece of wood (like a paint stirring stick), tapered the width down to about 1/2" and then cut a notch in that narrow end. This stick was handy for pushing on the hook without fear of it slipping it off. I also considered putting a notch in the end of a flat bladed screw driver but this was easy and worked well enough.
On to parts ordering. The dealer I ordered from didn't know much. I ended up with the 52 10 2 752 611 for the drivers side and the 52 10 2 752 614 for the passenger side. Each was $75.65 list/$60.52 net. The driver's side came with a nice hardware kit that included a ****, some omega clips, two screws to hold the adjuster mechanism and some of the plastic rivets. The passenger side didn't have the hardware or ****. I had ordered two ***** (dealer said they don't come with the mechanism) so I ended up with an extra ****. I had also ordered one of the mounting parts set (52 10 2 757 282 for $25.19/$20.15) which was mainly the big screws that secure the seat to the chassis. I never opened that bag. The zippered backs are so easy to do that you won't need any of the parts in the mounting set. No reason to take the seat out of the car.
The first seat took an hour because I took off the head rest/seat release and struggled with the flap release. The second seat took twenty minutes.
Thanks to Angib for the original post and all of the follow on suggestions and comments.
It certainly motivated me to get this very nice retrofit installed. I wouldn't have had the nerve to do this job without it even though I was mighty envious of the Mini owners that had the lumbar adjustment installed at the factory.If you are on the fence about this mod, JUST DO IT! You won't regret it.
Happy Motoring
MamaPills


Thread Starter
|
4th Gear
Joined: Jul 2009
Posts: 560
Likes: 6
From: (Old) England
I've never looked at a Countryman seat in detail, but the backrest parts diagram suggests that it is very similar under the cover to the standard Mini seat:
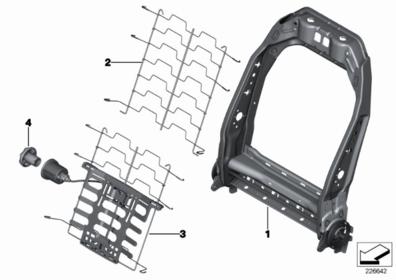
The backrest rear cover looks a similar idea to the older Mini seats, but maybe with a couple of screws in the bottom:

There really is no substitute for you just playing with your seat. Try dismantling it and see how it goes - if you get down to where the 'spring mat' (2 in the first diagram) is accessible, you can order the alternative parts and do it yourself, but if you lose confidence before you get there, then that's a valuable lesson too!

6th Gear
Joined: Jun 2010
Posts: 1,800
Likes: 2
Installed the supports last night in my leatherette sports seats.
Not too hard just watch the hands. I sliced my pinky finger and bled all over my hands and the rear seat before I noticed. +1 for easy cleanup of the leatherette
I found I didn't need to fish out the zipper pulls first. I just twisted with both hands the point where the seat back and lower portion connected to separate (some suggest a wide putty knife)... then the unzip.
The two lowest hooks in the mat were the worst. They have plastic coatings that get stuck in the little frame holes.
Anyways, I ordered the following two parts:
Part # 52-10-2-752-611
Part # 52-10-2-752-612
They included the mat, hand-wheel and a parts bag with two plastic omegas, couple clips. One package included a couple short self-tapping screws, the other mat did not. I didn't use the screws as they were a star shaped and I didn't have the tool with me. I just used 4 self-tapping Philips head screws.
Anyways I have a road trip today so we can test them out.
6th Gear
Joined: Jun 2010
Posts: 1,800
Likes: 2
I don't think it would be worth the trouble. Just buy the lumbar spring mat from MINI. The seat is designed for it after all.

4th Gear
Joined: Jan 2011
Posts: 478
Likes: 1
Just did my driver's seat and it is an absolute must for taller drivers.
I did note the lumbar frame is left/right compatible now, just have to move the cable to the other side.
Also, I have the fabric back seats and only had to open the zippers and remove the inner plastic support cover. Everything else was accessible without further dissassembly.
I did note the lumbar frame is left/right compatible now, just have to move the cable to the other side.
Also, I have the fabric back seats and only had to open the zippers and remove the inner plastic support cover. Everything else was accessible without further dissassembly.
4th Gear
Joined: Dec 2009
Posts: 452
Likes: 2
From: RIGHT BEHIND YOU... Made you look!
I noticed that on mine too. So if anybody needs a drivers' side spring mat, but can only find a passenger side one for sale in the classifides, go ahead and buy it. Looks like you might need a pair of needle-nose pliers to make the switch, but it's pretty obvious how to do it when you look at the part.
4th Gear
Joined: Dec 2009
Posts: 452
Likes: 2
From: RIGHT BEHIND YOU... Made you look!
Just finished the lumbar support install on my Justa's basic leatherette driver's seat, and I am really pissed...
...pissed I didn't do this mod two years ago!!!
Thanks for all the input in this thread!
Install took about 75 minutes, including a good amount of time looking for my needle-nose vice grips (didn't find them, but got along fine without them). I went very slow, and managed to not cut or scrape my hands.
No problem making that scary cut into the seat's side bolster. I was able to move the side foam enough to use a #15 torx bit on a 1/4" ratchet to put the screws on the adjustment cylinder. After I got the seat all put back together, I could feel the cylinder under the leatherette, and precisely make the cuts for the ****.
The better-half's MINI gets the same treatment when she gets home from work.
I planned on just doing the driver's seats in each car, but the increased comfort is so fantastic, I think I'll get the parts for the passenger seats too. We each spend a lot of time as passengers in each other's cars.

3rd Gear
Joined: Dec 2009
Posts: 299
Likes: 1
I just did my 2010 Leatherette. I used one of those cheap round lumbar pillows filled with little foam pellets. It was too much support so I just pulled the pillow through the wire webbing. Cost $0 (I had the pillow) and some blood.
Yeah!
Larry
Yeah!
Larry
3rd Gear
Joined: Mar 2011
Posts: 279
Likes: 1
From: Simi Valley, CA
Were you able to compare the factory lumbar support to your "pillow mod"? Also, does the pillow really give you even support or is it a bit lumpy?
6th Gear
Joined: Jun 2010
Posts: 1,800
Likes: 2
$70 for the proper parts isn't too outrageous, but I had a feeling there would be a cheaper DIY version of lumbar support.
Were you able to compare the factory lumbar support to your "pillow mod"? Also, does the pillow really give you even support or is it a bit lumpy?
Were you able to compare the factory lumbar support to your "pillow mod"? Also, does the pillow really give you even support or is it a bit lumpy?
3rd Gear
Joined: Dec 2009
Posts: 299
Likes: 1
I agree that the $150 is not too expensive. It just occurred to me it might work and when I've had adjustable lumbar supports, I just set it and forget it. I wasn't able to compare it to the factory lumbar, and I found I had to adjust the pillow much further down and reduce the protrusion into the seat by pulling the pillow back through the screening than I had it originally.
So far, it works for me.
So far, it works for me.
3rd Gear
Joined: Mar 2011
Posts: 279
Likes: 1
From: Simi Valley, CA
I agree that the $150 is not too expensive. It just occurred to me it might work and when I've had adjustable lumbar supports, I just set it and forget it. I wasn't able to compare it to the factory lumbar, and I found I had to adjust the pillow much further down and reduce the protrusion into the seat by pulling the pillow back through the screening than I had it originally.
So far, it works for me.
So far, it works for me.
Thanks again!

4th Gear
Joined: Dec 2009
Posts: 452
Likes: 2
From: RIGHT BEHIND YOU... Made you look!
You'll love it. Even with the lumbar support at its lowest setting, you'll immediately feel the difference over the seat without the adjustable support.

Did this to my wife's CM...
Couple of issues:
The spring mats cost me $150 each.. OUCH.
The seat frame does NOT have the hole for the adjustment so you have to unzip the rear to adjust the lumbar or replace the whole seat frame.
The spring mats cost me $150 each.. OUCH.
The seat frame does NOT have the hole for the adjustment so you have to unzip the rear to adjust the lumbar or replace the whole seat frame.
It sounds like you should be the guinea pig to try this out!
I've never looked at a Countryman seat in detail, but the backrest parts diagram suggests that it is very similar under the cover to the standard Mini seat:
The backrest rear cover looks a similar idea to the older Mini seats, but maybe with a couple of screws in the bottom:
There really is no substitute for you just playing with your seat. Try dismantling it and see how it goes - if you get down to where the 'spring mat' (2 in the first diagram) is accessible, you can order the alternative parts and do it yourself, but if you lose confidence before you get there, then that's a valuable lesson too!

1st Gear
Joined: May 2011
Posts: 40
Likes: 0
From: Canada
Pillow = Free = Awesome
I had some old ikea neck cushions which I wasn't using so as part of my spring clean up I decided to either donate or repurpose them. I had looked into the factory lumbar retrofit from MINI and in Canada total cost of parts from the dealer was $327(both front seats). So I cut open the cushions and started to remove the filling, and kept testing them in the back of my leatherette seat as they shrunk. Once I found the sweet spot, I sewed them up and installed them like Larry's photo shows. The result is very similar to the factory lumbar at the lower settings(a smooth curve to the seat back). When I tested the adjustable lumbar I found it had too sharp of a protrusion on anything but the lower settings, so for my purposes the pillow mod wins. Also for leatherette seats it is toolless and takes 10 minutes to do, so it is worth a shot even if it is just to see if the factory lumbar would be a worthwhile investment for you. Thanks for the excellent tip Larry, I had thought about doing this since I got the MINI but didn't have guts to do it till I saw how simple a mod it was for you!
3rd Gear
Joined: Dec 2009
Posts: 299
Likes: 1

But seriously, I'm glad it proved useful for you. I've learned some much from this Board, its good that my idea proved useful for someone else.
Larry