
How To Audio/Navigation :: Install an iPhone in the Armrest


Thread Starter
|
1st Gear
Joined: Mar 2008
Posts: 21
Likes: 0
Audio/Navigation :: Install an iPhone in the Armrest

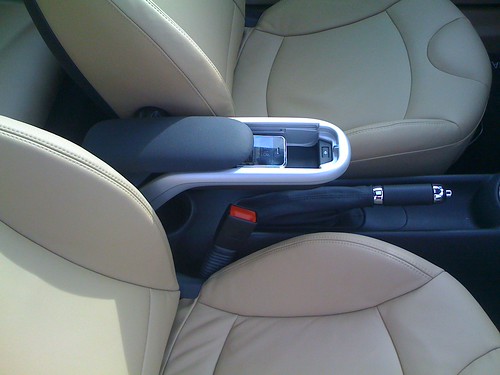
Why Mini choose the location of the iPod adapter to be in the lower console is beyond me. If you've got an iPhone you've got to stuff it upside down in the cup holder. And the adapter is too short to use a Profit vehicle mount, its ridiculous.
I made my own adapter extension with cradle and relocated it from the console to the arm rest. It replaces the phone adapter kit and it works perfectly. The cradle fits nicely inside the armrest so you can slide the iphone in and out easily.
Parts cost was less than $75 and it took a few hours to complete.
I'll post a "how to" shortly.
Last edited by schneidercom; Apr 6, 2008 at 12:22 PM.

Thread Starter
|
1st Gear
Joined: Mar 2008
Posts: 21
Likes: 0
iPhone or iPod installation "How To"
This mod assumes that you have the Aux/USB iPod kit installed AND the center armrest w/ phone adapter. There is some minor cutting involved, and the phone adapter will be completely removed as a result.
If you're like me though, Bluetooth and an iPod connector is all I want.
Here's what you'll need:
- USB cable extender - $8-$15
- Headphone 3.5mm extension - $7 - $15
- ProClipUSA iPhone cradle - $50
- Factory Mini Aux/USB Cable
Tools - Torx drivers, Dremel Cutting Tool, electrical tape and Plastic pry tools (Plastic putty knife works well).

http://www.radioshack.com/product/in...entPage=search

http://www.radioshack.com/product/in...entPage=search


http://www.proclipusa.com/?sectionpa...p_leftorright=
Getting started
Start by removing the side panels on the console
You'll need to remove the kick panel beneath the steering wheel (3 torx screws at the bottom, and 4 clips at the top). The side panels have 3 clips each, remove by prying up gently.
Also remove the 2 torx screws on the console (exposed after side panels are off)

Remove the Console Back Panel
This is where you'll need a pry tool, there are 2 clips that hold this in place.

Afterwards remove the torx screw holding the console in place.This'll give you a little play in the console to access the back of the iPod adapter.
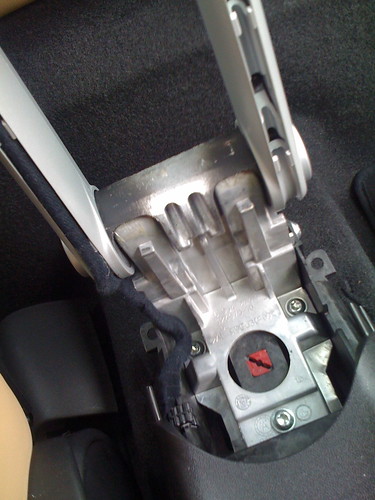
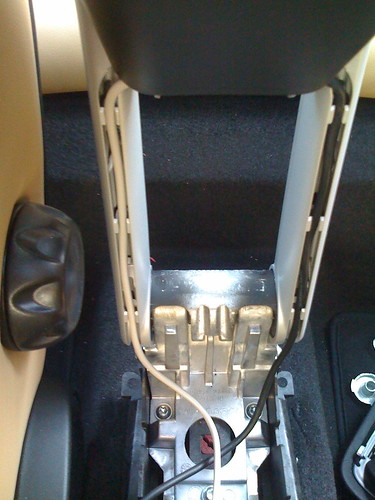
Remove the ipod adapter
There are metal clips holding it in place that you'll have to release to get it to pop out (takes a little patience).

Once its out, disconnect the 2 cables and fish them out the back right side of the console and reattach the connector.

Connect the 2 extension cables, tape up the connector with electrical tape and put the connector near its original location (there's room for it with cable attached).
Here's what it should look like when you're done.

Armrest take apart
Remove the screws holding the center console cover/parking brake (screws in the cup holders), as well as the trim pieces around the armrest hinge.
Disconnect the cable for the phone adapter (2 connectors next to the parking brake), and remove cable that runs up the underside of the armrest.

Remove the armrest cover, and trim piece over the phone adapter.
Remove the trim piece on the rear of the armrest.
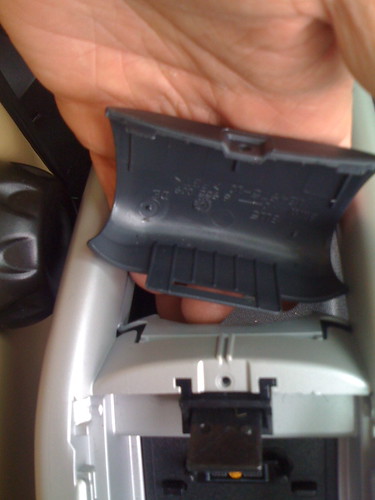
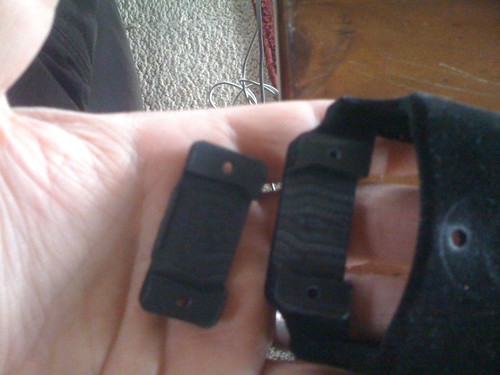
Then take out the phone adapter, there are plastic release clips around the edges of the adapter that release when you pry up (putty knife works well).
There are several springs, a controller board, and the manual release lever that you need to remove. Take the controller and cable out the back of the armrest.
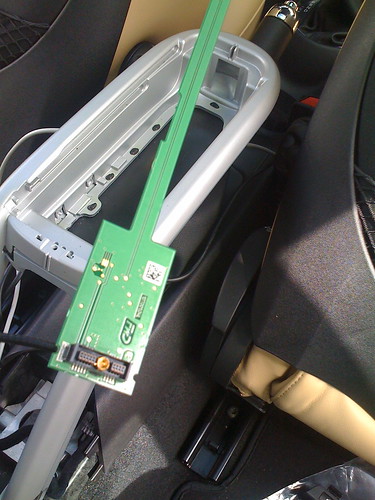
Then take out the metal phone adapter base by holding in the 4 grey plastic side tabs that hold it in place, this is difficult to remove by yourself. I did it alone by using 4 small nails, I wedged the nail in the clip to hold it in on all 4 clips, then used a screw driver to pop it out.
(Sorry, no picture available for this step)
But afterwards this is what it should look like.
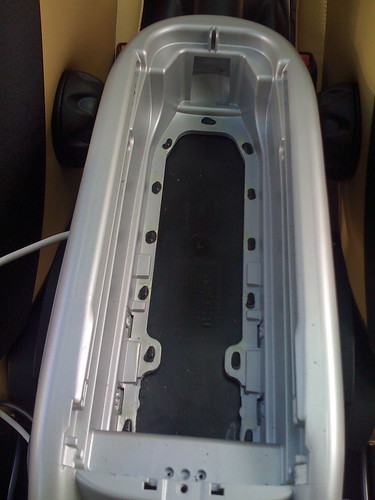
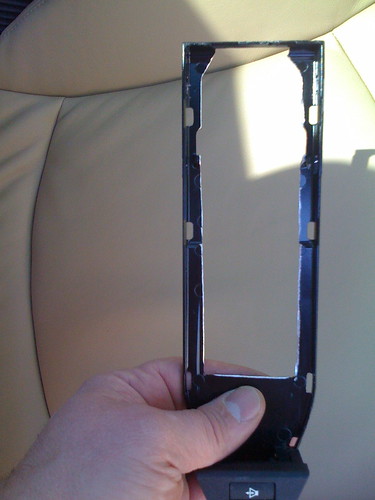
Cutting the Phone Adapter
Here is the trickiest part of the procedure, what you want to do is cut out the mid section of the phone adapter base. This will make room to conceal the cables for the ipod adapter and extension plugs.
** Make sure you do not damage the clip holes!! These are important for reassembling the armrest, note the 8 rectangular holes on the side, and 2 on the back.
I used a dremel tool with a cutting wheel and a small hax saw to cut out the middle, smooth out any sharp edges with a sanding wheel. It took about 20 minutes to complete.
This is what it should look like when you're done.
Installing the cables
Now run the USB and Audio extension cable from the dash to the armrest, you have a cable guide to use for each cable under the armrest.
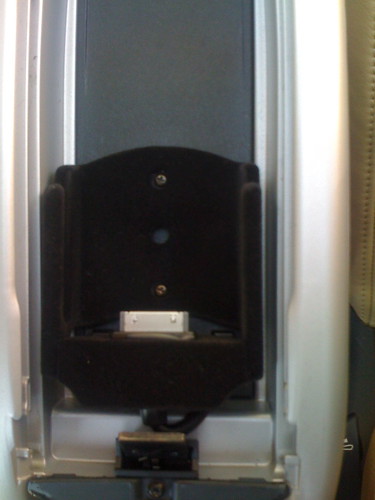
Once the cable is run, connect the iPod adapter to the cable extenders and organize them in the bottom of the armrest, arrange it so the ipod connector goes out the back and up and over the metal phone base. Clip the phone base back into place. This is what it should look like.
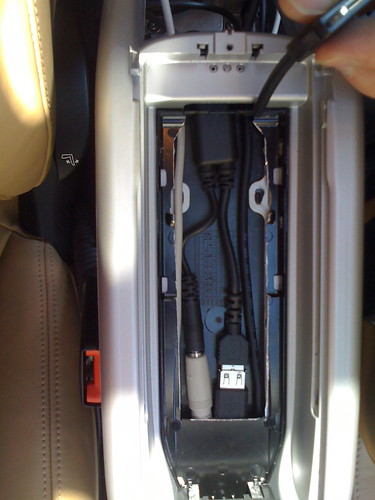
Reinstall the plastic phone adapter insert to cover the wires, this will clip in easily.
Neatly secure your cables under the console (any slack can be tied up near the shifter), and reassemble.
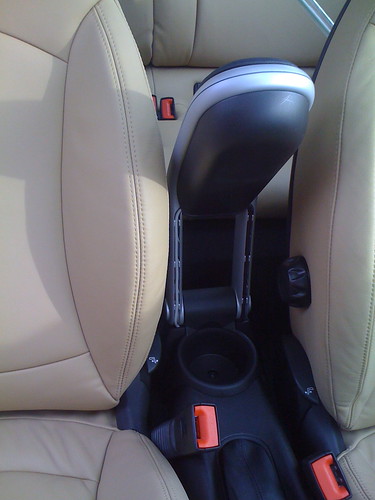
Mounting the cradle
The cradle has a swivel base that has to be removed in order to fit under the sliding armrest cover. Take apart the iPod connector holder to install the cable.
The ipod connector has a squeeze lock that holds it in place. These will prevent the iPhone from coming out of the cradle unless you disable them. I used electrical tape and tightly wrapped the ipod connector so the pins were depressed.
Some adjustments need to be made to "shim" the cable connector in the cradle. Adjust it so that the connector lines up perfectly with the phone. Once you've done this, drill a couple of pilot holes and fasten the cradle to the bottom of the armrest compartment. I set the cradle as far back as possible so I can get the iPhone in and out easily.
Put the armrest cover back on and reassemble the dash and console.
Have fun!!
If you're like me though, Bluetooth and an iPod connector is all I want.
Here's what you'll need:
- USB cable extender - $8-$15
- Headphone 3.5mm extension - $7 - $15
- ProClipUSA iPhone cradle - $50
- Factory Mini Aux/USB Cable
Tools - Torx drivers, Dremel Cutting Tool, electrical tape and Plastic pry tools (Plastic putty knife works well).
http://www.radioshack.com/product/in...entPage=search
http://www.radioshack.com/product/in...entPage=search
http://www.proclipusa.com/?sectionpa...p_leftorright=
Getting started
Start by removing the side panels on the console
You'll need to remove the kick panel beneath the steering wheel (3 torx screws at the bottom, and 4 clips at the top). The side panels have 3 clips each, remove by prying up gently.
Also remove the 2 torx screws on the console (exposed after side panels are off)
Remove the Console Back Panel
This is where you'll need a pry tool, there are 2 clips that hold this in place.
Afterwards remove the torx screw holding the console in place.This'll give you a little play in the console to access the back of the iPod adapter.
Remove the ipod adapter
There are metal clips holding it in place that you'll have to release to get it to pop out (takes a little patience).
Once its out, disconnect the 2 cables and fish them out the back right side of the console and reattach the connector.
Connect the 2 extension cables, tape up the connector with electrical tape and put the connector near its original location (there's room for it with cable attached).
Here's what it should look like when you're done.
Armrest take apart
Remove the screws holding the center console cover/parking brake (screws in the cup holders), as well as the trim pieces around the armrest hinge.
Disconnect the cable for the phone adapter (2 connectors next to the parking brake), and remove cable that runs up the underside of the armrest.
Remove the armrest cover, and trim piece over the phone adapter.
Remove the trim piece on the rear of the armrest.
Then take out the phone adapter, there are plastic release clips around the edges of the adapter that release when you pry up (putty knife works well).
There are several springs, a controller board, and the manual release lever that you need to remove. Take the controller and cable out the back of the armrest.
Then take out the metal phone adapter base by holding in the 4 grey plastic side tabs that hold it in place, this is difficult to remove by yourself. I did it alone by using 4 small nails, I wedged the nail in the clip to hold it in on all 4 clips, then used a screw driver to pop it out.
(Sorry, no picture available for this step)
But afterwards this is what it should look like.
Cutting the Phone Adapter
Here is the trickiest part of the procedure, what you want to do is cut out the mid section of the phone adapter base. This will make room to conceal the cables for the ipod adapter and extension plugs.
** Make sure you do not damage the clip holes!! These are important for reassembling the armrest, note the 8 rectangular holes on the side, and 2 on the back.
I used a dremel tool with a cutting wheel and a small hax saw to cut out the middle, smooth out any sharp edges with a sanding wheel. It took about 20 minutes to complete.
This is what it should look like when you're done.
Installing the cables
Now run the USB and Audio extension cable from the dash to the armrest, you have a cable guide to use for each cable under the armrest.
Once the cable is run, connect the iPod adapter to the cable extenders and organize them in the bottom of the armrest, arrange it so the ipod connector goes out the back and up and over the metal phone base. Clip the phone base back into place. This is what it should look like.
Reinstall the plastic phone adapter insert to cover the wires, this will clip in easily.
Neatly secure your cables under the console (any slack can be tied up near the shifter), and reassemble.
Mounting the cradle
The cradle has a swivel base that has to be removed in order to fit under the sliding armrest cover. Take apart the iPod connector holder to install the cable.
The ipod connector has a squeeze lock that holds it in place. These will prevent the iPhone from coming out of the cradle unless you disable them. I used electrical tape and tightly wrapped the ipod connector so the pins were depressed.
Some adjustments need to be made to "shim" the cable connector in the cradle. Adjust it so that the connector lines up perfectly with the phone. Once you've done this, drill a couple of pilot holes and fasten the cradle to the bottom of the armrest compartment. I set the cradle as far back as possible so I can get the iPhone in and out easily.
Put the armrest cover back on and reassemble the dash and console.
Have fun!!
Last edited by schneidercom; Apr 6, 2008 at 09:22 PM.


I'm not sure this applies to 1st Gen MINIs, as they do not come with USB connectors. I was going to move the entire thread to 2nd Gen Nav & Audio... but I see that schneidercom already has a thread there for this mod...
Thread Starter
|
1st Gear
Joined: Mar 2008
Posts: 21
Likes: 0
Trending Topics
5th Gear
Joined: Jan 2006
Posts: 1,026
Likes: 2
From: Florida
Nice Job. I thought about doing something very similar, but I don't have the 2008 USB kit, so I would have to purchase the OEM iPod adapter ($500) and a dock extender cable ($75-$100 depending on length) and I am not sure if it is worth it.
If I had the USB kit, this would be a MUST!
If I had the USB kit, this would be a MUST!

2nd Gear
Joined: Feb 2008
Posts: 129
Likes: 0
From: Somerville, MA
This looks great! I'm wondering if you could do the same with this cable, which would avoid the need for the extension cables. At 6.5', it should be long enough.
Thread Starter
|
1st Gear
Joined: Mar 2008
Posts: 21
Likes: 0
Nice find!
That cable would have made the project much easier (wish I'd come across it earlier). The reason for cutting the phone base primarily was to house the connectors and the bulky mini ipod cable. That cable would fit easily into the armrest without much modification. Nice find.

1st Gear
Joined: Apr 2008
Posts: 27
Likes: 0
This looks great! I'm wondering if you could do the same with this cable, which would avoid the need for the extension cables. At 6.5', it should be long enough.
Great find! I was wondering the same thing if there was a longer extension cable.

4th Gear
Joined: Mar 2008
Posts: 357
Likes: 1
From: Boulder, CO
That'd be great to know.. Many of us will follow your lead if it works out.... Good luck!
4th Gear
Joined: Mar 2008
Posts: 357
Likes: 1
From: Boulder, CO
Motoring File just posted this article re: iPhone integration, fyi...
http://www.motoringfile.com/2008/05/...ini/#more-6652
http://www.motoringfile.com/2008/05/...ini/#more-6652
1st Gear
Joined: Apr 2008
Posts: 27
Likes: 0
This looks great! I'm wondering if you could do the same with this cable, which would avoid the need for the extension cables. At 6.5', it should be long enough.
4th Gear
Joined: Mar 2008
Posts: 357
Likes: 1
From: Boulder, CO
Boo hoo....

Neutral
Joined: Mar 2009
Posts: 3
Likes: 0
This is exactly what I want to do with my 2009 mini cooper clubman - great post! 2 Questions:
1) My mini came with the armrest without the phone adapter in the arm rest. Does anyone know if this will work the same? (I opened the arm rest today and one of the two tabs that run through the guides snapped off - lame!)
2) If I understand ILv2Xlr8's post then it sounds like I can't use that kenwood cable. I think I read somewhere that the USB port only puts out 100ma instead of 500ma and therefore does a VERY slow charge of the phone. Perhaps the extension cable looses some power over that run. Thoughts? It would be great to boost the power somehow...

Thread Starter
|
1st Gear
Joined: Mar 2008
Posts: 21
Likes: 0
I spoke with my Mini dealer a few weeks ago and he tells me there is a new cable to be released that corrects the charging issue. Currently my 3G iPhone does not charge while docked in the armrest.
Last edited by schneidercom; Mar 28, 2009 at 01:41 AM.

Neutral
Joined: Jun 2009
Posts: 1
Likes: 0
Ridax offering iPhone 3G Charge Converter
http://www.ilounge.com/index.php/new...rge-converter/
Found this from a different post, might work out for the charging. If anybody tested this let me know.
Thanks
Found this from a different post, might work out for the charging. If anybody tested this let me know.
Thanks
1st Gear
Joined: Apr 2008
Posts: 27
Likes: 0
I didn't think there was a difference in chargers for the iphone and iphone 3G? My wife and I interchange the use of the wall chargers on our iphones all the time, but the USB on the Mini has not been able to charge either of our phones with the factory cord or any others? Anyone get a definite answer to this?

5th Gear
Joined: Oct 2005
Posts: 717
Likes: 0
From: Seattle, WA
Nice! And I found this on ZDnet (it's gotten quite a bit of publicity!)
It looks like I have the exact same armrest in my R53 cooper S, except it doesn't have all the handsfree hardware & cables - so it should be even easier for me. I'll just hook it up to the DICE ipod kit (single docking cable for audio and power).
Thanks!
It looks like I have the exact same armrest in my R53 cooper S, except it doesn't have all the handsfree hardware & cables - so it should be even easier for me. I'll just hook it up to the DICE ipod kit (single docking cable for audio and power).
Thanks!

Neutral
Joined: Sep 2009
Posts: 3
Likes: 0
2009 Mini Standard Aux port (no ipod/bluetooth)
Is their and aftermarket to add ipod connector to play iPhone through stereo? Aux connection is not impressive. I am thinking about the Griffin Tune Flex since I travel and can take it with me.
Any help is appreciated.
Chuck
Any help is appreciated.
Chuck