
Official MINI DRLs Fitted
#526
 01-12-2014, 06:29 PM


If you can get your mechanic to install for a decent price like SG's, then that's great. The reason I DIY'd was because when I called a reputable MINI shop that was used by a NAM member here in Bay Area, I was quoted $440 for install because of "all the parts that need to be removed" and how it took them a long time too, being it was also their 1st install.
Sent from my iPhone using NAMotoring
Sent from my iPhone using NAMotoring

#528
01-12-2014, 06:54 PM
If you can get your mechanic to install for a decent price like SG's, then that's great. The reason I DIY'd was because when I called a reputable MINI shop that was used by a NAM member here in Bay Area, I was quoted $440 for install because of "all the parts that need to be removed" and how it took them a long time too, being it was also their 1st install. Sent from my iPhone using NAMotoring


#531
01-13-2014, 06:36 AM
Sent from my iPhone using NAMotoring
#532
01-13-2014, 09:10 AM


#535
01-13-2014, 05:03 PM
#536
01-14-2014, 09:25 AM

2nd Gear
Join Date: Aug 2011
Location: Milwaukee, WI
Posts: 56
Likes: 0
Received 0 Likes
on
0 Posts
How did you snake the blue wire into the cabin without removing the plastic covering over the rubbery piece that you cut to feed the wire into the cabin? I had to remove my wipers to get that plastic covering off.
#537
01-14-2014, 09:27 AM
2nd Gear
Join Date: Aug 2011
Location: Milwaukee, WI
Posts: 56
Likes: 0
Received 0 Likes
on
0 Posts
I'm at my mechanic's shop now and he quoted me around $180 to finish the job. Maybe if you do as much prep work as you can like I did. It's "easy" to get the wiring harness in place; I brought my mechanic in to remove the bumper cover. And when I say easy, i mean it took me 3 hours to finish.
#538
01-14-2014, 09:32 AM
I did not remove the wipers or wiper cover. As suggested by someone else, you can prop up the plastic wiper area cover with spray paint caps and reach in (if you have smallish wrists) and undo the covering over the feedthrough.
#539
01-14-2014, 01:19 PM

5th Gear
Join Date: Jul 2012
Location: Richardson, TX
Posts: 777
Likes: 0
Received 0 Likes
on
0 Posts
Without taking the wiper apron off, isn't it a real challenge to snake a single wire through the outer firewall grommet around the brake booster to the inner firewall grommet? I installed extra driving lights with wiring taking the same route. I'm not a big guy but it was trick with the apron off. Will have to try your method though.
#540
01-14-2014, 05:30 PM
Without taking the wiper apron off, isn't it a real challenge to snake a single wire through the outer firewall grommet around the brake booster to the inner firewall grommet? I installed extra driving lights with wiring taking the same route. I'm not a big guy but it was trick with the apron off. Will have to try your method though.
Once the covering was removed I snipped the end off one of the spare ***** and used a ziptie to help feed the wire through.
#541
01-14-2014, 05:41 PM
I'm at my mechanic's shop now and he quoted me around $180 to finish the job. Maybe if you do as much prep work as you can like I did. It's "easy" to get the wiring harness in place; I brought my mechanic in to remove the bumper cover. And when I say easy, i mean it took me 3 hours to finish.

Sent from my iPhone using NAMotoring
#542
01-14-2014, 05:43 PM

I read the official instructions at least 20 or so times, and kept going back through the picture by picture install on the Total MINI dot com forums, and really thought I could do it on my own. I'd previously installed my JCW aero kit by myself with lousy tools in a dark parking garage. I must say, I'm glad I waited for my club's DIY day, because my MINI technician did 85-90% of the work, and it was still a pain in the rear. Too many tight spaces, and like all first time installs, trying to stick to the directions only hurt me because I couldn't understand why we couldn't get the control box to fit on the right side of the fuse box. Anyway, I don't think anyone should beat themselves up over the install if you're not a huge DIY person. Lots of little things to take apart, and lots of small places to work in, and you really do need the correct tools to reach all the tight spaces.
#543
01-14-2014, 05:49 PM
5th Gear
Join Date: Jul 2012
Location: Richardson, TX
Posts: 777
Likes: 0
Received 0 Likes
on
0 Posts
I read the official instructions at least 20 or so times, and kept going back through the picture by picture install on the Total MINI dot com forums, and really thought I could do it on my own. I'd previously installed my JCW aero kit by myself with lousy tools in a dark parking garage. I must say, I'm glad I waited for my club's DIY day, because my MINI technician did 85-90% of the work, and it was still a pain in the rear. Too many tight spaces, and like all first time installs, trying to stick to the directions only hurt me because I couldn't understand why we couldn't get the control box to fit on the right side of the fuse box. Anyway, I don't think anyone should beat themselves up over the install if you're not a huge DIY person. Lots of little things to take apart, and lots of small places to work in, and you really do need the correct tools to reach all the tight spaces.
#544
01-14-2014, 06:21 PM
Thanks for the compliment. I really do like them a lot. Having installed them now, the job isn't that big a deal. The bumper removal and install was easy. The wiring under the hood is easy, and now that I know the tricks to feeding the wire through the firewall, that isn't a big deal either. Plus, for my car, fitting the controller box on the left side of the wiring harness box makes sense in hindsight. I didn't get to see Gene crimp things up inside, so I'm lost there except for what's on the web - even he didn't crimp it down good enough, so I had the initial scare of the DRLs not working while all the others light positions did (fog and marker lights). Gene also has great tools, including the tool that makes taking the wiper off a breeze. I keep staring at the reflection of these in the cars in front of me when I'm at a light. And, I now also notice all the new Benz and Audi's with the LED DRLs, too.
#545
01-15-2014, 07:38 PM
2nd Gear
Join Date: Aug 2011
Location: Milwaukee, WI
Posts: 56
Likes: 0
Received 0 Likes
on
0 Posts
Did anyone figure out how to have full halos with headlights on like BMWs?
#546
01-15-2014, 07:47 PM
2nd Gear
Join Date: Aug 2011
Location: Milwaukee, WI
Posts: 56
Likes: 0
Received 0 Likes
on
0 Posts
Ah, will do! Wish I had time to get her a wash first.
Escaped the mechanic $154 poorer; not bad in my book! Unfortunately, they tapped into the wrong wire (used the MINI instructions even though I gave them the corrected info). They wanted more money to fix it so I decided to go DIY.
Serious props to MotorWorf's post 420 and the guide. That helped a lot. I have no idea how yall figured out the right wire to tap but i guessed at a grey wire and got lucky.
Last edited by stash182; 01-15-2014 at 07:52 PM.
#547
01-15-2014, 11:02 PM
Socket x14261 is the one on the top connected to the module, and the socket casing is black/interior casing is also black. If you use the wrong socket which is the x14260 on the bottom, the colors are black/grey for comparison--check out my pic. No grey wire on this socket either.
Sent from my iPhone using NAMotoring
#548
01-16-2014, 04:36 AM
#549
01-16-2014, 07:11 AM
Has anyone gotten any breakage protection for these light yet? I went to the shop that did my 3m paint protection film install (clear bra), and was told that the DRL shape is too curved for the film to stick.
I would hate for a rock to crack one of these and then to have to buy a new pair and do the install again. Any ideas?
I would hate for a rock to crack one of these and then to have to buy a new pair and do the install again. Any ideas?
#550
01-16-2014, 07:23 AM
Platinum Sponsor
We have the Lamin-X brand flog light film. which is for the stock fog light lens.
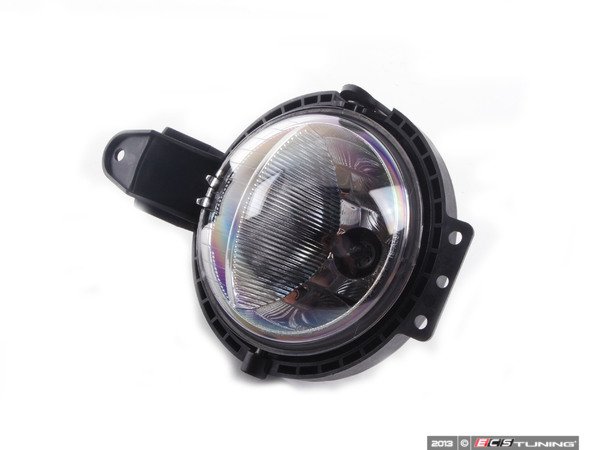
Front Fog Light With Position Light - Priced Each Part #63172751295
http://www.ecstuning.com/Search/SiteSearch/63172751295/
VS.
MINI Daytime Running Lights LED Part #63122338554
http://www.ecstuning.com/Search/SiteSearch/63122338554/

A good install shop should be able to do it with the clear ones. The DRL Leds look to have close to the same curve. I would give it a try. MN107
http://www.ecstuning.com/Search/SiteSearch/MN107-1/
Front Fog Light With Position Light - Priced Each Part #63172751295
http://www.ecstuning.com/Search/SiteSearch/63172751295/
VS.
MINI Daytime Running Lights LED Part #63122338554
http://www.ecstuning.com/Search/SiteSearch/63122338554/
A good install shop should be able to do it with the clear ones. The DRL Leds look to have close to the same curve. I would give it a try. MN107
http://www.ecstuning.com/Search/SiteSearch/MN107-1/
__________________

MINI Guru/ MINI Owner Since 2004 | NEW Lifetime Part Replacement | Local Pickup
Milltek | Genuine MINI | Forge Motorsport | NM Engineering | ECS Performance | M7 Speed
Customer Service Hours: 8am-8pm EST|Sales Team Hours: 8am-11pm | SAT 10am-7pm 800.924.5172
MINI Guru/ MINI Owner Since 2004 | NEW Lifetime Part Replacement | Local Pickup
Milltek | Genuine MINI | Forge Motorsport | NM Engineering | ECS Performance | M7 Speed
Customer Service Hours: 8am-8pm EST|Sales Team Hours: 8am-11pm | SAT 10am-7pm 800.924.5172
Last edited by ECSTuning; 08-25-2016 at 12:41 PM.