When you click on links to various merchants on this site and make a purchase, this can result in this site earning a commission. Affiliate programs and affiliations include, but are not limited to, the eBay Partner Network.
ElectricalFor discussions regarding wiring up electrical modifications such as radar detectors, brake light mods, power sockets, and driving lights in Clubman (R55), Cooper and Cooper S (R56), and Cabrio (R57) MINIs.
I'm planning on trying to retrofit a set of OEM Xenons into my 07 R56. I will be using a pair of OEM Xenon headlights with OEM ballasts and attempting to use my factory halogen wiring. I will not be installing the headlight washers or the leveling motors.
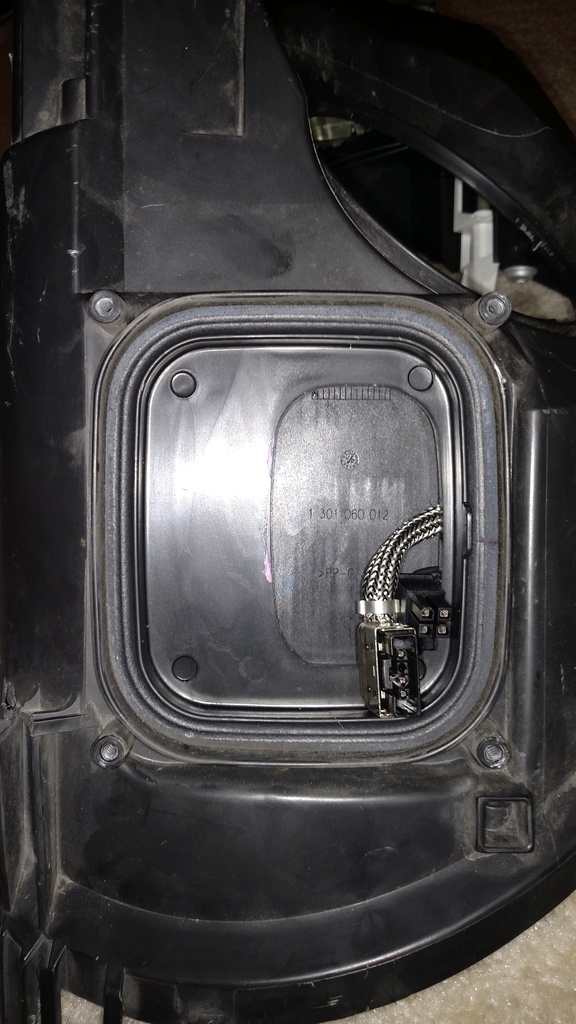
I had a broken headlight that I bought for parts and decided to cut it apart and look at the wiring. A picture is posted below. Basically, the wiring for the turn signal is independent (direct from the connector). There are 3 wires going to the ballast. 2 are power and one is for the high-beam solenoid. +12v to the solenoid wire activates the flapper for the high beams. The remaining wires go to the leveling motor. I have attached a simple diagram of the wiring as well.
I understand that the car will need to be coded to turn the bulb monitoring off, that shouldn't be an issue.
Ok. I was able to move the wires on the factory halogen connector to make it work with the Xenon light. When the motor is off, everything works well. When I start the car, the lights start flickering after about 10 seconds then turn off. I disabled cold and warm bulb monitoring for low beams and high beams in the FRM, still have the flicker. I'm thinking i might need to disable the bulb monitoring for the turn signals? Anyone have any ideas?
Added $522 to the VO and got the low beams to stop flickering. Now the high beams work for about 10 seconds then start to flicker. Everything else (flash to pass, blinkers, etc) is working well.
Success. The problem was in the hardware, not the software. I had to cut the negative wire running from the ballast to the solenoid and run it directly to ground. Not sure why the ground for the solenoid comes from the ballast but everything is working perfectly now.
If you have pre-LCI R56 all you need to retrofit xenons is a set of OEM headlights with ballasts and NCSExpert. There is a 25w (factory is 35w) retrofit kit out there, but I was told it would not work on my 07.
(1) LH OEM Xenon Headlight (P/N varies)
(1) RH OEM Xenon Headlight (P/N varies)
(2) Headlight Ballast Module (P/N: 1307329153)
(2) Xenon bulb and igniter (P/N: 63217217509) Any D1S bulb should work, oem is OSRAM
(2) Wiring repair connectors (P/N: 61130007256)
(1) Headlight washer cover right (P/N: 61672752560)
(1) Headlight washer cover left (P/N: 61672752559)
I bought a used set of Xenons from eBay for about $200. If you do the same, try to find a set with the ballasts and bulbs. Also be sure the mounting tabs are not broken and the xenon lens is attached to the housing. Many of the ones on ebay are broken internally.
Remove the ballast module, disconnecting the silver and black connectors
Feed the black connector into the main headlight compartment, so it can be reached from the blinker service hole.
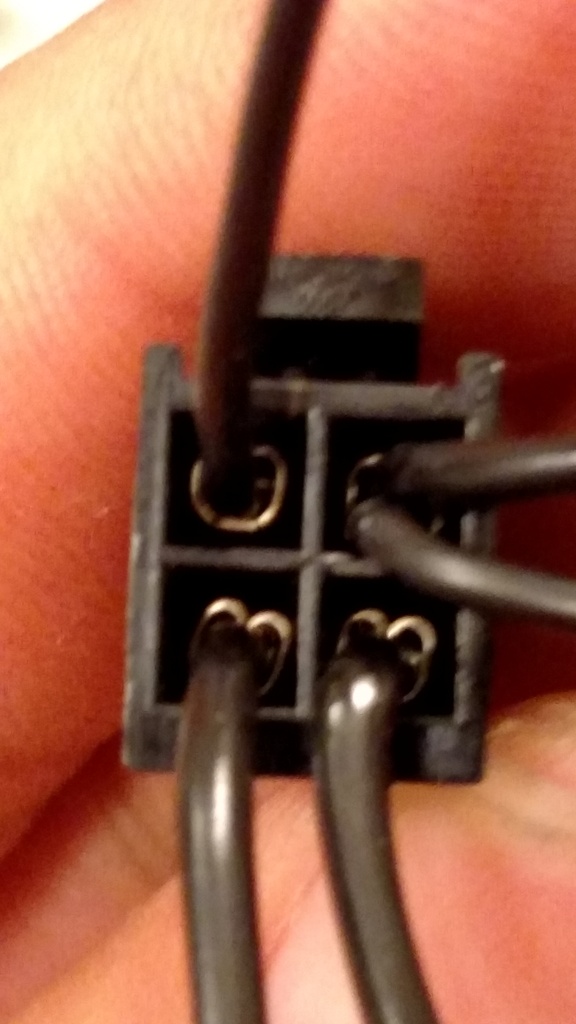
There are 5 wires. 2 are thicker, 3 are thinner. Of the thin ones, 2 go to the same pin in the connector. We need to cut the other thin wire and splice it into one of the thick wires. This is a connection to ground for the solenoid.
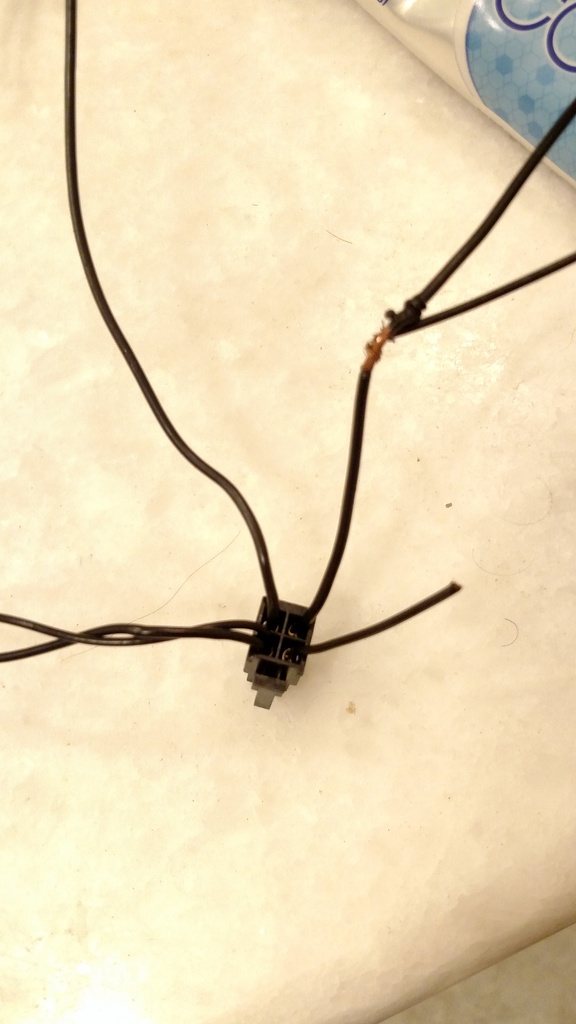
This is what you want to splice. The wire coming from the black connector is left disconnected. This connection and the bare wire should be soldered or at least taped.
Reassemble the headlight and reinstall the ballast
I'm sorry I don't have very good pictures of this part.
Remove the halogen headlights. There are 4 10mm bolts and a wiring connector on the back.
THIS PROCESS IS THE SAME FOR LEFT AND RIGHT:
Peel back some of the electrical tape from the wiring going to the headlight
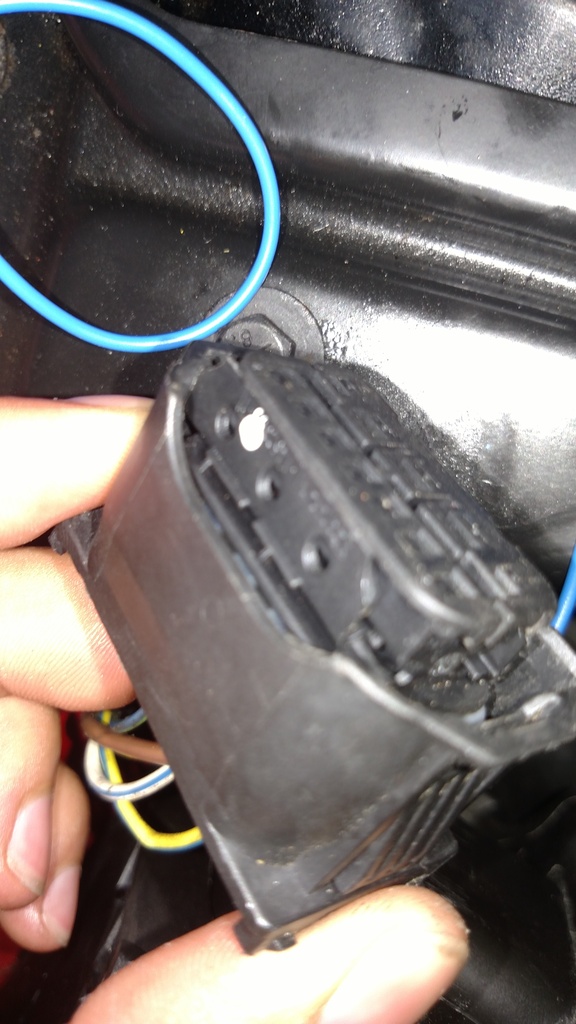
pop the cover off the back of the connector. The connector should now look similar to the one below. Then, using a small screwdriver, push the 4 small black tabs on the back of the connector towards the outside, while pulling the outer sheath off of the connector. You can see the four tabs in this picture:
Once you have the sheath off, you need to pry back the two L shaped strips with the three holes in them. They are hinged on one side and hold the wires into the connector. One is shown below:
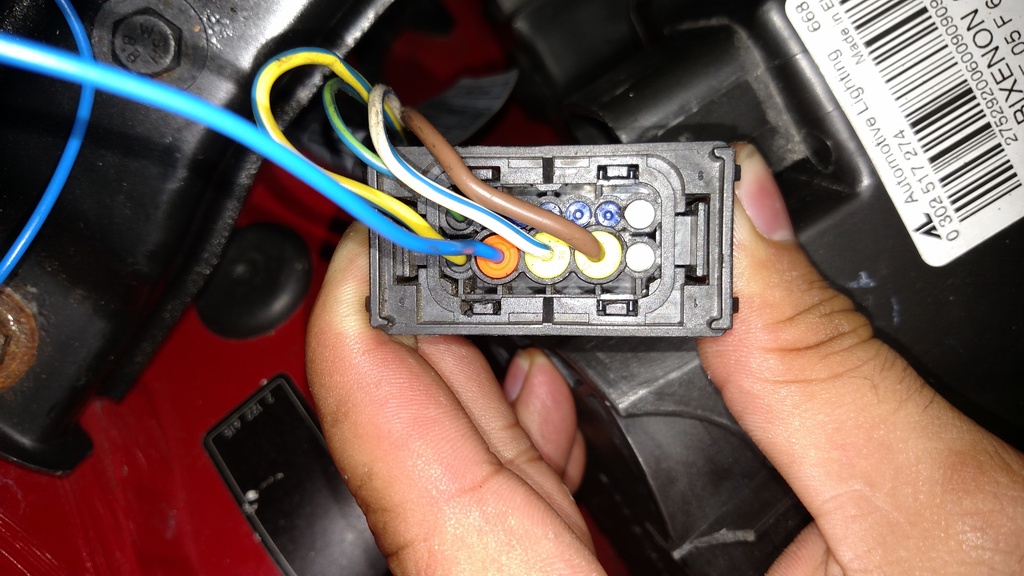
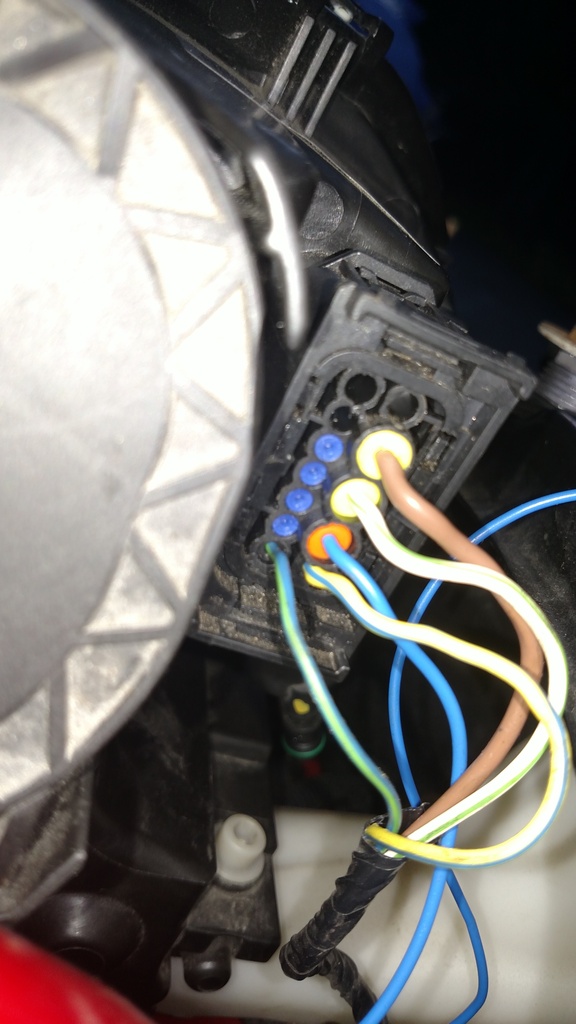
With this done, you can pull the wires out of the connector. Pull all 4 wires out and then reinstall them so they look like this:
You will need a pick or small screw driver to remove the insulating plug in one of the holes. Again, this wiring is the same for both left and right. The function of the wires is below:
Brown: Ground -
White w/ Blue Stripe: Low Beam +
Yellow w/ Blue Stripe: High Beam +
Blue w/ Green Stripe: Turn +
You will also need to add a ground for the turn signal. This is where you use part number 61130007256. In my picture, this is the solid blue wire. This wire can then either be run to the body as a ground, or spliced into the brown wire going to the headlight.
Once you have all 5 wires inserted into the connector, snap the "L" shaped pieces back in and reinstall the outer sheath and back cover.
Install the Xenon headlights and plug them in. Glue the two washer covers to the headlight in the appropriate spot. You could install the whole washer assembly, but gluing the covers on has the same effect.
You will need to add $522 (the code for Xenon lights) to the FRM. I used NCSExpert, I won't add the details here because it is all over the web, but basically you need to read out the Vehicle Order, add $522 to the FRM and CAS (fa_write command) and then sg_coderien the FRM with a blank .MAN file to force it to rewrite your FRM encoding with values from the DATEN. Make sure to turn the car off for 5 seconds after coding to reset the FRM.
This is all that needs to be changed to activate the Xenons. You do not need to change any of the bulb monitoring or any other parameters.
The things that should change:
Xenons should not flicker with the engine running
High beams should not flicker with the engine running
When "flashing to pass" with the high beams, the low beams should stay on
When cranking the engine with the lights on, the lights should on.
No bulb out/warning lights should be triggered.
Nice job! Thanks for starting the thread to help out all who may follow in the same quest. I think xenon's are a must-have for any car.
I had them on my R53, always wanted them on the R56, but I hadn't seen a good (and cost effective) way to add them. The difference is unbelievable. The OEM 35 watt xenons are incredibly bright. Single best improvement I've ever made to my car.
Sorry to resurrect this, but I thought I'd give an update on using this thread to do a successful retrofit on my 03/07 build R56 S. I scored a pair of OEM lights from a wrecker months ago, but have not been able to install now.
So, to boil down the process a little:
Disconnect battery
Remove old halogen lights.
Modify the car-side headlight plugs as stated above, by adding the ground and moving the high-beam wire.
Modify the new headlight's wiring by chopping the wires specified and joining them for the high-beam solenoid flap ground.
Reconnect battery.
Code the car by adding $522, etc.
Enjoy good headlights.
This would really only need to be done on early build R56s.
***For more info, I referred to the Bentley manual.***
From what I can gather, there are 3 wiring possibilities when it comes to headlights.
R56 up to Aug '08. From there to LCI changeover (around Sept '10). Then to R56 end.
This is from having halogen and HID avail in all 3 spans. It seems the later (after '08) cars have both the grounds on pins 2 and 4 already, and maybe other wires added for the high-beam actuation. SInce it was cold outside, I didn't spend a ton of time studying the manual.
Can someone posts pics of their LCI (or after Aug of '09) build R56 so we can compare the back of the car-side wiring plug?
Wanted to bump this thread and thank willgar for your groundwork to get xenon's retrofitted. I went ahead an followed your steps and got my xenons to work. I programmed the 25w xenon retrofit along with the xenon light retrofit option (ISTA-P) I wanted to add that even after I got all of the wires in the orientation that you had described, as well as modifying the high beam flap solenoid, my high beam lights did not work on my 09/2009 R55. I had no power going to pin 5 of my headlight connector. I dug around and looked at various schematics and determined that the FRM is sending power out of pin 41 of the grey connector (x14260) but there was no pin in that hole. I put a pin in and tested and sure enough, source voltage coming out of the line. I then found the two yellow with blue tracer wires that are signals lines for the high beams. They are pin 6 on x14261 (black connector) and pin 4 of the x14260 (grey). I spliced the two lines together and connected it to the pin 41 line that I mentioned earlier on x14260 and now I have fully functional xenon headlights swapped from halogen.
Thank you again for posting your findings, it was very helpful.
nope, 9/2009 R55s. The lights were stock xenon headlights from unknown origin (non lci though) performed 25w retrofit along with regular xenon retrofit and headlights would no come on. Had to move the wires as per this thread, although, once retrofitted, and wires moved, I had no high beams. Therefore like I said, had to add a pin to the FRM harness and splice into existing high beam lines.
Would it have been easier to plop down $800 on some xenons and have it work after 10 minutes? Of course; but I got the lights for free, so I made them work for me.
Great thread - with all the info required - our 2012 R57 now has 35w Xenons with the levelling motors connected and the washers working.
I had to change the washer bottle - the original only has 1 pump - so Ebay delivered a 2 pump model.
Then it was just a case of running a wire from pin 10 in the footwell fuse box to the pump - grounding the other wire to the chassis, adding a relay in the fuse box (k6) and enabling it with NCS Dummy.
Thanks to everyone that contributed to this thread.
Xenon with auto wash
Last edited by BuckTalltrees; Oct 27, 2020 at 01:43 PM.
Reason: Added photo