
Cooper Intake Diverter Mod $5


Cooper Intake Diverter Mod
This article was written for all Cooper owners with an aftermarket (HAI). This obviously won't concern MCS owners as our intakes are a bit different.
Essentially I found a way to improve the efficiency of the stock system to provide more power. Thanks to RednWhiteCooper for the inspiration!
***********
Improving Airflow
Our Coopers begin with only 115bhp, so we really need all the help we can get. After 19,000 miles I eventually went aftermarket on the intake and exhaust to improve airflow to gain horsepower. I noticed that on particularly cold days with the ambient temperature around 67 degrees, my car really felt it had more power. After doing some checking around, I realized a deficiency in my intake system, and proceeded to solve it with a total expenditure of under $5 in parts from my local Home Depot!
The end result was a noticeable power boost and significantly improved air flow efficiency.
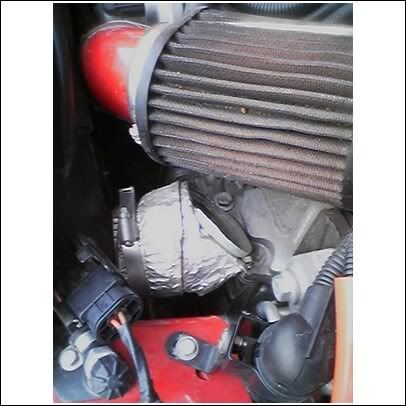
$5 Mod Pic #1

Diverter has been properly secured to ensure proper airflow.
Cold Air Flow

Now cold air from the newly secured diverter is forced into the intake instead of into the cavity below the intake. Cold air doesn't rise, so it doesn't make sense for it to flow below the intake unless it's directed at the intake!
Before Mod

Before this mod, you can see how the air just flows out into the cavity below the intake with no where to go. Although this picture is misleading because it was taken from above, the diverter exit isn't anywhere close to the intake.
Diverter

Take a look at your Diverter. Does it look like this? Push your hand through the rectangular hole--does the Diverter just flop around?
Diverter Fix

The first thing to do is secure the bottom tab of the diverter with a self tapping screw. I didn't want to upset airflow by drilling any unnessary holes or placing any obstructions. I also didn't want to make anything permanent.
Problem Solved

Fix #2

After driving around a little bit with the diverter now securely in place on the bottom, I found that the air flow was strong enough to still push the top of the diverter off it's tabs. So I had to find a way to secure that. The simplest method I could think of was a Zip Tie, but how to secure it so it didn't compromise the rubber seal above it was part of the challenge. So I decided to drill 3 holes. You can see the first 2 holes here. One on the tab front, and one just above it.
Diverter Tab

You can see that the 3rd hole was drilled on the Diverter Tab.
Zip Tie

This allowed me to feed the Zip Tie through the holes and cinch it tight. It took some doing to get the Zip Tie to flow through the holes. I actually bent the tip of the Zip Tie 90 degrees and used tweezers to help guide it through the holes.
Trim Off Excess

Using wire cutters, I trimmed off the excess and it's done. Now the diverter can properly channel cold air to the intake without any disruption of airflow. It can still be taken apart if needed, and I didn't make any drastic modifications to achieve this.
Part 2:: Home Depot

I made a trip to my local building supply store and found this in the plumbing section. It's a 2" rubber tube about 1/2" thick that bends 90 degrees. It's smooth inside and out, easily trimmable with scissors, and costs less than $5.
Another View

Close Up of Label

Hose Clamps

Remove and discard the hose clamps.
Initial Test Fit

I can't believe how perfect the fit was inside the existing Diverter tube! Look at the flange on the rubber tube and how it lines up with the OEM Diverter. By twisting the rubber tube, you can adjust the airflow direction. All you have to do now is cut the tube to allow clearance for your intake.
Mark Cut Line

I placed the intake on top, and drew a cut line with a sharpie marker.

Scissors

Using scissors I cut along the line.
Discard

This is how much I removed. Not too much.
Finished!

Now I have an real CAI. Ok, it's not 100% real. To be most effective I should disperse the airflow over a wider area. A housing over the intake might do this. I noticed a coffee can was about the right side to use as a form.
The real question is "Does it Work??". Well my butt dyno seems to think so! There definitely seemed to be more power once I got enough speed (moving air), and best of all, when I felt the intake tube and my new rubber tube diverter--both were cool or cold to the touch, where as previously the intake tube was warm.
This mod requires you to have a HAI (Hot Air Intake), like the Moss MINI or Moss Cobalt intake which right now is on clearance for $49. You can tell a HAI by looking at the filter cone. Is the filter cone exposed or hidden behind a cover? Does the system somepower push cold air into the intake??? If not, this solution should work for you!
Essentially I found a way to improve the efficiency of the stock system to provide more power. Thanks to RednWhiteCooper for the inspiration!
***********
Improving Airflow
Our Coopers begin with only 115bhp, so we really need all the help we can get. After 19,000 miles I eventually went aftermarket on the intake and exhaust to improve airflow to gain horsepower. I noticed that on particularly cold days with the ambient temperature around 67 degrees, my car really felt it had more power. After doing some checking around, I realized a deficiency in my intake system, and proceeded to solve it with a total expenditure of under $5 in parts from my local Home Depot!
The end result was a noticeable power boost and significantly improved air flow efficiency.
$5 Mod Pic #1
Diverter has been properly secured to ensure proper airflow.
Cold Air Flow
Now cold air from the newly secured diverter is forced into the intake instead of into the cavity below the intake. Cold air doesn't rise, so it doesn't make sense for it to flow below the intake unless it's directed at the intake!
Before Mod
Before this mod, you can see how the air just flows out into the cavity below the intake with no where to go. Although this picture is misleading because it was taken from above, the diverter exit isn't anywhere close to the intake.
Diverter
Take a look at your Diverter. Does it look like this? Push your hand through the rectangular hole--does the Diverter just flop around?
Diverter Fix
The first thing to do is secure the bottom tab of the diverter with a self tapping screw. I didn't want to upset airflow by drilling any unnessary holes or placing any obstructions. I also didn't want to make anything permanent.
Problem Solved
Fix #2
After driving around a little bit with the diverter now securely in place on the bottom, I found that the air flow was strong enough to still push the top of the diverter off it's tabs. So I had to find a way to secure that. The simplest method I could think of was a Zip Tie, but how to secure it so it didn't compromise the rubber seal above it was part of the challenge. So I decided to drill 3 holes. You can see the first 2 holes here. One on the tab front, and one just above it.
Diverter Tab
You can see that the 3rd hole was drilled on the Diverter Tab.
Zip Tie
This allowed me to feed the Zip Tie through the holes and cinch it tight. It took some doing to get the Zip Tie to flow through the holes. I actually bent the tip of the Zip Tie 90 degrees and used tweezers to help guide it through the holes.
Trim Off Excess
Using wire cutters, I trimmed off the excess and it's done. Now the diverter can properly channel cold air to the intake without any disruption of airflow. It can still be taken apart if needed, and I didn't make any drastic modifications to achieve this.
Part 2:: Home Depot
I made a trip to my local building supply store and found this in the plumbing section. It's a 2" rubber tube about 1/2" thick that bends 90 degrees. It's smooth inside and out, easily trimmable with scissors, and costs less than $5.
Another View
Close Up of Label
Hose Clamps
Remove and discard the hose clamps.
Initial Test Fit
I can't believe how perfect the fit was inside the existing Diverter tube! Look at the flange on the rubber tube and how it lines up with the OEM Diverter. By twisting the rubber tube, you can adjust the airflow direction. All you have to do now is cut the tube to allow clearance for your intake.
Mark Cut Line
I placed the intake on top, and drew a cut line with a sharpie marker.
Scissors
Using scissors I cut along the line.
Discard
This is how much I removed. Not too much.
Finished!
Now I have an real CAI. Ok, it's not 100% real. To be most effective I should disperse the airflow over a wider area. A housing over the intake might do this. I noticed a coffee can was about the right side to use as a form.
The real question is "Does it Work??". Well my butt dyno seems to think so! There definitely seemed to be more power once I got enough speed (moving air), and best of all, when I felt the intake tube and my new rubber tube diverter--both were cool or cold to the touch, where as previously the intake tube was warm.
This mod requires you to have a HAI (Hot Air Intake), like the Moss MINI or Moss Cobalt intake which right now is on clearance for $49. You can tell a HAI by looking at the filter cone. Is the filter cone exposed or hidden behind a cover? Does the system somepower push cold air into the intake??? If not, this solution should work for you!
Last edited by OctaneGuy; Jul 15, 2006 at 09:38 AM.
5th Gear
Joined: Jun 2002
Posts: 965
Likes: 4
From: Loveland, CO
Thanks for the write up! I just went out and did step 1, secure the intake diverter. Just a note of caution for anyone else doing this. For the bottom tab, make sure to use a fairly short self tapping screw. You don't want to drill into the top of the radiator  ..... I almost did!
..... I almost did!
Very good suggestion. I forgot to note that--I used the shortest I could find to make sure it only clears the plastic and doesn't go any further into the radiator!!! 
Originally Posted by Johnna
Thanks for the write up! I just went out and did step 1, secure the intake diverter. Just a note of caution for anyone else doing this. For the bottom tab, make sure to use a fairly short self tapping screw. You don't want to drill into the top of the radiator ..... I almost did!
..... I almost did!
6th Gear
Joined: Jul 2002
Posts: 2,021
Likes: 4
From: Burlington, VT
Since we're talking Cooper intakes... how much noise is added at highway cruising speeds (70mph, ~3500 rpm?) I've got the Borla exhaust on my Cooper, and for me it's already bordering on "too loud" for long highway cruises. It sounds great on the track or the back roads when I'm motoring, but for the 3 hour highway trips to Boston, it's a little much. If an intake would make the car louder at 3500rpm, I'd have to pass. If the noise only really came in at 4000rpm and above, that would be cool.

Well the Borla Exhaust is LOUD!! My Remus is just about perfect. Several MC owners with the Borla think the Remus is much more tolerable over the Borla. The intake makes a sound that you really only hear when you step hard on the gas---thus I'm always stepping hard on the gas. 
If you gradually press the gas---you shouldn't hear the intake.
Richard
If you gradually press the gas---you shouldn't hear the intake.
Richard
Originally Posted by velVeT
Since we're talking Cooper intakes... how much noise is added at highway cruising speeds (70mph, ~3500 rpm?) I've got the Borla exhaust on my Cooper, and for me it's already bordering on "too loud" for long highway cruises. It sounds great on the track or the back roads when I'm motoring, but for the 3 hour highway trips to Boston, it's a little much. If an intake would make the car louder at 3500rpm, I'd have to pass. If the noise only really came in at 4000rpm and above, that would be cool.
Trending Topics

Coordinator :: Dynamic MiNi Collective
Joined: Apr 2005
Posts: 116
Likes: 0
I agree on the Remus exhaust - just about a perfect sound level.
Went out to look at the air intake - all prepared to drill and zip-tie, and shucks, the intake is very securely held in place by the factory tabs.
Who'd a thunk!
Thanks anywho.
Went out to look at the air intake - all prepared to drill and zip-tie, and shucks, the intake is very securely held in place by the factory tabs.
Who'd a thunk!
Thanks anywho.

Yeah I think some tape or silicone for extra sealing can't be a bad idea. Ok well maybe not silicone cause you don't want anything getting loose, but some good tape is probably not a bad idea.
I think my diverter tube was broken by one of the service visits to my former dealer. I thought they were all like that, but I did an intake install for a friends 2003 Cooper a few weekends ago, and his was fine and solid.
I think my diverter tube was broken by one of the service visits to my former dealer. I thought they were all like that, but I did an intake install for a friends 2003 Cooper a few weekends ago, and his was fine and solid.

Former Vendor
Joined: Jan 2004
Posts: 8,337
Likes: 4
From: oh10
Originally Posted by snid
Since we're talking Cooper intakes... how much noise is added at highway cruising speeds (70mph, ~3500 rpm?) I've got the Borla exhaust on my Cooper, and for me it's already bordering on "too loud" for long highway cruises. It sounds great on the track or the back roads when I'm motoring, but for the 3 hour highway trips to Boston, it's a little much. If an intake would make the car louder at 3500rpm, I'd have to pass. If the noise only really came in at 4000rpm and above, that would be cool.
I have the borla exhaust and the K&N typhoon intake....cant really hear the intake over the exhaust unless you absolutely floor it
Octane...great right up

Why would they have wanted that intake duct for the air cleaner assembly in the center of the grille from the factory instead of closer to the cleaner assembly(more towards the drivers side of the car). After looking at a thread on the S's about reducing the temp of the intake and cutting the top section off of the radiator support to gain airflow, I was thinking the same way. I have a Rad support off of an S that has a duct that is closer to the drivers side....but the shape of the hood being different and possibly a bigger radiator make the section at the radiator that could be trimmed is substantially less than just trimming the stock non-S rad support. Not saying that I am not willing to due that to have a true CAI. Also the backing of the grill on the Left side could be trimmed to allow more airflow. I already have a Typhoon intake setup off an S that I will probably modify to fit my Cooper and then make a heat shield to totally separate if from the engine compartment. Any more ideas on a true CAI???
Chad
Chad

6th Gear
Joined: Aug 2006
Posts: 2,184
Likes: 0
From: bryan tx
ah, I too have done this :] I figured if stock mini intended the air to go through that hole to the intake, thats the main source of air. and with the aftermarket HAI that tube points away from the intake. so all your left with is the Hai sucking air from the mount and engine bay. ill post my method as well. only costed 2 bucks :]


OctaneGuy,
I wonder if you have actually improved flow or just added a "nozel" that directs, but restricts. Worse yet, when you add a curve, the restriction is several times the equivalent (lenght) straight piece. I was looking at the same issue (with an afe return) and was thinking about deleting some of the pipe.
Just a thought.
Terry
No idea really. It's cheap enough to try for yourself. Before the tube, the air would flow everywhere--above and below the intake. Judging by the "imprint" on the intake from where the tube met it, it did what it was supposed to do.
I don't have this Cooper anymore, so can't really say much beyond that.
Richard
I don't have this Cooper anymore, so can't really say much beyond that.
Richard
OctaneGuy,
I wonder if you have actually improved flow or just added a "nozel" that directs, but restricts. Worse yet, when you add a curve, the restriction is several times the equivalent (lenght) straight piece. I was looking at the same issue (with an afe return) and was thinking about deleting some of the pipe.
Just a thought.
Terry
I wonder if you have actually improved flow or just added a "nozel" that directs, but restricts. Worse yet, when you add a curve, the restriction is several times the equivalent (lenght) straight piece. I was looking at the same issue (with an afe return) and was thinking about deleting some of the pipe.
Just a thought.
Terry
6th Gear
Joined: Aug 2006
Posts: 2,184
Likes: 0
From: bryan tx
I rapped mine in some heat shieldish thermal tape lol. cant remember what its actually called.. but I figured it would help my scoop from heating up and just destroying what I had done. I also let it sit back alittle so it would hit the whole intake and pushing all the heat away as well.
6th Gear
Joined: Aug 2006
Posts: 2,184
Likes: 0
From: bryan tx
well mine is far enough away so there wont be a rubbing issue.. and I recommend doing the same. I figure with all the movement in the engine bay if its close enough it could damange your cone filter... and they are very easy to damage

2nd Gear
Joined: Nov 2006
Posts: 76
Likes: 0
today i installed this mod and on a ruffley layed out 1/4 mile on the street, i increesed 7mph
without the 90* bend
1. 79
2. 80
3. 79
4. 81
10 mins later with the mod
1. 86
2. 87
3. 86
4. 88
now granted this is only a ruff mesurement but this deffently helps thanks OctaneGuy keep up the good work
without the 90* bend
1. 79
2. 80
3. 79
4. 81
10 mins later with the mod
1. 86
2. 87
3. 86
4. 88
now granted this is only a ruff mesurement but this deffently helps thanks OctaneGuy keep up the good work
2nd Gear
Joined: Nov 2006
Posts: 76
Likes: 0
i was looking at my car when i installed this mod and i thought that if you could somehow figure out how to rout a pipe up from below around the airdam and up into the air filter area .....
im going to look into this a bit more and if i figure something out i will post it
im going to look into this a bit more and if i figure something out i will post it

1st Gear
Joined: Aug 2006
Posts: 17
Likes: 0
Anyone ever thought of doing this mod with the aFe A155410561 intake? I was thinking that you could cut a hole in the base of it in order to couple the $5 rubber tube. I figure since it has a built-in heat shield this would make it a little better. Thanks to the heat shield (which more or less makes it a box) the air coming in would have little else to go save the intake cone.

http://www.autopartswarehouse.com/po...5jZSBTb3VuZCI=
Does that even sound like it would work?
http://www.autopartswarehouse.com/po...5jZSBTb3VuZCI=
Does that even sound like it would work?
Last edited by bonerjams2K3; Jul 29, 2008 at 09:15 AM.


Thread
Thread Starter
Forum
Replies
Last Post
igzekyativ
MINIs & Minis for Sale
34
Jul 16, 2020 12:54 PM