
Headlights


Mine is a wipac replacement headlight assembly so im not sure if it matches yours but if it does here's the steps.
1) Theres a screw on the bottom of the chrome ring, remove it and the ring will pop off
2) Underneath, theres about 6 screws but you only want to touch one of them. The one you want to remove goes directly into the plastic base and is not slotted (just a plain hole). On mine its towards the bottom. Do not loosen the screws that go into the slotted brackets. (The slotted ones keep your beam aimed)
3) The glass will come out of the base and then you can remove the 3 screws that clamp the glass to the inner ring.
Trending Topics
I hate to say this but you probably will need to check out the wiring. Mine were dim and I cleaned connections to get them working better. I can't remember where the headlight wires hook into and my wiring harness is tangled up in a box so I can't help you there.

4th Gear
Joined: Feb 2008
Posts: 334
Likes: 0
Personally i check everything every time i touch a section of a car. no point in having a new battery with frayed wires aye?
Behind the headlight is the wheel well so you probably won't find any rust you didn't already know about.
I'd check the connector with a meter, you should have between 12 and 14 volts and a couple of amps at the headlight. That will at least give you a place to start.
You could also try hooking up the headlight directly to the battery to see if it gets any brighter, then you know if you need better bulbs or not. Just don't zap your self or start a fire doing this.
Last edited by stratman977; Mar 2, 2008 at 07:55 PM.


6th Gear
Joined: Jun 2006
Posts: 5,692
Likes: 2
Wait wait wait... If you upgrade the headlamps, you'll also need to be sure to upgrade the wiring.
As an example, let's take a look at these modern replacement lights from GBCarparts.com - a relatively common and inexpensive upgrade:
http://www.gbcarparts.com/proddetail...=Lamp7Headlamp
So, let's say you chose the "hyper white" xenon type bulbs, which are 100W per bulb. "Great!", you say. "That will be much clearer and brighter!" And you'll be right - these lamps can be expected to out something like 30%-40% more illumination than the dim, stock lamps (OEM, IIRC, is 55W main beam/60W high).
Here's the problem: 200W means that almost 17 amps of juice (16.666 to be exact) are flowing through the circuit, which is ALSO lots more than stock. Fine if you have the wiring to handle the load, but in the stock headlamp circuit, 100% of the voltage for the relatively dim bulbs is actually sent across the cabin switch - they are not wired with a relay like a sane person would do.
This is fine for the stock lamps, however this is simply more current than the switch or wires are built to handle,plus all that current is going through the plastic switch which you are touching with your possibly damp finger every time you turn on the lamps.
But wait.... it gets better.
In addition, there are many, many threads on the UK Mini forums talking about catastrophic MELTING of the switch and/or crisping of the wires after installing modern bulbs.Makes sense - the brighter bulbs would be sending about 70% more current through the wires and switch than they're safely rated to handle (approx. 17 amps instead of around 10 amps) - not good. To reiterate: fires under the bonnet or in the cabin are Officially Very Bad (tm) and should be avoided at all costs.
** Bottom line: if you do anything but replace the bulbs with OEM-rated replacements, you'll need to also install beefier wires for the actual lamps (10 gauge will safely tolerate 30 amps, which gives you a bit of overhead), a separate 25 amp fuse to handle the headlamp circuit (17A X 1.5 for overhead = 25A more or less), and I'd highly advise putting the headlamps on a proper relay, using the existing headlight wiring coming from the headlight controls on the steering column to control the relay trigger voltage. **
Or, if this freaks you out, you can simply trace every wire and clean everything up. Re-seating all the contacts is always a good idea, and MAY give you a bit more illumination - it can't hurt anyway. Be sure to disconnect the battery ground terminal before doing ANYTHING on the electrical system, and be sure to check every connection carefully. Any dodgy-looking splices (especially anything the previous owner did, likely wrapped in half-melted electrical tape) should be yanked out, replaced with a proper soldered connection and wrapped in a double-layer of heat-shrink tubing to make it water tight. Interior connections (not connections under the bonnet which can get wet) can be replaced with crimp-on butt-caps, available at Radio Shack for just a few bucks. Never use screw-on caps like you see in house wiring - the vibrations of the car walk them off, and once the wire is exposed it will short.
A butt cap - crimps on a pair of stripped wires, one in each end:

I'm doing this very same replacement later in the spring and I'll be sure to shoot pics for a How-to. I've run across several threads over the months (none of which I can find ATM), but another one can't hurt, right?
As an example, let's take a look at these modern replacement lights from GBCarparts.com - a relatively common and inexpensive upgrade:
http://www.gbcarparts.com/proddetail...=Lamp7Headlamp
So, let's say you chose the "hyper white" xenon type bulbs, which are 100W per bulb. "Great!", you say. "That will be much clearer and brighter!" And you'll be right - these lamps can be expected to out something like 30%-40% more illumination than the dim, stock lamps (OEM, IIRC, is 55W main beam/60W high).
Here's the problem: 200W means that almost 17 amps of juice (16.666 to be exact) are flowing through the circuit, which is ALSO lots more than stock. Fine if you have the wiring to handle the load, but in the stock headlamp circuit, 100% of the voltage for the relatively dim bulbs is actually sent across the cabin switch - they are not wired with a relay like a sane person would do.
This is fine for the stock lamps, however this is simply more current than the switch or wires are built to handle,plus all that current is going through the plastic switch which you are touching with your possibly damp finger every time you turn on the lamps.
But wait.... it gets better.
In addition, there are many, many threads on the UK Mini forums talking about catastrophic MELTING of the switch and/or crisping of the wires after installing modern bulbs.Makes sense - the brighter bulbs would be sending about 70% more current through the wires and switch than they're safely rated to handle (approx. 17 amps instead of around 10 amps) - not good. To reiterate: fires under the bonnet or in the cabin are Officially Very Bad (tm) and should be avoided at all costs.
** Bottom line: if you do anything but replace the bulbs with OEM-rated replacements, you'll need to also install beefier wires for the actual lamps (10 gauge will safely tolerate 30 amps, which gives you a bit of overhead), a separate 25 amp fuse to handle the headlamp circuit (17A X 1.5 for overhead = 25A more or less), and I'd highly advise putting the headlamps on a proper relay, using the existing headlight wiring coming from the headlight controls on the steering column to control the relay trigger voltage. **
Or, if this freaks you out, you can simply trace every wire and clean everything up. Re-seating all the contacts is always a good idea, and MAY give you a bit more illumination - it can't hurt anyway. Be sure to disconnect the battery ground terminal before doing ANYTHING on the electrical system, and be sure to check every connection carefully. Any dodgy-looking splices (especially anything the previous owner did, likely wrapped in half-melted electrical tape) should be yanked out, replaced with a proper soldered connection and wrapped in a double-layer of heat-shrink tubing to make it water tight. Interior connections (not connections under the bonnet which can get wet) can be replaced with crimp-on butt-caps, available at Radio Shack for just a few bucks. Never use screw-on caps like you see in house wiring - the vibrations of the car walk them off, and once the wire is exposed it will short.
A butt cap - crimps on a pair of stripped wires, one in each end:
I'm doing this very same replacement later in the spring and I'll be sure to shoot pics for a How-to. I've run across several threads over the months (none of which I can find ATM), but another one can't hurt, right?
Last edited by ImagoX; Mar 3, 2008 at 07:05 PM.

6th Gear
Joined: Dec 2002
Posts: 1,539
Likes: 0
But, first check your ground cable as this will also cause lights to dim. It is a group of black wires with an eye fitting attached to the firewall in the right front of the car in front of & below the Brake master cylinder. Remove the screw, clean corrosion and reinstall. Also check for corrosion at the lights. Remove the ring around the lights. Then remove the 3 screws holding the retaing ring around the lamp.

3rd Gear
Joined: Nov 2006
Posts: 187
Likes: 0
From: Cincinnati, OH
I can take some photos of my headlights (on the car) if you would like. I do have the upgraded halogen bulbs but my wiring harness has also been replaced in whole. I did not think about that in regards to your Mini.

OVERDRIVE
Joined: Jul 2006
Posts: 7,037
Likes: 283
From: Melbourne, FL
Angel Eyes
I have 'em too
Running lite only:
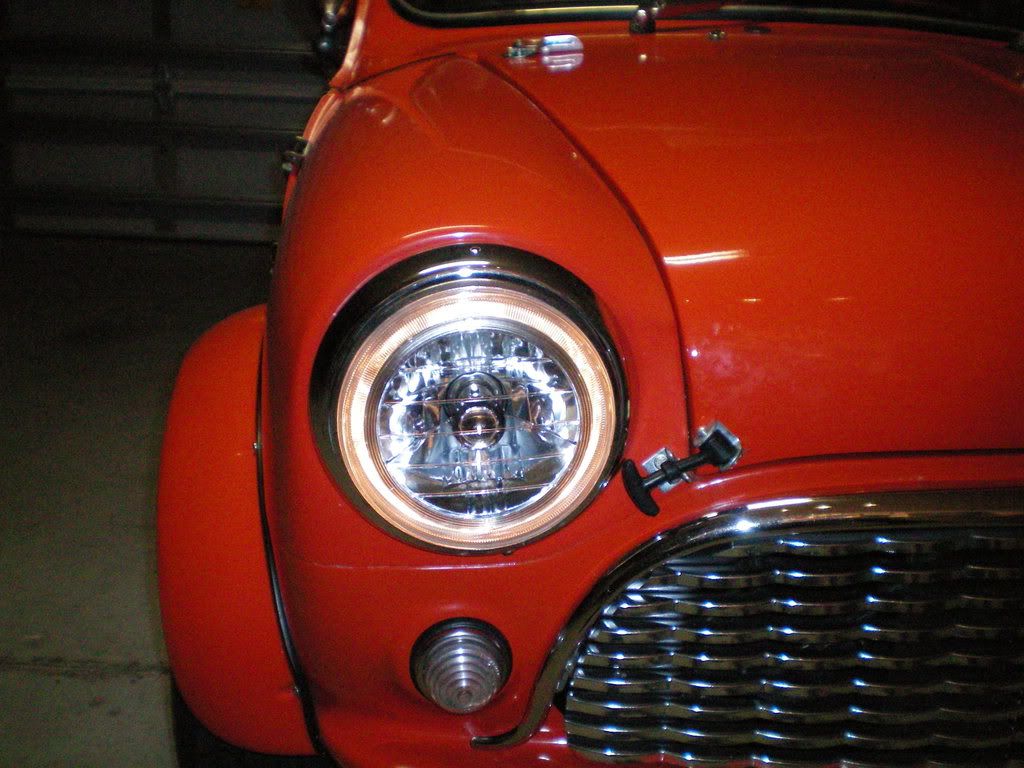
RL and low beam
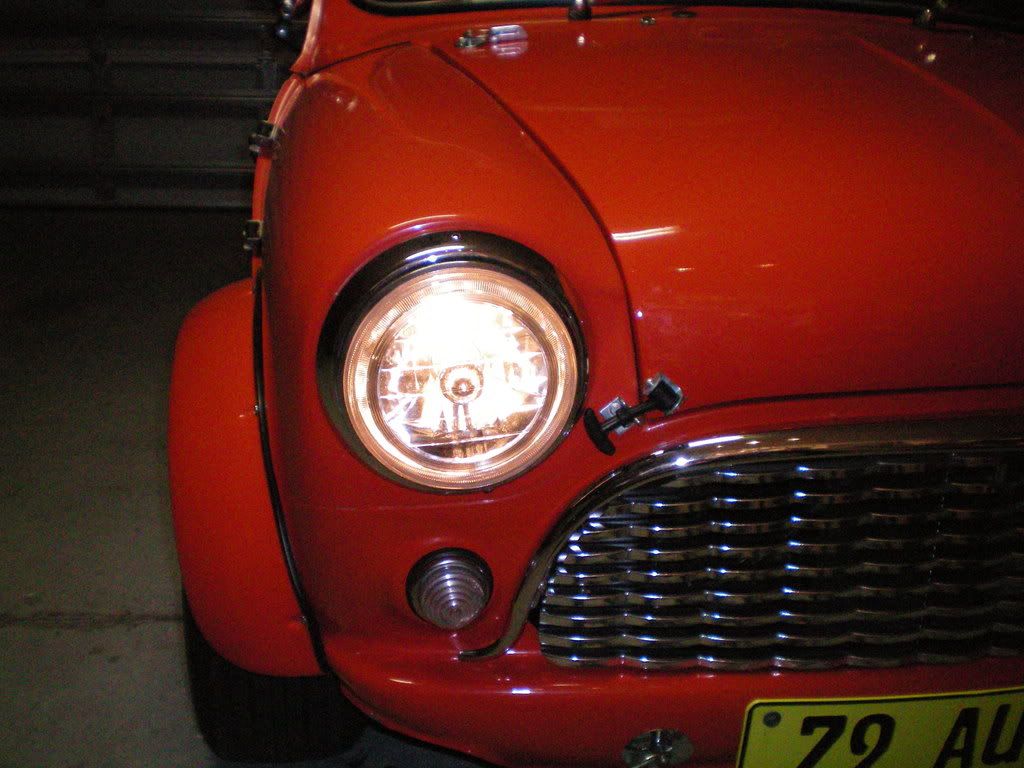
I have them on the standard harness (altho a new one...new wire but not heavier duty), not wired to a relay...(altho my big horns are to a relay and if I ever add driving/fogs they will be too)
http://minisport.com/acatalog/info_SPDWF-D6019.html
Running lite only:
RL and low beam
I have them on the standard harness (altho a new one...new wire but not heavier duty), not wired to a relay...(altho my big horns are to a relay and if I ever add driving/fogs they will be too)
http://minisport.com/acatalog/info_SPDWF-D6019.html
Last edited by Capt_bj; Mar 5, 2008 at 03:13 PM.