

Difficulty compressing the rear brake piston (while rotating). Why?


Let me ask this after reading all of the great information: Is there any potential problem if the rear pistons were NOT pushed in all the way? (aside from not the obvious problem of having enough room to install the pads and then mount the whole caliper assembly in place around the rotor)...
What if I *thought* I had them pushed in all the way, yet the pistons were just binded as described above? I was able to remove and replace my pads and remount the calipers; I just hope a problem doesn't come up because the pistons weren't initially pushed in all the way.
Side note: The brakes have been fine aside from an initial problem of the left side inboard pad (with the clips on it) popping off the piston head groove. When it popped off I'd hear a clicking sound because the pad was skipping across the slotted rotor. Drove me nuts but I seemed to have resolved it.


3rd Gear
Joined: Apr 2009
Posts: 176
Likes: 1
From: Burke, VA
I provided the following on another thread this morning re: rotating/compressing the rear wheel piston(s). I just installed a set of CT 1521 Bobcats and, on the rear wheels, used a DISC BRAKE PISTON TOOL, mfg. by KD Tools of Lancaster, PA. to rotate/compress the rear pistons. I've had the tool for many years and have used it on both domestic and import vehicles. My recollection is that it was not expensive and makes this part of the job very easy. It works with a 3/8" drive rachet. You will need to use an extension but that is all. Go to KD Tools website and you can see what the tool looks like. Search under their "catalogue".

1st Gear
Joined: Aug 2009
Posts: 14
Likes: 0
Thank you!!!!
[QUOTE=ofioliti;2725074]Well, I finally got to finish this 'project.'
It was the rear right piston that was giving me problems, so I decided to start on the left rears. I used the Harbor Freight tool. I rotated an PUSHED while rotating (with muscle power; not the screwing in action of the HF tool). After about 15 minutes of this (with breaks to find a more comfortable position to get more leverage!) this darn thing finally started to move in. Once it began moving in, it was actually not too difficult to push and twist. I switched over to needle nosed pliers (just for fun) and got it pushed in all the way! Whew! Got the new pads and rotors on and took a break.
Then I returned for the right rear piston. Worked on it for an hour with HF tool. I turned the heck out of it but it would not move back at all! I figured I just did not have the strength to push the darn thing in. So, I decided to try one more method described by Dr. Obnxs in one of his MC2 articles: Compress with a C-clamp and rotate with channel lock pliers. It worked like a charm!
I tightened up the clamp and even without rotating the piston, it moved back slightly. After I could not tighten it anymore, I took the pliers and gently grasped the end of the piston (careful not to catch the rubber) and rotated 1/4 turn. Then, tightening the c-lamp pushed back the piston some more. After about 4 turns with the pliers (1 full turn of the piston) I was able to push the piston all the way back in the with c-clamp alone. As it tightened the rotating disc at the end began to rotate as well and rotated the piston with it until the piston was completely retracted.
So, my experience was:
1. The rotating and pushing are indeed "independent."
2. Once you cannot push in, you need to rotate.
3. Rotating alone will not retract the piston (I tried for an hour!). (Markjenn, I am guessing that when you rotate, you may be also pushing in slightly on a less resisting piston.)
4. Even if the piston is ready to be pushed back (i.e. the 'sleeve nut' has been rotated back enough--see picture in post above), it may require some force especially at the beginning. That's where the c-clamp helped me.
5. I did this without dealing with the hand brake cable; no cracking open the bleeder valve; I did crack open the brake fluid reservoir and checked the level as the piston(s) compressed (had to remove a bit of fluid to prevent overflowing).
This little entry right here saved my *** today. Thank you so much. My dad and I tried changing the rear brakes and had a helluva time. Thank you.

1st Gear
Joined: Jan 2008
Posts: 16
Likes: 1
Harbor Freight tool worked great yesterday, but...
only after I discarded the "plate" (part #1 as stamped) and hung the caliper using the bottom hex bolt (only) so that the caliper is rotated back on that bolt but part of the caliper is still braced against the rotor. This way I was able to use the thrust bolt to push and twist (clockwise) and the piston went back in smoothly (although it does take significant pressure). The disc adapter I used was stamped "M" and fit perfectly into the piston. My pads were pretty worn so I think the hardest part was just getting the piston started back into the threads. Every time I tried with the plate attached the thing would just bind up. Once I got rid of the plate it went pretty easy. BTW, it doesn't matter which thrust bolt is used after that. Either one can be turned clockwise while leaning into it with full body weight.

Neutral
Joined: Mar 2010
Posts: 9
Likes: 0
From: Annapolis, MD
Thanks for all the helpful information. I spent a full day looking for the kit to compress the piston. FYI: The ones that Pep Boys and Advanced Auto parts have for loaners do not have the correct disc adapter. Borrowed a friend's Ampro disk brake kit and came across the same issue: The adapter plates are not the right size but are so close it is frustrating.
I called the dealership and they said the tool was over $400...Not a viable option if you're trying to save some $$.
Sounds the the HF tool kit works well... Will pick up today and hopefully finish the brakes tonight. Did not know about this whole twist and turn bit until I popped the caliper off and tried to compress it. Needless to say it is NOT going back on without compressing the piston.
Let's hope this works! She's sitting on jack stands in the garage at the moment.
Last edited by jrwmini; Sep 26, 2011 at 06:47 AM. Reason: add info.

Thread Starter
|
6th Gear
Joined: Sep 2003
Posts: 2,268
Likes: 4
From: Always curious ...
Thanks for all the helpful information. ...
Sounds the the HF tool kit works well... Will pick up today and hopefully finish the brakes tonight. Did not know about this whole twist and turn bit until I popped the caliper off and tried to compress it. Needless to say it is NOT going back on without compressing the piston.
Let's hope this works! She's sitting on jack stands in the garage at the moment.

OVERDRIVE
Joined: Jul 2006
Posts: 7,037
Likes: 283
From: Melbourne, FL
last time I looked
and I'm a post'er about the HF kit
it appeared that HF had CHANGED the kit . . . . so take all the comments about it with a grain of salt..... and/or come back here and tell us what's up.
and I'm a post'er about the HF kit
it appeared that HF had CHANGED the kit . . . . so take all the comments about it with a grain of salt..... and/or come back here and tell us what's up.
Neutral
Joined: Mar 2010
Posts: 9
Likes: 0
From: Annapolis, MD
You are indeed correct. The tool differs from the one pictured in the walkthrough. It is in a blue case and produced by "pittsburgh professionals". I bought the 18 piece kit for about $40. It worked like a charm. The adapter plate marked M was a perfect fit and it went pretty smooth.
It did bind up a few times one my first caliper, but overall was pretty easy. I was surprised, but I only needed to use the backing plate to get it started. Once I had it going in, the tool began to bind and was difficult to turn. I just backed off the plate a little and used hand force to push while turning. Holding the back of the caliper to brace it helped to stabilize it. Worked just fine for me! Good buy for $40 for sure.
It did bind up a few times one my first caliper, but overall was pretty easy. I was surprised, but I only needed to use the backing plate to get it started. Once I had it going in, the tool began to bind and was difficult to turn. I just backed off the plate a little and used hand force to push while turning. Holding the back of the caliper to brace it helped to stabilize it. Worked just fine for me! Good buy for $40 for sure.

2nd Gear
Joined: Jul 2010
Posts: 91
Likes: 0
I was having problems getting the rear piston to push in until I saw this thread. I could not get the brake caliper tool to push in the piston and gave up and saw the mention of using needle nose pliers. Worked like a charm on the driver side. The passenger side was a different story. I just didn't have the pressure needed to push in the piston with the pliers. Back to the brake caliper tool and no matter how hard I tried, I was just fighting myself as it appeared the tool was getting bound. It would get to a point and just not move anymore. After loosening the tool a bit, I did notice that the tool would turn, but the disc that actually fits onto the piston wasn't. After some inspection, I noticed the pin that held it in place was missing. Luckily the first screw I found on the workbench fit perfectly. A little grinding with the dremel and I was good to go. After that, the caliper tool worked perfectly and the piston went right in. Just a thought that you may want to look to see if the pin is still in place before trying to use the tool.


I just completed replacement of the rear pads and rotors on my '07 MCS. I have read all of the posts here concerning the HF tool and the binding being a function of the threads of the tool being different from the threads within the caliper and that made perfect sense to me. I decided to try the following HF caliper tool:
http://www.harborfreight.com/four-wh...ool-95713.html
I lined up the side of the "cube" with the pins that fit the caliper piston the best, inserted a 3/8" extension and using a short ratchet, simply rotated the piston clockwise slowly while applying a bit of inward pressure. The piston retracted into the caliper very easily...piece of cake. I did lubricate the boot between the caliper and the piston with silicone spray as suggested and did not experience "bunching" of the boot until the piston was all the way retracted....just reversed the ratchet and straightened the boot out. Perhaps to much is being made of the amount of pushing force required while rotating the piston....maybe that's why needle nosed pliers work. I hope this adds something to the "body of knowledge" on the rear pad replacement topic. By the way this alternate tool is quite cost effective at $6.99.

3rd Gear
Joined: Apr 2010
Posts: 189
Likes: 0
I took advantage of the 15% holiday discount by MINI MANIA and bought the red ebc pads set for my front/rear brakes. So later this year I will have the pleasure of working on the brakes for the first time. 
I didn't purchase it...mostly because I didn't think about it at the time. However did anyone try the MINI MANIA brake caliper tool for the R56? Wonder if that would work better than the harbor freight tool?
Also, how difficult is it to gain access to the brake sensors if you replace those? Do you have to remove the wheel well liner to get to the connector?
2nd Gear
Joined: Jul 2010
Posts: 91
Likes: 0
You do not have to remove the fender liners, but you will have to remove some screws to help bend/move the liner out of the way and snake your hand though to get to the connectors. The front is much easier than the rear.
I was able to replace the brake sensor without removing anything, there was enough room in my '07 MCS to get to the connector (actually 2 of them in the same location...also the ABS sensor in same place).

Neutral
Joined: Jul 2013
Posts: 2
Likes: 0
Well, I finally got to finish this 'project.'
It was the rear right piston that was giving me problems, so I decided to start on the left rears. I used the Harbor Freight tool. I rotated an PUSHED while rotating (with muscle power; not the screwing in action of the HF tool). After about 15 minutes of this (with breaks to find a more comfortable position to get more leverage!) this darn thing finally started to move in. Once it began moving in, it was actually not too difficult to push and twist. I switched over to needle nosed pliers (just for fun) and got it pushed in all the way! Whew! Got the new pads and rotors on and took a break.
Then I returned for the right rear piston. Worked on it for an hour with HF tool. I turned the heck out of it but it would not move back at all! I figured I just did not have the strength to push the darn thing in. So, I decided to try one more method described by Dr. Obnxs in one of his MC2 articles: Compress with a C-clamp and rotate with channel lock pliers. It worked like a charm!
I tightened up the clamp and even without rotating the piston, it moved back slightly. After I could not tighten it anymore, I took the pliers and gently grasped the end of the piston (careful not to catch the rubber) and rotated 1/4 turn. Then, tightening the c-lamp pushed back the piston some more. After about 4 turns with the pliers (1 full turn of the piston) I was able to push the piston all the way back in the with c-clamp alone. As it tightened the rotating disc at the end began to rotate as well and rotated the piston with it until the piston was completely retracted.
So, my experience was:
1. The rotating and pushing are indeed "independent."
2. Once you cannot push in, you need to rotate.
3. Rotating alone will not retract the piston (I tried for an hour!). (Markjenn, I am guessing that when you rotate, you may be also pushing in slightly on a less resisting piston.)
4. Even if the piston is ready to be pushed back (i.e. the 'sleeve nut' has been rotated back enough--see picture in post above), it may require some force especially at the beginning. That's where the c-clamp helped me.
5. I did this without dealing with the hand brake cable; no cracking open the bleeder valve; I did crack open the brake fluid reservoir and checked the level as the piston(s) compressed (had to remove a bit of fluid to prevent overflowing).
I'm bumping this only because this is the most recent advice on the subject i could find on Google, so hopefully this may bump it up the listings a bit for anyone else having a similar problem that can't wait to have a dedicated tool delivered.

Neutral
Joined: Aug 2014
Posts: 1
Likes: 0
Thanks again for the tips, folks.
I haven't had a chance to get to the rears (maybe this weekend), but in the meantime, I was able to finally find a diagram of the interior of a rear caliper with the self-adjusting piston/hand brake mechanism.
A description of the mechanism and how it works is here:
http://www.autoshop101.com/forms/brake06.pdf
This is the figure from that document:
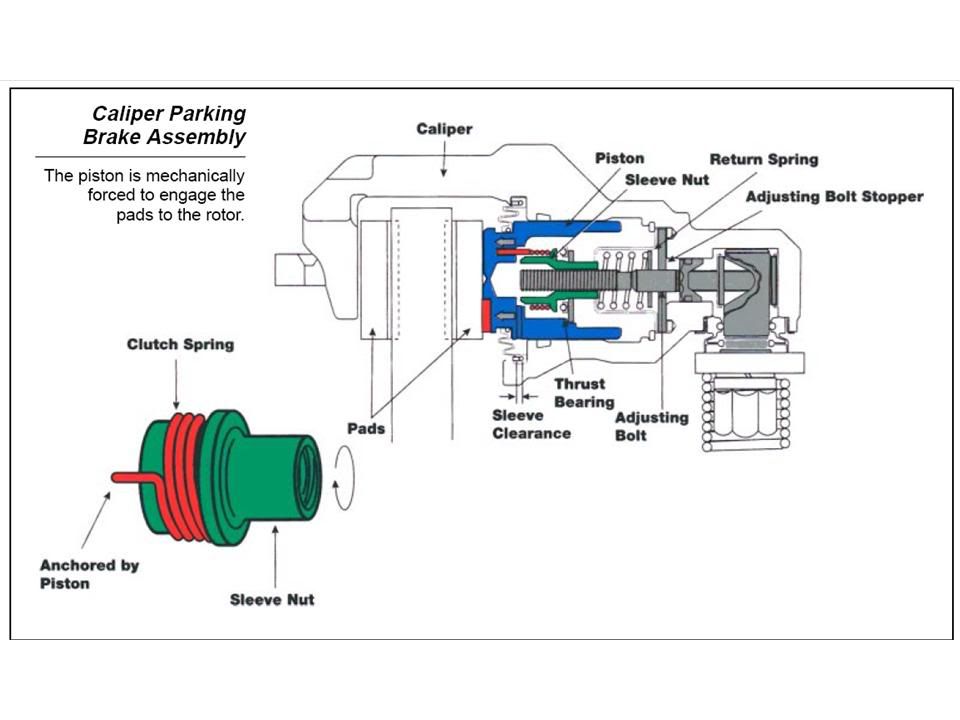
Apparently this is for a Toyota, but I suspect the basic mechanism is similar.
In short, the green sleeve nut is the part that needs to be rotated back along the central bolt to provide space for the piston to be pushed back. It appears that the torque you apply to the piston as you rotate it is transferred to that nut via the spring.
Everything that people are describing seems to make sense now. You would have to rotate the piston a bit until that spring opens up completely and starts to rotate the nut. After the nut has been screwed in a bit, then the piston can be pushed back a bit as well. Then the process has to be repeated.
The seizing of the tool would indeed happen because the threading of the nut-bolt is probably not the same as the threading of the Harbor Freight tool., i.e, the HF tool might be pushing in faster than the nut can be screwed in.
Comments?
I haven't had a chance to get to the rears (maybe this weekend), but in the meantime, I was able to finally find a diagram of the interior of a rear caliper with the self-adjusting piston/hand brake mechanism.
A description of the mechanism and how it works is here:
http://www.autoshop101.com/forms/brake06.pdf
This is the figure from that document:
Apparently this is for a Toyota, but I suspect the basic mechanism is similar.
In short, the green sleeve nut is the part that needs to be rotated back along the central bolt to provide space for the piston to be pushed back. It appears that the torque you apply to the piston as you rotate it is transferred to that nut via the spring.
Everything that people are describing seems to make sense now. You would have to rotate the piston a bit until that spring opens up completely and starts to rotate the nut. After the nut has been screwed in a bit, then the piston can be pushed back a bit as well. Then the process has to be repeated.
The seizing of the tool would indeed happen because the threading of the nut-bolt is probably not the same as the threading of the Harbor Freight tool., i.e, the HF tool might be pushing in faster than the nut can be screwed in.
Comments?

My question is: why is turning not enough to rewind the piston? It should turn the spring and consequently the sleeve nut... Why is there a need to push?


Neutral

Joined: Jan 2014
Posts: 10
Likes: 0
From: SW Cook county, Illinois
Oldie but goodie!

Neutral
Joined: Nov 2020
Posts: 1
Likes: 0
integrated parking brake piston woes
I found a tear in my piston boot as well. Now it came time to learn how to fix that! DIY style!! I could easily find parts off of rock auto and ended up ordering the same part 3 times. On the first reinstall I put a tear in the new one because I tried to fit the whole thing over the IPB piston w/o taking it out, yet. So on the second one I went ahead and unscrewed the piston (using the crucible and a ratchet) and it unscrewed without a problem. I didn't notice yet that the screw hole within the caliper have 2 spring loaded clips on either side of its opening. I would later learn this was the reason I would be mildly applying pressure whilst turning. I ended up doing a combination of HF tool and crucible. Since the HF tool was too large to fit to start threading the piston but once I got a few turns in with the ratchet wrench and forming my own "C" clamp with my hand, the HF tool (when spun slow) finished all its rotations without a bind up!
So, you need to apply the downward (or inward) force to get beyond those clips. Your mileage may very but once you apply just the right amount of pressure, it seems to behave accordingly and spin right in. I've been preforming all this on my 2015 Mazda 3 with 169,000mi on it but this just goes to show you, IPB is IPB (meaning, Integrated Parking Brake) and good luck to you all thank you!!!
So, you need to apply the downward (or inward) force to get beyond those clips. Your mileage may very but once you apply just the right amount of pressure, it seems to behave accordingly and spin right in. I've been preforming all this on my 2015 Mazda 3 with 169,000mi on it but this just goes to show you, IPB is IPB (meaning, Integrated Parking Brake) and good luck to you all
thank you!!!
In case anyone stumbles across this today (November 18, 2023) and can help me, PLEASE say so. I'm doing my rear brakes on a Gen1. I have the BMW tool to rotate and compress the piston. I have compressed the piston but can't remove the tool! I can't rotate the tool backwards, and can't generate enough 'slack' in the plate that holds the tool against the caliper. HELP!.

Thread
Thread Starter
Forum
Replies
Last Post
jpgwinn24
R55 :: Clubman Talk (2008+)
1
Aug 20, 2015 06:57 PM