
Need Advice. Misfire cyl 1 and 3, completely dead cylinders.


Thread Starter
|
2nd Gear
Joined: Mar 2012
Posts: 56
Likes: 0
Finally got the head off.

Some adjacent chambers.

Pretty cruddy.
I haven't done any cleaning or anything. Unfortunantly. When I was diagnosising. I closed the intakes and put some soapy water in the ports to see if it was holding, or air would come out and cause bubbles. Good idea. But forgot to remove it and rotated the engine. Then couldn't get it all out. So I have some rust on the cylinder walls :(
Kinda hard to tell.

So I might have to pull at least that piston and flex hone it and hope its not to bad. But that's my fault.
The valve seat doesn't look to bad, but I haven't cleaned it up or anything.
I also have some build up on a few exhaust valve stems. Thinking that it could be from the combustion chamber, or maybe valve seals?
Anyone done their own work?

Some adjacent chambers.
Pretty cruddy.
I haven't done any cleaning or anything. Unfortunantly. When I was diagnosising. I closed the intakes and put some soapy water in the ports to see if it was holding, or air would come out and cause bubbles. Good idea. But forgot to remove it and rotated the engine. Then couldn't get it all out. So I have some rust on the cylinder walls :(
Kinda hard to tell.

So I might have to pull at least that piston and flex hone it and hope its not to bad. But that's my fault.
The valve seat doesn't look to bad, but I haven't cleaned it up or anything.
I also have some build up on a few exhaust valve stems. Thinking that it could be from the combustion chamber, or maybe valve seals?
Anyone done their own work?
Thread Starter
|
2nd Gear
Joined: Mar 2012
Posts: 56
Likes: 0
Just confirmed tonight that I do have a burnt exhaust valve. I was able to rotate the valve slightly and see the damaged area with an inspection camera. I'm in the process of removing the head now.
I contacted Calico Coatings and they said to coat the whole head (combustion chambers, intake and exhaust ports, valve faces and the backs of the valves) was only $70! That seemed crazy cheap to me but I called and they said it was right. So that is my plan, to send them the head and new valves.
CSMITTY, I don't really know what that tool would be for, unless it is to keep the cam in place while everything is still in the vehicle. I guess I will find out shortly
The tool is for keeping pressure on the camshaft while undoing the bearing caps. to keep the cam from warping since its a hollow cam. Just trying to decide how necessary it is. Did you end up using it?
Last edited by csmitty; Jan 12, 2015 at 08:30 AM.

6th Gear
Joined: Aug 2011
Posts: 2,064
Likes: 15
From: Silly-con Valley
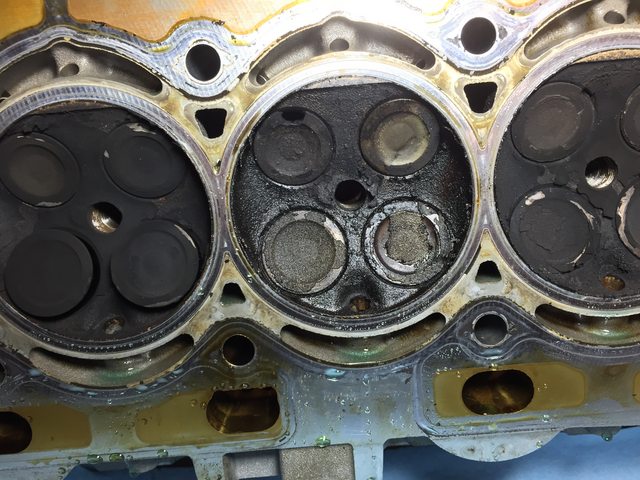
It could be the picture, but it looked to me like you have leakage and/or burning on at least 3 of the exhaust valves shown. Two could possibly be damage around the seat. Check all eight exhaust valves carefully, along with their seats and guides.
Thread Starter
|
2nd Gear
Joined: Mar 2012
Posts: 56
Likes: 0
What from the picture indicates that to you? I'm not real trained on spotting a leaky valve. I will definitely disassemble and check them all out. Just trying to decide how I want to get the camshafts off and if I'm going to spend the money on that hold down tool for the camshafts.

2nd Gear
Joined: Sep 2010
Posts: 77
Likes: 0
The coating is called CT-2 (http://www.calicocoatings.com/coatings/). It is a thermal barrier, so it should keep the valve cooler (I've heard 150-200 deg F). It MIGHT help keep the carbon from sticking as well, but we'll see. A heat dissipating coating would be bad, as it would make more heat enter the valve. The only place you would want that would be on the seats or on the stems. The idea is to keep as much heat out of the engine as possible. I'm not sure if they disassemble it and such, mine will disassembled and cleaned when I send it to them. I believe they will do a final sand blasting and cleaning, but it should be clean when they get it.
I took mine apart without the tool. I can't imagine that it flexes all that much. The valve operation puts quite a lot of force on the camshaft, so it should be pretty stiff. I wouldn't think that having it be hollow would make a huge difference, since it should just carry oil (I'll have to look at mine), so it should be a smallish hole. I can't imagine that they would make it hollow to reduce weight or something. Maybe just once you start removing it, don't stop and let it sit half removed for several hours
For the rusty cylinder, can you get away with just putting the piston at BDC and honing it (or otherwise cleaning it) without removing the piston? Maybe even just try a towel with some WD-40 on it to see if it cleans up enough.
For "Anyone done their own work?", you might need to elaborate I do most of my own work, but I don't have a machine shop, either. So I will be taking it to one to have new guides put in it and the seats re ground. My seats are fairly pitted, especially on the intake side, oddly. The exhaust valves were fairly pitted as well, but they're getting replaced. I'm also doing some very mild porting (smoothing port walls, a little bowl work and some mild combustion chamber modifications/polishing).
I took mine apart without the tool. I can't imagine that it flexes all that much. The valve operation puts quite a lot of force on the camshaft, so it should be pretty stiff. I wouldn't think that having it be hollow would make a huge difference, since it should just carry oil (I'll have to look at mine), so it should be a smallish hole. I can't imagine that they would make it hollow to reduce weight or something. Maybe just once you start removing it, don't stop and let it sit half removed for several hours
For the rusty cylinder, can you get away with just putting the piston at BDC and honing it (or otherwise cleaning it) without removing the piston? Maybe even just try a towel with some WD-40 on it to see if it cleans up enough.
For "Anyone done their own work?", you might need to elaborate
I do most of my own work, but I don't have a machine shop, either. So I will be taking it to one to have new guides put in it and the seats re ground. My seats are fairly pitted, especially on the intake side, oddly. The exhaust valves were fairly pitted as well, but they're getting replaced. I'm also doing some very mild porting (smoothing port walls, a little bowl work and some mild combustion chamber modifications/polishing).
Thread Starter
|
2nd Gear
Joined: Mar 2012
Posts: 56
Likes: 0
The coating is called CT-2 (http://www.calicocoatings.com/coatings/). It is a thermal barrier, so it should keep the valve cooler (I've heard 150-200 deg F). It MIGHT help keep the carbon from sticking as well, but we'll see. A heat dissipating coating would be bad, as it would make more heat enter the valve. The only place you would want that would be on the seats or on the stems. The idea is to keep as much heat out of the engine as possible. I'm not sure if they disassemble it and such, mine will disassembled and cleaned when I send it to them. I believe they will do a final sand blasting and cleaning, but it should be clean when they get it.
I took mine apart without the tool. I can't imagine that it flexes all that much. The valve operation puts quite a lot of force on the camshaft, so it should be pretty stiff. I wouldn't think that having it be hollow would make a huge difference, since it should just carry oil (I'll have to look at mine), so it should be a smallish hole. I can't imagine that they would make it hollow to reduce weight or something. Maybe just once you start removing it, don't stop and let it sit half removed for several hours
For the rusty cylinder, can you get away with just putting the piston at BDC and honing it (or otherwise cleaning it) without removing the piston? Maybe even just try a towel with some WD-40 on it to see if it cleans up enough.
For "Anyone done their own work?", you might need to elaborate I do most of my own work, but I don't have a machine shop, either. So I will be taking it to one to have new guides put in it and the seats re ground. My seats are fairly pitted, especially on the intake side, oddly. The exhaust valves were fairly pitted as well, but they're getting replaced. I'm also doing some very mild porting (smoothing port walls, a little bowl work and some mild combustion chamber modifications/polishing).
I took mine apart without the tool. I can't imagine that it flexes all that much. The valve operation puts quite a lot of force on the camshaft, so it should be pretty stiff. I wouldn't think that having it be hollow would make a huge difference, since it should just carry oil (I'll have to look at mine), so it should be a smallish hole. I can't imagine that they would make it hollow to reduce weight or something. Maybe just once you start removing it, don't stop and let it sit half removed for several hours
For the rusty cylinder, can you get away with just putting the piston at BDC and honing it (or otherwise cleaning it) without removing the piston? Maybe even just try a towel with some WD-40 on it to see if it cleans up enough.
For "Anyone done their own work?", you might need to elaborate
I do most of my own work, but I don't have a machine shop, either. So I will be taking it to one to have new guides put in it and the seats re ground. My seats are fairly pitted, especially on the intake side, oddly. The exhaust valves were fairly pitted as well, but they're getting replaced. I'm also doing some very mild porting (smoothing port walls, a little bowl work and some mild combustion chamber modifications/polishing).The camshaft I believe I'll just be careful when removing it. Similar to removing the head bolts and maybe only a little at a time evenly.
For the cylinder I suppose I could. Just would need to be able to rotate the engine since the crank bolt is removed, but I guess there's no reason I couldn't re install it temporarily. Then get back to 90deg.
I suppose I meant my comment to be a thermal barrier and checked out the CT-2 on their website. For $70 that's not a bad investment. Again, with the quickness that this will be sold. Might not make the most sense.
How many valves are you replacing?
2nd Gear
Joined: Sep 2010
Posts: 77
Likes: 0
If you're selling it, I wouldn't do the coating, you probably won't get any money for it.
As far as taking it apart and putting it back together, it shouldn't be anything out of the ordinary. When I removed my camshafts, I broke all of the bolts loose, then removed them, that way it minimized any flex, but I really wouldn't think it would matter too much. Like you said, take them off similar to the head bolts. If your seats aren't so bad, you might be able to get away with just lapping them. My guides were worn out, if yours are too, then you might just need to pay a shop to do it all.
I am replacing all of my valves, with Supertech inconel ones, but I plan on keeping it, also. If your other valves look OK, you can probably get away with just cleaning them and putting them back. You'll probably want to try and get rid of any pitting, though. At $46/ea, replacing 8 valves gets expensive in a hurry!
If you have a manual, you should be able to rotate the engine by putting it in 6th gear, locking one wheel in place (I use a board or a ramp) then rotate the other tire. Not positive it would work with an auto, the TC might just spin, but it would be worth a try.
6th Gear
Joined: Aug 2011
Posts: 2,064
Likes: 15
From: Silly-con Valley
Look a the upper-left valve in each combustion chamber. The middle one obviously has a chunk missing from it; that is a badly burned valve.
The one in the cylinder to the left has a very dark mark right about the 12-o-clock position near the edge of the valve. It might be a piece of the valve starting to fail, or might be a crack or some such in the seat or the head around the seat.
There is a similar mark at about the 1-o-clock position of the valve in the cylinder to the right.
Both of those two might show early-stage problems, or might be nothing.
A burned valve may have overheated the valve guide as well, so it will be worth checking at least that one valve for play in the guide. Probably best to check all of them, though.
I personally would likely have a machine shop do all of the checking and repairing of the head.

6th Gear
Joined: Mar 2013
Posts: 3,428
Likes: 37
From: Mission Viejo, CA
I can't believe how much carbon buildup you have not only on your valves but the head and on top of the pistons! 
In some places you can peel the carbon off the pistons like tree bark, this is the worst case I have seen on an N14. Thank God those of us that know what to expect as far as carbon on the valves and combustion chambers, nothing walnut blasting every so often and BG 44K can't fix!
Did you ever have the valves walnut blasted before 100,000 miles?
Thread Starter
|
2nd Gear
Joined: Mar 2012
Posts: 56
Likes: 0
I can't believe how much carbon buildup you have not only on your valves but the head and on top of the pistons!
In some places you can peel the carbon off the pistons like tree bark, this is the worst case I have seen on an N14. Thank God those of us that know what to expect as far as carbon on the valves and combustion chambers, nothing walnut blasting every so often and BG 44K can't fix!
Did you ever have the valves walnut blasted before 100,000 miles?
I haven't done much to it lately besides starting to strip it down. Ordering parts today though to take advantage of the low Euro.
6th Gear
Joined: Mar 2013
Posts: 3,428
Likes: 37
From: Mission Viejo, CA

I assume you plan on replacing the broken valves, any head work planned? If it was me I'd replace all the valves with the massive amount of carbon you had in your engine. Down the road I'd like to have my head rebuilt with all new parts and perhaps a thicker head gasket to drop compression down to 10.25:1 so I can run more boost.
Thread Starter
|
2nd Gear
Joined: Mar 2012
Posts: 56
Likes: 0
Sorry its been a while, been selling and buying houses so haven't had much time for the Mini. However, I did get the head cleaned up. Two valves replaced ( I found some cheaper than through the dealer, I'll try to dig up the source) they went reassembled the springs and retainers, pressure tested it and did a "valve job"
However, going back and reassembling the tappets they all have some give to them, like a little squish, except for 3 of them. They won't compress at all by hand. Would this warrant a replacement or just try to give them a little smack with a rubber faced dead blow? Suckers are like $20 a piece. I had them al numbered and have gone back with their respective rocker arms and cylinder.
2nd question. They disassembled the bridge I guess you'd call it, that that the HPFP and vacuum pump attach to. I'm assuming its going to need a small bit of rtv when reassembling. Since I didn't take it off I didn't get to see what was under it, however I did see some in the corners so thats why I was a bit curious.
Lastly, when reassembling the camshafts, would a film of oil suffice or is assembly lube recommended? I seem to remember reading a TSB that just oil was needed but wondering what everyone else was doing.
Also I had to pull the oil pan since the timing chain guides broke when they got removed and some pieces fell down in to the oil pump area. But got that back on yesterday so hopefully done taking things apart and getting them back together!
However, going back and reassembling the tappets they all have some give to them, like a little squish, except for 3 of them. They won't compress at all by hand. Would this warrant a replacement or just try to give them a little smack with a rubber faced dead blow? Suckers are like $20 a piece.
I had them al numbered and have gone back with their respective rocker arms and cylinder. 2nd question. They disassembled the bridge I guess you'd call it, that that the HPFP and vacuum pump attach to. I'm assuming its going to need a small bit of rtv when reassembling. Since I didn't take it off I didn't get to see what was under it, however I did see some in the corners so thats why I was a bit curious.
Lastly, when reassembling the camshafts, would a film of oil suffice or is assembly lube recommended? I seem to remember reading a TSB that just oil was needed but wondering what everyone else was doing.
Also I had to pull the oil pan since the timing chain guides broke when they got removed and some pieces fell down in to the oil pump area. But got that back on yesterday so hopefully done taking things apart and getting them back together!

2nd Gear
Joined: Dec 2012
Posts: 120
Likes: 1
From: San Diego
how'd this work out for you?
I just had a similar failure, dealer ended up hooking me up with a new engine on goodwill and i got a new clutch and flywheel thrown in at the same time.
I hate to say it, but I'd be worried that the oil buildup is more due to worn bore sleeves and blow by than anything else. The 15k oil change intervals really ruined these engines for a lot of enthusiasts, the earliest record I could find of a change from the original owner was around 17.5k! Running that long on the initial oil is going to kill an engine so quickly. Hopefully engine 2 + a meticulous owner works out. Best of luck!
6th Gear
Joined: Mar 2013
Posts: 3,428
Likes: 37
From: Mission Viejo, CA
how'd this work out for you?
I just had a similar failure, dealer ended up hooking me up with a new engine on goodwill and i got a new clutch and flywheel thrown in at the same time.
I hate to say it, but I'd be worried that the oil buildup is more due to worn bore sleeves and blow by than anything else. The 15k oil change intervals really ruined these engines for a lot of enthusiasts, the earliest record I could find of a change from the original owner was around 17.5k! Running that long on the initial oil is going to kill an engine so quickly. Hopefully engine 2 + a meticulous owner works out. Best of luck!
I just had a similar failure, dealer ended up hooking me up with a new engine on goodwill and i got a new clutch and flywheel thrown in at the same time.
I hate to say it, but I'd be worried that the oil buildup is more due to worn bore sleeves and blow by than anything else. The 15k oil change intervals really ruined these engines for a lot of enthusiasts, the earliest record I could find of a change from the original owner was around 17.5k! Running that long on the initial oil is going to kill an engine so quickly. Hopefully engine 2 + a meticulous owner works out. Best of luck!

Thread
Thread Starter
Forum
Replies
Last Post
bbak11010
MINI Parts for Sale
0
Sep 7, 2015 08:08 PM
bbak11010
MINI Parts for Sale
0
Sep 7, 2015 08:03 PM
MasterShaftner
R56 :: Hatch Talk (2007+)
3
Sep 4, 2015 03:52 PM