I'm Gonna DIY my Timing Chain Repair...Need Some Advice Please
#1
 02-21-2013, 11:42 AM


I'm Gonna DIY my Timing Chain Repair...Need Some Advice Please
I've received some great advice about how and where to get this inherent problem repaired and any way you slice it, I'm looking at an exorbitant labor charge that I can't bring myself to pay at the moment. Plus, I love a good project.
I have both a Bentley Service Manual and time on my side as I have another vehicle I can drive in the meantime. Oddly enough my Dad bought me the service manual for a gift shortly after I bought the Mini. Maybe he was trying to tell me something
As I plan this out, I've got some questions that I would love help with.
1. The first and most obvious question is what has been done to prevent this from happening again? As an example, I installed a DT turbo oil supply line instead of the OEM part because it was prone to fail again. Do the kits that MINI offers provide re-engineered parts to solve the original issue or do I need to supplement parts in the kit with better parts?
2. What else should I address while I'm in there rooting around. For instance, I'm I able to clean the inherent carbon buildup on the intake runners easily and if so, how? I'm replacing the spark plugs since it hasn't been done before and I'm just a shade over 60k. My water pump is leaking so that'll be replaced as well. Anyone want add to my to do list?
3. Special tools. If anyone has a set of timing tools available that they would consider parting with or would loan/rent, let me know. I'll pay shipping. Otherwise, I may buy the full set and consider renting them in the future as I imagine this could become a common DIY repair.
4. Both the dealer and BoOst SpIKe recommended I drop the oil pan and remove any possible metal fragments from the broken upper chain guide, if it is indeed broken. What's the best method for clearing both the oil pan and cylinder head of fragments without creating more problems?
5. Lastly, I'd love any recommendations on the best/cheapest place to get all these lovely new parts. I've heard prices for the timing kit very between $350 and $400 and the water pump between $150 and $200.
I plan on putting together a "How To" tutorial as I do this so hopefully someone else can benefit from my experience too.


#3
02-21-2013, 12:21 PM
For parts, Detroit Tuned sells the full timing chain kit --> http://www.detroittuned.com/mini-r56...tensioner-kit/
As does Way Motor Works --> http://www.waymotorworks.com/timing-...-cooper-s.html
Way also sells the special tools kit --> http://www.waymotorworks.com/timing-...7-r58-r60.html
I would imagine there are other sources as well.
For the water pump, I've been monitoring ECS Tuning --> http://www.ecstuning.com/Mini-2009-C...ng/Water_Pump/
as I need to replace mine and I've been waiting on them to get the HEPU units back in stock.
While you are in there, you might as well slap in a new serpentine belt.
#4
02-21-2013, 02:39 PM

Platinum Sponsor
jcauseyfd - For the water pump, I've been monitoring ECS Tuning --> http://www.ecstuning.com/Mini-2009-C...ng/Water_Pump/
We can get them ASAP , you don't have to wait for things to show stock.
http://www.ecstuning.com/Search/11518604888/
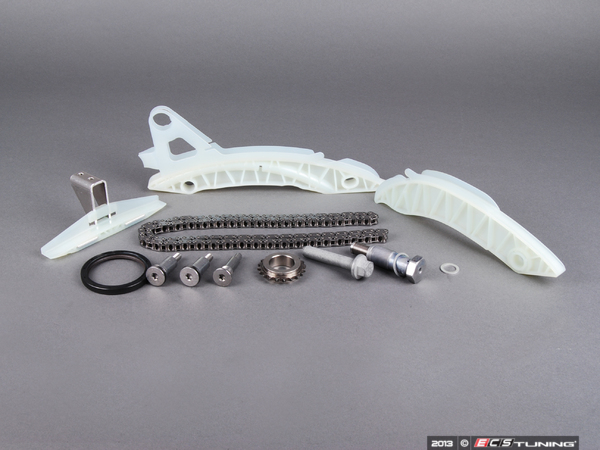
Timing Chain , Kits , and Tensioners are all here:
2007 MCS Edit * Comes with all the install bolts now * In both kits.
http://www.ecstuning.com/Mini-2007-Cooper-R56-S-Coupe-L4_1.6L_N14B16A/Engine/Timing/

Thanks
We can get them ASAP , you don't have to wait for things to show stock.
http://www.ecstuning.com/Search/11518604888/
Timing Chain , Kits , and Tensioners are all here:
2007 MCS Edit * Comes with all the install bolts now * In both kits.
http://www.ecstuning.com/Mini-2007-Cooper-R56-S-Coupe-L4_1.6L_N14B16A/Engine/Timing/
Thanks
__________________

MINI Guru/ MINI Owner Since 2004 | NEW Lifetime Part Replacement | Local Pickup
Milltek | Genuine MINI | Forge Motorsport | NM Engineering | ECS Performance | M7 Speed
Customer Service Hours: 8am-8pm EST|Sales Team Hours: 8am-11pm | SAT 10am-7pm 800.924.5172
MINI Guru/ MINI Owner Since 2004 | NEW Lifetime Part Replacement | Local Pickup
Milltek | Genuine MINI | Forge Motorsport | NM Engineering | ECS Performance | M7 Speed
Customer Service Hours: 8am-8pm EST|Sales Team Hours: 8am-11pm | SAT 10am-7pm 800.924.5172
Last edited by ECSTuning; 02-15-2016 at 08:28 AM.
#5
02-22-2013, 10:04 PM
As for service of the oil pan and potential debris that may (or may not be present) in your upper valve train area and in your oil pan I would recommend just having a detailed look around at and around the valve train as well as oil passages. Once you finally have the chain assembly removed, inspect what you have in your hand in comparison to the new parts (especially the chain guide rails), if you notice anything missing, its time to go fishing  . Drop the oil pan (its simple and if you have a swivel 8mm you don't even have to move the exhaust system @ the flex section. With the pan off, make sure to inspect the oil pump, pump pick up and the screen for fragments that like to make there way up into that area which can cause issues and many who perform this service forget to look here. Also remove the oil pump chain cover (black) and inspect the pump chain and sprocket for fragments as well as any damage while your there.
Now for cleaning the pan, parts wash or brake clean will be your best friend unless you have access to a parts washer. Make sure you clean the pan as well as bed plate where the pan meets the block of any left over gasket material. A nice scraper and parts wash should do the trick getting it off the bed plate side. For the pan, you can use a 90 degree die grinder with a surface prep wheel on it to clean up the pan of gasket material as well as it will give it a fresh surface.
Also, ensure the information you are using to perform this job is up to date in terms of Torque Specs of the Tensioner, Cam bolts, Crank/Harmonic Balancer bolt as well as guide/bearing bolts. Its key to make sure you Torque them properly as well as in proper sequence during install. There has been some improper as well as updated information (changes from BMWNA & MINIUSA) that has changed in terms of these specs in the past year.
One last thing, take your time, this isn't a job you want to do again in the near future. I always say sometimes taking the extra time to inspect and being detailed will lead to better results and a much better as well as cleaner and most times more efficient install. I've personally done this job more times then I care to admit to, and still with as much experience, knowledge and tools readily available to me, I still take my time doing this specific job. I've seen some hack jobs and other shops that have performed this service and not properly do it (or only do half the job) and it has cost some unnecessary failures of engines.
Good luck.
. Drop the oil pan (its simple and if you have a swivel 8mm you don't even have to move the exhaust system @ the flex section. With the pan off, make sure to inspect the oil pump, pump pick up and the screen for fragments that like to make there way up into that area which can cause issues and many who perform this service forget to look here. Also remove the oil pump chain cover (black) and inspect the pump chain and sprocket for fragments as well as any damage while your there.Now for cleaning the pan, parts wash or brake clean will be your best friend unless you have access to a parts washer. Make sure you clean the pan as well as bed plate where the pan meets the block of any left over gasket material. A nice scraper and parts wash should do the trick getting it off the bed plate side. For the pan, you can use a 90 degree die grinder with a surface prep wheel on it to clean up the pan of gasket material as well as it will give it a fresh surface.
Also, ensure the information you are using to perform this job is up to date in terms of Torque Specs of the Tensioner, Cam bolts, Crank/Harmonic Balancer bolt as well as guide/bearing bolts. Its key to make sure you Torque them properly as well as in proper sequence during install. There has been some improper as well as updated information (changes from BMWNA & MINIUSA) that has changed in terms of these specs in the past year.
One last thing, take your time, this isn't a job you want to do again in the near future. I always say sometimes taking the extra time to inspect and being detailed will lead to better results and a much better as well as cleaner and most times more efficient install. I've personally done this job more times then I care to admit to, and still with as much experience, knowledge and tools readily available to me, I still take my time doing this specific job. I've seen some hack jobs and other shops that have performed this service and not properly do it (or only do half the job) and it has cost some unnecessary failures of engines.
Good luck.
Last edited by boOst spIKe; 02-22-2013 at 10:19 PM.
#6
02-23-2013, 05:12 AM

5th Gear
I walnut shell blasted my intake valves myself for about $70 parts and material from Harbor Freight. I already had the air compressor and shop vac.
I am writing this up now and will post steps within next few days. Actual blasting takes about 3 minutes per cylinder and valves look new. This is the technique dealership uses - and charges almost $800 for. Total job including removal/replacement of intake manifold takes about 3-4 hours. Good luck on your project.
I am writing this up now and will post steps within next few days. Actual blasting takes about 3 minutes per cylinder and valves look new. This is the technique dealership uses - and charges almost $800 for. Total job including removal/replacement of intake manifold takes about 3-4 hours. Good luck on your project.
#7
03-13-2013, 07:02 PM

Trending Topics
#8
03-25-2013, 05:59 AM
I'm within a day of ordering the parts necessary to replace my timing chain but as I review my bentley manual, I'm getting special tooled to death. So far I'm looking at a the timing tool kit and the crankshaft holder wrench but I'm concerned about how to replace the crank seal. Is this possible to do without a special tool and if not, where do I get this tool necessary to slide the seal on and seat it properly. I can't find it anywhere?
Also, a special tool was mentioned to remove a fastener above the exhaust in order to get the oil pan out. Anyone know what this one is about? The pictures and description in the manual weren't clear on this.
Also, a special tool was mentioned to remove a fastener above the exhaust in order to get the oil pan out. Anyone know what this one is about? The pictures and description in the manual weren't clear on this.
Last edited by Everyday I'm Motorin; 03-25-2013 at 07:08 AM.

#10
03-25-2013, 07:01 AM
I had it off when I replaced the turbo oil supply line. It's not hard, just a PIA. I re-read a post above from Boost Spike and he mentioned it wasn't difficult and didn't require the removal of the exhaust.
The fastener I'm referring to seemed to have something to do with securing the oil pan to the engine block. Their was a step in the Bentley manual for dropping the oil pan that required Mini special tools to remove this fastener. I couldn't tell what it was from the picture provided.
The fastener I'm referring to seemed to have something to do with securing the oil pan to the engine block. Their was a step in the Bentley manual for dropping the oil pan that required Mini special tools to remove this fastener. I couldn't tell what it was from the picture provided.
#11
03-27-2013, 08:03 PM
5th Gear
DIY Walnut Shell Blasting
I've received some great advice about how and where to get this inherent problem repaired and any way you slice it, I'm looking at an exorbitant labor charge that I can't bring myself to pay at the moment. Plus, I love a good project.
I have both a Bentley Service Manual and time on my side as I have another vehicle I can drive in the meantime. Oddly enough my Dad bought me the service manual for a gift shortly after I bought the Mini. Maybe he was trying to tell me something
As I plan this out, I've got some questions that I would love help with.
1. The first and most obvious question is what has been done to prevent this from happening again? As an example, I installed a DT turbo oil supply line instead of the OEM part because it was prone to fail again. Do the kits that MINI offers provide re-engineered parts to solve the original issue or do I need to supplement parts in the kit with better parts?
2. What else should I address while I'm in there rooting around. For instance, I'm I able to clean the inherent carbon buildup on the intake runners easily and if so, how? I'm replacing the spark plugs since it hasn't been done before and I'm just a shade over 60k. My water pump is leaking so that'll be replaced as well. Anyone want add to my to do list?
3. Special tools. If anyone has a set of timing tools available that they would consider parting with or would loan/rent, let me know. I'll pay shipping. Otherwise, I may buy the full set and consider renting them in the future as I imagine this could become a common DIY repair.
4. Both the dealer and BoOst SpIKe recommended I drop the oil pan and remove any possible metal fragments from the broken upper chain guide, if it is indeed broken. What's the best method for clearing both the oil pan and cylinder head of fragments without creating more problems?
5. Lastly, I'd love any recommendations on the best/cheapest place to get all these lovely new parts. I've heard prices for the timing kit very between $350 and $400 and the water pump between $150 and $200.
I plan on putting together a "How To" tutorial as I do this so hopefully someone else can benefit from my experience too.
I have both a Bentley Service Manual and time on my side as I have another vehicle I can drive in the meantime. Oddly enough my Dad bought me the service manual for a gift shortly after I bought the Mini. Maybe he was trying to tell me something
As I plan this out, I've got some questions that I would love help with.
1. The first and most obvious question is what has been done to prevent this from happening again? As an example, I installed a DT turbo oil supply line instead of the OEM part because it was prone to fail again. Do the kits that MINI offers provide re-engineered parts to solve the original issue or do I need to supplement parts in the kit with better parts?
2. What else should I address while I'm in there rooting around. For instance, I'm I able to clean the inherent carbon buildup on the intake runners easily and if so, how? I'm replacing the spark plugs since it hasn't been done before and I'm just a shade over 60k. My water pump is leaking so that'll be replaced as well. Anyone want add to my to do list?
3. Special tools. If anyone has a set of timing tools available that they would consider parting with or would loan/rent, let me know. I'll pay shipping. Otherwise, I may buy the full set and consider renting them in the future as I imagine this could become a common DIY repair.
4. Both the dealer and BoOst SpIKe recommended I drop the oil pan and remove any possible metal fragments from the broken upper chain guide, if it is indeed broken. What's the best method for clearing both the oil pan and cylinder head of fragments without creating more problems?
5. Lastly, I'd love any recommendations on the best/cheapest place to get all these lovely new parts. I've heard prices for the timing kit very between $350 and $400 and the water pump between $150 and $200.
I plan on putting together a "How To" tutorial as I do this so hopefully someone else can benefit from my experience too.
https://www.northamericanmotoring.co...leaning-2.html
#12
04-12-2013, 10:37 PM

The updated parts for this repair to prevent future failure....the newly educated owner. Check your oil often. It's the best thing you can do. The chain tensioner is slightly longer and has a higher pre-tension, however, this is not a "fix", it is BMWs attempt at minimizing the impact that low oil level has on the chain system especially during cold start up with minimal oil pressure. The best advise I can give you for the repair....don't overthink the repair. Do it one step at a time. And if you pin the crank and the camshafts do NOT have the information labels facing straight up on both cams.....you are not in the right pinned position.

#14
04-21-2013, 09:03 AM

I still have my tools if you want to rent them, just message me and we can discuss. Changing it isn't hard per se, just time consuming. Always be methodical, thorough and clean. Also, the torque angle listed in my Bentely manual was not the new spec for the crank pulley, so make sure you check to make sure you use the right angle. The only special tools I used were the camshaft locking tools, crankshaft pin, dummy tensioner and a homemade crank pulley holding tool. Nothing on mine was broken, just worn. I did change the oil pump drive chain, not because I thought it was bad but because its only $30 and you're almost there anyway, so why not get some cheap insurance. I didn't change my crank seal, I don't believe it leaks and I changed mine about a year ago.

#16
04-23-2013, 10:41 PM

I finally got this project under way. I popped the top on the N14 and this is what I was greeted with. I wasn't shocked to see the upper guide rail in pieces but rather disbelief that this could happen at less than 60k.


I set the replacement next to the shattered one just to get an idea of how much of it is missing.

And where did some of it end up?....Right here.


I set the replacement next to the shattered one just to get an idea of how much of it is missing.
And where did some of it end up?....Right here.
#17
04-23-2013, 11:54 PM
I guess, every MINI with the death rattle has a broken upper slide rail... Mine was missing just a plastic flange (will make a photo later). Without that piece the plastic rail was vibrating on the metal support.
Unfortunately, as I dont have access to the right tools yet, I just replaced the upper rail. It is better now, but you still occasionally hear it. I also have the -551- 82mm tensioner.
Unfortunately, as I dont have access to the right tools yet, I just replaced the upper rail. It is better now, but you still occasionally hear it. I also have the -551- 82mm tensioner.
#18
04-24-2013, 03:05 AM
jcauseyfd - For the water pump, I've been monitoring ECS Tuning --> http://www.ecstuning.com/Mini-2009-C...ng/Water_Pump/
We can get them ASAP , you don't have to wait for things to show stock.
http://www.ecstuning.com/Search/11518604888/
Timing Chain , Kits , and Tensioners are all here:
2007 MCS
http://www.ecstuning.com/Mini-2007-Cooper-R56-S-Coupe-L4_1.6L_N14B16A/Engine/Timing/
Thanks
We can get them ASAP , you don't have to wait for things to show stock.
http://www.ecstuning.com/Search/11518604888/
Timing Chain , Kits , and Tensioners are all here:
2007 MCS
http://www.ecstuning.com/Mini-2007-Cooper-R56-S-Coupe-L4_1.6L_N14B16A/Engine/Timing/
Thanks
#19
04-24-2013, 04:56 AM
#20
04-24-2013, 05:05 AM
For the valve head you just have to undo the two hoses that attach to it. Then remove all the hex bolts. Straight forward job.
#21
04-24-2013, 09:52 AM

6th Gear
#22
04-24-2013, 11:38 AM

#23
04-24-2013, 11:58 AM

Last edited by Everyday I'm Motorin; 04-24-2013 at 12:05 PM.
#24
04-24-2013, 12:23 PM

Nothing really... Just open the valve head (the plastic engine cover) and then unscrew the two hex- bolts that hold the rail in place. See the pictures posted before about how the upper rail looks like.
For the valve head you just have to undo the two hoses that attach to it. Then remove all the hex bolts. Straight forward job.
For the valve head you just have to undo the two hoses that attach to it. Then remove all the hex bolts. Straight forward job.
This is good to know. I've had the death rattle and a new tensioner was installed. I think I'll do this slide rail as well as a precautionary measure.
#25
04-24-2013, 06:34 PM
