When you click on links to various merchants on this site and make a purchase, this can result in this site earning a commission. Affiliate programs and affiliations include, but are not limited to, the eBay Partner Network.
Stock Problems/IssuesDiscussions related to warranty related issues and repairs, or other problems with the OEM parts and software for MINI Cooper (R50), Cabrio (R52), and Cooper S (R53) MINIs.
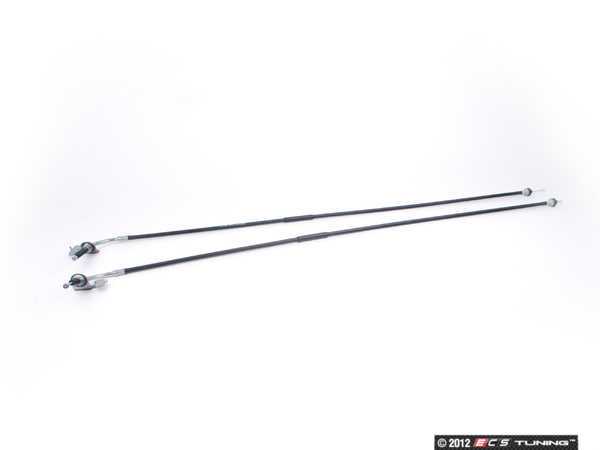
I went out to Artoo this morning, backed out of the driveway pulling up to the mailbox. I pulled the parking brake lever and it felt like the cable snapped. I took off the parking brake boot and everything looks good there. I'll take off the rear wheel and look there too but I am expecting that will look good too. Leaving only a broken cable as the problem.
Has it happened to any of you guys? What does it take to repair? Is there a difference between the OEM and aftermarket cables?
I took a look and the drivers side cable is clearly broken. I ordered it and the parts guy asked if I wanted both cables. Hummmmmmm. So I looked at the right side and although it looked like it was "pulled" and not releasing, the cable was whole.
So I guess I will be replacing one cable and lubing the other as well as the sliders.
Were you able to get your parking brake cable fix done? I am 99% sure mine has also snapped, and while I can find parts, I can't find a how-to. Maybe you can give me a pointer or two?
Hi Rich,
Were you able to get your parking brake cable fix done? I am 99% sure mine has also snapped, and while I can find parts, I can't find a how-to. Maybe you can give me a pointer or two?
I did have it changed but I didn�t do it myself as it looked like it would be easier on a lift and didn�t want to do it on my back in the cold. I gave it to �my guy�. It took about a half hour and he is fast.
After studying all the forums, I decided to take the plunge and change the emergency brake cable on my 04 MCS at 75K mi and driven all year around in Minnesota. These are the steps to follow:
1) If available, read the factory manual and study the pictures.
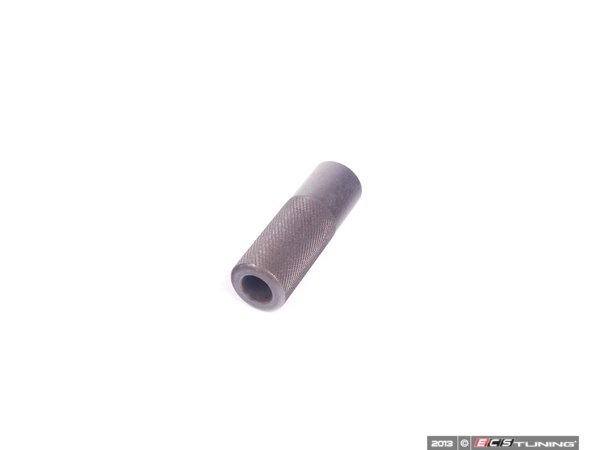
2) Order the Factory tool 83 30 0 494 835; It will simplify your life I ordered mine from
3) The nite before, soak the cable flange at the tire end with PB in hopes that it will easily slide out from the bracket. (In my case, the flange was frozen in place and after repeated attempts of heat, PB, and heavy blows... it refused to come out. I ended up using a grinder and then drilling it out with a 5/8" drill, abt 1 mm less than the actual dia. Time abt 3 hrs for each side excl time to buy a � �� drill and reduced shank bit. Normally, the job should take seconds.
4) Working inside the car, use a butter knife or dull screwdriver and gently press down along the periphery of the boot. You will hear a click. There are approx 5 snaps on each side.
5) Roll the boot over the handle, exposing the inner workings
6) The shroud is held in place by one screw. With gentle upward pressure the shroud�s pins will release from their friction sockets; one pair at either side of the handle�s base. The other pair near the rear. At this point the shroud can be lifted out.
7) Remove DSC module held in place with 2 cap screws (8mm ?); it is harder to remove the electrical socket when the unit is still mounted. Once in your hand, the socket�s retaining means becomes evident.
8) after prying the plastic strips that hold the harnesses, remove the mounting bracket (4 screws),
9) Unscrew the cable adjusting nut and push the cable rearward and remove the cable ends from the normalizing bar.
10)Returning to the outside, remove one side of the muffler clamps, allowing the exhaust system to drop down an inch or so. This will allow the rear exhaust heat shield to removed.
11) Unscrew the rear heat shield bolts and loosen the front bolts on the same shield.
12) lifting the front upwards will allow the shield to clear the front bolts and be rolled out from under the exhaust. At this point the cables are exposed with good access.
13) Unscrew the grometed guide, and dislodge the cables from their guides.
14) At this point, the cables are held in place at the bulkhead by a set of spring clips. By spindling the factory tool over the cable from the inside, the springs are compressed allowing the cable to be simply pulled out. That was slickpart of job..
13 Firmly push the new cables into the bulhead until the spring clips take hold. Reverse the remainder of the operation. Adjust the cable tension for 3-4 clicks.
If it were not for the frozen ends, I estimate the job should take about 3 hours.
Once my "How to... " gets approved, you can see how to DIY. Re your question, if the first one breaks, the second is right behind. The effort to do the second cable adds abt 10 min to a 2-3 hr job. I would replace both.
Interesting because my experience was exactly the opposite: Using the factory tool 83300494835 to compress the tangs on front end, the cables easily slip out. The other end that is affixed to the caliper casting, however, is a PIA to remove. If I was in the business, I would devise a press to push it out the cable from the casting. It took me the better part of three hrs of grinding and drilling to extract each side.
Soaked the rear section with penetrating oil and the rear sections came out easy when I did mine. I bet from being up north ( MN ) they can really get corroded in the rear section.
The front was harder. I did not have the special tool the last time I did it. The retracting flange of the front cable was hard to reach and was hung up on the body right below the center console.
The salt can really do a number on the rear braking components.
The tool is simply spindled on to the cable (which is flopping in the breeze) and pushed rearward to the bulkhead. So doing compresses all the tangs and makes extraction easy. Without the tool, I see how difficult to reach the bottom tang. Simply jerking the cable to the rear (as I can see happening) will compromise the hole causing the spring clip means not to work... then the problem amplifies.
From: NW Indiana (45 min south of Downtown Chicago)
Driver's side not working
I had my car up on jacks to do a rotor job.
I chocked the back wheels so I could loosen the hex bolt on the driver's side back rotor. The wheel would spin when I try to loosen the bolt. The wheel on the passenger side didn't spin.
My question: Is there any way to adjust the driver's side parking brake?
It seems to be loose or something.
My guess is the drivers side is frozen in an open position and therefore inoperable. There is only one bolt (in a differential T arrangement) that tightens both sides simultaneously. With a frozen driver's side, the adjustment effects only the other side (which is not your problem). Bottom line you are facing replacing both sides... abt 3 hr job assuming you use the factory tool and other ends are not frozen.
Judging from your note's date, you probably have fixed the problem. Sorry for not getting bk sooner.
You can follow the pictures here and then with those cables above. You can see how they unhook from the back to the caliper and then from the front once the under the rear section center console. You can use the tool to help:
From: NW Indiana (45 min south of Downtown Chicago)
Thanks,
Do you guys offer any cables that wont rust? I don't want to have to replace this again. I live about 45 min south of downtown Chicago. Home of salty roads, and 5 foot high snow piles.
We have been getting the snow / salt here too. Cant wait till spring.
We only have the OEM MINI version, and some aftermarket ones but they are the same. There are no other versions like SS. I replaced mine with new ones and before install I took the rear one step further on prevention. These have a plastic coating on the cable on the line inside the boot which does a good job but once salt/grime get in there over time it can rust. I used light grease and applied it under the boot/ near the head connection, and down the tube ( with a little penetrating fluid ) as a precaution and it seem to work fine , with this bad winter it kept the rust off mine. Like a coating. I do it in the spring also.
Ouch. I think I paid $60 shipped for the pair of doormans and it took about 3 hours to install and would be much closer to 2 hours if I had to do it again.
You can follow the pictures here and then with those cables above. You can see how they unhook from the back to the caliper and then from the front once the under the rear section center console. You can use the tool to help:
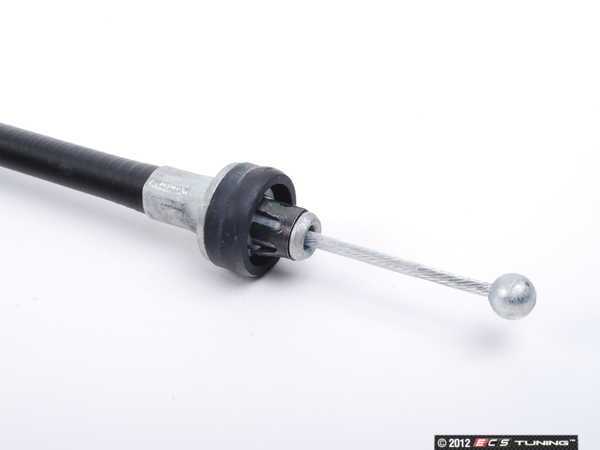
Thread the tool through the broken cable and push forward to a bulkhead. the tool compresses the spring tangs at the terminal end allowing the terminal to be withdrawn w/o effort. Without this tool, the round hole gets compromised so that the replacement will not be held secure. The operation takes about 5 sec with no force required. ggg 651 216-4125
After studying all the forums, I decided to take the plunge and change the emergency brake cable on my 04 MCS at 75K mi and driven all year around in Minnesota. These are the steps to follow:
1) If available, read the factory manual and study the pictures.
2) Order the Factory tool 83 30 0 494 835; It will simplify your life I ordered mine from
3) The nite before, soak the cable flange at the tire end with PB in hopes that it will easily slide out from the bracket. (In my case, the flange was frozen in place and after repeated attempts of heat, PB, and heavy blows... it refused to come out. I ended up using a grinder and then drilling it out with a 5/8" drill, abt 1 mm less than the actual dia. Time abt 3 hrs for each side excl time to buy a � �� drill and reduced shank bit. Normally, the job should take seconds.
4) Working inside the car, use a butter knife or dull screwdriver and gently press down along the periphery of the boot. You will hear a click. There are approx 5 snaps on each side.
5) Roll the boot over the handle, exposing the inner workings
6) The shroud is held in place by one screw. With gentle upward pressure the shroud�s pins will release from their friction sockets; one pair at either side of the handle�s base. The other pair near the rear. At this point the shroud can be lifted out.
7) Remove DSC module held in place with 2 cap screws (8mm ?); it is harder to remove the electrical socket when the unit is still mounted. Once in your hand, the socket�s retaining means becomes evident.
8) after prying the plastic strips that hold the harnesses, remove the mounting bracket (4 screws),
9) Unscrew the cable adjusting nut and push the cable rearward and remove the cable ends from the normalizing bar.
10)Returning to the outside, remove one side of the muffler clamps, allowing the exhaust system to drop down an inch or so. This will allow the rear exhaust heat shield to removed.
11) Unscrew the rear heat shield bolts and loosen the front bolts on the same shield.
12) lifting the front upwards will allow the shield to clear the front bolts and be rolled out from under the exhaust. At this point the cables are exposed with good access.
13) Unscrew the grometed guide, and dislodge the cables from their guides.
14) At this point, the cables are held in place at the bulkhead by a set of spring clips. By spindling the factory tool over the cable from the inside, the springs are compressed allowing the cable to be simply pulled out. That was slickpart of job..
13 Firmly push the new cables into the bulhead until the spring clips take hold. Reverse the remainder of the operation. Adjust the cable tension for 3-4 clicks.
If it were not for the frozen ends, I estimate the job should take about 3 hours.
For the record, my MCS '04 has 135 K miles when the brake cable again broke (60 K miles since I last replaced it). The car is driven all year around and suffers MN winters. Thinking I would beat my past time (armed with experience mow) I started the process. To the above comments, I would add the following... particularly applicable to high mileage cars subjected to Midwest winters:
A) Get the car in the air. Tire ramps for front, Jack stands at the rear jack points. This will give you room and is safe.
B) After removing rear wheels, attempt to remove the outer muffler clamps. These are accessible. With heat and PB, they may break free; consider your self lucky. (in my case I used a die grinder on one side and had to fashion a replacement; I was lucky on the other side). If you are not so adventurist, consider buying replacement clamps from the dealer while your car is drive able (or you can use the wife's car). Leave the slightly loosened clamps in place until step C is complete.
C) Disconnect the cable at the break and attempt to drive the cable assy out of the brake casting. The two parts tend to weld together so it likely will take heat, PB, and calculated hits with small drift punch. A larger punch will tend to form a lip on aluminum piece making extraction very difficult; once realized, I switched to a sacrificial screwdriver. In my case, one side slipped out. The other side took several hours; things went faster once I switched to screw driver. (anti seize would be a good thing to use for the next time )
D) At this point, the loosened muffler clamps can be removed, allowing the mufflers to drop several inches and easy removal of the heat shield to be removed. Note the location of the cable guides
E) Finally. I misplaced my extraction tool and was reluctant to spend another $40. A subsequent post suggested using a 12mm socket. I used a 12 pt 1/2 drive socket which worked as well. Given a choice, I would have opted for slightly longer cables... perhaps 10-15 mm longer. The job should be several hours. My time abt 12 hrs
My next cable replacement will occur at 200K miles depending on when the car and I are still around. Hopefully, I can beat my time