
Octane winter project


Thread Starter
|
5th Gear
Joined: Mar 2005
Posts: 779
Likes: 0
The pedal assembly is now installed:

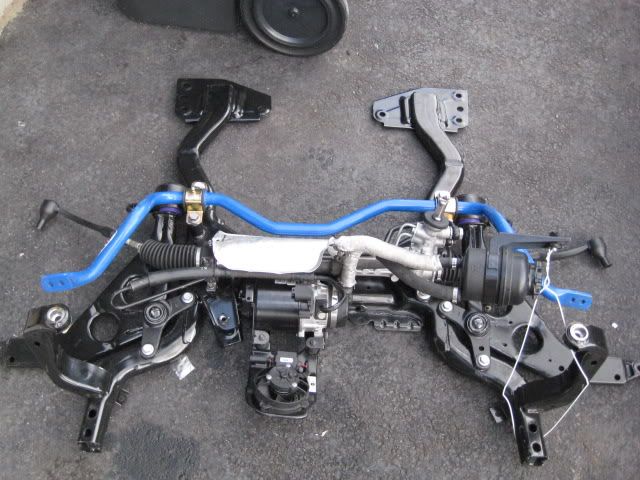
The front subframe getting put together:


Tapping the end of the frt control arms in anticipation of the bushings install:

Thread Starter
|
5th Gear
Joined: Mar 2005
Posts: 779
Likes: 0
A productive day today.
Brake lines installed:

"Hood" pins for the hatch re-installed:

That's how we order our round decals to close all body holes:

Shifter reinstalled:


Steering wheel reinstalled:

We started wiring power to the battery:


Dead-pedal reinstalled:

Hand-brake reinstalled:

Installing the sway-bar on the rear subframe:


Rear subframe installed:


Heatshield:

Bling for the interior:


Taillights installed:

But before you get there, ensure you plug the holes:


Otherwise your bulb will crack. Yes, been there!
Drill and tap holes for fuse boxes...

...before install:

Door latches:

Anybody can guess what it's for:

Slicing it...

...before install:

And the (almost) finished result:

Brake lines installed:
"Hood" pins for the hatch re-installed:
That's how we order our round decals to close all body holes:
Shifter reinstalled:
Steering wheel reinstalled:
We started wiring power to the battery:
Dead-pedal reinstalled:
Hand-brake reinstalled:
Installing the sway-bar on the rear subframe:
Rear subframe installed:
Heatshield:
Bling for the interior:
Taillights installed:
But before you get there, ensure you plug the holes:
Otherwise your bulb will crack. Yes, been there!
Drill and tap holes for fuse boxes...
...before install:
Door latches:
Anybody can guess what it's for:
Slicing it...
...before install:
And the (almost) finished result:


Coordinator :: RSR Motorsports Forum
Joined: Jan 2006
Posts: 629
Likes: 0
From: Arizona
Sway Bar
Alain:
Tarret rear bar . . . very nice. Wish there was one for the front
You will like it . . . expensive but $$ well spent.
Car looks REALLY nice. Any takers for 3R?
Randy
Tarret rear bar . . . very nice. Wish there was one for the front
You will like it . . . expensive but $$ well spent.
Car looks REALLY nice. Any takers for 3R?
Randy
Thread Starter
|
5th Gear
Joined: Mar 2005
Posts: 779
Likes: 0
Thanks Randy!
I haven't really looked yet. I was waiting for the finished product first.
If everything arrives, we will try to have it ready for the weekend with basic wiring mods. Famous last words...
I haven't really looked yet. I was waiting for the finished product first.
If everything arrives, we will try to have it ready for the weekend with basic wiring mods. Famous last words...
Thread Starter
|
5th Gear
Joined: Mar 2005
Posts: 779
Likes: 0
Alain
Thread Starter
|
5th Gear
Joined: Mar 2005
Posts: 779
Likes: 0
I guess we're a bit behind on the updates.
So we'll try to catch-up.
Fuel tank getting almost ready to install:

Modified vent lines:

We found the dash locating piece:

"Urethaning" it to the dash panel:

The wiring mess that started:


Functional bling: The quarter panel piece. We molded an R56 and extended it in height. It also makes for a cleaner lexan window install since it will be flat instead of curved:

Also using urethane here:

Installing the wheel speed sensors in the new alu. trailing arms:

An insert had to be machined to match the different diameters (no pics)
Installing wheel studs on the new hubs:

The final product:


Installing the rear control arms:


Cutting rear windows:


Stencil of where the painted area will be. We removed the protection paper on the outer edge:

Sanding the outside before painting:

Painting:


The custom driver floor pan...

...is now installed:


Rear bumper tow strap and re-bar installed:


We started installing the exhaust brackets (modified stock ones):

Installing nutserts to screw the windows:


Prepping the rear hatch:


Re-installing the aerocatch:

Installing on the body:

So we'll try to catch-up.
Fuel tank getting almost ready to install:
Modified vent lines:
We found the dash locating piece:
"Urethaning" it to the dash panel:
The wiring mess that started:
Functional bling: The quarter panel piece. We molded an R56 and extended it in height. It also makes for a cleaner lexan window install since it will be flat instead of curved:
Also using urethane here:
Installing the wheel speed sensors in the new alu. trailing arms:
An insert had to be machined to match the different diameters (no pics)
Installing wheel studs on the new hubs:
The final product:
Installing the rear control arms:
Cutting rear windows:
Stencil of where the painted area will be. We removed the protection paper on the outer edge:
Sanding the outside before painting:
Painting:
The custom driver floor pan...
...is now installed:
Rear bumper tow strap and re-bar installed:
We started installing the exhaust brackets (modified stock ones):
Installing nutserts to screw the windows:
Prepping the rear hatch:
Re-installing the aerocatch:
Installing on the body:

Thread Starter
|
5th Gear
Joined: Mar 2005
Posts: 779
Likes: 0
A picture of the recess where the hub will fit in the trailing arm (with hole for sensor):

The insert fitted before installing the wheel speed sensor:

Sensor and hub installed:

The new front + rear suspension:


Trailing arms holders installed (and gas tank):

Making the rear upper cup bushing fit properly:

Trailing arms installed:


Test fitting the 8" wide wheels.

(with fender arch installed)
Where we know we're going to have to grind to get more space :(you can notice the custom inserts behind the shock)


All prior to installing a proper spacer. I guess we forgot to take pictures of the final rear sway bar arms on the splined bar. That will be for another day.
Enlarging the hole for the tow strap to fit on the rear bumper:


Gas cap door installed:

Front control arms+bushings installed on the frt subframe:

The front "bullhorns" fitting between the subframe and the bumper do not come threaded when bought new:

So you use the factory bolt...

...to thread the nut:

Front swaybar installed on the subframe:
Front subframe assembly installed on the car:


Front suspension installed:

Installing brass bushings on the calipers:

And installed on their final resting position:

Insulating the wheel speed sensors (otherwise they will melt in extreme temp.)

Front sway bar links installed (see previous pic.):

Getting the center exhaust mounts refreshed. Did I mention I like Krylon. The best paint. Period.

Installing the flywheel and new clutch from our friends and sponsor bullyclutch.com on the engine (sorry, forgot to take a pic. of the disc. It's a four-puck)

Bushings installed in the tranny/engine mounts:

Throttle body reinstalled with mods to the vent line:

New idler pulley:

Lightened airbox holder:

Front fenders install:


Our new heated windshield installed:

Final install of the hatch lexan windows:


The final look for the rear windows when the protection papers are removed:


Side skirts being taped-up:

The hood is also installed (no it's not the same one as was lightened earlier in this thread - that one is already being used ). And since I see an engine below the hood, I guess it's already in!

The insert fitted before installing the wheel speed sensor:
Sensor and hub installed:
The new front + rear suspension:
Trailing arms holders installed (and gas tank):
Making the rear upper cup bushing fit properly:
Trailing arms installed:
Test fitting the 8" wide wheels.
(with fender arch installed)
Where we know we're going to have to grind to get more space :(you can notice the custom inserts behind the shock)
All prior to installing a proper spacer. I guess we forgot to take pictures of the final rear sway bar arms on the splined bar. That will be for another day.
Enlarging the hole for the tow strap to fit on the rear bumper:
Gas cap door installed:
Front control arms+bushings installed on the frt subframe:
The front "bullhorns" fitting between the subframe and the bumper do not come threaded when bought new:
So you use the factory bolt...
...to thread the nut:
Front swaybar installed on the subframe:
Front subframe assembly installed on the car:
Front suspension installed:
Installing brass bushings on the calipers:
And installed on their final resting position:
Insulating the wheel speed sensors (otherwise they will melt in extreme temp.)
Front sway bar links installed (see previous pic.):
Getting the center exhaust mounts refreshed. Did I mention I like Krylon. The best paint. Period.
Installing the flywheel and new clutch from our friends and sponsor bullyclutch.com on the engine (sorry, forgot to take a pic. of the disc. It's a four-puck)
Bushings installed in the tranny/engine mounts:
Throttle body reinstalled with mods to the vent line:
New idler pulley:
Lightened airbox holder:
Front fenders install:
Our new heated windshield installed:
Final install of the hatch lexan windows:
The final look for the rear windows when the protection papers are removed:
Side skirts being taped-up:
The hood is also installed (no it's not the same one as was lightened earlier in this thread - that one is already being used
). And since I see an engine below the hood, I guess it's already in!

6th Gear
Joined: Jul 2002
Posts: 2,021
Likes: 7
From: Burlington, VT
Why are the wheelspeed sensors still being used? Is it a rule? I've got a bad sensor somewhere on my track Cooper, and I haven't been worrying about getting it fixed. No ABS, no traction control, no DSC. Of course, I need a new state inspection sticker next month, so I either have to find a sympathetic technician or get the sensor fixed.
Thread Starter
|
5th Gear
Joined: Mar 2005
Posts: 779
Likes: 0
I can gain 2 to 5 car lengths under braking when comparing to most Hondas that race against me. I'd like to think that it's the driver's abilities but to be honest it has nothing to do with it. When your competitors mention the MINI brakes on their speeech on the podium, it also means they notice. That ABS works extremely well on the track. At least for us it does. I know some other MINI teams have had challenges in the past, but for us, we're very happy with it.
With agressive pads in the rear, you can make it lock+ release for a fraction of a second. It enables us to run a rear sping setup that it is more conservative as the brakes will make the car pivot instead of agressive rear spring rates.
With agressive pads in the rear, you can make it lock+ release for a fraction of a second. It enables us to run a rear sping setup that it is more conservative as the brakes will make the car pivot instead of agressive rear spring rates.


Thread Starter
|
5th Gear
Joined: Mar 2005
Posts: 779
Likes: 0
We installed the centre console painted trim piece on it's holder:

Then installed it onto the dash:

The factory painted front grill prevents good flow of fresh air into the engine bay. The accessory version is a lot better, but the ends are closed for some reason:


So we grind away to open-up the honeycomb shape on the ends:


The edges are de-burred:

For the final product:

Then installed it onto the dash:
The factory painted front grill prevents good flow of fresh air into the engine bay. The accessory version is a lot better, but the ends are closed for some reason:
So we grind away to open-up the honeycomb shape on the ends:
The edges are de-burred:
For the final product:
Well done. What about the lower grill? Do you use the accessory (aero) grill for the bumper apron as well? That honeycomb is fully open end to end. I know, the bumper apron behind it is solid, so what's the point? You can cut a slot through the apron behind the lower grill and get another roughly 30 sq inches (+/-) of opening for more fresh air.....
Thread Starter
|
5th Gear
Joined: Mar 2005
Posts: 779
Likes: 0
Well done. What about the lower grill? Do you use the accessory (aero) grill for the bumper apron as well? That honeycomb is fully open end to end. I know, the bumper apron behind it is solid, so what's the point? You can cut a slot through the apron behind the lower grill and get another roughly 30 sq inches (+/-) of opening for more fresh air.....
I wasn't clear, I said lower grill but I was talking about the middle grill...the narrow one at the top of the fascia rather than the large, open lower grill at the bottom. The standard grill piece for that location is a single solid slat while the aero equivalent is an open honeycomb. The fascia behind this is solid which normally has no effect whatsoever, but it can be opened up easily to take advantage of the open aero grill.
I see what you mean re the location of flow though. I guess I feel like the other side of the coin is that the more air you have forcing its way into the bay the greater the overall pressure to force hot air out, thereby potentially lowering the ambient under the hood. I opened mine because I figure it at least isn't doing any harm.....it's either not a factor or it's an improvement. Then again, I have a non-S, so no I/C and I therefore get to think of the system a bit differently.
I see what you mean re the location of flow though. I guess I feel like the other side of the coin is that the more air you have forcing its way into the bay the greater the overall pressure to force hot air out, thereby potentially lowering the ambient under the hood. I opened mine because I figure it at least isn't doing any harm.....it's either not a factor or it's an improvement. Then again, I have a non-S, so no I/C and I therefore get to think of the system a bit differently.