
R60 JCW design package installation


Thread Starter
|
2nd Gear
Joined: Feb 2012
Posts: 73
Likes: 1
From: Los Angeles, CA
JCW design package installation
for those interested, i added the JCW red mirror caps and air ducts today. took no more than 15 minutes.
for the mirror caps, after searching on the boards, i found that you can pull off the actual mirror to get to the clips to pop off the old caps.
http://www.flickr.com/photos/59240565@N04/7317852342/http://www.flickr.com/photos/59240565@N04/7317852342/ by http://www.flickr.com/people/59240565@N04/, on Flickr
http://www.flickr.com/photos/59240565@N04/7317849654/http://www.flickr.com/photos/59240565@N04/7317849654/ by http://www.flickr.com/people/59240565@N04/, on Flickr
for the air ducts, i wedged a bicycle tire iron to take off the old ducts. new ones pop right in.
http://www.flickr.com/photos/59240565@N04/7317862606/http://www.flickr.com/photos/59240565@N04/7317862606/ by http://www.flickr.com/people/59240565@N04/, on Flickr
http://www.flickr.com/photos/59240565@N04/7317865436/http://www.flickr.com/photos/59240565@N04/7317865436/ by http://www.flickr.com/people/59240565@N04/, on Flickr
http://www.flickr.com/photos/59240565@N04/7317860340/http://www.flickr.com/photos/59240565@N04/7317860340/ by http://www.flickr.com/people/59240565@N04/, on Flickr
gonna probably black out that orange side marker and black out the headlight and taillight rings.
http://www.flickr.com/photos/59240565@N04/7317858044/http://www.flickr.com/photos/59240565@N04/7317858044/ by http://www.flickr.com/people/59240565@N04/, on Flickr

I used a couple of plastic fast food knives to get between the inlets and the clips on my CM. No scratching and the knives have enough flexibility to work their way in.
The mirror glass - not so successful. I broke the passenger side mirror glass. I have the aspherical mirrors from the UK Ebay store that cover that right up.
The mirror glass - not so successful. I broke the passenger side mirror glass. I have the aspherical mirrors from the UK Ebay store that cover that right up.

Thread Starter
|
2nd Gear
Joined: Feb 2012
Posts: 73
Likes: 1
From: Los Angeles, CA
ozarkgolfer - i was worried about breaking the glass too. good idea on the plastic knife 
livestrong - bought it here http://mini.sewellparts.com/accessor...2012/4808.html. quick shipping
with this...
https://www.northamericanmotoring.co...iting-for.html
livestrong - bought it here http://mini.sewellparts.com/accessor...2012/4808.html. quick shipping
with this...
https://www.northamericanmotoring.co...iting-for.html
Thread Starter
|
2nd Gear
Joined: Feb 2012
Posts: 73
Likes: 1
From: Los Angeles, CA
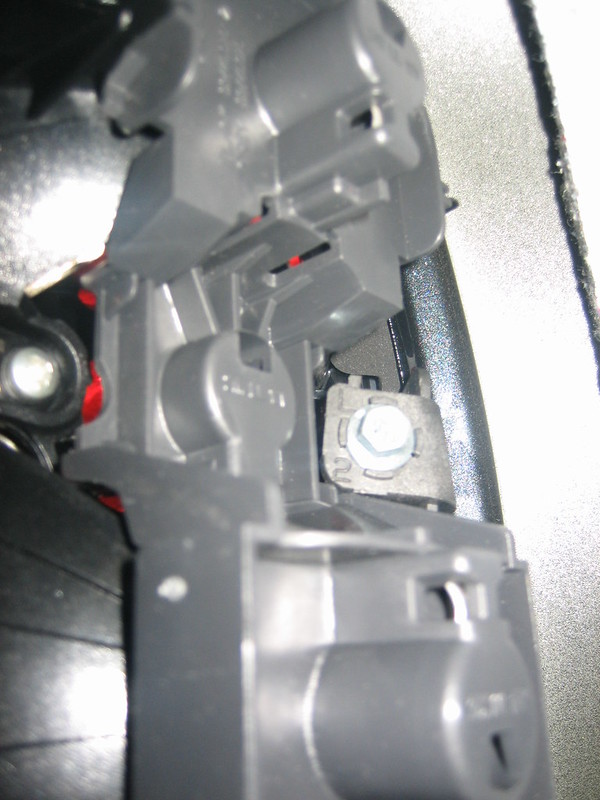
i guess i'll just add to my thread......here are pics of how i blacked out the taillight rings. sorry, but i guess i never took pics of the front rings.
there are two outer nuts that you have to loosen to remove the tabs.
http://www.flickr.com/photos/59240565@N04/7438232530/http://www.flickr.com/photos/59240565@N04/7438232530/ by http://www.flickr.com/people/59240565@N04/, on Flickr
http://www.flickr.com/photos/59240565@N04/7438233842/http://www.flickr.com/photos/59240565@N04/7438233842/ by http://www.flickr.com/people/59240565@N04/, on Flickr
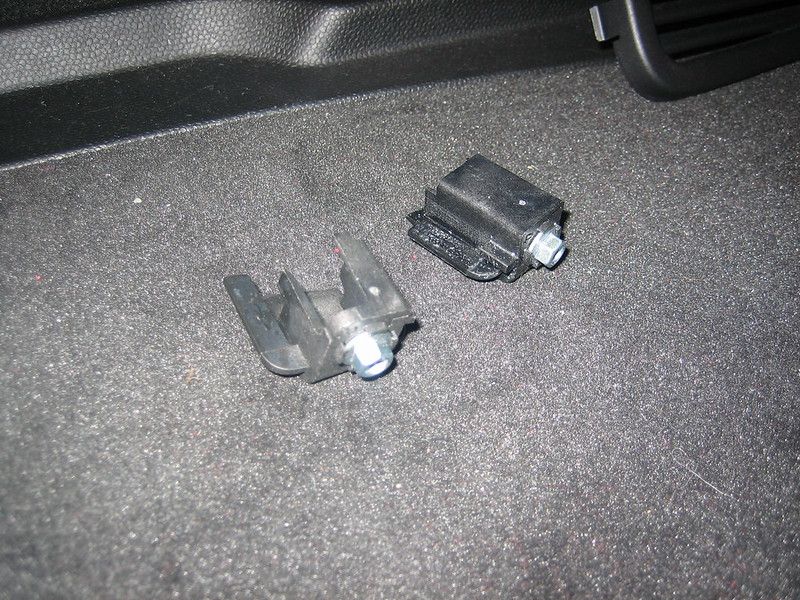
what they look like off
http://www.flickr.com/photos/59240565@N04/7438230138/http://www.flickr.com/photos/59240565@N04/7438230138/ by http://www.flickr.com/people/59240565@N04/, on Flickr
http://www.flickr.com/photos/59240565@N04/7438231272/http://www.flickr.com/photos/59240565@N04/7438231272/ by http://www.flickr.com/people/59240565@N04/, on Flickr
http://www.flickr.com/photos/59240565@N04/7438228346/http://www.flickr.com/photos/59240565@N04/7438228346/ by http://www.flickr.com/people/59240565@N04/, on Flickr
http://www.flickr.com/photos/59240565@N04/7438235206/http://www.flickr.com/photos/59240565@N04/7438235206/ by http://www.flickr.com/people/59240565@N04/, on Flickr
there are two outer nuts that you have to loosen to remove the tabs.
http://www.flickr.com/photos/59240565@N04/7438232530/http://www.flickr.com/photos/59240565@N04/7438232530/ by http://www.flickr.com/people/59240565@N04/, on Flickr
http://www.flickr.com/photos/59240565@N04/7438233842/http://www.flickr.com/photos/59240565@N04/7438233842/ by http://www.flickr.com/people/59240565@N04/, on Flickr
what they look like off
http://www.flickr.com/photos/59240565@N04/7438230138/http://www.flickr.com/photos/59240565@N04/7438230138/ by http://www.flickr.com/people/59240565@N04/, on Flickr
http://www.flickr.com/photos/59240565@N04/7438231272/http://www.flickr.com/photos/59240565@N04/7438231272/ by http://www.flickr.com/people/59240565@N04/, on Flickr
http://www.flickr.com/photos/59240565@N04/7438228346/http://www.flickr.com/photos/59240565@N04/7438228346/ by http://www.flickr.com/people/59240565@N04/, on Flickr
http://www.flickr.com/photos/59240565@N04/7438235206/http://www.flickr.com/photos/59240565@N04/7438235206/ by http://www.flickr.com/people/59240565@N04/, on Flickr
2nd Gear
Joined: May 2011
Posts: 138
Likes: 0
From: Dallas, TX
Trending Topics
Thread Starter
|
2nd Gear
Joined: Feb 2012
Posts: 73
Likes: 1
From: Los Angeles, CA
glad i could help. i'm not sure it is the best or right way but it worked for me. just make sure you wedge the inner tabs (the ones you didn't take off) really tight before you put back and tight the outer tabs.

insulation?
Hey Cursor718,
How for you manage to gain access to those nuts? Did you have to pull off the flooring and insulation to get to those 2 clamps? I don't even know where to start. Any insight is greatly appreciated!
How for you manage to gain access to those nuts? Did you have to pull off the flooring and insulation to get to those 2 clamps? I don't even know where to start. Any insight is greatly appreciated!

4th Gear
Joined: Aug 2012
Posts: 574
Likes: 5
From: New Jersey
the tail lights can be accessed by removing the vent grill on each side in the boot area. yup.. it's tight.
Thread Starter
|
2nd Gear
Joined: Feb 2012
Posts: 73
Likes: 1
From: Los Angeles, CA

Thread Starter
|
2nd Gear
Joined: Feb 2012
Posts: 73
Likes: 1
From: Los Angeles, CA

5th Gear
Joined: May 2013
Posts: 897
Likes: 0
i guess i'll just add to my thread......here are pics of how i blacked out the taillight rings. sorry, but i guess i never took pics of the front rings.
there are two outer nuts that you have to loosen to remove the tabs.
IMG_8662 by cursor718, on Flickr
IMG_8658 by cursor718, on Flickr
what they look like off
IMG_8666 by cursor718, on Flickr
IMG_8663 by cursor718, on Flickr
there are two outer nuts that you have to loosen to remove the tabs.
IMG_8662 by cursor718, on Flickr
IMG_8658 by cursor718, on Flickr
what they look like off
IMG_8666 by cursor718, on Flickr
IMG_8663 by cursor718, on Flickr
Here is how I did it.
- Remove outer nuts and pieces pictured above. The lower outer can be removed with an 8mm nut driver IF it is a deep socket to take in the screw to get to the nut. You cannot use a nut driver on the others though. I used a 5/16" closed in wrench. Closed end is critical. You'll never do this with an open end wrench. 8mm and 5/16" are close enough and these aren't hard to turn.
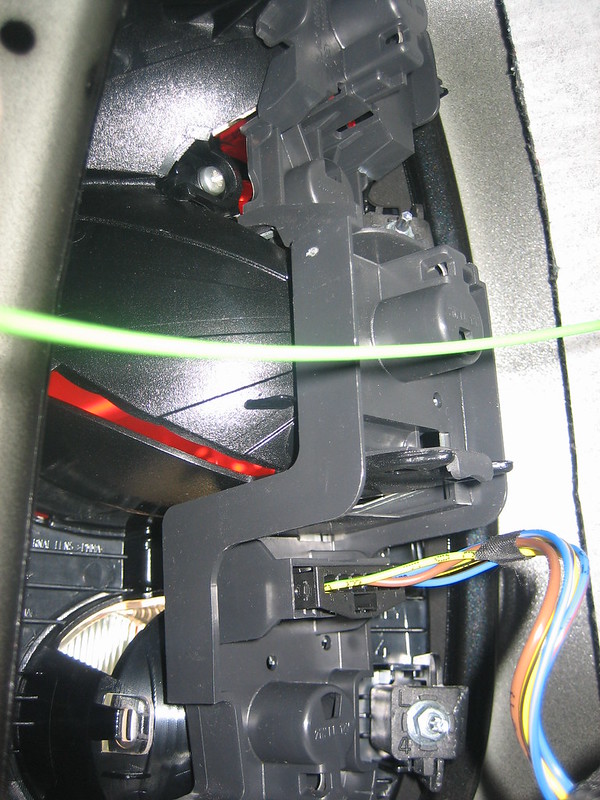
- Wiggle the assembly out.
- Disconnect the wiring harness. Just wiggle and tug. It isn't real tight.
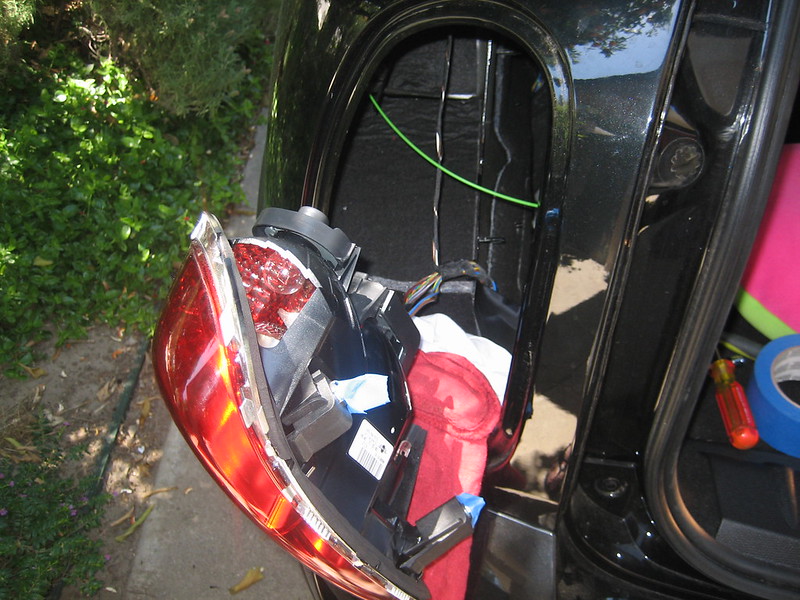
- Pry old ring off one tab at a time. Having a 2nd pair of hands here is helpful but not necessary. Sometimes they flop back on as you work your way around.
- I removed the side from the sticky tape on the new rings, then put on the assembly. These were BMW part numbers from Way Motor Works. The factory models didn't have the sticky tape.
- I then loosened the other two nuts (the inner upper/lower units)
- Put the outer pieces in place, but didn't tighten.
- Put the assembly back in.
- Outer lower is simple - nut driver. I got it finger tight then went to the others.
- Outer upper not too hard. Put the closed in wrench on the screw and use 2-3 fingers to tighten the wrench
- Same on inner lower.
- Inner upper - good luck. I am pretty thin. 160lbs, 5'11", and a runner, so I have those thin arms and hands of someone who runs 50mi a week and does maybe 10 pushups a week. I got my wife to do it. I couldn't get my hand up there and tighten it. She said her secret was to turn the wrench so it curved towards the rear bumper (exactly opposite of logic as I usually have the handle of a wrench curve towards me.)
- Finally went back to outer lower and tightened it up.
Then repeat on other tail light. I am still not 100% certain I have it on water-tight. It doesn't seem to fit exactly like it did when it came off, but there is a nice rubber seal around it. I guess I'll find out in Jan/Feb when it actually rains in SoCal. I took the left one off 3 times and finally called it good enough. The right one I did once. If either leaks, I'll take to the dealer and pay them to fix it. They probably have a special tool for this that doesn't require yoga moves to get in there.
Anyway, they look FANTASTIC. As I said, the parts from WMW were BMW parts, so sort of surprised the Mini dealer didn't have them.
Highly recommended, but unlike the front rings, this is not a 10 min job.

1st Gear
Joined: Jul 2013
Posts: 12
Likes: 0
just my 2 cents...
i had to replace the right tail light because a van driver decided to gently squeeze it with its vehicle
i could have let the service guys do it, but i said wtf...so, long story short, if you want a tight fitting tail light you have to make sure the 4 nuts that hold it in place are quite securely fastened. This is especially hard to do as far as the inner upper one is concerned. I used a short handle 8mm closed in wrench and, i must tell you, it was a job fit for a contorsionist. Not to mention that a new tail lamp has, what seems to be, a much beefier rubber/foam insulation outer layer which makes it in turn all the harder to achieve a proper "flush to the body" final look.
I suspect that removing part of the boot side trim would make access to that particular area much easier.
...and i think you have to place the tail light in FIRST, and then AFTERWARDS fasten the nuts in place. The first couple of times i did like you described it, with half-way fastening and then fitting the light in, but I just could not get that eye pleasing result as the light seemed to pop just a little bit off the body.
Last edited by Bigblack; Aug 12, 2013 at 01:12 AM.
Banned
Joined: Nov 2012
Posts: 709
Likes: 1
If you just remove 2 of the 4 bolts on one side, you run the risk of not having a tight fit when reassembling.
I did it this way at first, and when I put it back on, I had to angle the light to allow the tabs/bolts that were still attached to the light to feed into the groove of the body frame to make a tight fit...but every time I did so and attached the remaining 2 bolts, i was able to very easily pop the whole light out with my hands. It was apparent that the bolts I left on were not grabbing correctly.
So i wound up doing it the right way, which involved tearing the @#$%^& out of my hands trying to angle my wrist to properly attach the upper bolts. It sucked. I hope I never have to take them off again.
Banned
Joined: Nov 2012
Posts: 709
Likes: 1

5th Gear
Joined: May 2013
Posts: 897
Likes: 0

3rd Gear
Joined: Jun 2007
Posts: 294
Likes: 0
From: Littleton, CO
Just curious... If all bulbs are covered in the service plan that I have for the 6 year 100000 miles, then could I have them place the rings on at the same time they change the bulb? Or does changing the bulb not involve remving everything down to the trim?
5th Gear
Joined: May 2013
Posts: 897
Likes: 0
No. You can change bulbs by twisting out modules. No tools required. Just like the headlights and fog lights.

5th Gear
Joined: Nov 2011
Posts: 1,073
Likes: 2
Curious but do you really HAVE to remove the whole light just to take the rings off? The gen 2 MINIs just pop off by prying from the bezel side. The pic above of the tail light hanging out with ring removed shows what appears to be the same style clips as the gen2 models so it seems it could be done similarly without all that work.
5th Gear
Joined: May 2013
Posts: 897
Likes: 0
Curious but do you really HAVE to remove the whole light just to take the rings off? The gen 2 MINIs just pop off by prying from the bezel side. The pic above of the tail light hanging out with ring removed shows what appears to be the same style clips as the gen2 models so it seems it could be done similarly without all that work.