Hi Guys, thank you for letting me join even though I am from Europe.
I have a 2007 Cooper R56 which I am fitting a new cam chain kit on which is going well, it was hard to find the flywheel locking hole so I invested in a little extendable mirror which helped me find it in 10 minutes (if that helps anyone).
Anyway whilst looking around at everything I noticed that my Mini has lost about a half inch of coolant level in about 8 months, it was on max but has moved to about 1mm below the min level ( I will top it up after I have put it all back together don't worry). Also there was some emulsification in the valve cover and on the oil filler cap, there was quite a lot at one end (half inch thick) where the PCV is but not at the other.
Now we have been in lockdown since September as you know, so I have never done a journey more than 4 miles in that time and have done that 3 or 4 times a week. Given that when I drained the oil out it was nice and dark, transparent with no water in it and also when I checked the oil each week before I started doing the chain, there was no mayo to be seen on the dipstick, all the valve train etc was pristine and nicely coated in dark oil with no chocolatey froth anywhere, do you think this is just down to cold weather and short journeys rather than a head gasket that is failing? When I checked the oil in the summer there was no mayo, this has been a recent thing, the car was quick and felt good and didn't have any hesitations or anything before I started the chain. It has only started getting warm here this week so I cannot tell if it would clear the goo as I have it apart.
So I guess my main question is, do you think the head gasket is on the way out and as I already have the top end apart to do the cam chain, would it be a good call to do the head gasket at the same time anyway to be sure? Or do you think leave it undisturbed and just do the chain, put it back together and see if it eases during the summer now we can travel a bit further as from this week? Or maybe run some Irontite through it?
Further points
I cannot find any leaks anywhere or signs of any other than the half inch drop in the header tank, could this be natural evaporation?
There is only steam coming out of the exhaust first thing in the morning or a cold start
The heater is super hot and toasty
It sometimes gurgles but goes after a good long run, it usually only does this if I use the aircon and its a short trip of 4 miles or so
The fan comes on and stays on for 10 minutes after a short journey or when the Air Con is switched on, but it does not do this after a longer journey and everything is nicely warmed up, this is normal I think?
The engine management light is on (orange) but I think this is the cam chain and tensioner out of adjustment and weak/stretched as its the original at 80,000 miles! It rattles which is why I am doing it.
The fault code is a P0420 Catalyst System Efficiency Below Threshold (Bank 1) - new cat and sensors on the way anyway.
There was no sign of froth or milky chocolate oil anywhere other than the mayo inside the cam cover, when I took it off all the oil was a nice dark treacle like colour on all the metal surfaces
Thank you for reading and for your help.
Edit: If I do the head gasket will I need to have it skimmed? It has not overheated to my knowledge so it should be nice and flat, but if I do it I will check it with a straight edge.
Have you bleed the system to get all the air out and then top it off with antifreeze. Have you checked all your coolant lines and hoses for leaks.
If you do go the route of taking off the head might as well go all the way and get the head checked and cleaned---up.
This way you'll have piece of mind when putting it back together if you elect to go that route.
Hi guys, no I have not done a leak down test as yet and I have checked the hoses and bled the system a few times over the months I have owned it (9 months) but cant find any leaks. Looking back through the MOT history, it had two advisories in 2015 and 2016 for low coolant levels, so I would err on the side it has a leak somewhere that was never fixed that I cannot see as it's so minute. I think if it was getting low on coolant 4-5 years ago and it was a HG it would have failed by now as its done another 30,000 miles since then, I think I would expect to see water in the oil also judging by the amount of mayo on the cam cover, but there was none in the pan or on the dipstick or in the engine, only on the cam cover and it was pale and not chocolate froth, so I think its probably years of condensation, in other words oil's not been mixing with water round the engine to get a bit brown and frothy. There is also no rust anywhere on the engine components which would show a bit of moisture. I think its never really been apart and checked or taken on long runs or given TLC in all the years its been alive (even if it says it has a full service history) and needs some love and some good long runs, its the original old style cam chain set and tensioner so I know its never been done or checked.
I will do the chain and guides etc I think, put it back together and give it some good long runs and see what happens. If I see any emulsifying after a few long hard runs, I will do some more investigation. Could be something like the thermostat housing, rad or cap leaking when its hot that is causing the drop, its not a catastrophic sudden drop, its about half an inch a year. If I find anything in the meantime after doing some tests I will strip it down again in the summer, as contrary to what most people say, its really not that hard of a job if you have worked on cars or done timing etc before, easily done in 2 days if you have the correct tools and start early and do some research beforehand, I found it much easier than most have said it is and you don't need to remove the bar that goes over the top of the rad housing or put it into its "service position". I don't want to remove the head unless I really have to because it can be a minefield and cause more problems that were not there in the first place. I might shove my camera down the bores to see if I can see any coolant also, but I would suspect there is none.
Anyway I have been on a shopping spree to replace all the things that clearly have not been done:
New Manifold/Cat and sensors
New thermostat housing and gasket
New timing chain kit, new oil pump chain kit
New good quality oil and filters
New spark plugs
New discs and pads
I got new HG and head bolts just in case
New vacuum pump
New rocker cover gaskets
New water pump pulley
New liquid gasket for the oil pan
and I am going to try one of those PCV replacement membrane kits.
Should keep me going for a couple of weekends with something to do.
Will keep you all posted and let you know what the eventual outcome is in case it helps others. Thanks for your assistance
I looked up about the fan for clarification, on the R56 Cooper is should rotate on high speed when you switch the AC on at low speeds up to about 30mph when airflow then takes over, this is to keep it cool in summer when in town areas, where there is a lot of heat.
After the engine is shut off in all weathers. the fan is designed to run for up to 15 minutes until the coolant temperature drops to 105c, the fan should chime in at 108c. If there is heat soak and the coolant temp exceeds 108c at any point after running and turning the engine off and the fan is not currently turning, the fan may then also start after you have parked up and shut the engine until its dropped to 105c coolant temp.
On Cooper S N14's it should run on for 5 minutes then shut off, this is so the water pump and fan together can cool down the turbo.
So I think its probably normal and working as it should be.
I will just do the chain, clean it all out, new filter (Will check it for gunk, if it has gunk then I know there is an issue...), oil etc, put it all back together and then take it for some runs and see how it goes. If it fails its not the end of the world as I still have the bike to use whilst I repair it and I love getting my hands dirty, its the best way to get to know your car, work on it yourself. Thanks again for your advice guys, will let you know how things turn out.
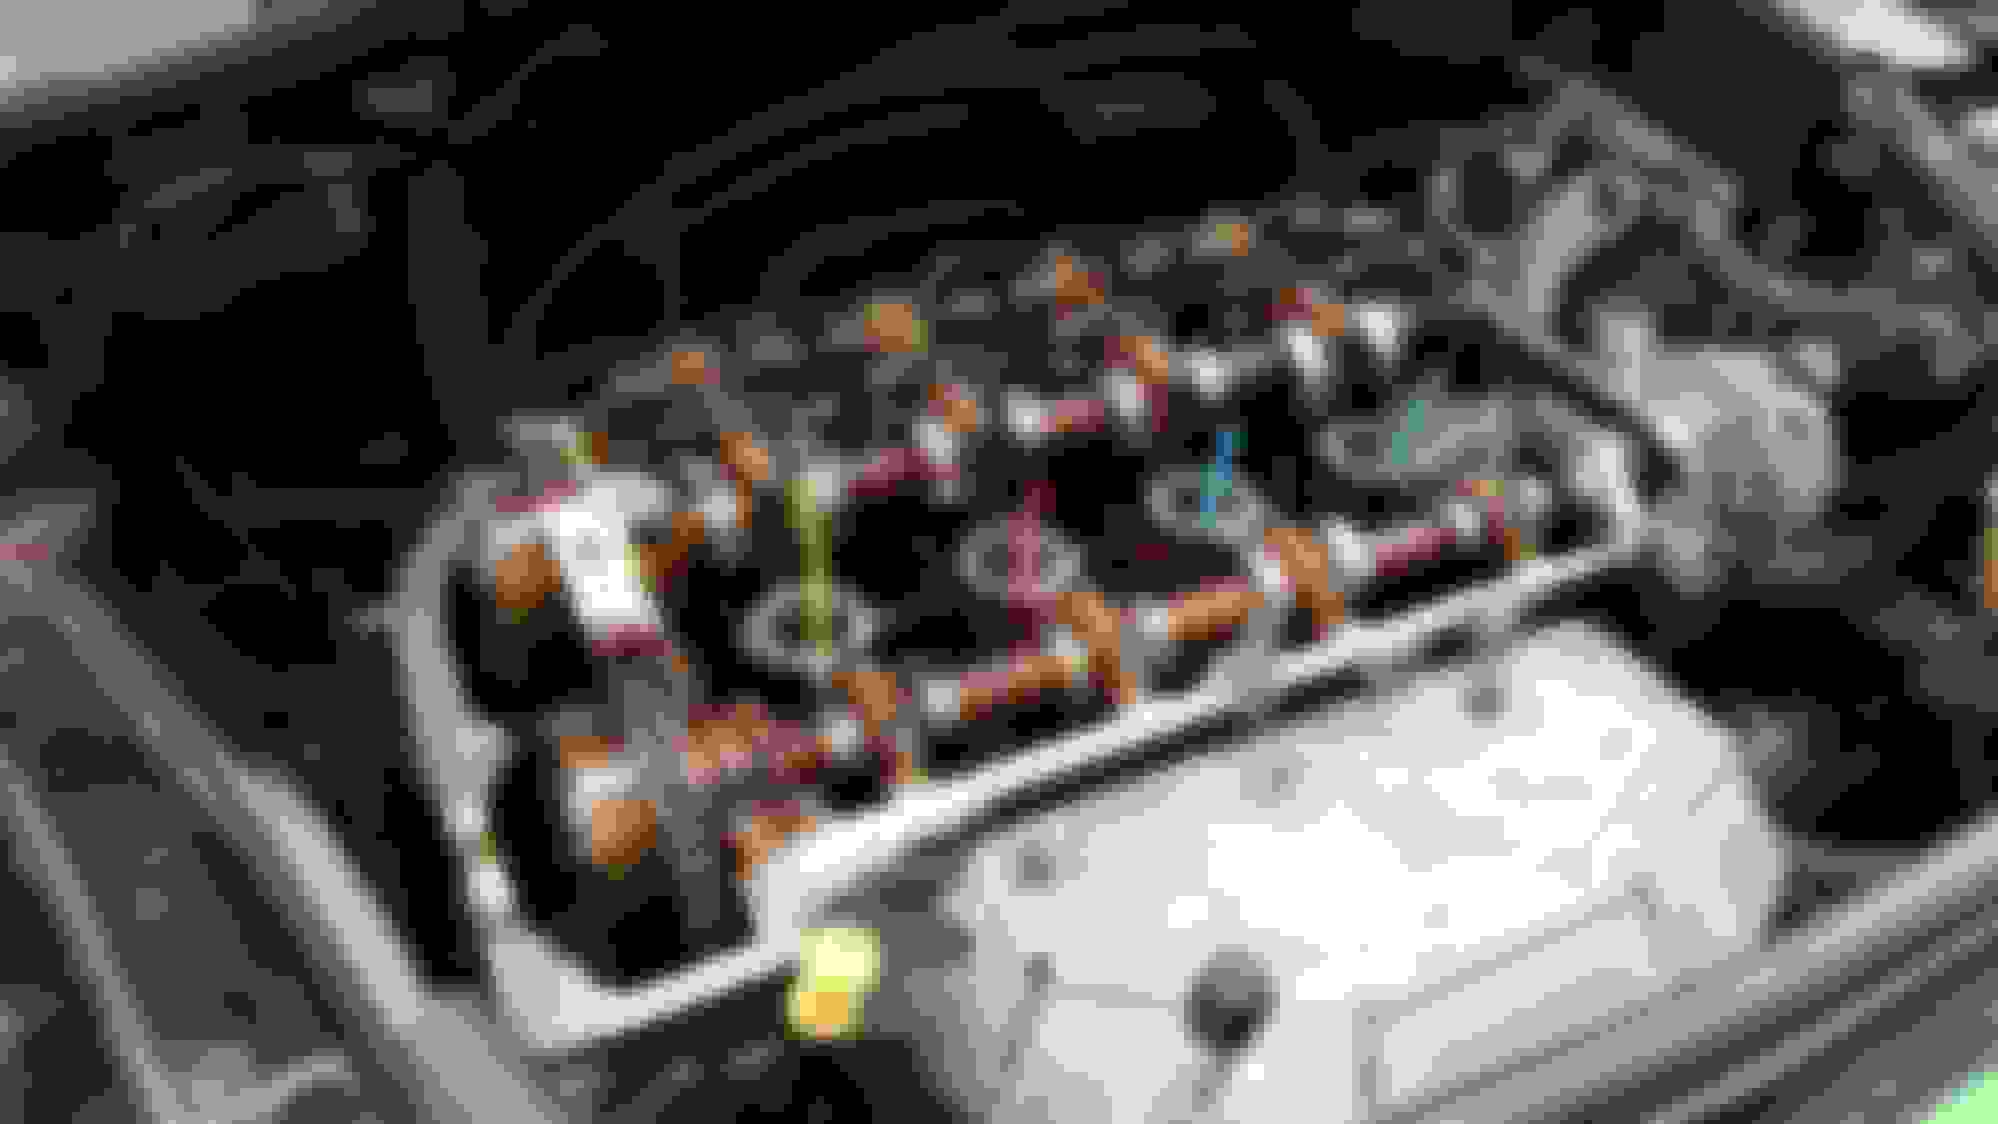
I think I have been lucky, I could hear that something was not right with the engine, here is what I found today on further dismantling, a broken guide with a crack and the tensioner fell apart when I unwound it. Also the intake VANOS solenoid was covered in some strange material, all I can think this is, is ground up bits of plastic from a previous failed guide that has been floating round the engine. The oil looked good in the bottom end, no sign of water anywhere, just nice golden brown oil which is good.
At a stage now when I will begin putting the new chain kit on tomorrow and then remove the oil pan and clean out the oil pickup etc. I think I pulled it all out just in time before there was a failure. The goo only seems to be in the valve cover and the hose that attaches to it which is good. I don't think this engine has ever been apart, it all looks to be original parts.
Broken tensioner, the spring was bent and the end fell of into the bottom of the chain tunnel, I retrieved the other end with the magnet tool thing.
Broken chain guide cracked
VANOS with some strange plasticky sand all over it.
Oil looks in good condition with no water
Water level that was too low
Teeth on VANOS units look ok and not hooked, I will re-use these for now.
Original tensioner, was surprisingly wear free. But you should discard all these old items, bolts etc and use new ones, only reuse the VANOS units if they are ok, everything else in the bin
This is how much I dismantled that was not on the block itself to get to everything, which was the headlight, the wheel arch lining, the engine mounts and the throttle body. That is all you need to remove to get at everything for a timing chain change. You can move the engine up and down on a jack to get to the various bolts. Ring spanners with a deep offset are handy for reaching things.
Using straws to check all the cylinders are in the middle.
How far the flywheel pin went in to lock the crank
Hi again, timing all done ok and I checked the oil pan and strainer and there was no plastic bits so that's a relief., but I took my cat off today as it needs a new one, new lambda sensors and the exhaust flexi has also gone so being replaced as well. I found some oil and dirt on the vacuum pump side of the engine to the right and under the exhaust manifold mating surface, right where the head gasket is. It seems dirty and not clean oil so probably has dripped down from somewhere else to pool there bringing dirt with it? I cleaned the area up a bit and the gasket looks ok.
It is a bit oily around the bottom of the vacuum pump and downwards but not excessively so. Do you think this has come down from the rocker cover? and not the head gasket going? Thank you
I'd be more suspicious of the valve cover gasket leaking. The two corners at the vacuum pump end often need a bit of RTV to ensure a good seal. Lots easier to chase oil leaks when the engine has been cleaned --- plug holes and spray-clean it before re-assembly?
So I found so much wrong with the Mini in the end, that I decided to do a restoration, its taken me seven months so far. I love the Mini so I thought I would rather get it up to the standard I want than to replace it with something else.
Was a bit disappointed when I got to looking at it and discovered a hell hole, as this was meant to have a full service history and it turned initially into a horror story, but I am getting near completion now. I also think the MOT was dodgy as some of these things should not have passed the MOT and were dangerous. I toyed with the idea of taking the garage to small claims court but ended up thinking what's the point, I am an Engineer so will do a proper job. I feel this poor car has never had anyone give it some TLC or want to look after it properly.
Things I discovered:
Both subframes holed
Shocks leaking and damping gone x4
Cracked springs x2
A bit of rust developing under the rear body
Exhaust shot to pieces and failing cat, both lambda probes shot
Brake pipes corroded and borderline dangerous
Fuel feed line to injection rail worn through rubber coating as it had been impinging on a hose clip. This is a known issue I think as BMW suggests new lines should be shrouded and a stand off clip installed. (If you have an R56 I would suggest you check this line ASAP in case it wears through completely and sprays your engine in high pressure fuel, I got mine in time but its down to the cords)
Clutch line leaking and cracked
Wheel bearings shot, the front left one fell in half when I removed it
CV joints on the way out
Both VANOS solenoids blocked with broken gauze
All four rear control arm bushings gone
Both RTAB's split
Front suspension bushes split
Two rims buckled, one with a 1.5" chip in the front face that had been hidden with filler
3x tyres leaking air
Brake discs undersize
Brake calipers heavily corroded and boots split
Front shock mountings rusted
Front shock bearings heavily worn
Various clips missing on trim
Bonnet release cable broken and bodged up
Chip in windscreen
Windscreen wipers split
Battery poor
So I have spent every weekend since March rebuilding the bottom of my car, I sanded off all the underbody rust and treated it with Bilt-Hamber Hydrate80 and then repainted it all with black chassis paint, dropped and replaced the front and rear subframes with all new parts, repainted the subframes after de-rusting them, refurbished the sills and a multitude of other things. Been lots of tea, tiredness and sweary rants along the way, but I am happy with the results. Now I know my Mini is at a standard I am happy with I think and I can do a lot on it without using a manual, I have learnt the car and how its all put together.
Things I have done:
Refurbished the front and rear suspension and subframes.
New suspension
New brakes
Replaced all the hard brake lines with lines I made myself
New exhaust heat shields etc
New CV joints
New Cat and sensors
Did all the timing chain
Repainted the underside removing the rust
New VANOS solenoids
New water pump, vacuum pump, thermostat housing
New gear **** and bottom ring
New battery
New clutch line and clutch slave
New fuel pipe
Engine back together running, all fault codes cleared and VANOS adaptions reset (you were right guys thank you, no more oil has since appeared where I thought it was leaking at the head gasket so it was running down from the top of the engine)
New oil filter and good quality oil
New coolant
All genuine new BMW nuts and bolts and trim fixings
Sump resealed with Loctite sealant
New aux drive belt
Cleaned alternator
New windscreen wipers
I have been taking photos as I go along so it would help people who are working on their own Minis as the one thing I found with the Mini, even armed with a manual was the lack of info on how to do things compared to other cars. I guess this is because BMW's tend to be dealer maintained cars and are not what is considered on the DIY maintenance end of things. I have dumped all these photos which are unsorted, going from old at the bottom to new on a GP album here
Things I found
Dropping the subframes is not hard if you have worked on cars before
Its much easier to do everything if you spend an hour or so putting the front end into service mode, believe me when I say it will save you effort in the long run
You can just about do the rear brake lines with the petrol tank in place, but I would remove it for less hassle
The front brake lines were the hardest job as you have route them around the back of the engine through the hole in the wheel arch, it can be done if you are gentle and wiggle the line about to feed it through, I bent the first line I made so had to attempt it twice.
Unbelievably ordering things like bolts, heat shields, RTAB, nuts, clutch lines etc can be up to half the price direct from a BMW dealer than they are from the well known auction sites. Some of the auction site suppliers are very much price gouging, charging almost twice as much. For instance the RTAB, the things that look like snails, from BMW were �47 each, on the auction site they were �80. Ask BMW or a reputable supplier for a price first, it saved me a lot of money.
Be prepared to drill out bolts if working on the underside.
Don't remove any of the bolts on the suspension components and subframes with an Impact Driver. do it by hand with a breaker bar, it will save the threads as they are fragile. Clean the bolts before removal to stop dragging crud through the threads.
Get yourself a decent socket set that covers 1/4", 3/8" and 1/2" drives and a decent set of Torx sockets.
Some of the torque settings are critical as some are stretch bolts so get a half decent torque wrench. It tells you which bolts need to be replaced in the Haynes manual. The torque settings on the suspension bolts are critical as the Mini is quite tightly sprung with not a lot of suspension travel so has a lot of vibration which can back out bolts, use loctite if unsure.
The Mini R56 Cooper brake lines use a DIN flare, this took me ages to find out, hope it helps.
I should hopefully finish it all off in about 2 to 3 weekends time, the joys I have left are bleeding the clutch and brakes and hoping it starts and replacing the worn fuel line.
I will update again once this is done, but will continue adding images to the album, if anyone has any questions I will try to help as soon as I can as I think sharing info is what the internet is for.
I am currently refurbishing my alloys, two are bent and one of those two has a large chip in the front face, so its scrap basically, I discovered it under some filler whilst sanding down for painting. I will order a replacement after Christmas as funds are tight, cheaper to get one off the auction sites than have it fixed, I have straightened one with a bottle jack and some carefully applied heat, if I was not a mechanical engineer by trade I think I would be well and truly stuffed having bought this poor Mini.
Guess the fan behaviour is normal. Mine is running virtually most of the time with AC on at idle.
I don't think it does at speed but who knows. The loud single-speed fan is obnoxious. I do have
an N16 though. I don't think the coolant loss is normal. Evaporation loss should be imperceptible.
Hope you went with the HJS header/cat unit as it's the best for the money. When you get or do
an alignment do the 'free camber mod' before'. I see you have fitted Bilstein B4 dampers. They
are decent. I'd have recommended Bilstein B6 despite bing more expensive.
Anyway a great built thread, good luck!
Thank you 930, getting near the end of it thank god, I have enjoyed it as it gave me something to do during the lockdowns and I thought it was worth saving as the body is really good still for its age. Still had lots of swearing and end of tether moments along the way though
I could only get the B4's when I ordered at the time as Bilstein had stopped production and it is all that was in stock, but will probably upgrade them in a couple of years. I got the original BMW cat as they last a long time, I like original things
For the evaporation I think it is probably the pressure cap needs replacing as the seal is very worn, I now think its not losing much but enough to check it out. I know what you mean by the fan, as soon as I turn my AC on its like being in front of a large vacuum, its so loud and can be a bit embarrassing sometimes, people look at it and wonder what the noise is, but I asked BMW and they said its fairly normal. if I go on a run with the AC on it stops after a while, its the short journeys when its on all the time. I will do the free camber mod as its so simple to do, for those who don't know what it is, just pull the little pins out the top of the top mount so it gives you more adjustment, it allows you to push the top of the shock over more on the front dampers. I would have preferred an N16 but funds didn't stretch that far, my friend has one and its been his daily driver since new and has never let him down, 125,000 miles now I think, but he does look after it. It is a shame that some people dont look after cars, it doesnt take much really.
Man you need to rename this thread and put it in the build log. Ha.
Nice work!
Thank you Allen, I will once I work out how to do it
One thing I have noted since I did the camchain, you can really tell the difference between a bad or failing tensioner/guide and one that is not, it sounds smooth with zero chatter, idle is completely stable and it is very quiet.
If it sounds chattery or agricultural, get it checked, I was surprised how much difference it made.
In the near future I will also add all the torque settings for the various bolts I removed and which ones you can and cannot reuse, as I said before, any questions please ask, I will try to answer as soon as possible.
I thought whilst I was waiting for the weather to improve so I could carry on and finish refurbishing my alloys, I would do a video slideshow of my Mini adventure so far....
So I made a little PWA app for the torque specs rather than listing them here as promised previously, I thought it was easier than writing them all down here, I was going to do just mine but I expanded on it a bit.
I hope its useful for you guys, it still a work in progress and I have only put it on the hosting 15 mins ago, so the SSL may not be live yet depending where you are.
I want to add more to it over the weeks, maybe the R50 and 53 series, JCW and also the Diesel 56, N18 etc. The one thing that hacked me off when I was working on the Min was running upstairs to look at ISTA or remembering the torque settings from the paper manual, I got a bit fed up over the months of getting under the car, forgetting the torque setting and then having to climb out from under it and go thumb through the manual again or go up to the PC to look. I thought what I needed was a mobile phone based listing of all the torque settings but the ones I found were hard to navigate on my old phone I use outside under the car or the specs were spread out over loads of sites. So I built a small PWA based website instead, I wish I had had this when I out on the car but hey ho. Anyway hope it helps. It should be accurate, but if you spot any glaring errors please let me know. I will double check it all on Monday. I am still working on the PWA offline side of things as the site is not caching properly offline in Android, but will fix that hopefully in the next week.
Comments are welcome for tweaks, issues etc. I am not going to litter it with adverts like some sites, it will always be free to use and I wont ever charge for it, all I ask is you don't rip it off, not too much anyway
So we finally made it to Scotland 18 months ago, drove up in the Mini with the wife, dog and 4 cats packed into the car and have been living here ever since, best thing we ever did, beautiful country in every way.
We have had many adventures in our little wee Mini and its been a lot of fun!
The Min did not miss a beat until last week when the lower part of the radiator failed, think it got punctured by a stone and with no warning going down the bypass it shed all of its coolant within half a mile and overheated 🤣
Coolant was everywhere in the engine bay and then there was a cloud of steam and it then stopped completely with a red overtemp light, this flashed on for about 4 seconds. I could not even turn it over, the battery was completely flat. It was on a roundabout and the police helped me push it to a safe spot. Got it home via a tow from the AA. It all happened in the space of 20 seconds at 70mph...was a bit scary tbh.
I think the rad failed completely and catastrophically, was a total coolant loss, what was left turned to steam and burst the thermostat housing (there were lots of coolant on top the gearbox) and the oil filter housing gasket also failed at the same time. The crossover pipe unusually was in good condition and the water pump was also ok as its the new metal type, no debris anywhere in the coolant that shouldn't be there.
So I have removed all the old cooling system, new thermostat, water pump, hoses, radiator, crossover pump and ac condenser all waiting to be fitted.
Before I do all this, do you think its probably a good idea to do a compression check? Or shall I just pull the head anyway as I am this far into dismantling it, to check its not warped? Its only an extra weekend on rebuilding it all.
Nothing luckily has melted plastic wise, so I would assume that the metal parts are also all ok, no damage to the cam cover, the thermostat interior is still intact, so I would think the overheat was not as bad as some of the ones where things made of plastic melt. It was at the end of a 70mph run so it was being effectively cooled until I slowed down for the roundabout and then it steamed up within seconds and died.
No water on the dipstick, no water in the oil that came out the filter housing and no water in the cam cover interior or under the filler cap.
***Edit: looking down the bores, no coolant or "washed" piston tops, they are still black, the spark plugs are still dirty and have not been cleaned off by coolant, there is definitely no coolant in the head area or in the oil pan, no distortion or melting of the coils, no chocolate froth anywhere, all the valves are still dirty and not washed, the car was running fine that morning and was its normal self until it happened, its always started within 2 seconds of pressing the button and felt healthy, the only thing I did notice that morning was the heater took a long while to warm up and the engine over-revved on start up for a few seconds like it wouldn't come off choke for a longer period, but it was wet and cold.
Any thoughts guys? pull the head to prevent a future head gasket failure because of an overheat condition or do a compression + leakdown check and if ok put it all back together?
Also can I do a leakdown and compression test without the coolant system plugged onto it? and can I do a compression check without having the battery turn the engine over manually?
Leak down test next tomorrow, but clearly something very wrong, couldn't believe the results so did them again twice for the wet and the results were repeatable. Both cylinders 3 and 4 the same reading as each other on both dry and wet
Blown head gasket? :( with a leak between those two cylinders?
Suggest you proceed with caution here and evaluate if this is the junction at which it may be time to start with another car or at least another engine.
Aluminum blocks and heads tend to be unforgiving of overheating events. Your original post suggested that you believe the impact of the overheat to be minimal. I'm not at all sure that such is possible.
At a minimum the head come off.
If the head is worth salvaging, it will need to be straightened and skimmed, skimming alone will potentially leave the cam bores mis-aligned. you are likely better off trying to obtain another head.
Project is guaranteed to cost significantly more than any initial estimate.
If I can think of any more cheery thoughts later, I'll post them.
So I have decided I am going to spend a few months rebuilding the engine, I cant afford a new car, (well I can easily up to 10 grand) but because I was made redundant and nearly lost the house, I have a poor credit rating from the recession in 2008 so cant get a loan. Thankfully I paid all my mortgage off in the end after 32 years...but the non payment time sticks...
So a rebuild buying a few bits a month it will be, however long it takes, as I restored all the under body and suspension etc, its too good to chuck anyway. I think it will take around 5 months.
Some of these parts are aftermarket OEM quality not BMW, but then I only need it to last 2 years until I can get a lump sum off my pension for a new car or may keep this one. Anything is going to be better than what is now!
My shopping list is:
BMW Valvetronic tool �69.99
Valve spring compressor kit �37.55
Radiator �65
Condenser �54.99723/
11217616164 x 1 �9.90
11367536087 x 2 �7.99 �7.99
Valve cover gasket kit �12.99
Timing chain kit �37.99
Spark Plugs �29.76
Set of valves �138.00
Head gasket 39.99
Rocker cover gaskets �25
Exhaust Gasket �35
Intake manifold gaskets �13.99
Exhaust clamp �22
Head Skim �65.00
Pressure test �100
Piston ring set �49.99
Piston ring tool �11
Big end bearings �35.00
Con rod bolts �32.96
Already got from before:
New hoses
New thermostat
New head bolts
New crossover pipe
New water pump
New head gasket
Oil filter housing gaskets
5litres of oil
Coolant
Coils
Dropped valve seat repair ���? If I find out they have, I will save up for the recon head which has been revalved, reseated, new stem seals and pressure tested.
Thank you for your answer, how will skimming the mating face with the block cause the cam bores to misalign? misalign with what?
Thank you John
Hey John,
When a head warps it basically turns into banana - so both the top and bottom are distorted. The idea behind straightening a head is that it will put the cam bores back into alignment, then you skim the gasket surface. If the head is warped a very minimal amount then straightening may not be needed and only a skim is required.
Best wishes on the build!
Peter
Thank you Peter, I understand, I might just save up for the remanufactured head, saves all the work even if its twice the cost..just a straight swap and new gasket onto the block as long as the block is square....
will see what I have when I remove the head, expecting a disaster, that way if its better than expected it will be a good thing 😁 will add pictures etc as I go along to help other folk.
Cheers John