
R52 Fault code 1498 fix problem...


Thread Starter
|
1st Gear
Joined: Sep 2011
Posts: 11
Likes: 0
Fault code 1498 fix problem...
Hello,
My first post here so her she goes. Have a 2006 Mini S convertible with 11,000 miles and the original owner (can you tell?). Recently the "service" light came on along with the EML. The EML appears after about 3 seconds after start up and stays on. At start up the EML light is NOT on.
Local parts place pulled a code of 1498 and with a bit of research determined it to be a vacuum leak most likely between the sc and the airbox. This car has never been in an accident. The mini dealership stated the leak could be just about anywhere and that I believe.
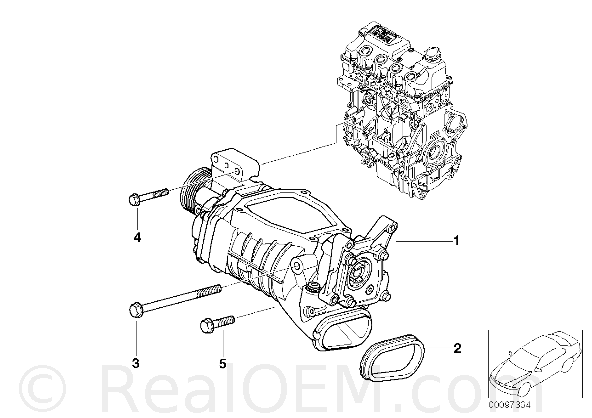
Try to fix my own stuff and noticed the supercharger and air intake block the view of just about anything that I need to check. Read on how to remove the front end for "service mode" and quite prepared to do so but will GLADLY accept any advice on what path to take as in what to look for problem wise.
Sprayed brake cleaner at idle at different points which didn't make any difference in RPM's so my uneducated guess is that this problem will not be easy to find.
thanks for your time,
gjd.
My first post here so her she goes. Have a 2006 Mini S convertible with 11,000 miles and the original owner (can you tell?). Recently the "service" light came on along with the EML. The EML appears after about 3 seconds after start up and stays on. At start up the EML light is NOT on.
Local parts place pulled a code of 1498 and with a bit of research determined it to be a vacuum leak most likely between the sc and the airbox. This car has never been in an accident. The mini dealership stated the leak could be just about anywhere and that I believe.
Try to fix my own stuff and noticed the supercharger and air intake block the view of just about anything that I need to check. Read on how to remove the front end for "service mode" and quite prepared to do so but will GLADLY accept any advice on what path to take as in what to look for problem wise.
Sprayed brake cleaner at idle at different points which didn't make any difference in RPM's so my uneducated guess is that this problem will not be easy to find.
thanks for your time,
gjd.
Thread Starter
|
1st Gear
Joined: Sep 2011
Posts: 11
Likes: 0
Checkers,
Used the search mode prior to posting but found nothing. Tried different word combinations without any results. To fix your problem did you have to remove the front end for "service mode" ? Was your ride ever in an accident because when I mentioned that tube at the dealership the reply was, "in a crash lately"?
Thanks for replying. gjd.
5th Gear

Joined: Nov 2005
Posts: 874
Likes: 60
From: Modesto, Ca
gjd
My car has never even had a paint scratch. Mine is an automatic but the sticks have one also. Mine only happened at highway speed. The tube in question is plastic and has plastic welds for fittings. Under pressure they would expand and cause a vacuum link. The problem is going to be a vacuum link some where. I don't work alot on my car I have several shops I have do the work. On the search just use the numbers 1498. If that doesn't work let me know and I'll go back and find the thread name.
My car has never even had a paint scratch. Mine is an automatic but the sticks have one also. Mine only happened at highway speed. The tube in question is plastic and has plastic welds for fittings. Under pressure they would expand and cause a vacuum link. The problem is going to be a vacuum link some where. I don't work alot on my car I have several shops I have do the work. On the search just use the numbers 1498. If that doesn't work let me know and I'll go back and find the thread name.
Thread Starter
|
1st Gear
Joined: Sep 2011
Posts: 11
Likes: 0
Tore down to the s/c -t/b plastic air duct but ran into a snag. Two small rigid plastic pipes (vaccuum) run into that piece but are secured with red colored collars that slip into it. Is there a special pliers or something else that releases these red keepers?
Btw the dealership printout of the large plastic air duct and related parts but it shows only ONE pipe coming out of it and mine has TWO. What's strange is that my vin was given just in case that $113.00 part was vin specific, and obviously the wrong part with the correct diagram (but close).
Btw the dealership printout of the large plastic air duct and related parts but it shows only ONE pipe coming out of it and mine has TWO. What's strange is that my vin was given just in case that $113.00 part was vin specific, and obviously the wrong part with the correct diagram (but close).

gjd -
The problem is not the car but the driver... you drive too few miles. The best solution is for you to switch yours with mine, which is also an '06 MCSc (39k) and has no stinking P1498 code!
Anyhow... here's a thread that might help:
https://www.northamericanmotoring.co...ault-mean.html
Check the following items:
1. Inter-cooler rubber boots (#2,11)
2. Intake duct from Throttle Body to Supercharger (#15)
http://www.realoem.com/bmw/showparts...35&hg=17&fg=05
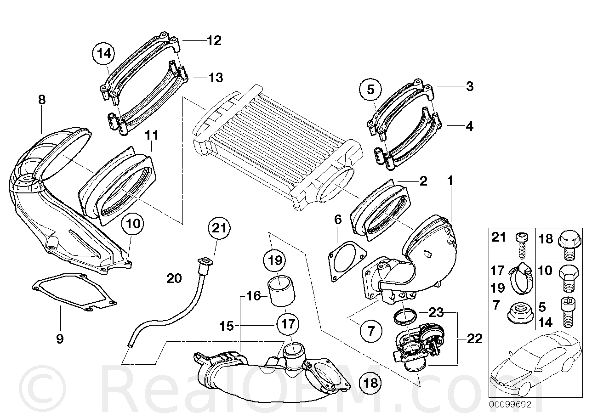
3. Rubber gasket between Intake Duct and Supercharger (#2)
http://www.realoem.com/bmw/showparts...92&hg=11&fg=50
The problem is not the car but the driver... you drive too few miles. The best solution is for you to switch yours with mine, which is also an '06 MCSc (39k) and has no stinking P1498 code!
Anyhow... here's a thread that might help:
https://www.northamericanmotoring.co...ault-mean.html
Check the following items:
1. Inter-cooler rubber boots (#2,11)
2. Intake duct from Throttle Body to Supercharger (#15)
http://www.realoem.com/bmw/showparts...35&hg=17&fg=05
3. Rubber gasket between Intake Duct and Supercharger (#2)
http://www.realoem.com/bmw/showparts...92&hg=11&fg=50
Thread Starter
|
1st Gear
Joined: Sep 2011
Posts: 11
Likes: 0
Thanks for the tips will try them when I get back to my ride. It's all apart now in the Service Mode. Would like to know on how to pull out the plastic hoses that have a red collar locking them into the plastic duct work. Looks like those red collars need to be compressed in order to release them. Special pair of pliers maybe?
My S has TWO plastic vaccuum lines entering the duct (part #16 first diagram). Going to replace it any other part discussed to fix the code #1498 since it's easier and cheaper for me to do it now when it's all apart. Really didn't expect problems like this at 11,000 miles!
My S has TWO plastic vaccuum lines entering the duct (part #16 first diagram). Going to replace it any other part discussed to fix the code #1498 since it's easier and cheaper for me to do it now when it's all apart. Really didn't expect problems like this at 11,000 miles!
Trending Topics
Thread Starter
|
1st Gear
Joined: Sep 2011
Posts: 11
Likes: 0
Code #1489 fixed! Replaced vaccuum hose (1of 2) which is part #21 on the above diagram plus the two blue o-rings that this part slips onto. The fix is simple but getting at it and identifying the problem is not-the maze of wires and ducts hides the starting point of part#21.
From my limited knowledge it appears vaccuum is supposed to assist in keeping the hose in place which the 0-rings sealing the fit snugly. Alas, the o-rings and the plastic hose were a sloppy fit (only 11,000 miles) and perhaps a pothole at a slow speed caused the connection/seal to break its connection however slightly. A visual check at this connection/seal is not possible unless you own the x-ray glasses from 1960.
The fit of the new vaccuum line along with the two replaced blue o-rings was a very secure and snug fit. The old one could almost break the connection/seal by the weight of the grey vaccuum hose itself. Add a slight jar to that mix and you have failure written all over it!
Learned a lot working on this problem and went "to school" as my father used to say but kept it out of the dealership. Furthermore, realized my Scangauge had a bad cable which was replaced and was able to erase code #1489 without purchasing a BMW specific code reader.
Appreciate the advice given and hope someone can learn to fix this problem through this posting.
Thread Starter
|
1st Gear
Joined: Sep 2011
Posts: 11
Likes: 0
It's the vaccuum hose, #20, my mistake. Didn't come across any screw. Btw the diagram is incorrect as there are TWO vaccuum hoses that enter the intake duct. One black and the other gray which is #20 and is the problem maker.
Also wanted to report that after learning to say to the parts counter employee that I was a car club member my bill was reduced by 10%. That little sentence save me almost 30 bucks! Learned that trick from a recent poster.
Also wanted to report that after learning to say to the parts counter employee that I was a car club member my bill was reduced by 10%. That little sentence save me almost 30 bucks! Learned that trick from a recent poster.
Thanks for the clarification. I'll keep an eye out for these tubes if there's a vacuum leak.
Didn't know Mini gives discount. Will give it a try... "I'm a member of the Secret Mini Society"... hopefully that gets 20% off. Hehe
Didn't know Mini gives discount. Will give it a try... "I'm a member of the Secret Mini Society"... hopefully that gets 20% off. Hehe


Neutral
Joined: Feb 2010
Posts: 5
Likes: 0
Hi folks.
Been reading up on/searching P1498 and trying to get more info on the actual process of replacing the intake tube. I'm good on the red clip removal, but still a little fuzzy on how to actually get to that point.
1. Is service position 1 needed to get access in order to remove the tube?
2. Is there an actual write-up for the intake tube removal process?
Thanks.
I just did this a few Sunday's ago.
Things to note:
First I removed the MFE and drained the coolant (captured and for reuse)
Then pretty much tore down what was connected to the intake tube (not in any particular order):
The MFE took me about 40 minutes this time, and I took my time with the rest. Tear down was probably 3 hours then putting it all back together. I started at 10 and finished at 5 (including purging the coolant), but I'm sure it would take others much less time.
Getting the intake tube, throttle body, bypass valve and SC horn to all align and seat the green gasket was a bit of a PIA, but I got it all in there nice.
After inspecting all of my old items (MAP, TMAP, Intake tube, Gray MAP vacuum line) it appears that the only obvious failure was the green gasket was cracked.
*Unfortunately 4 days after my repair, I threw a 1688 and went into limp mode, along with what Dash Command said was an "Unknown Code".
The car is actually at the dealer right now. They say that the bypass (original) is shot, needs replacement (they updated the part due to a known issue) and they have to program the DME (if anyone has any insight on why they need to program my DME for a new bypass valve - please let me know - I have the stock 210 JCW program that's 1.5 years old)
Hope this helps, let me know if you need any more info.
Good luck!
Things to note:
- Make sure you have all the gaskets you'll need (SC horn, Green intake, Throttle body) and parts you may want to replace (MAP, TMAP, MAP Gray Vacuum line, Intake tube, Bypass Valve*, Throttle body)
- Anytime you remove the MFE you may screw up some of the plastic screw plugs in the wheel wells and the bumper skirt screws/clips may be rusted in need of replacement. Get them and have them on hand for replacement.
- May be worth having some coolant on hand
First I removed the MFE and drained the coolant (captured and for reuse)
Then pretty much tore down what was connected to the intake tube (not in any particular order):
- Intercooler
- Airbox to throttle body hose
- Throttle body
- SC horn
- Bypass valve
- MAP Sensor
The MFE took me about 40 minutes this time, and I took my time with the rest. Tear down was probably 3 hours then putting it all back together. I started at 10 and finished at 5 (including purging the coolant), but I'm sure it would take others much less time.
Getting the intake tube, throttle body, bypass valve and SC horn to all align and seat the green gasket was a bit of a PIA, but I got it all in there nice.
After inspecting all of my old items (MAP, TMAP, Intake tube, Gray MAP vacuum line) it appears that the only obvious failure was the green gasket was cracked.
*Unfortunately 4 days after my repair, I threw a 1688 and went into limp mode, along with what Dash Command said was an "Unknown Code".
The car is actually at the dealer right now. They say that the bypass (original) is shot, needs replacement (they updated the part due to a known issue) and they have to program the DME (if anyone has any insight on why they need to program my DME for a new bypass valve - please let me know - I have the stock 210 JCW program that's 1.5 years old)
Hope this helps, let me know if you need any more info.
Good luck!

1st Gear
Joined: Apr 2014
Posts: 35
Likes: 0
B4 u do anything do a smoke test.
I spent over 1000$ Of time and money trying to fix that problem.
Changed the supercharged inlet tube, Intercooler booths, and a few sensors.and a full tune up .. The problem didn't go away. After performing a smoke test it was clear that the intake manifold gasket was cracked and was letting through a lot of air, which is usually what an eml light means, emissions leak

Hi all,
I'm wrestling with this troublesome code too after an engine rebuild (oil loss without oil warning light, timing chain eats plastic guide, shavings plug oil intake, cycle accelerates... jamez knows the details). I was getting codes 0300 and 0313 after the rebuild which were fixed by reseating some loose connectors which were letting unmetered air in, but now I get 1498 and the EML & CEL lights, but only intermittently. We are ready to take 'er apart again to find where it's leaking air now (maybe the positive and negative leaks were cancelling each other out earlier?!). Anyway, good luck to me... I hope this fixes it for GOOD.
I'm wrestling with this troublesome code too after an engine rebuild (oil loss without oil warning light, timing chain eats plastic guide, shavings plug oil intake, cycle accelerates... jamez knows the details). I was getting codes 0300 and 0313 after the rebuild which were fixed by reseating some loose connectors which were letting unmetered air in, but now I get 1498 and the EML & CEL lights, but only intermittently. We are ready to take 'er apart again to find where it's leaking air now (maybe the positive and negative leaks were cancelling each other out earlier?!). Anyway, good luck to me... I hope this fixes it for GOOD.
1st Gear
Joined: Apr 2014
Posts: 35
Likes: 0
Hi all,
I'm wrestling with this troublesome code too after an engine rebuild (oil loss without oil warning light, timing chain eats plastic guide, shavings plug oil intake, cycle accelerates... jamez knows the details). I was getting codes 0300 and 0313 after the rebuild which were fixed by reseating some loose connectors which were letting unmetered air in, but now I get 1498 and the EML & CEL lights, but only intermittently. We are ready to take 'er apart again to find where it's leaking air now (maybe the positive and negative leaks were cancelling each other out earlier?!). Anyway, good luck to me... I hope this fixes it for GOOD.
I'm wrestling with this troublesome code too after an engine rebuild (oil loss without oil warning light, timing chain eats plastic guide, shavings plug oil intake, cycle accelerates... jamez knows the details). I was getting codes 0300 and 0313 after the rebuild which were fixed by reseating some loose connectors which were letting unmetered air in, but now I get 1498 and the EML & CEL lights, but only intermittently. We are ready to take 'er apart again to find where it's leaking air now (maybe the positive and negative leaks were cancelling each other out earlier?!). Anyway, good luck to me... I hope this fixes it for GOOD.
zombie renewal x2
almost a year to the day - another 1498 popped up last night.
the car had run perfectly from November's bypass replacement until now.
time to investigate a smoke machine...
almost a year to the day - another 1498 popped up last night.
the car had run perfectly from November's bypass replacement until now.
time to investigate a smoke machine...

3rd Gear
Joined: Mar 2013
Posts: 296
Likes: 35
From: Bayfield, Ontario
Jamez
Smoking is the only way to go!! I built my own to make sure that a particular issue wasn't due to a vacuum leak. Maybe we should have one in the SOMC club tool box/rental program. R53's are prone to leaks that are very difficult to find.
Back to your BPV--mine was leaking at the hose connecting the intake tube and BPV...maybe your BPV was fine. My hose was older and I've had it off numerous times.
When I do the next build....all these problem areas will get a light coat of sealant prior to assembly....things shake loose with hard use.
Thx mate!
I was thinking the same thing, so I'm trying to find a non-DYI version so we can have it for borrowing at the club.
Any suggestions on where to find one, let me know.
I was thinking the same thing, so I'm trying to find a non-DYI version so we can have it for borrowing at the club.
Any suggestions on where to find one, let me know.
3rd Gear
Joined: Mar 2013
Posts: 296
Likes: 35
From: Bayfield, Ontario
They sometimes come up on ebay used, but still pricey...think the last one was $3-400US
Not sure that we can't make a decent DIY one...just need to work on the coil heating/smoking part...just ran out of time when I made my first one. Charcoal and mineral oil worked fine but got a little hot.
Not sure that we can't make a decent DIY one...just need to work on the coil heating/smoking part...just ran out of time when I made my first one. Charcoal and mineral oil worked fine but got a little hot.

Thread
Thread Starter
Forum
Replies
Last Post
bcman
R56 :: Hatch Talk (2007+)
2
Aug 28, 2015 04:47 PM