
R52 New Easy-Up circuit for Cabrios!


Joined: Sep 2004
Posts: 10,340
Likes: 5
From: Woodside, CA
I wish I had good photos...
but I don't what I've got is in the current document (I've put an early form of the doc up here on the web site... It's not complete yet....)
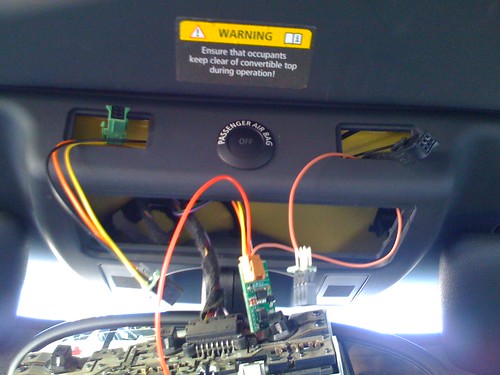
Anyway, you pop out a panel with something like a credit card, push out the switches, disconnect the switch harnesses, plug in the Top Commander harnesses, plut the car harnesses back in, and put it all back in place. No tools (other than the credit card) required!
Matt
Anyway, you pop out a panel with something like a credit card, push out the switches, disconnect the switch harnesses, plug in the Top Commander harnesses, plut the car harnesses back in, and put it all back in place. No tools (other than the credit card) required!
Matt


Joined: Sep 2004
Posts: 10,340
Likes: 5
From: Woodside, CA


Just go read the thread about people getting their hand crunched by the closing sunroof (which has no pinch protection). The Easy-up then becomes a safety feature because you can get your hand well out of the way before the sunroof closes. We'll ignore the part where the whole roof closes with little intervention and oversight. Just kidding with all of this, of course.

OVERDRIVE
Joined: May 2005
Posts: 8,233
Likes: 128
From: San Francisco
Just go read the thread about people getting their hand crunched by the closing sunroof (which has no pinch protection). The Easy-up then becomes a safety feature because you can get your hand well out of the way before the sunroof closes. We'll ignore the part where the whole roof closes with little intervention and oversight.
Joined: Sep 2004
Posts: 10,340
Likes: 5
From: Woodside, CA
Well, ya caught us there!
So we changed the name of the product to the Top Commander. It does both up and down, and while Easy-Up sounded good, it really was a misnomer!
Matt
Matt

So only those who have pre-ordered will be in the exclusive club of "easy-up" owners, while the rest of you just get a "Top Commander". Yes, I'm kidding again. I like the new name better, too. Just bumping a good idea.
Joined: Sep 2004
Posts: 10,340
Likes: 5
From: Woodside, CA
Here's where we are....
the main board is done (it's actually the same board as the Auto Sportplus with different programming) and the daughterboards are on the way. They plug into the switches and the harness plugs into them. The guys in Europe were pretty insistant that there be a minimum of Posi-Tap connectors (there is only one). when those boards show up, I have to put a notch in them (so they'll fit the switch housing) then we solder them up and start shipping!
Matt
Oh yeah, we take better pictures and update the documentation too!
Matt
Oh yeah, we take better pictures and update the documentation too!

4th Gear
Joined: Nov 2004
Posts: 376
Likes: 3
From: Rancho Palos Verdes, CA
I've just stumbled onto this thread, although I ordered my circuit a while ago...
One Q that occurs to me is compatibility with GBMINI's Auto-up window circuit: I have one installed now for my windows and for the DSC "Track Mode"... Will the Top Commander coexist peacefully with my existing circuit, or will I have to lose my individual window auto-up control and track mode by removing the GBMINI circuit?
Very happy to see the progress with this project. Hope to see a lot of purchases so you will be motivated to implement the remote version!
Best Regards,
_Dave_

3rd Gear
Joined: May 2006
Posts: 164
Likes: 0
From: Morristown, NJ
I've just stumbled onto this thread, although I ordered my circuit a while ago...
One Q that occurs to me is compatibility with GBMINI's Auto-up window circuit: I have one installed now for my windows and for the DSC "Track Mode"... Will the Top Commander coexist peacefully with my existing circuit, or will I have to lose my individual window auto-up control and track mode by removing the GBMINI circuit?
Very happy to see the progress with this project. Hope to see a lot of purchases so you will be motivated to implement the remote version!
Best Regards,
_Dave_
One Q that occurs to me is compatibility with GBMINI's Auto-up window circuit: I have one installed now for my windows and for the DSC "Track Mode"... Will the Top Commander coexist peacefully with my existing circuit, or will I have to lose my individual window auto-up control and track mode by removing the GBMINI circuit?
Very happy to see the progress with this project. Hope to see a lot of purchases so you will be motivated to implement the remote version!
Best Regards,
_Dave_
I would assume that both work in conjunction because the top commander is connected by the controls up top. and GBMINI circuit is connected by the bottom switched. Lets see though...

6th Gear
Joined: May 2002
Posts: 3,433
Likes: 1
From: Gloucester, MA, USA
Correct, there's no connection between my original circuit, and the new one that FES-AUTO are creating - however, the car will likely prevent you closing the door windows while operating the top (you can try that today if you have enough fingers!)
Joined: Sep 2004
Posts: 10,340
Likes: 5
From: Woodside, CA
Thanks Ian...
for all those who don't know how these things work, they are in parallel with the buttons. The electronically mimic what you do with your fingers. The car can't tell the difference between what you do manually, and what these circuits do.
While modern car electronics are a bit of a black box to most, these things just act like automatic buttons. And another nice thing, is they can't be detected by factory diagnostic tools! This is cool because to the dealer, it's like they aren't even there.
Matt
While modern car electronics are a bit of a black box to most, these things just act like automatic buttons. And another nice thing, is they can't be detected by factory diagnostic tools! This is cool because to the dealer, it's like they aren't even there.
Matt
4th Gear
Joined: Nov 2004
Posts: 376
Likes: 3
From: Rancho Palos Verdes, CA
Thanks for the responses, guys! Ian's auto-up circuit was my first mod, and I've been VERY happy with for all these years. I'm really looking forward to having the Top Commander up and running as well.
Kudos!
_Dave_
PS: Hope the remote version gets developed soon!
Kudos!
_Dave_
PS: Hope the remote version gets developed soon!


4th Gear
Joined: Nov 2004
Posts: 376
Likes: 3
From: Rancho Palos Verdes, CA
Got my Top Commander circuit in the mail today! Took me about half an hour to install (Took pics, and used a multimeter to identify the power cable in the OEM harness); WORKS GREAT!
I posted some pics here.
Here's the FES website info for it.
Thanks Doc! Now how 'bout that REMOTE version?!
_Dave_
I posted some pics here.
Here's the FES website info for it.
Thanks Doc! Now how 'bout that REMOTE version?!
_Dave_

Got mine today too - also less than 30 minutes to install, mostly trying to decide if "the far right pin on the light box" was the purple wire on my 2005 cabrio. Checked the wiring diagrams in Bentley, and sure enough, it was!
The only odd thing - when I tested the circuit with all the parts hanging, the double tap for the top didn't work consistently. I plugged the switches back into their receptacles, and everything works great. Must have been just enough strain on the connections on the daughter boards to create intermittent contact?
This is so cool! Thanks

Joined: Sep 2004
Posts: 10,340
Likes: 5
From: Woodside, CA
So cool!
glad they're showing up and working well! If you folks find any problems in the install docs or places where it could be more clear, please e-mail me at mattr@fes-auto.com. Guenter wrote it and his english is a bit shakey....
Next is the R57 version... We've got the logic worked out, I think. But bummer for the R57 people, there's no window switch up there so it's just the top functions.
Also, we're selling rkw's (Richard Woo) anti-reflective gauge lenses now. These are really perfect for the cabrio crowd as there practically no reflections from the lenses especially usefull with the top down. They're on our site for 1st gen standard, 1st gen Nav, 1st gen Chrono and 2nd gen tach.

BlimeyCabrio has the first iteration of the stuff and can let you all know how he likes them. Blimey (and any other owner of the early versions), we're now using a better anti-reflective coating. Richard and FES are offering low cost upgrades to the latest and greatest. E-mail me if interested....
Matt
Next is the R57 version... We've got the logic worked out, I think. But bummer for the R57 people, there's no window switch up there so it's just the top functions.
Also, we're selling rkw's (Richard Woo) anti-reflective gauge lenses now. These are really perfect for the cabrio crowd as there practically no reflections from the lenses especially usefull with the top down. They're on our site for 1st gen standard, 1st gen Nav, 1st gen Chrono and 2nd gen tach.
BlimeyCabrio has the first iteration of the stuff and can let you all know how he likes them. Blimey (and any other owner of the early versions), we're now using a better anti-reflective coating. Richard and FES are offering low cost upgrades to the latest and greatest. E-mail me if interested....
Matt
Shills get free upgrades, I think. 
Anyway - the first generation of Richard's replacement lenses were a HUGE improvement over stock - especially in the cabrio. I've been running them for the past 2+ years. They not only dramatically cut down on reflections (as shown above) but also give the instruments a generally "higher quality" look - you don't realize how cheap-looking the OEM plastic domes are until you see them side-by-side with the upgraded lenses.
These are one of my favorite mods - they're almost essential if you have aftermarket gauge faces in a darker color - in that case, the reflections off the OEM lenses can make the gauges almost unreadable in bright light. The anti-reflective coating makes the lenses almost invisible with the darker gauge faces - which is GOOD.