When you click on links to various merchants on this site and make a purchase, this can result in this site earning a commission. Affiliate programs and affiliations include, but are not limited to, the eBay Partner Network.
We�ve hit a snag with the 20mm spacers - I�ve got tires rubbing at all corners when there�s 2 passengers riding in the car. It�s reasonably constant upfront when ever going over mild bumps, and very occasional from the rear. I decided I�d like to figure this out so I can keep the spacers. I love the way they look and the wider track is awesome while cornering.
I pulled off the plastic fender trims tonight and can see where the rubbing has been occurring. No real harm done so I decided to get busy with a rotary sander on the areas effected.
With the fenders off I took it for a drive. There was no rubbing from the front and only an even less occasional rear rub. This led me to do some additional sanding on the outside edge of the rear fender liners.
I need some help getting these bloody clips out of the front fenders. Any ideas? I obviously just don�t have the correct tool to get at them. I�ve tried plyers but the clips are so brittle that they�re falling apart. Good news is, I already have new clips as I ordered spares from out motoring last month.
How do I get these Clips out!? 😒
Last edited by jacktown; Jun 24, 2020 at 09:34 PM.
I took a time out from the Mini whilst parts hoarding. Almost everything has arrived so it's time to start pulling things off and replacing with OEM or OEM + parts. I'm most excited for new Coil-Overs, all new bushings, R56 Rear Control Arms and the R56 Brembo BBK. Also swapping to a 17% reduced size pulley and while in there, going to replace a ton of things that are still working but looking a little haggard, down to bolts that are looking worn out.
Altogether I'm doing the following:
Alta adjustable Rear Sway Bar
Powerflex Bushings: Front Control Arm Bushing, Lower Engine Mount Small Bushing, Lower Engine Mount Large Bushing, Rear Trailing Arm Front Bushing Set, Rear Shock Top Mount Bushing Set
Flat-out Suspension
Front turn signals
Brembo JCW Big Break Kit (Calipers, Rotors, Pads, Fluid)
R56 Rear Trailing Arms
Aluminum lines
OEM End Links
Detroit Tuned Bypass Valve
Craven Speed 17% reduced size Supercharger pully
Serpentine Belt
Kingsborn Ignition Wires
Brisk plugs
Screaming Deamon Coil
Canton Coolant overflow tank
Upper Hydraulic Mount
Helix Short Shift Adaptor
OEM Radiator
OEM AC cooler
Power Steering Fan
New Bosch Battery
Hood and Trunk Struts
I'll also swap out these 20mm spacers for 15mm ones. I'm already test fitting the rear 15mm's in this picture
I've probably missed a few things but for the most part, that's all for now. I think at this point I'm approaching double the purchase price of the car in parts, but it's so worth it!
The Radiator and AC unit are off. The rad support was broken in a lot of places so I figure it's not worth rescuing. Got a new one on the way for tomorrow.
Thanks Jackmac for helping me find the official diagram for JCW logo placement in the aero front bumper. Popping it here incase it's useful for anyone.
Making progress. Valve cover gasket is in along with the new leads etc, pulley, belt etc. Cleaned up a lot of oil and also got the new coolant reservoir on.
I have some new rally lights on the way so I�m going to delete the front fogs and run wiring up in to the engine bay so the new rally lights will operate off the fog switch.
It is possible to keep the fog lights and also connect the rally lights by using a relay. Both will come on together with the switch.
yes that would be possible but I’ve painted the Fog light inlets black and installed Zunnsport grills so it doesn’t really make sense to have Fogs in them anymore. My fogs are also in awful condition and I forgot to order replacements. If it bugs me by not having them I’ll retrofit then later
Last edited by jacktown; Sep 12, 2020 at 12:53 PM.
Forgot to mention, the belt tensioner needed replacement as it had seized. Got hold of a new one yesterday and would probably recommend everyone just replace it while you're in there. (old news I'm sure)
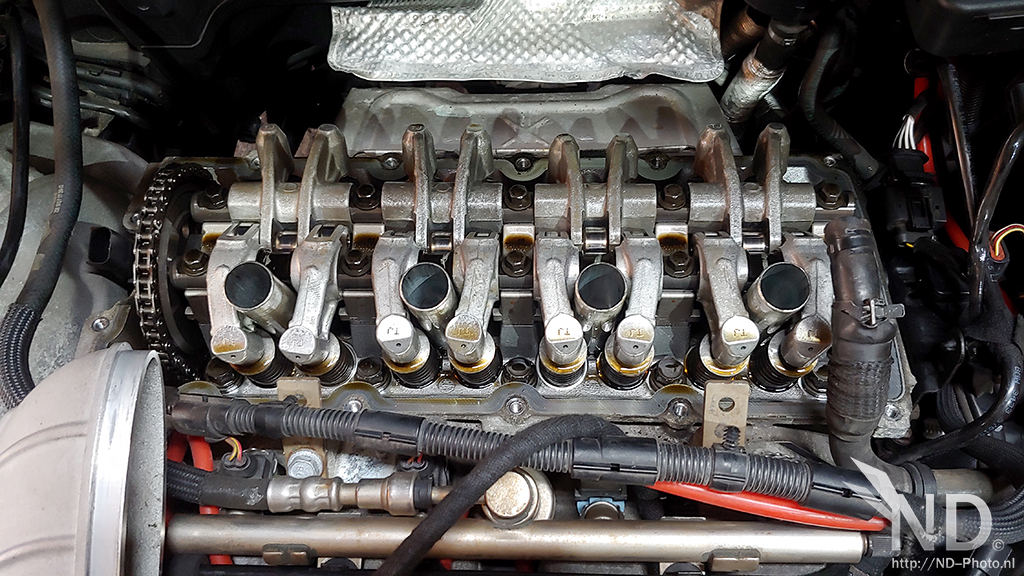
Nothing to see here. Replaced the valve cover gasket The frame rail the upper passenger side mount sits on was un-cleanable Sanded it down and repainted it pepper white. I treied to avoid doing this but I'm happy with how it turned out considering how awful it looked. Replaced the JCW plugs with Brisk ones. Anyone else using these? Happy with them? Replaced the stock coolant reservoir with a Canton Aluminum one as recommended by someone earlier in the thread. I didn't realize I needed a new lid so found something appropriate to do the job. I've been on the fence about upgrading from the JCW Intercooler. If there's an aftermarket one with a larger core that the JCW cover would fit well, please let me know. For now I'm going to turn it upside down as it's really clean on the underneath.
Good work on the paint retouch and also good to see that your head is also clean. I noticed the same when I did my valve cover job. The canton reservoir looks ace, I will probably go for an aluminium one with an inspection window, for peace of mind.
Good work on the paint retouch and also good to see that your head is also clean. I noticed the same when I did my valve cover job. The canton reservoir looks ace, I will probably go for an aluminium one with an inspection window, for peace of mind.
an inspection would be nice 👍🏻 I didn�t think of rhat when ordering parts
New FLATOUT Suspension coilovers showed up today - they were straggling behind the rest of the parts so will be doing all the suspension, brake work over the next few days. What is everyone doing with regards to replacements for front control arms. I'm assuming I should replace the worn out ball joints at which point, I should probably just go the easier slightly more expensive route and replace the whole control arm on each side. Is there an aluminum set available? (I already have R56 rear control arms to go in)
Those look great! I like the linear springs and the adjuster on the bottom of the rear struts so you can adjust them without removing them. Hopefully there�s a combo of threads for the front camber adjustment bolts so you don�t have to cut your strut towers for access. My ST mounts only had one configuration so I�ll need to drop the strut far enough when adjusting because I didn�t want to cut the towers. Same for the dampening adjustment on the rears, they are on top so you have to remove them or drill a hole for the remote cable adjuster.
Unlike the rear R56 aluminum arms, I don�t think the fronts are compatible with the 1st gen. and the only aftermarket control arms I�ve seen for these were custom tubular arms (Chrome-moly?) a long time ago but they kept failing, even with later versions that were beefed up.