
R50/53 Coolerworx shifter install


Thread Starter
|
1st Gear
Joined: Mar 2019
Posts: 30
Likes: 4
Coolerworx shifter install
I decided to tackle the shifter install during the down time. Figured I would do a write up while I am at it and see if I can get the formatting and image hosting how I like it. I did not take as many pictures as I would have liked as I ran into problems along the way. The two most helpful resources was pnwr53's thread and mod mini's video on replacing the shift cables
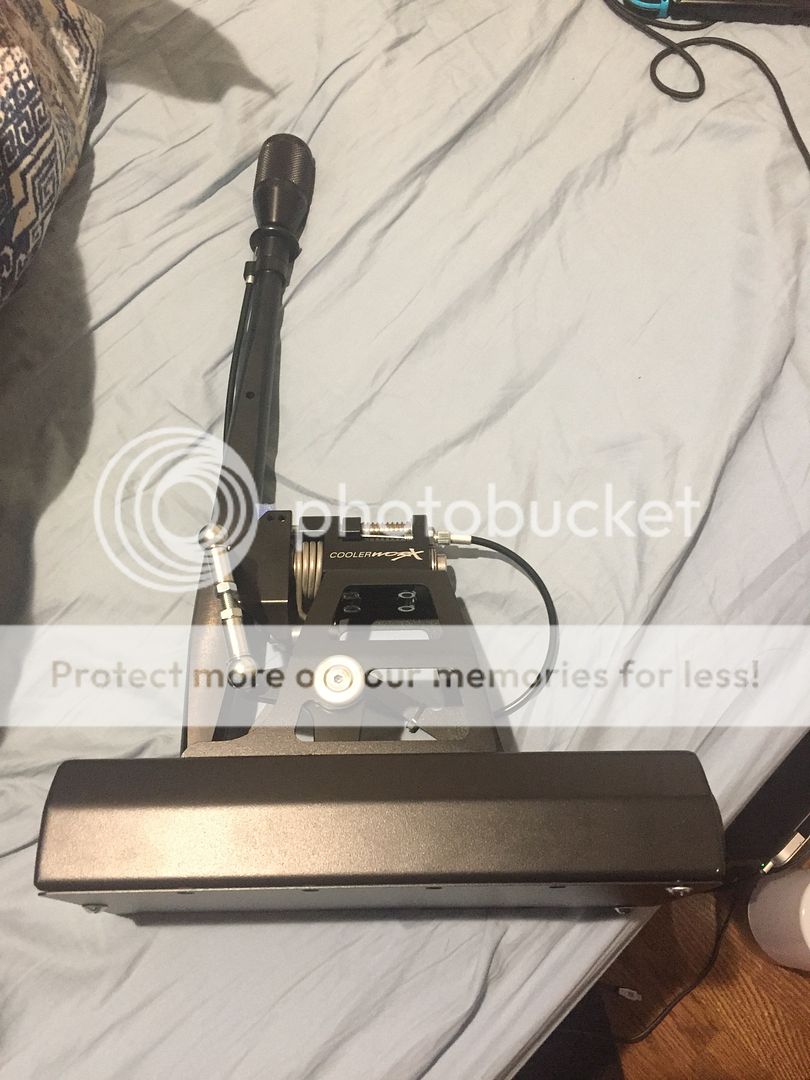
Why Coolerworx:
I originally wanted to run all cravenspeed gear on my car when I first bought it rather than mix and match companies. After adding up the shifter, shift ****, shift well cover, shifter bushing, and finding a way to seal up the hole that would need to be cut, it was only a little bit more for a self centering coolerworx shifter.
Purchased from coolerworxna, they had a pretty good deal, and the exchange rate was in our favor. Shipping only took a couple days.
 [/URL
[/URL
Coolerworx install:
Inside the car:
Remove shift **** (Pull up, make sure not towards your face)
Pull up trim ring/shift boot and remove (Retained by zip tie)
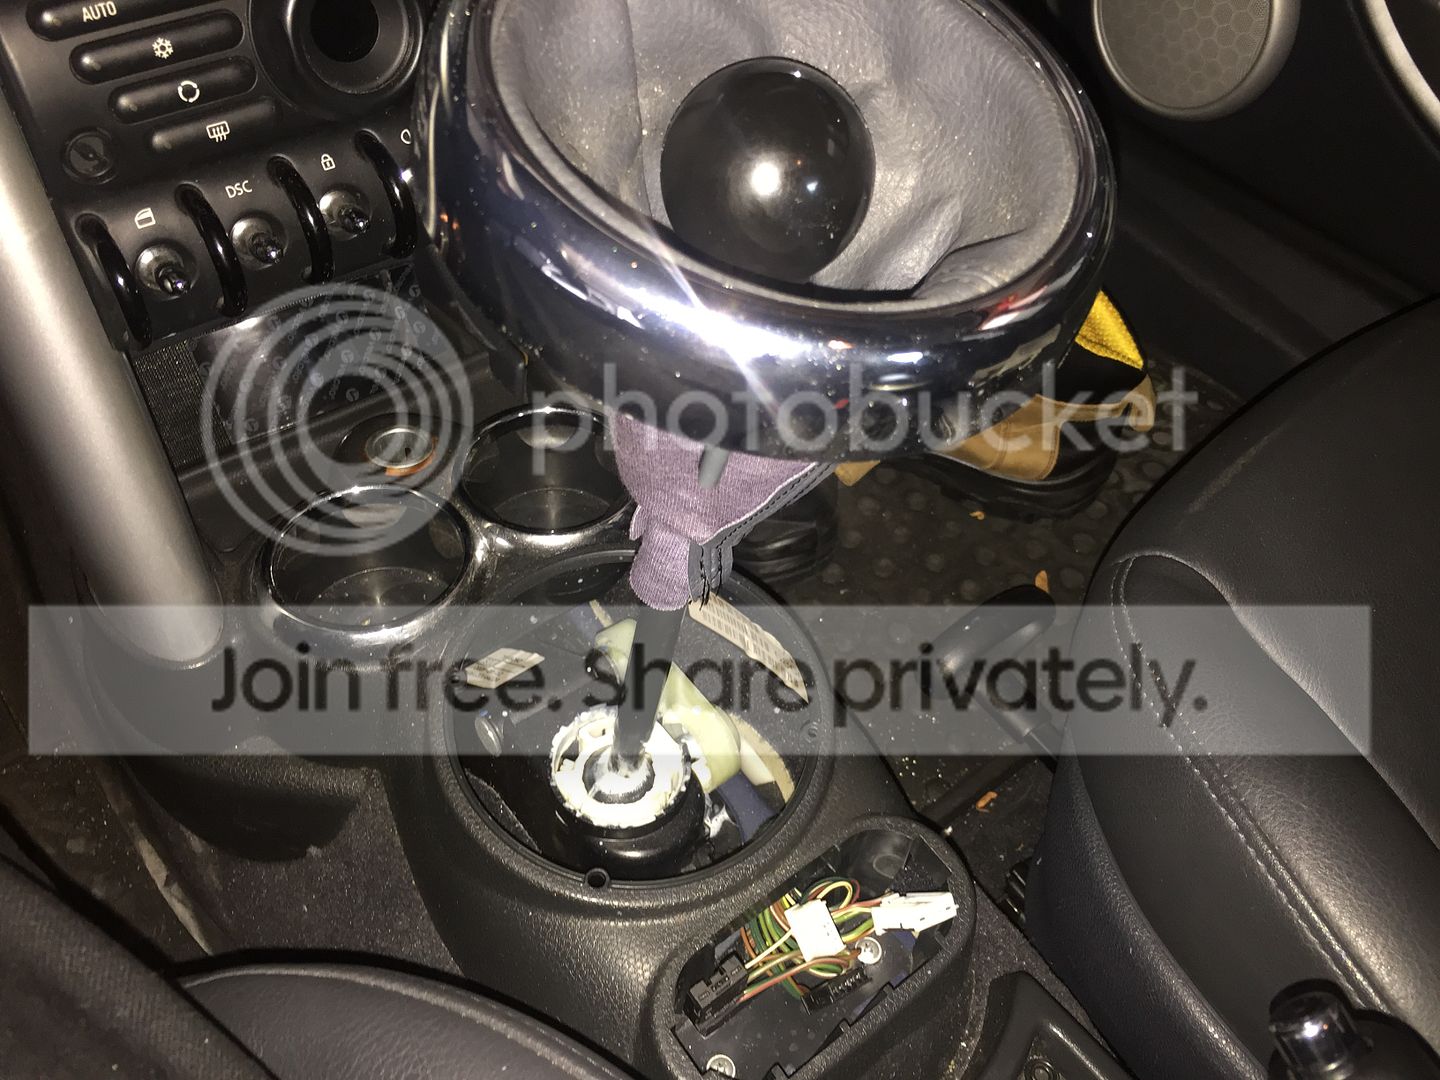
Remove mirror/seat warmer switch (Insert hand in shift well towards rear and pull up)
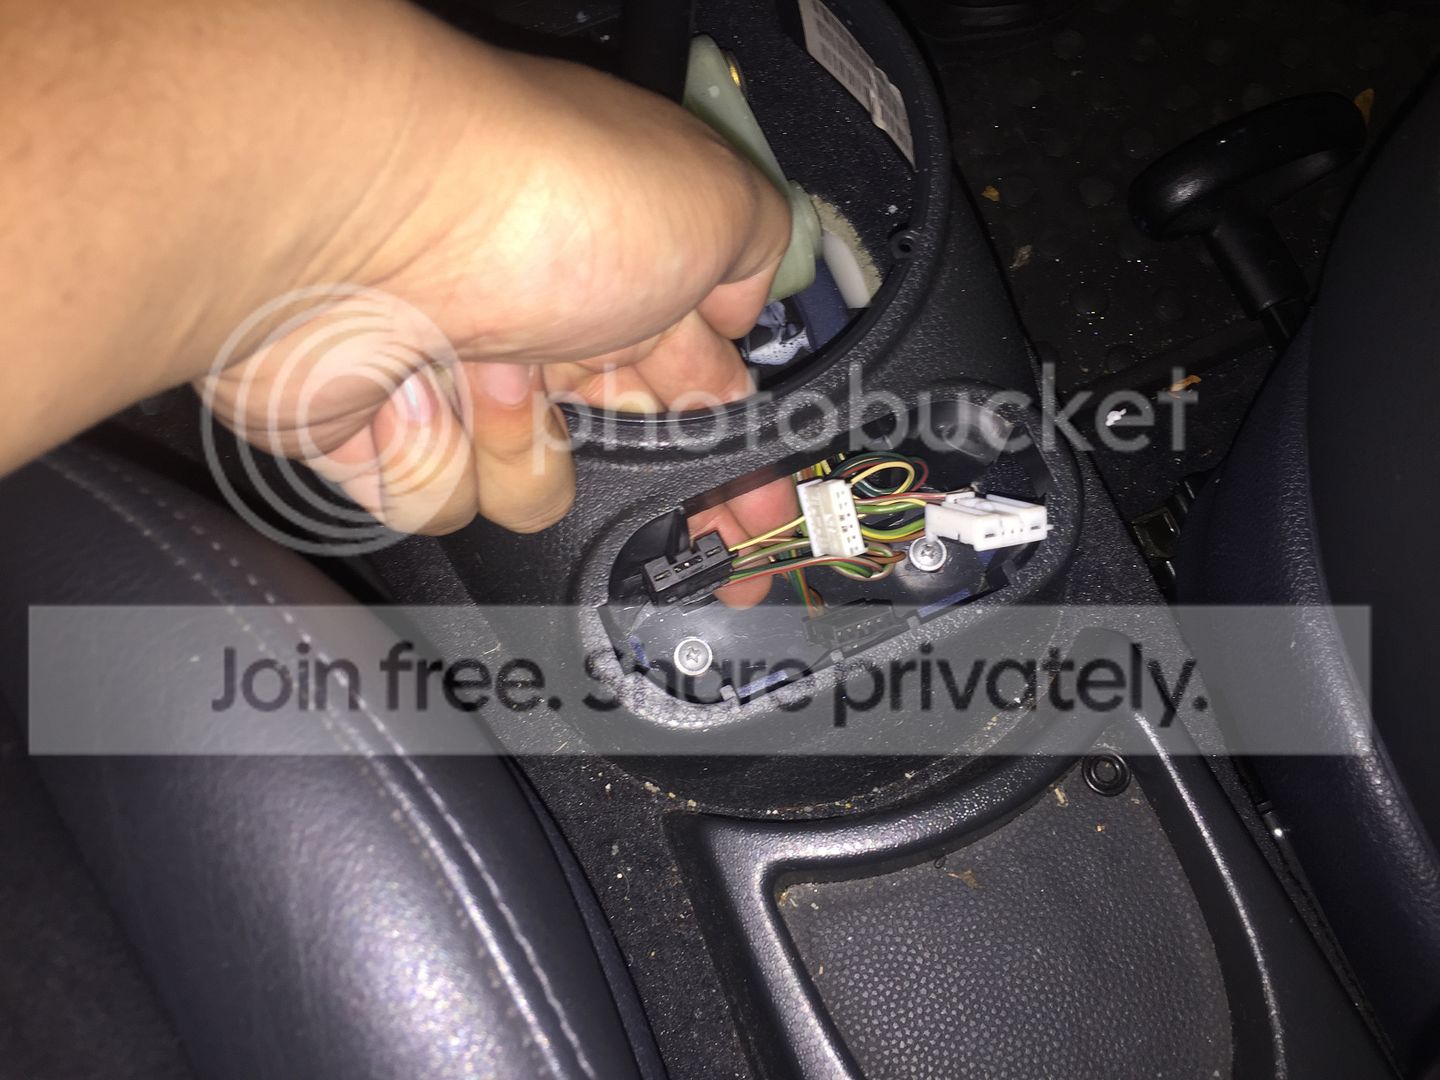
Release 4 plugs on the switch two black and two grey (note orientation)
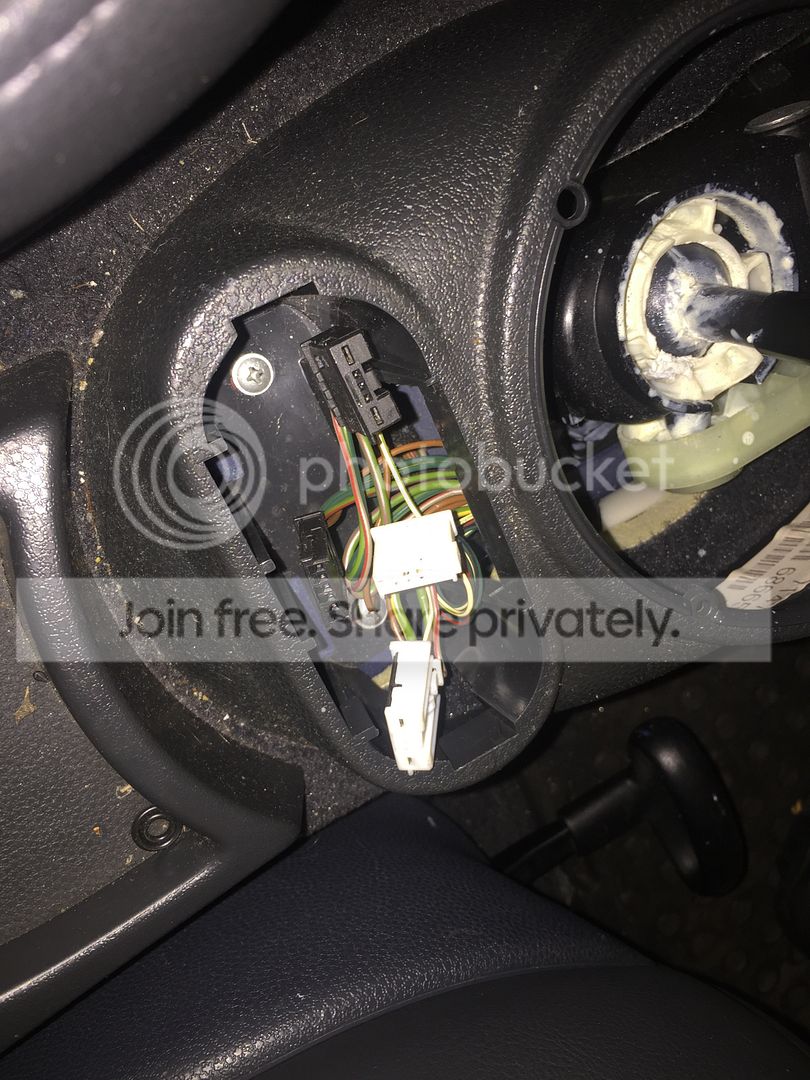
Undo 4 phillips (two in switch cavity and two in cup holders)
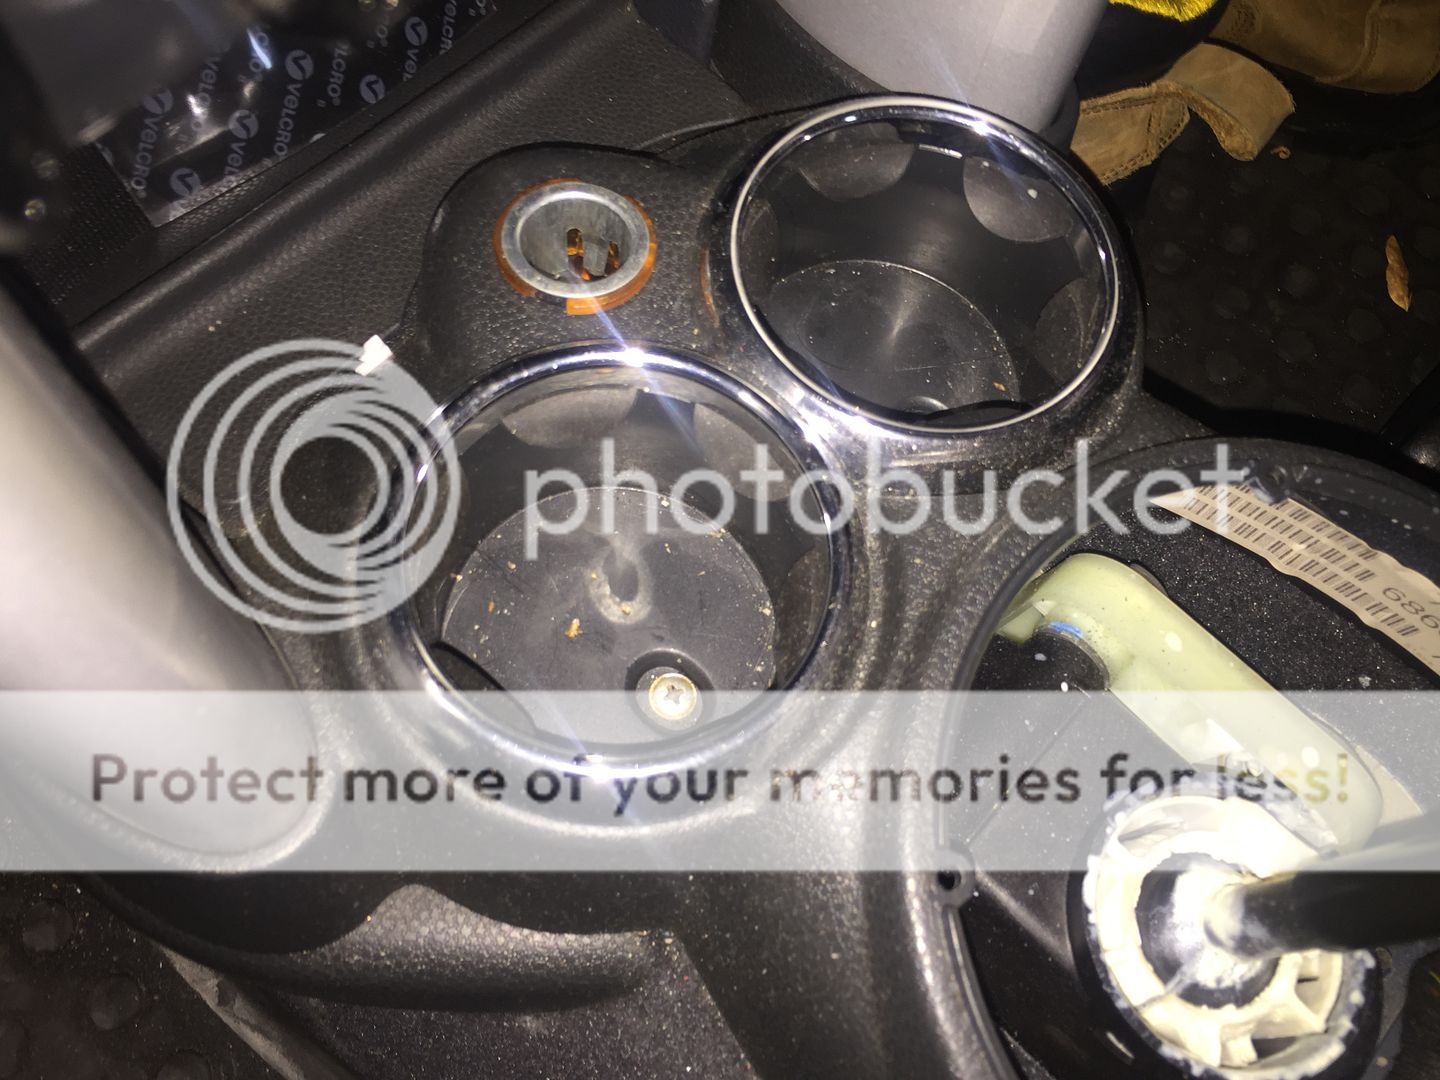
If equipped, undo front torx screw holding the pocket in front of cup holders
Undo down tubes/knee tubes (Passenger side can be easily accessed by opening the glove box, for driver side reach under steering wheel, grab panel with many fingers and pull firmly to release panel granting access to top bolt)
Jiggle center console assembly and free down tubes
As you lift center console undo 12v accessory plug
Undo the bottom panel/downtube stops (retained by two nuts)
Under the car:
Jack up the car. (I was able to do this with just some ramps on one side of the car, the higher the car is the easier it will be. Use jack stands, ramps, etc do not end up in the ER or dead from a fallen car)
Put some kind of lubricant/penetrating oil on the bolts for the exhaust and let sit (I used WD40)
Remove the two bolts. (I used a 130 ft lb impact gun and had no success, a long jack handle was able to break them loose for removal)
Undo the 6 10mm bolts holding the exhaust hanger (exhaust will drop, be careful)
Undo the 6 washers holding the center exhaust tunnel shield (also 10mm)
Undo the 1 bolt sitting above the catalytic converter (8mm)
Undo the o2 sensor wire clip (clips onto heat shield)
Remove the exhaust shield
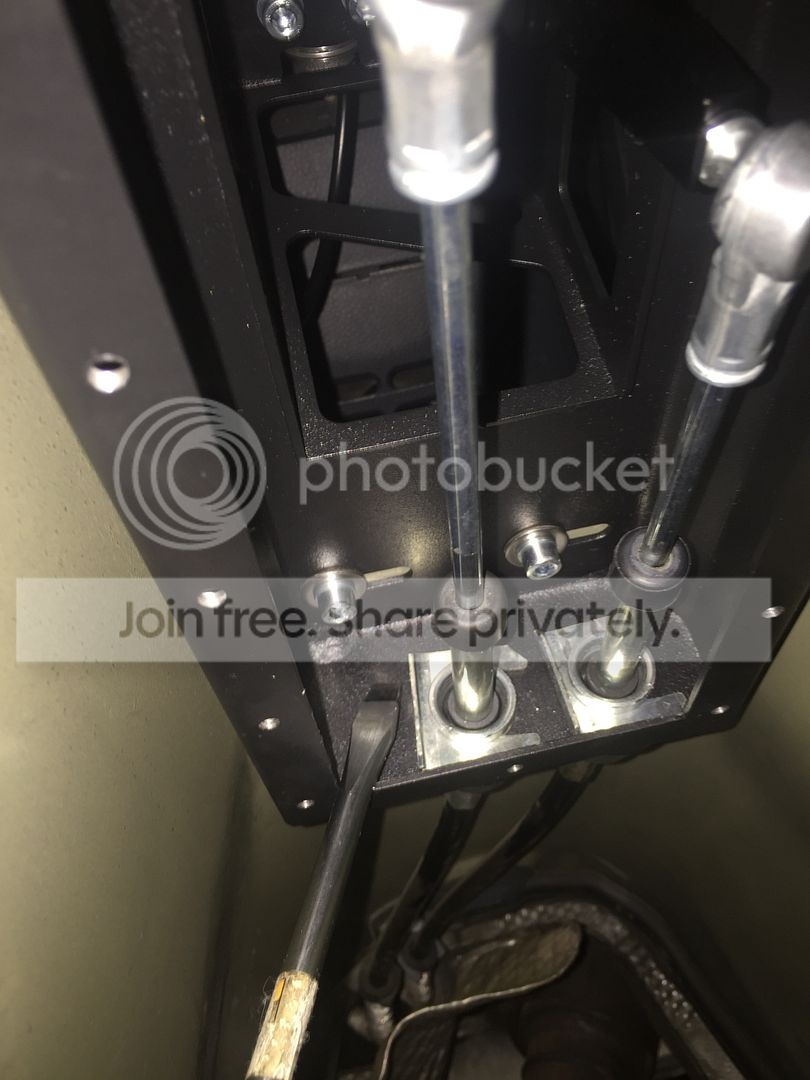
Undo the torx bolts holding the shifter box
Inside the car press in on the retaining tabs (2 in front, 1 in rear)
Push shifter box down
Using a flat head screw driver undo the tabs on the shifter box
Reattach shifter box to tunnel using at least 2 bolts (on opposite ends, do all 4 if easy to do)
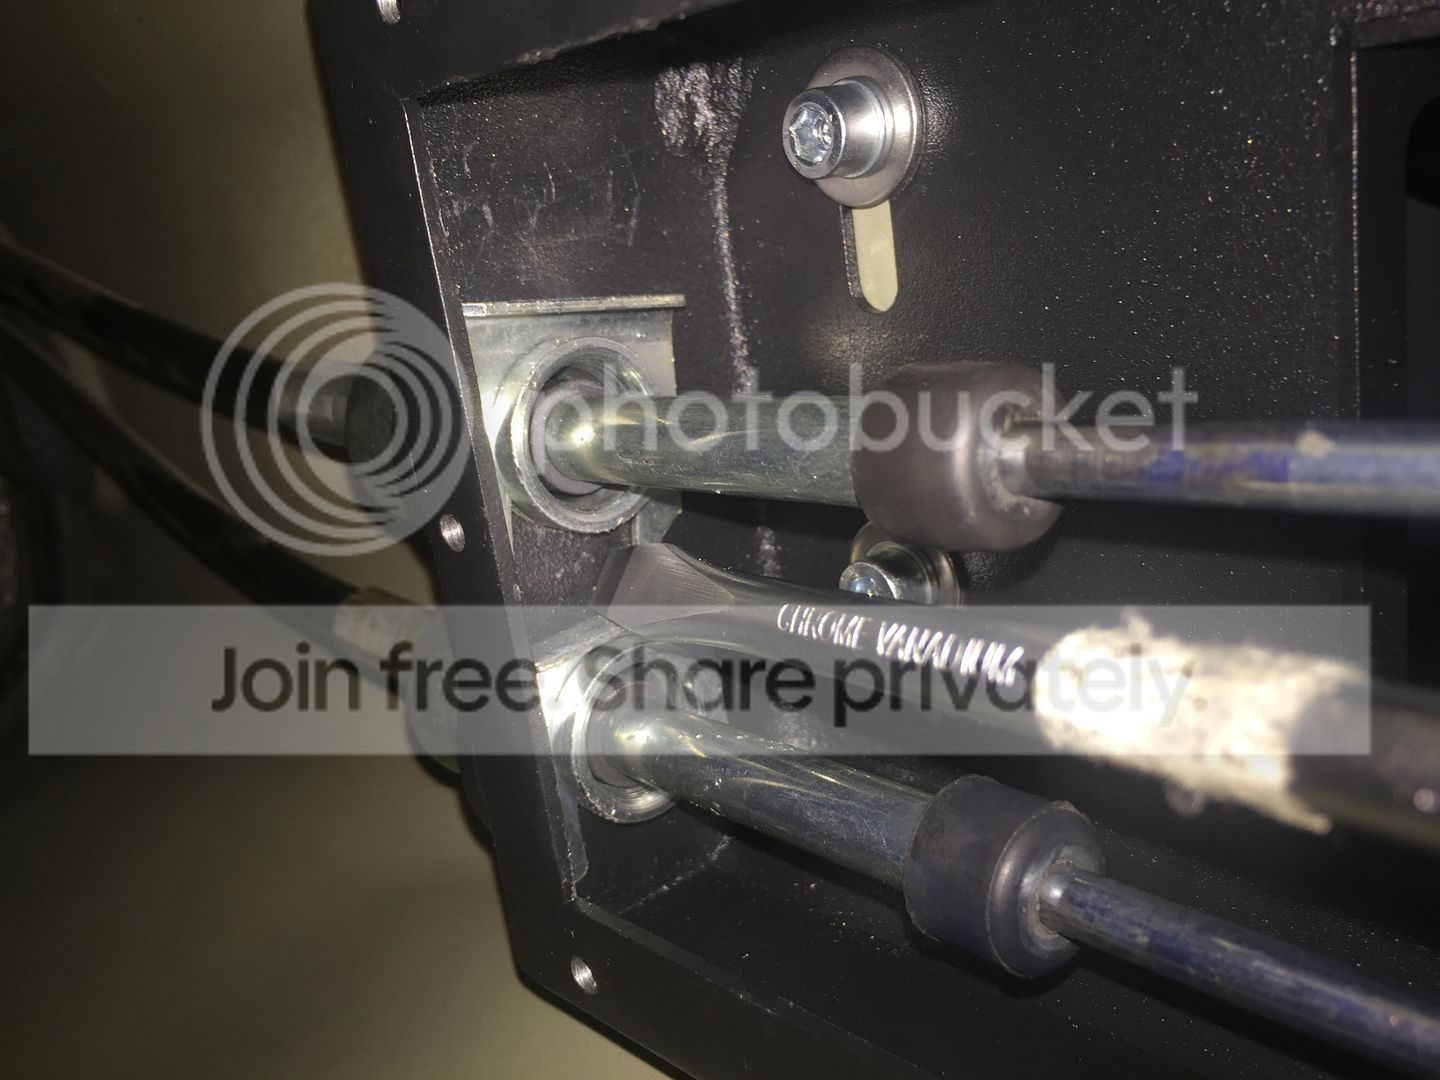
Using a 14mm wrench stick it between the ball and the socket. You are trying to pry against the shifter not the linkage, pull down on the wrench not up.
On the ball 90* rotated, if you have the right thickness wrench and are lucky firmly tapping the wrench between the ball and socket will free the ball.
Undo the spring clips, a set of channel locks will help immensely in getting a firm purchase, you can also wait to drop the box again.
Drop the box and separate the shifter box from the cables
Remove the gaskets on the shifter cables
IMPORTANT
Remove the arm made of the ball joints (silver) and the protruding ball or it will be difficult to fit (10mm nut, ***** can be removed from socket by pulling the spring clip, rotating and pushing toward the threaded end)
Loosely insert the cables into the coolerworx shifter box
Install the shifter box with the supplied allen bolts (these really should be knurled to help with install)
Keep in mind the fit will be pretty tight, you may have to slightly file one of the slots forward or aft
Install allen bolts with lock washer then the wide washer, use blue loctite, there is no gasket here and you do not want these to rattle loose. They also supply nuts for the top if you choose to use them.
Install the smaller ball first, with the other cable loose you will have room to start sliding in the spring clip. These will install at 90* since there is a lip for the cover now. You can get these started with your fingers, try and get it slightly past the hole for the other cable.
You can now insert the cable for the larger ball completely, if you were able to slide the spring clip enough in the step above you can use a screw driver to pry against the shift cable to seat the first spring clip. If your screw driver is not wide enough you can use two.
As above you can get the second spring clip started with your finger. You can then pry against the lip on the bottom to help seat this clip.
One of these cables are usually mounted at 90* so they will sit at a 45* on the ball. The plate on the bottom will more or less prevent it from rotating off. Hopefully the contact does not cause drag. Consider lubricating the back side of the socket.
The cover needs clearance or will rub as you move the shifter from left to right. Use a metal hammer and hit the interference area on the panel.

Install the cover use Loctite to keep these from rattling loose
Reinstall the tunnel shield, 6 washer nuts and the 1 bolt above the cat. Don’t forget the o2 sensor clip
Install the exhaust loosely don’t forget the gasket
Tighten the exhaust hanger to the body
Tighten the exhaust completely
In the car you will have to reinstall the silver arm.
Undo the lock up front to center the shifter so it slips in 3rd and 4th with minimum resistance.
Lock the lock.
Adjust the length of the silver arm (it is not a turn buckle, so one side will have to be removed to lengthen or shortened
You want to make sure it has enough lateral movement to engage the channels including reverse.
This can have a bit of excess and the travel can be limited using the stops.
This is the correct orientation of the locks given what they supply
The two allen bolts and the nut go towards the rear, the grub screw goes towards the front and is locked with another grub screw from above.
The allen bolts with the nuts control side to side max travel set these so they guide the shifter into 1st and 5th.
The grub screw comes into play for reverse. With the reverse lockout cable pulled up, this should allow the shifter to move over past 1st and grab reverse, you can limit the travel with this grub screw and lock into place.
Trim cup holder to fit shifter, you can alternatively just back half the rear portion to mount the mirror adjustment/seat heater switches. It will be a puzzle of sorts. Install the low plate, spread the pocket that sits in front of the cup holders wide and place vertically so the screw is facing up, move the cup holder into place taking care of the reverse lockout cable and the mirror adjustment switch plugs, make sure to plug in the 12v accessory plug, insert the down tubes/knee bars, tighten everything.
Location will shift, I know in PNWr53’s install he had both of the cup holder tabs intact, with mostly the driver side on the bottom plate. On my install I had most of the passenger side intact. YMMV.
The shift **** thread is M12 x 1.5. It is a common euro spec
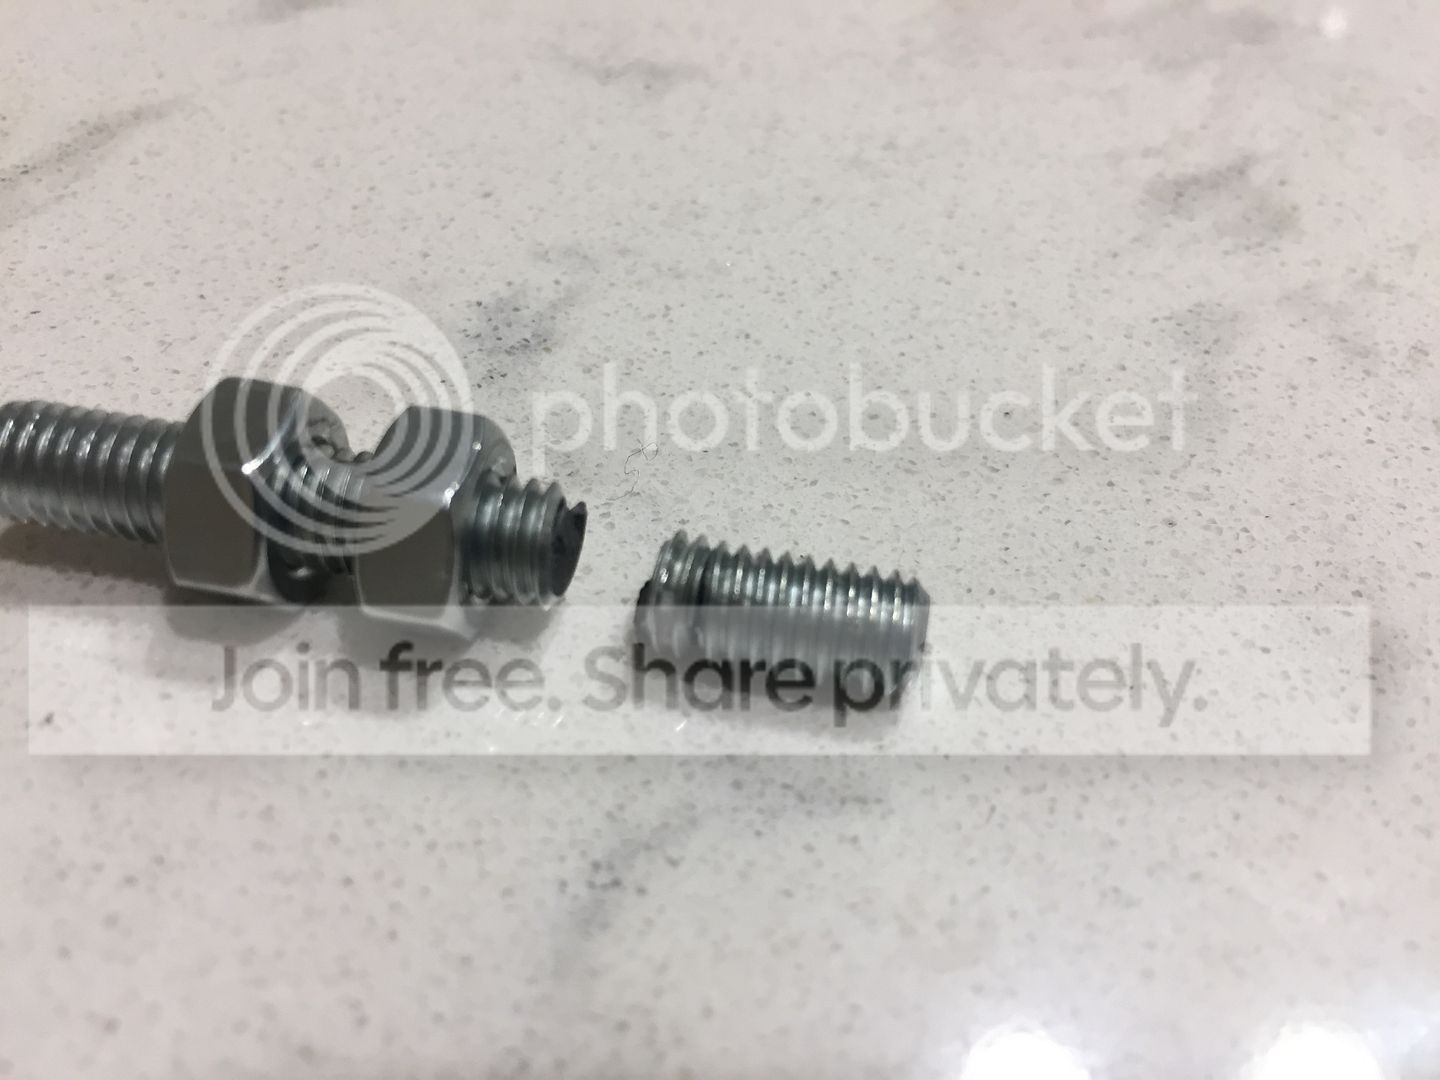
The threaded rod between the two ball joints is m6x1.0 ~42mm long. It is not a turn buckle so you can just cut the threads off a long bolt if this breaks on you. It sits pretty much bottomed out on both ball joints as shipped I think I have roughly 20mm of threads between the ball joints. I tried to install it with the turn buckle on and a light tap ended up cracking the rod in 2 places
Why Coolerworx:
I originally wanted to run all cravenspeed gear on my car when I first bought it rather than mix and match companies. After adding up the shifter, shift ****, shift well cover, shifter bushing, and finding a way to seal up the hole that would need to be cut, it was only a little bit more for a self centering coolerworx shifter.
Purchased from coolerworxna, they had a pretty good deal, and the exchange rate was in our favor. Shipping only took a couple days.
 [/URL
[/URLCoolerworx install:
Inside the car:
Remove shift **** (Pull up, make sure not towards your face)
Pull up trim ring/shift boot and remove (Retained by zip tie)

Remove mirror/seat warmer switch (Insert hand in shift well towards rear and pull up)

Release 4 plugs on the switch two black and two grey (note orientation)

Undo 4 phillips (two in switch cavity and two in cup holders)

If equipped, undo front torx screw holding the pocket in front of cup holders
Undo down tubes/knee tubes (Passenger side can be easily accessed by opening the glove box, for driver side reach under steering wheel, grab panel with many fingers and pull firmly to release panel granting access to top bolt)
Jiggle center console assembly and free down tubes
As you lift center console undo 12v accessory plug
Undo the bottom panel/downtube stops (retained by two nuts)
Under the car:
Jack up the car. (I was able to do this with just some ramps on one side of the car, the higher the car is the easier it will be. Use jack stands, ramps, etc do not end up in the ER or dead from a fallen car)
Put some kind of lubricant/penetrating oil on the bolts for the exhaust and let sit (I used WD40)
Remove the two bolts. (I used a 130 ft lb impact gun and had no success, a long jack handle was able to break them loose for removal)
Undo the 6 10mm bolts holding the exhaust hanger (exhaust will drop, be careful)
Undo the 6 washers holding the center exhaust tunnel shield (also 10mm)
Undo the 1 bolt sitting above the catalytic converter (8mm)
Undo the o2 sensor wire clip (clips onto heat shield)
Remove the exhaust shield
Undo the torx bolts holding the shifter box
Inside the car press in on the retaining tabs (2 in front, 1 in rear)
Push shifter box down
Using a flat head screw driver undo the tabs on the shifter box
Reattach shifter box to tunnel using at least 2 bolts (on opposite ends, do all 4 if easy to do)
Using a 14mm wrench stick it between the ball and the socket. You are trying to pry against the shifter not the linkage, pull down on the wrench not up.
On the ball 90* rotated, if you have the right thickness wrench and are lucky firmly tapping the wrench between the ball and socket will free the ball.
Undo the spring clips, a set of channel locks will help immensely in getting a firm purchase, you can also wait to drop the box again.
Drop the box and separate the shifter box from the cables
Remove the gaskets on the shifter cables
IMPORTANT
Remove the arm made of the ball joints (silver) and the protruding ball or it will be difficult to fit (10mm nut, ***** can be removed from socket by pulling the spring clip, rotating and pushing toward the threaded end)
Loosely insert the cables into the coolerworx shifter box
Install the shifter box with the supplied allen bolts (these really should be knurled to help with install)
Keep in mind the fit will be pretty tight, you may have to slightly file one of the slots forward or aft
Install allen bolts with lock washer then the wide washer, use blue loctite, there is no gasket here and you do not want these to rattle loose. They also supply nuts for the top if you choose to use them.
Install the smaller ball first, with the other cable loose you will have room to start sliding in the spring clip. These will install at 90* since there is a lip for the cover now. You can get these started with your fingers, try and get it slightly past the hole for the other cable.
You can now insert the cable for the larger ball completely, if you were able to slide the spring clip enough in the step above you can use a screw driver to pry against the shift cable to seat the first spring clip. If your screw driver is not wide enough you can use two.

As above you can get the second spring clip started with your finger. You can then pry against the lip on the bottom to help seat this clip.

One of these cables are usually mounted at 90* so they will sit at a 45* on the ball. The plate on the bottom will more or less prevent it from rotating off. Hopefully the contact does not cause drag. Consider lubricating the back side of the socket.
The cover needs clearance or will rub as you move the shifter from left to right. Use a metal hammer and hit the interference area on the panel.

Install the cover use Loctite to keep these from rattling loose
Reinstall the tunnel shield, 6 washer nuts and the 1 bolt above the cat. Don’t forget the o2 sensor clip
Install the exhaust loosely don’t forget the gasket
Tighten the exhaust hanger to the body
Tighten the exhaust completely
In the car you will have to reinstall the silver arm.
Undo the lock up front to center the shifter so it slips in 3rd and 4th with minimum resistance.
Lock the lock.
Adjust the length of the silver arm (it is not a turn buckle, so one side will have to be removed to lengthen or shortened
You want to make sure it has enough lateral movement to engage the channels including reverse.
This can have a bit of excess and the travel can be limited using the stops.
This is the correct orientation of the locks given what they supply
The two allen bolts and the nut go towards the rear, the grub screw goes towards the front and is locked with another grub screw from above.
The allen bolts with the nuts control side to side max travel set these so they guide the shifter into 1st and 5th.
The grub screw comes into play for reverse. With the reverse lockout cable pulled up, this should allow the shifter to move over past 1st and grab reverse, you can limit the travel with this grub screw and lock into place.
Trim cup holder to fit shifter, you can alternatively just back half the rear portion to mount the mirror adjustment/seat heater switches. It will be a puzzle of sorts. Install the low plate, spread the pocket that sits in front of the cup holders wide and place vertically so the screw is facing up, move the cup holder into place taking care of the reverse lockout cable and the mirror adjustment switch plugs, make sure to plug in the 12v accessory plug, insert the down tubes/knee bars, tighten everything.
Location will shift, I know in PNWr53’s install he had both of the cup holder tabs intact, with mostly the driver side on the bottom plate. On my install I had most of the passenger side intact. YMMV.
The shift **** thread is M12 x 1.5. It is a common euro spec
The threaded rod between the two ball joints is m6x1.0 ~42mm long. It is not a turn buckle so you can just cut the threads off a long bolt if this breaks on you. It sits pretty much bottomed out on both ball joints as shipped I think I have roughly 20mm of threads between the ball joints. I tried to install it with the turn buckle on and a light tap ended up cracking the rod in 2 places

Last edited by seattlejester; May 6, 2020 at 05:31 PM.

Thread
Thread Starter
Forum
Replies
Last Post
jbell
Drivetrain (Cooper S)
43
Oct 15, 2018 10:03 AM
Interior/Exterior Short Shifter install question
Haseo461x
Interior/Exterior
4
Aug 20, 2011 12:08 PM
Interior/Exterior Ham fisted mechanic tanks shifter install
SpunkytheTuna
Interior/Exterior
8
Mar 27, 2007 09:15 PM