So, I had a vacuum leak at the green gasket. I just replaced it aaannnddddd It's still leaking. I believe I still have a leak there because if I stick a hose down to listen to the top, flat side of the gasket, I can hear a whistle/howl that goes up in pitch with the RPM. You can't hear it at either of the short ends of the gasket but you can also hear it if you stick a hose up to the long, flat bottom side & listen. There's a lot more to the story but that's the meat of what I'm up against now. So then:
I replaced the gasket with a Victor Reinz "value line" gasket from Mini Mania. Is there ANY difference between this gasket and the OEM Mini gasket?? In my experience, VR actually makes many of the OEM gaskets so I figured this wouldn't matter.
Has anyone gotten a "bad out of the box" green gasket? Would it be worth replacing again or just bite the bullet & replace the black plastic inlet tube?
Do these inlet tubes eventually just warp / distort around the SC fitting area?
Is there any way to check it / measure certain areas to verify its bad before replacing it?
Considering how much aftermarket support there is for these cars, I can't believe this fitting hasn't been re-worked by anyone. It's seriously the most poorly engineered thing on the whole car. I saw that M7 tried making a replacement a few years ago but they seem to have stopped...
Make sure it is lined up properly. I had my Mini in service mode and it was pretty easy to do. When the front end was back on, it was pretty tough to get it back in place and get the bolt back on.
Make sure it is lined up properly. I had my Mini in service mode and it was pretty easy to do. When the front end was back on, it was pretty tough to get it back in place and get the bolt back on.
Yeah, I've done it in service mode previously but I think I've figured out a pretty good alternate method. I pulled the Intercooler & the 3 nuts for the driver's side IM horn. Then pull the bumper & beam which allows you to shift the driver's side of the MFE forward a few inches. This gets you just enough room to slide the horn off the IM and the SC inlet pipe off of the SC all in one motion, leaving the BPV tube connected & everything.
I did it this way because you don't have to drain / remove the radiator, saving you from bleeding the coolant system & allowing you better access to the green gasket area when the car is fired back up to check / troubleshoot stuff.
So, I had a vacuum leak at the green gasket. I just replaced it aaannnddddd It's still leaking. I believe I still have a leak there because if I stick a hose down to listen to the top, flat side of the gasket, I can hear a whistle/howl that goes up in pitch with the RPM. You can't hear it at either of the short ends of the gasket but you can also hear it if you stick a hose up to the long, flat bottom side & listen. There's a lot more to the story but that's the meat of what I'm up against now. So then:
I replaced the gasket with a Victor Reinz "value line" gasket from Mini Mania. Is there ANY difference between this gasket and the OEM Mini gasket?? In my experience, VR actually makes many of the OEM gaskets so I figured this wouldn't matter.
Has anyone gotten a "bad out of the box" green gasket? Would it be worth replacing again or just bite the bullet & replace the black plastic inlet tube?
Do these inlet tubes eventually just warp / distort around the SC fitting area?
Is there any way to check it / measure certain areas to verify its bad before replacing it?
Considering how much aftermarket support there is for these cars, I can't believe this fitting hasn't been re-worked by anyone. It's seriously the most poorly engineered thing on the whole car. I saw that M7 tried making a replacement a few years ago but they seem to have stopped...
Any help on this would be HUGELY appreciated!!
Just trying to figure out what's wrong with my car, if it's a vacuum leak or not. You mind checking out this video and telling me if this is what your leak sounded like? Thanks for the help. https://m.youtube.com/watch?v=2tLxD_4jKwM
I had to replace the duct horn two times. One from factory had worn out an oblong hole in the attachment area where the green jam gasket is. Second one was bit warped from MINI, maybe came off the mold wrong so wouldn't seat properly.
IMO no matter what the gasket was for, use MINI brand.
And when installing that duct horn it can be a *****. The green gasket is called a Jam Gasket. It's called that because you have to "jam" the duct horn home tightly at the bottom before fastening it down. It can be a bear to do, and if not done correctly ( By putting the car into Service mode ) you will hear a leak, especially when driving under a bridge or through a tunnel.
Did you fully seat both the MAP sensor source and vacuum source to the black intake tube?
Is your bypass valve working as it should? No broken spring, torn diaphragm?
Have you connected the vacuum source from the throttle body to the tank ventilation system on the passenger side?
Did you crack the black tube and are chasing the wrong suspect?
It does sound like a vacuum leak, but hard to tell where from.
When we have the system apart we'll lay a bead of black RTV in the mating surface of the black tube to aide in sealing the system more positively.
Yep, I've checked all of the above. I actually really like the idea of the RTV bead in the pipe-gasket surface. If it leaks again, I'm totally doing that.
Looks like I will be replacing the duct horn as the hole for the retaining bolt was stripped, which made the hole in the horn oblong and allowed the green gasket to leak by. I am trying to buy a helicoil kit to repair the threads but cannot find a diagram for the bolt thread pitch. Anyone know it off the top of their head?
I found it easiest by first sliding the well lubed round part on to the manifold. But only slide this part on about half way. Now slide the horn end on and be sure that it seats properly by looking under and on the sides. Now you can slide the round end all the way up and you should hear and feel a "pop" sound indicating the horn has seated. Look under horn to be sure and finally look at the screw hole, It should be lined up almost perfectly.
Using lube when disabling the round part works wonders. I use a flat head screwdriver and lots of lube and pry down on the rubber tube and force the end off and then the horn side just pops off. I put my fingers in the throttle body side and pull down with force while using the screw driver to help slide it off. I can do this in one fluid motion now.
I learned this by trial and error when I broke a map sensor line and had to tear it all apart again.
When I did my front end service without new gaskets (which is really dumb just buy them all) I took some seethrough red anerobic (seals up without exposure to air) and slid a light coating around the inside of the green gasket after i cleaned the part where it mates to the supercharger. lined it all up, shoved pretty good, no vac leaks.
I found it easiest by first sliding the well lubed round part on to the manifold. But only slide this part on about half way. Now slide the horn end on and be sure that it seats properly by looking under and on the sides. Now you can slide the round end all the way up and you should hear and feel a "pop" sound indicating the horn has seated. Look under horn to be sure and finally look at the screw hole, It should be lined up almost perfectly.
Using lube when disabling the round part works wonders. I use a flat head screwdriver and lots of lube and pry down on the rubber tube and force the end off and then the horn side just pops off. I put my fingers in the throttle body side and pull down with force while using the screw driver to help slide it off. I can do this in one fluid motion now.
I learned this by trial and error when I broke a map sensor line and had to tear it all apart again.
I'd love to follow your advice on this, but after reading through this several times trying to visualize what you're describing, I have no idea. If you could take the time to re-write using the actual names of each component, that would be greatly helpful.
I'd love to follow your advice on this, but after reading through this several times trying to visualize what you're describing, I have no idea. If you could take the time to re-write using the actual names of each component, that would be greatly helpful.
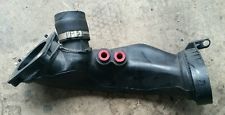
Once you get to this part, it will become clear. The "round" part that I kept referring to is the intake. The horn side is simply that, "the horn" and the only other part on this duct tube is the "throttle body". There are three main components on this duct, the "horn", "intake" and finally the "throttle body". The small red holes are the vent tubes leading to the brake booster and map sensor.
Rest assured, follow along with the video and when you get to this point it will become crystal clear. The author of the video admits that this part is his least favorite part on the mini. The video jumps past him actually removing the tube.
It's not a hard job at all. I was very intimidated with the mini at first but now I love working on it.
The intake duct is the hardest part of the job but it's not that bad with a few pointers. It's also the most delicate because it has two vent tubes that can be broken if not careful. This is also where the green jam gasket goes.
Using lube when disabling the round rubber hose works wonders. I use a flat head screwdriver and lots of lube and pry down on the rubber tube while using my fingers in the throttle body side and pulling down with force. All while prying with the screw driver on the round intake tube to help slide it off. Once the rubber tube is clear of the intake, the horn side will come free with a little tug.
When reassembling.....
I found it easiest by first sliding the well lubed round part on to the manifold. But only slide this part on about half way. Now slide the horn end on and be sure that it seats properly by looking under and on the sides. Now you can slide the round end all the way up and you should hear and feel a "pop" sound indicating the horn has seated. Look under horn to be sure and finally look at the screw hole, It should be lined up almost perfectly.
The round rubber hose or tube should be generously sprayed with lube followed by prying the rubber open to let the lube saturate. Use a strong large screw driver or pry bar to work the tube down some. It's on there tight as heck. Put a few fingers down the throttle body side for leverage and pull down while prying the rubber hose down. Keep working it and it'll slide off. You will not be able to remove the horn side first. The rubber end must be pulled down before the horn side will become free.
Putting it back on is the same, but slide the rubber hose on the manifold only half way. then start working the horn side on. Once the horn side is almost completely on, slide the rubber hose part completely up and the horn side will follow with a "pop" sound. Make sure the horn side is on properly by looking underneath and all around. You'll know it's seated by the screw hole location being centered. Put the hose clip back on, insert and tighten screw and the hardest part is done.
Hey all I had a question of where the green gasket should be seated before sliding the intake tube back in place. I�m assuming it should be seated in the intake tube, but just wanted to make sure it shouldn�t be on the supercharger side.
The Green Goblin is taunting me and it ain't no fun.
First experience with re-assembly and it's proving to be a bugbear to get the inlet tube to "pop" proper into place and seat correctly.
Now taking a de-stress break with a nice beer because I was getting frustrated and need to chill before re-attempt as I was nearing redline
and almost ready to resort to brute force BFHammer!!!
Hey all I had a question of where the green gasket should be seated before sliding the intake tube back in place. I�m assuming it should be seated in the intake tube, but just wanted to make sure it shouldn�t be on the supercharger side.
Just did my first major service (SC, water pump, CPS O-ring, thermostat etc.) and it wasn't too bad. Now I'm getting a whine air leak. Didn't do it immediately, after a day or so. It was a supercharger replacement as the old one was making bad noises. I got the replacement from someone who said it was from a wreck and I assumed the sweeping outlet? was never removed as I got it in one piece. Now I'm not sure. See the video for the sound it's making and I can change the sound by pushing it. I tried pushing/moving the plastic intake tube which made no difference. The sound is coming from the belt side. Thoughts?