When you click on links to various merchants on this site and make a purchase, this can result in this site earning a commission. Affiliate programs and affiliations include, but are not limited to, the eBay Partner Network.
Excellent job! I grew up , the son of a British Motors dealer, in MD. My first Mini, a 61. Wish I still had that one. Even more, wish I still had access to the shop. Lucky you.
Wow man its really coming along. Cant wait to see the finished product. You gonna park it for the winter?
Thanks, yeah the shiney stuff makes me think there is a end in sight. lol
And nope this is my only daily driver I have the 48 Pontiac convert (post #11) as my summer driver that gets parked.
Originally Posted by zenbuilder
Excellent job! I grew up , the son of a British Motors dealer, in MD. My first Mini, a 61. Wish I still had that one. Even more, wish I still had access to the shop. Lucky you.
Thanks, this is actually all being done in my driveway and single car garage so far. Will be going out to the shop to ge the final body paint but the small stuff doors, hatch, roof and bumpers will be done at home.
Old school Minis are cool just a little small for a DD.
More progress yesterday, not as much as I'd have liked since it was pouring rain all day limited space in my tiny garage.
Reinstalled the hatch window and mounted/aligned it so I could paint the roof tonight.
Cut out the front windshield. It was a aftermarket install very shoddy work, last guy cut a chunk out of the dash pad. Repaired the dash and since I am converting the interior over to black I preped masked and painted/dyed the dash, way easier with the glass out.
Pic to show the color change, glove box door and the rest will be painted outside the car
Also steam cleaned the carpet after I had removed the rest of the interior and pulled it up to inspect for rust. Nothing besides a little below the drivers pedals which I took care of. Also fixed the crack that has been on my drivers seat since I bought the car, wasn't any worse just bothered me. It looks better in person after the fix, camera picks up details you really can't see.
Curious how you repaired the seat crack. Since 90% of us suffer from it, I'd like to see more detail and know more how to fix it (vs taking to an upholstery place)
All I can say is WOW! What a lot of work! Even if this is stuff you've done for 24 years, it's still impressive. I'm also interested in how you took care of the seat crack.
Thanks guys.
For the seat I didn't take any step by step pics since no one semed interested in any of the steps in the build so I stopped.
I would normally just replace the panel on the seat since we have a upholstery shop above the body shop I own part of, but I'm going to evently be doing leather so I didn't want to waste the time of pulling part and stiching a new piece in.
Basically I glued the crack together with proper industrial strength vinyl cement, it was only a crack on top plastic not through the fabric. I used HH-66 cement on a toothpick worked into the seam about 2" at a time, leave for 5 min or so then press the seam down with wax paper for a minute to let the adhesive bond. Any that squished out I removed with a little acetone, careful with that just light wipes as it will soften the vinyl quickly. After it was fully bonded I dyed it with SEM black since I am doing the whole interior black, well most of it some will stay grey for accents. Since most would not paint a wipe down with Armor All wipes (natural none shiney) or any vinyl conditioner you want to use should give it back the oils you pulled out with the acetone.
Sorry I can't be of any more help than that.
I just found this thread. Congrats on a great resto. This is kind of new territory: restoring a R53, and it tells us that our favorite cars are getting older.
Looking good! For some reason, I kind of like the way the MINI looked with the paint stripped. You did a seriously good job with stripping the paint BTW. Keep it up! What's next on the list?
Wow I love this thread. 12 years ago I was reading about ordering a mini. Now I am reading about restoring a mini. This is great. I'm wishing I had another car so I could restore mine like this.
More awesome progress!
I can't wait to see what's next.
Thanks man.
Originally Posted by jamez
Thx for the outline finhead. That was more than enough for me to understand how to.
Keep up the amazing work and sharing with the community, you're an inspiration
Great that it helped you out, and just had to share and you guys are the only ones that would care.
Originally Posted by Helix13mini
I just found this thread. Congrats on a great resto. This is kind of new territory: restoring a R53, and it tells us that our favorite cars are getting older.
Never thought of it as a restoration, but I guess you could look at it like that. Not near as big of a job as it looks really would be quicker if I could work on it and not have to spread my time over real work etc.
Originally Posted by takrdown
This is amazing!!! Classic!!! Jealous of your skills!
Thanks, really just what I was trained to do.
Originally Posted by PelicanParts.com
Looking good! For some reason, I kind of like the way the MINI looked with the paint stripped. You did a seriously good job with stripping the paint BTW. Keep it up! What's next on the list?
I did as well, would last about 5min even cleared with all the crap they put on the roads here in the winter.
Next on the list is finishing up the rear quarter patches and seal that up well. Then I am thinking while it's apart I might vent the fenders to have a bit of a different look than all the other Mini's around here. Finish the lower body work and paint. Then finish dying the interior pieces black. I'm sure there will be more things I want to do before it's back together but that's the short list.
Originally Posted by gpwpat
Wow I love this thread. 12 years ago I was reading about ordering a mini. Now I am reading about restoring a mini. This is great. I'm wishing I had another car so I could restore mine like this.
I wish I had a second car to dirve right now as well, my other car is only insured for shows or to have work done on it.
And a small update.
Roof has now been painted the Old English White, which IMO is way better than the brite whte Mini used. I took a pic with the wing next to it to show the difference.
I installed the Windshield and new clips and top molding (third try from FCPeuro on those. )
Installed all the elctronics and windows back into the doors and the hatch, aligned everything and adjusted all the latches.
Finished the vinyl dye on the front seats (they were all taken apart for the process) the kick panels and all the dash pieces. They were all installed back into the car so I have a seat to sit in to move the car around now.
Sorry for the triple post here.
I wanted to ask some opinioins from anyone reading this that might have one.
The dash/door trim I have is the Alloy Pantina which is fine but I'm up for a change. Was going to go with the black leather red stitch, but at $1000 CND for just the 3 pieces on the dash I'm out on that. So I was thinking either color match to the body BRG or go with the Red to match the accents on the mech part of the car? Any input?
What I have
Woud this even work with BRG/white top combo?
Or something like this, only pic I could find of a Green dash.
I would do BRG color match or you can get the wood design? Classy with the BRG. The hot orange only come in the three piece factory, you have a five piece dash. You would have to paint that also.
I really like the old English white top, very nice, like the WC50 kind of.
Good luck, really like how its coming along.
Nope mine is the 3 pieces dash mid 2005 Cooper S.
Yep I can paint the dash/trim any color I choose really just a matter of deciding what to go with. Wouldn't be buying anything just painting what I have so no orange, would be red.
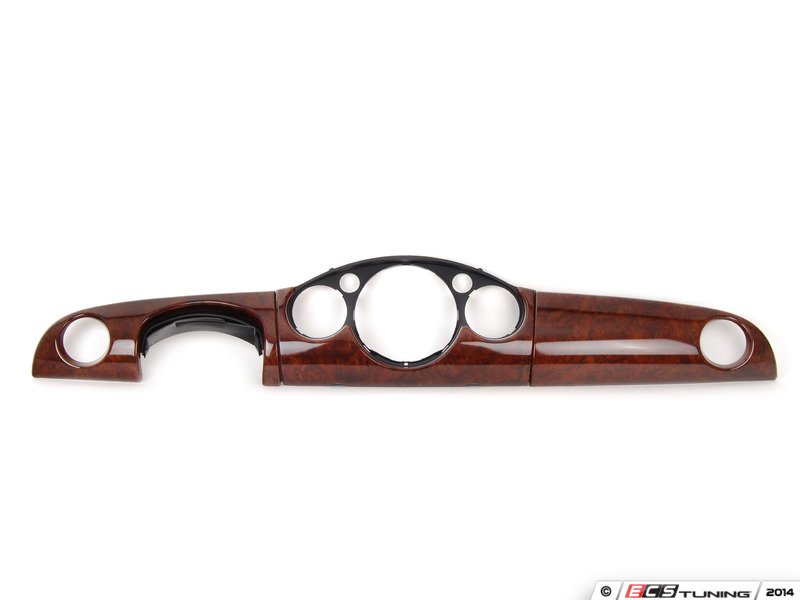
And I was really thinking about getting the wood grain kit when you had it on sale but the one piece was still at full price which is kind of a crazy price to start with.
Fin,
That dash looks great.
If you like the wood grain...why not air brush it?
I'm sure you have the techniques for that style and with your quality level it would be down right astonishing.
Fin,
That dash looks great.
If you like the wood grain...why not air brush it?
I'm sure you have the techniques for that style and with your quality level it would be down right astonishing.
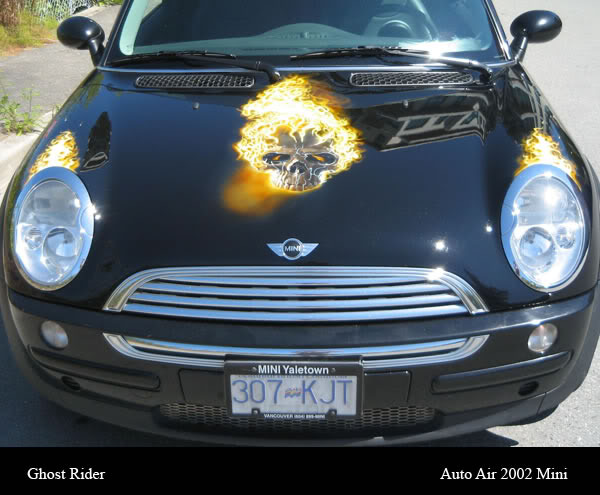
That airbrush work is fantastic...nice real flame techniques...
You could pull off a wood grain better than I ever could..
Here is my first and only attempt in WG paint...I know it's not great but it does turn heads.
Your real flame is so good I know you could duplicate and improve on this easily...I strongly recommend you let some of your wild custom side take over..your doing amazing work.
Sorry for pics I.just ran out and took shots really quick...my good cam is at
home
I'd still like to see your BRG dash...
But I'm trying to convince otherwise..wood is so classy...
Your a 1 WG Nardi wheel away from pure British sports car
Sorry for the triple post here. I wanted to ask some opinioins from anyone reading this that might have one. The dash/door trim I have is the Alloy Pantina which is fine but I'm up for a change. Was going to go with the black leather red stitch, but at $1000 CND for just the 3 pieces on the dash I'm out on that. So I was thinking either color match to the body BRG or go with the Red to match the accents on the mech part of the car? Any input? What I have Woud this even work with BRG/white top combo? Or something like this, only pic I could find of a Green dash.
How about the Old English White? I think that'll look pretty sharp with chrome instrument trim.
Thanks for the opinions guys I'm going to have a go at wood graining it when I get time.
Had a ton of real work to get to the last week or so, didn't get anywhere on the Mini until Thursday. Did all the metal work and body work on the rear tail lights, Friday morning I primed it all up and hit the other small bodywork areas. Firday night I blocked out the entire car with 240-320-400 and then wet sanded with 600, called it a night about 2AM.
Put it together enough to take out to my shop on Saturday morning/afternoon, shop is about a hour away.
Put it up on the hoist (sitting on it in the picture above) we have a 3.5" low profile portable hoist in the paint booth since it's about the best thing to have other than a spray gun. Got it all pulled back apart, masked up and washed down (3 step process) by about 1am. Here is the only pics I took mid paint point 4 coats of BRG base. I fallowed that by 3 coats of High solids clear. Didn't get a pic of that yet, will do when I go back out in a few days to put it all back together.
And for the record I really dig the satin finish in these pics and wish I had of stuck to my original plan of a satin finish clear coat. Just couldn't justify the extra $600 for clear since I had the HS on hand so it was a freebee.


 )
)