
R50/53 Messed up my R50's timing... Please help


I got the head out. It's scary when you realize you have most of the socket sizes memorized... Been working on this car for far too long.
Today is a sad day. It turns out that the R50 engine most certainly is an interference engine. Mine did some pretty good interferein'...
Just dropped it off at the machine shop for valve job #2. It's hard to start a car when all your intake valves break and are stuck open. Aside from a couple tiny marks, the pistons appear to be ok. Gonna check them out more closely when I go to the garage tomorrow.
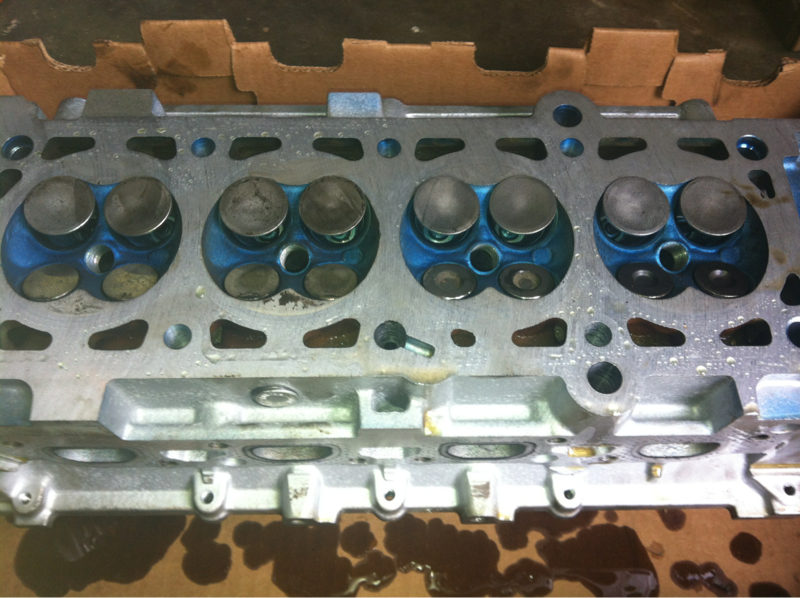
Here are some pics of the damage. *facepalm*
Attachment 79427
Attachment 79428
Attachment 79429
Attachment 79430
Today is a sad day. It turns out that the R50 engine most certainly is an interference engine. Mine did some pretty good interferein'...
Just dropped it off at the machine shop for valve job #2. It's hard to start a car when all your intake valves break and are stuck open. Aside from a couple tiny marks, the pistons appear to be ok. Gonna check them out more closely when I go to the garage tomorrow.
Here are some pics of the damage. *facepalm*
Attachment 79427
Attachment 79428
Attachment 79429
Attachment 79430

1st Gear
Joined: Jul 2012
Posts: 40
Likes: 2
Sorry to hear about your issue, have to say there is something to be said about spending a little extra money on some repair manuals which should have prevented all of your problems. Bentley Publishing is a good start and supplement with Chilton and Haynes. Just sayin!!!! You may may need to take off the timing cover, locate the crankshaft timing gear mark, turn the engine to the correct position, then position the chain on the crank gear correctly, then put the chain on the camshaft gear correctly and then bolt it in place. More work than you anticipated but the results will be fail safe. Hope you didn't damage the pistons, a look from the top end doesn't mean there is no damage. Safe travels, WTMF

Thread Starter
|
2nd Gear
Joined: Jun 2013
Posts: 66
Likes: 0
From: Rhode Island
Thank you, I really appreciate all the help and advice I've received on the forum. You guys are amazing.
It has been a very long summer since buying this car back in June. I knew it had some problems when I bought it, but underestimated the depth of it all. I can't wait to get the car on the road... I'll appreciate it all the more now that I've had it apart multiple times and basically know it inside and out. This is the first time I've done my own repairs past changing my own oil and windshield wipers. I learned quite a bit about being my own mechanic "the hard way" this summer... but like you said, I'm becoming somewhat of an expert on how to repair my mini, which will be valuable knowledge in the future.
It has been a very long summer since buying this car back in June. I knew it had some problems when I bought it, but underestimated the depth of it all. I can't wait to get the car on the road... I'll appreciate it all the more now that I've had it apart multiple times and basically know it inside and out. This is the first time I've done my own repairs past changing my own oil and windshield wipers. I learned quite a bit about being my own mechanic "the hard way" this summer... but like you said, I'm becoming somewhat of an expert on how to repair my mini, which will be valuable knowledge in the future.

2nd Gear
Joined: Aug 2012
Posts: 55
Likes: 0
Sorry to hear about your issues. But i have noticed a few things wrong with your setup and also the cylinder head. For one the engine should be a noninterference engine. On both models if every part is correct.
I rebuilt my whole 2003 R50 motor half a year ago from top to bottom, a new cylinder head and new piston rings and cleaning, along with new water hoses and all the major parts needed to be change. This was due because my cylinder #1 intake valve broke.
When i took off my head i never let the chain fall down(to not let timing becoming out of adjustment), and i also marked every part and alignment to the correct placement where the re install process should be with every new part. Having timing correct is major. The Camshaft spocket should be facing 11'o clock for TDC along with the piston 1 Compression stroke with both valves closed.
There are a few problems i see with yours.
#1. your cylinder head looks like you have two cylinders with different exhaust valves then the other two, which looks like the Supercharged model version, and the other two normal. This is a big no-no since every valve needs to be the same. If it's different then that means those valves are different sizes and will be longer and would create hitting the pistons at TDC. (See yours Vs Mine)
VS
#2. If you sent in your head to get it machined, then they are doing it wrong and putting wrong parts in. The supercharged valves are completly different then the Non-Supercharged, since the Non-S valves are shorter and flat, to comply with the flat piston top heads. The Supercharged version valves are longer and go deeper into the Piston heads, but the Supercharged Pistons have a groove on the top to comply with the form of the valves and length of them. (So this issue would cause them hitting)
I notice you didn't clean the carbon build up on the pistons, and your just doing a cylinder rebuild. I did all mine and made it difference. Your cylinders are due for a cleaning and with the glaze on the cylinder walls, don't expect high compression readings.
So with some of the information i have provided, looks like you have gotten a Supercharged version cylinder head for a Non-Supercharged engine(Or at least with different parts). Along with the timing being incorrect i feel this needs to be corrected.
When i rebuilt mine i cranked it a few times to build up oil pressure, filled the crankcase with oil and cylinder head, put the head cover on and checked compression, all my readings were 195lbs for each cylinder and this was before the new cylinder rings were broken in so should be higher now. then i put the spark plugs in and it fired up on the first stroke and ran perfect with me running the engine at a rpm of 1500-2000 rpm for 10 mins for the break in process. But what helped was me marking timing marks and making sure i put everything in right place. I hope you can get yours running. So i will provide with a few photo's so you can try and see how mines went.
From start to finish pictures. (Not all pictures included too many to post :P) But a rough draft short summary.
(Service Mode)

(Process of taking head off)

(Cylinder head off and 10+ years of buildup)

(Block with 10+ years of buildup)

(On Table)
(10+ Years carbon buildup getting ready to clean)

(Cleaned piston and getting ready to put new Piston rings on)

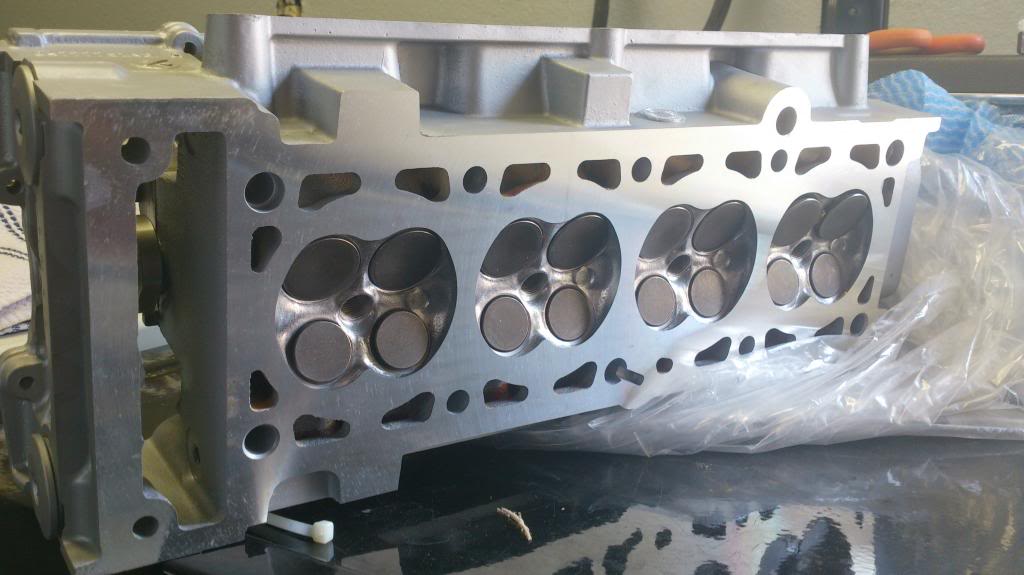
(Cylinder head with all same valves. No difference between them)
(Pistons out and prep for deglazing)

(Pistons in block with cleaning done)

(Closeup of pistons and cylinder walls deglazed and crosshatched 45'degrees)

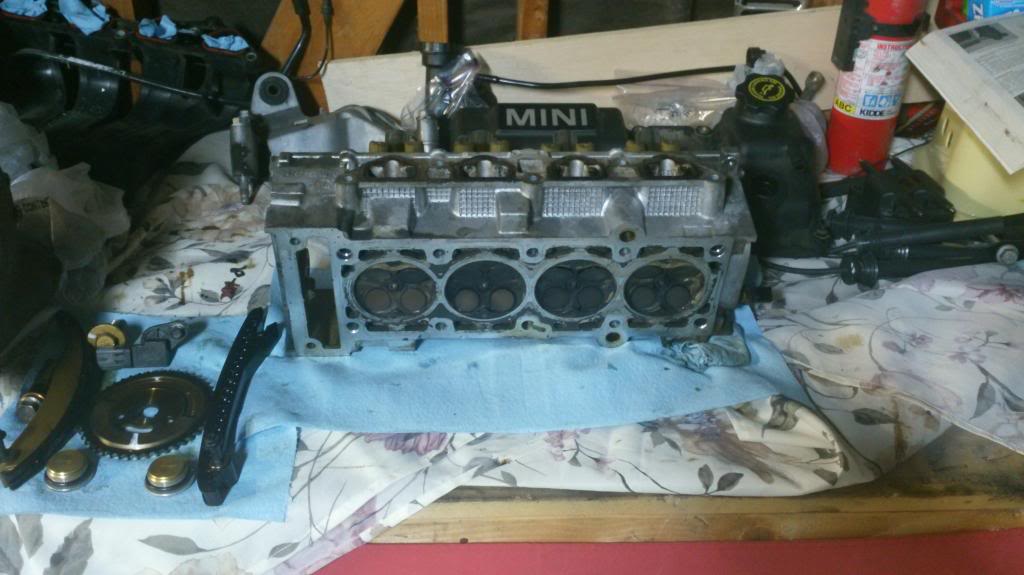
(Cylinder head back on block)
So as you can see my cylinder head has all the same look valves and has no painted blue on it either. I hope this information helped and sorry for long post!.
I rebuilt my whole 2003 R50 motor half a year ago from top to bottom, a new cylinder head and new piston rings and cleaning, along with new water hoses and all the major parts needed to be change. This was due because my cylinder #1 intake valve broke.
When i took off my head i never let the chain fall down(to not let timing becoming out of adjustment), and i also marked every part and alignment to the correct placement where the re install process should be with every new part. Having timing correct is major. The Camshaft spocket should be facing 11'o clock for TDC along with the piston 1 Compression stroke with both valves closed.
There are a few problems i see with yours.
#1. your cylinder head looks like you have two cylinders with different exhaust valves then the other two, which looks like the Supercharged model version, and the other two normal. This is a big no-no since every valve needs to be the same. If it's different then that means those valves are different sizes and will be longer and would create hitting the pistons at TDC. (See yours Vs Mine)
VS
#2. If you sent in your head to get it machined, then they are doing it wrong and putting wrong parts in. The supercharged valves are completly different then the Non-Supercharged, since the Non-S valves are shorter and flat, to comply with the flat piston top heads. The Supercharged version valves are longer and go deeper into the Piston heads, but the Supercharged Pistons have a groove on the top to comply with the form of the valves and length of them. (So this issue would cause them hitting)
I notice you didn't clean the carbon build up on the pistons, and your just doing a cylinder rebuild. I did all mine and made it difference. Your cylinders are due for a cleaning and with the glaze on the cylinder walls, don't expect high compression readings.
So with some of the information i have provided, looks like you have gotten a Supercharged version cylinder head for a Non-Supercharged engine(Or at least with different parts). Along with the timing being incorrect i feel this needs to be corrected.
When i rebuilt mine i cranked it a few times to build up oil pressure, filled the crankcase with oil and cylinder head, put the head cover on and checked compression, all my readings were 195lbs for each cylinder and this was before the new cylinder rings were broken in so should be higher now. then i put the spark plugs in and it fired up on the first stroke and ran perfect with me running the engine at a rpm of 1500-2000 rpm for 10 mins for the break in process. But what helped was me marking timing marks and making sure i put everything in right place. I hope you can get yours running. So i will provide with a few photo's so you can try and see how mines went.
From start to finish pictures. (Not all pictures included too many to post :P) But a rough draft short summary.
(Service Mode)
(Process of taking head off)
(Cylinder head off and 10+ years of buildup)
(Block with 10+ years of buildup)
(On Table)
(10+ Years carbon buildup getting ready to clean)
(Cleaned piston and getting ready to put new Piston rings on)
(Cylinder head with all same valves. No difference between them)
(Pistons out and prep for deglazing)
(Pistons in block with cleaning done)
(Closeup of pistons and cylinder walls deglazed and crosshatched 45'degrees)
(Cylinder head back on block)
So as you can see my cylinder head has all the same look valves and has no painted blue on it either. I hope this information helped and sorry for long post!.
Last edited by Tinythumb; Aug 9, 2013 at 07:33 PM.
Thread Starter
|
2nd Gear
Joined: Jun 2013
Posts: 66
Likes: 0
From: Rhode Island
Thanks for all that info! The reason there are 4 valves that are different from the rest is because they are the 4 that needed to be replaced the first time. All the rest of the valves were just cleaned up and re-used.
Last edited by sperljam; Aug 10, 2013 at 07:25 AM.
2nd Gear
Joined: Aug 2012
Posts: 55
Likes: 0
No problem on the info, but i understand the 4 valves you say were replaced because of them needing too. But the look of them are wrong. The different look and shape of them are meant to serve a different purpose for the compression and combustion process.
I would make sure you got the right non-s cylinder head and parts along with the right valves. And same matching parts. Who ever is your machining business, i would look into getting the correct one. Too bad your far away or i would build your car to the running status.
If you cant get this rebuild done yourself, i would get it repaired by a company so this damage will get covered and the timing corrected. If the rebuild was started without having everything timed and marked, then more of a pain later on to get it set. And since there is damage already there could be more on the bottom end of the engine that cant be seen from above. i wish you the best of luck on doing it yourself.
By the way, whats with the different color blue on your head?
Last edited by Tinythumb; Aug 9, 2013 at 11:30 PM.
Thread Starter
|
2nd Gear
Joined: Jun 2013
Posts: 66
Likes: 0
From: Rhode Island
The head and all is the proper R50. This is the head that I removed from the car, I didn't replace the head. Only those 4 exhaust valves were replaced. I can check with the machine shop if you think those valves aren't correct. I just figured they were aftermarket or more advanced or something compared to the original valves. As for the blue, I'm guessing that was part of the machine shop's cleaning/resurfacing job.
The problem was not so much that the valves are incorrect, I just didn't have a firm knowledge base of the job when I got into it. I'm a schoolteacher in my late 20's, definitely not an experienced mechanic, and this is my first time working on an engine.
This whole debacle stems from the fact that I didn't understand that the shop gave me the head back with the camshaft in a different position than when I dropped it off to them. So when I put the head back in, I didn't adjust anything to get the crankshaft to align properly with the camshaft. I also torqued up the cam bolt with the sprocket in the wrong place. I ended up doing this to the sprocket:
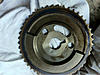
The pin that locks into the notch on the sprocket punched a nice indentation into the back of the sprocket.
So, I now have a much greater knowledge and appreciation for getting the timing just right. After the car wouldn't start, I went back in and adjusted the timing just right, but before taking the head out the second time. Obviously it was too late at that point, but i didn't learn that until removing the head today. I'll be removing the timing cover again when i go to reassemble to make sure the timing chain marks are correct on both shafts.
2nd Gear
Joined: Aug 2012
Posts: 55
Likes: 0
Yeah not having a good start and know how can create these types of problems.
A lot of times they never give you the head back to the normal alignment for TDC, its the repairer to figure it out.
Well good luck and keep us informed on your rebuild!
A lot of times they never give you the head back to the normal alignment for TDC, its the repairer to figure it out.
Well good luck and keep us informed on your rebuild!
Thread Starter
|
2nd Gear
Joined: Jun 2013
Posts: 66
Likes: 0
From: Rhode Island
While I wait to get the head back from the machine shop, I have a question. I want to make absolutely sure I install everything properly this time, obviously...
Is there a way to tell whether the crankshaft is positioned correctly, to go along with getting the copper chain links aligned with the arrows on the crankshaft sprocket?
I made sure the chain was lined up with the marks when I removed the head. I never tampered with the crankshaft sprocket. So, the crankshaft, pistons, and crank sprocket are all set at factory settings. But I don't know if there is a difference between the compression stroke and the exhaust stroke that I need to look for.
The Bentley book tells you to line up the copper chain links with the timing marks on the sprocket, but it doesn't say whether there is more than one rotation of the crankshaft that could "appear" correct as far as matching chain to sprocket. I didn't know to mark the timing cover/pulley before removing things, so that trick doesn't help me at this point.
As it sits right now, the 2 arrows on the crank sprocket are facing the front of the car, all 4 pistons are halfway up/down their cylinders, and the copper links are on the arrows.


Talking about jumping in with both feet. Impressive.
Also, I believe the blue color is the marking paint that machine shops use. They spray it on so they can visually tell where material came off when resurfacing the valve seats.
Thread Starter
|
2nd Gear
Joined: Jun 2013
Posts: 66
Likes: 0
From: Rhode Island
Thanks!! I am so relieved... and the feeling of accomplishment is beyond belief! This was definitely a "learn as you go" type project, since I've never really worked on a car before. I hit some serious road blocks, but eventually got the job done and acquired a HUGE amount of knowledge in the process. I haven't done all the numbers yet, but I'm thinking that even with the 2nd valve job, I might still have come out ahead $-wise against taking the car to the dealer. Took about 2 months longer, but it was worth the trouble.
To sum up what went on with my car this summer, I bought the car in June, and knew it had some issues... just had no clue how big the issues were. It started out as a cylinder 3 misfire. I couldn't afford to take it to the dealer so I decided to take it apart myself and just get the head machined. When I took it out, I found that 4 exhaust valves were burned. So I had the machine shop do a valve job. This included removal/installation of the camshaft. When I got the head back, the camshaft was in a different position than when I dropped it off... but I didn't understand engine timing well enough.
I ended up putting the camshaft sprocket on incorrectly. There is a pin sticking out of the camshaft that locks into a groove on the cam sprocket! That means there is only one way for the sprocket to be properly attached to the camshaft. If you attach it in the wrong orientation and torque up the cam bolt, you end up with a little round indentation in the back of the sprocket, and a broken set of valves. I turned over the engine by hand a few times. It was not turning over smoothly, but at the time, I didn't understand how smoothly it should have been moving. (no prior experience to draw from)
I spent the next month or so, about 2-3 days a week trying to start the car. With bent valves that wouldn't close. (I'll try to post some pics of the damaged valves soon.) Obviously, this was not gonna happen. So I finally got the idea, after chatting with people on this thread, to take the head off again and check for damage.
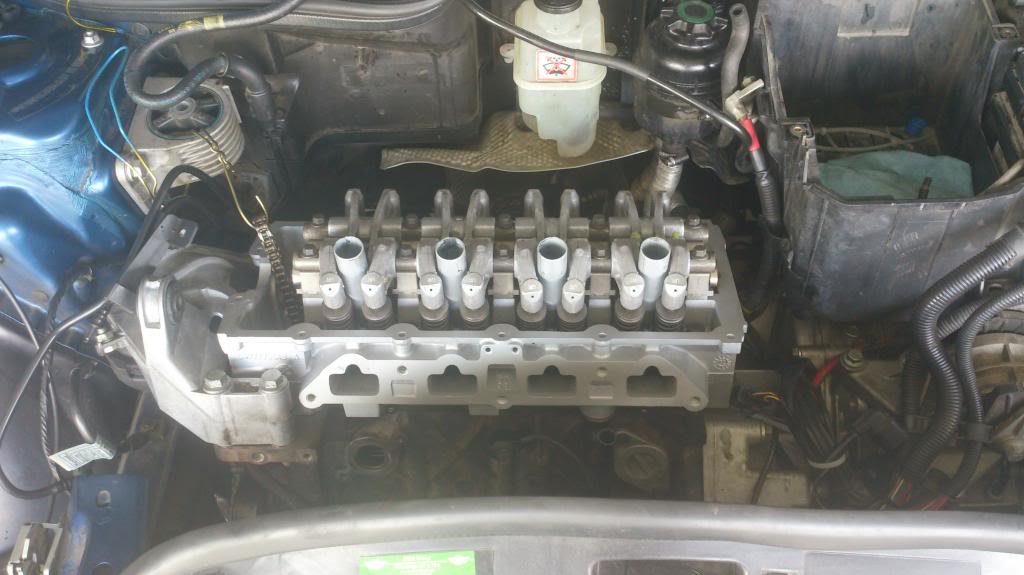
There was obvious damage, so I took it in for a second valve job. It turned out that I had bent every single valve. When I got the head back 2 days ago, I got to work reassembling the engine, slowly... carefully... double checking everything...
I had the timing cover off, so I could get the timing just right. I was able to get the 2 copper links to line up with the crank sprocket timing arrows, and then turned the cam shaft with a wrench on those 2 flat spots to where it would line up properly with the sprocket & BMW cam locking tool. I then engaged the chain with the cam sprocket with the single copper link on the cam timing arrow.
After that, I only needed to look at the Bentley manual to check the torque specs... the rest of the process is memorized at this point! Took it for a little joyride yesterday... she's purring like a kitten! I'm looking forward to finally getting to use my new daily driver!
To sum up what went on with my car this summer, I bought the car in June, and knew it had some issues... just had no clue how big the issues were. It started out as a cylinder 3 misfire. I couldn't afford to take it to the dealer so I decided to take it apart myself and just get the head machined. When I took it out, I found that 4 exhaust valves were burned. So I had the machine shop do a valve job. This included removal/installation of the camshaft. When I got the head back, the camshaft was in a different position than when I dropped it off... but I didn't understand engine timing well enough.
I ended up putting the camshaft sprocket on incorrectly. There is a pin sticking out of the camshaft that locks into a groove on the cam sprocket! That means there is only one way for the sprocket to be properly attached to the camshaft. If you attach it in the wrong orientation and torque up the cam bolt, you end up with a little round indentation in the back of the sprocket, and a broken set of valves. I turned over the engine by hand a few times. It was not turning over smoothly, but at the time, I didn't understand how smoothly it should have been moving. (no prior experience to draw from)
I spent the next month or so, about 2-3 days a week trying to start the car. With bent valves that wouldn't close. (I'll try to post some pics of the damaged valves soon.) Obviously, this was not gonna happen. So I finally got the idea, after chatting with people on this thread, to take the head off again and check for damage.
There was obvious damage, so I took it in for a second valve job. It turned out that I had bent every single valve. When I got the head back 2 days ago, I got to work reassembling the engine, slowly... carefully... double checking everything...
I had the timing cover off, so I could get the timing just right. I was able to get the 2 copper links to line up with the crank sprocket timing arrows, and then turned the cam shaft with a wrench on those 2 flat spots to where it would line up properly with the sprocket & BMW cam locking tool. I then engaged the chain with the cam sprocket with the single copper link on the cam timing arrow.
After that, I only needed to look at the Bentley manual to check the torque specs... the rest of the process is memorized at this point! Took it for a little joyride yesterday... she's purring like a kitten! I'm looking forward to finally getting to use my new daily driver!


2nd Gear
Joined: Feb 2018
Posts: 51
Likes: 4
Thank you for this thread! I have a similar problem and will be taking my timing cover off to reset timing. I replaced a cracked head and must have gotten the timing off a tooth .It runs but not very good. Spits and shutters. I will reset timing using cam and crank marks .Can I reuse the timing cover gaskets and seals?

Neutral
Joined: Nov 2024
Posts: 2
Likes: 0
The engine W10B16A is clearly an interference design.
Additionally you mention the valves for the S version are longer, but they are exactly the same BMW reference number.


Last edited by satoshi; Nov 27, 2024 at 03:20 PM.


Thread
Thread Starter
Forum
Replies
Last Post