

Carbon Fiber Joey Mod DIY!


Thread Starter
|
1st Gear
Joined: Nov 2013
Posts: 39
Likes: 2
Carbon Fiber Joey Mod DIY! (and some random upholstery mods)
Hi all - I got this idea from the new Koenigsegg Regera, which has carbon fiber headlights. I’ve seen a few other carmakers do this too, Alfa Romeo 4C, etc. My car is green and black, so I thought carbon fiber would do the job for a black out.
This was a painstaking project! The headlights are a big enough pain to just open and disassemble, adding carbon fiber work to the mix makes it… a time consuming mess. This took me about two weeks from beginning to end. I am not really experienced with carbon fibering, but I didn’t like the vinyls available (I’ve tried a few) so I figured, what the heck, I’ll learn how to make my own carbon fiber parts. This is only my second project (I know, a little ambitious)—I’ve only covered my dash panels prior to this. The results are not so perfect that McLaren is going to offer me a job, but I’m very happy with the results. The shape of the headlights are rather complex for a single piece of carbon fiber cloth, but I managed to do it. Getting the weave perfectly straight everywhere is a bit frustrating, but it's straight enough for my liking—the headlights aren’t something you’re going to stare at a lot (like a dash panel).
Given my experience with covering my dash panels, I learned quickly that fraying can be a real pain, and even with tape, carbon fiber doesn’t always want to stay put. I plan on covering several other components of the interior, the center console, control console, air vents, speedo etc., so I invested in a vacuum pump (future posts to come when I finish those parts!). The headlights would have been impossible to do without a vacuum pump, but luckily I knew better than to try it without one.
So, on to the process. There are several other threads on opening the headlights, Red Bull has a good one. I used a heat gun after a little accident with the oven no harm done, just a little smoke (ok a lot
  )….
)….
My recommendations for opening the headlights: take your time and be careful! The first one wasn’t too bad to open, but I might have been too confident opening the second one, as it cracked along the edge at the top (not as bad as it sounds, it’s all fixed). If you try to pry too much too quick they can crack…just a warning. There are two clips that have to be removed before you start prying—one is at the top, the other is behind the lens washers in the U shaped part. Once you get the stupid things opened, the inner light plate can be removed by removing 4 screws—no further disassembling is required except to remove the four screws that hold the turn signal lights. Again, be careful, for some reason MINI seems to like to use brittle plastic (I guess they didn't expect me to get in there, )—loosen the screws carefully. If we were only just painting now this might not be that hard, but on to the carbon fibering…. (I think I’ve created my own verb here).
I chose to use a 4x4 twill carbon fiber for my car—it has a more dramatic look than 2x2 carbon fiber and it’s unusual—I like it. Plus, Pagani uses 4x4 twill, so if it’s good enough for them… So, besides a vacuum pump, vacuum bagging, peel ply, bagging tape, laminating brushes, mixing sticks, and a digital gram scale, you’ll need a good epoxy. I used a brand called Raka—mainly because it’s UV resistant! No need to worry about yellowing over time I’ve found it very easy to work with, it’s good stuff.
Steps:
1. lay the carbon fiber on the headlight and conform it to the shape of the headlight, bearing in mind which way you want the weave to lay—don’t trust a tape measure, put it on the part. Allow for enough excess to wrap around the back and tape down. I’ve learned with the way carbon fiber can fray you want a safe margin of error. I also never epoxy pieces that have untaped edges—leave the tape on, it will hold the weave together. Outline your piece with masking tape and cut down the middle of the tape. This will leave some tape on the part you’re using to cover the part, and it will prevent the remaining carbon fiber from unraveling. Watch some youtube videos if you want to learn more about carbon fiber, I’ve found youtube to be the most helpful, especially this one:
. Additionally, I recommending taping over the screw holes for the turn signal so you don’t fill them with dripping epoxy…
2. Add black pigment to some epoxy (30g epoxy per headlight is plenty) to provide a black background for the carbon fiber. If you’re lucky enough to have the black headlights, you can skip this step! Another pointer, you usually use equal amounts of epoxy by weight as carbon fiber, so if your carbon fiber weights 30 grams, use 30 grams of epoxy. I found 30 grams was the right amount for each coat.
3. After the base coat dries, scratch it up with some 120 grit (not wet) so the next layer of epoxy has good contact.
4. Now the fun part. Do one headlight at a time or you will have too much to juggle! The process will involve: 1. preparing your vacuum bag 2. mixing epoxy 3. painting the part with a light coat of epoxy 4. laying the carbon fiber on top of the WET epoxy 5. taping back all the fringe/edges to the back of the headlight 6. painting on TOP of the carbon fiber with the remaining epoxy (it is thus coated from the bottom and the top) 7. place precut pieces of peel ply on top of the WET epoxy (try to avoid loose fringe); place a piece of peel ply under the headlight too—the peel ply will keep the epoxy from sticking to the vacuum bag. You will need a piece of peel ply or breather cloth to run from the part to the vacuum attachment (I used peel ply b/c that’s what I had). 8. Place the part in the vacuum bag, seal it, and then slowly apply vacuum. Stop it occasionally to rearranged the vacuum bag to fit the part well. You do not want a lot of creases on what will be the finished surface, because they can cause the carbon fiber to bunch up in ridges, thus distorting the weave (live and learn…). Assure a good conformity between the carbon fiber, the part, and the bagging material. Check for leaks! Leave the vacuum on until the part dries and don’t remove the part before the epoxy is set!
5. Once you get past step 4, everything else is finishing work! Note that carbon fiber can look pretty bad during the process, but it will turn out alright! You will not need the vacuum pump after step 4. Add one coat of epoxy and dry sand it to assure you have a smooth surface. The remaining process involves layering up the epoxy, do 3-4 coats, waiting for each coat to go tacky before adding the next. You will want to cut out the holes for the projector and turn signal light--up to you when you want to do that. I usually do my trimming after the first coat of epoxy is set.
6. Once you have all your layers of epoxy, it’s sanding time. Prepare for sore arms or get yourself some power tools. Depending on the smoothness of the surface, you may need rougher/finer grit. I used 60 grit just to get rid of drips etc., then moved on to 120. This is a very complex shape to sand and get smooth surfaces! I used a chop stick with a piece of sand paper to get in the little wedge by the light washers---fun! Wet sand through progressively finer grits, 400, 800, 1200, and 1500 if you want.
7. You will have to clear coat the part to make it shine. I used Rustoleum crystal clear enamel and I’m very pleased with it—I’ve used some other clear coats and I like the Rustoleum the best. Spray painting isn’t my forte (again, not much experience), but here’s tips from my limited use: spray a light first coat and wait 5-10 minutes. Once it is set this will give the second coat something to stick to. Don’t go “wet” with the spray until at least the 3rd coat. I’ve learned that a reasonably clean clear coat can be finished to a glass like surface, so don’t worry if it isn’t perfect.
8. Sanding time again! Soak your sandpaper in water before use (make sure it’s wet sandpaper). Depending on how smooth your clear coat is, start with 800 or 1000. Wet sand the surface smooth to at least 1500 grit. I recommend going to 2000 as it will make getting a glass surface easier. Now, the secret bit! I looked all over the internet and found people struggling with how to get a glass smooth clear coat—I didn’t find much help! But I have found the answer! Use a rubbing compound, such as Mothers professional rubbing compound. The bottle says it will remove 1500 grit sanding scratches. I was shocked, this stuff actually works! Apply it with a foam pad and after you've rubbed it a bit, wipe it off with a microfiber cloth.
9. If your arms don’t hurt already, now it’s time to polish—or buy the power tools like I said Save yourself the trouble and get a 3 inch polishing pad (like you would use on a rotary buffer) and a 3 inch velcro backing plate for a drill. A drill will work better than a buffer, at least for this part, because the surfaces are small. Apply rubbing compound to the whole surface of the pad and buff away. It didn’t take me more than a few minutes to get a glass surface using this method
10. Reassemble the headlights! I rubbed all the surfaces with an anti-static anti-fog spray before reassembling. Use butyl rubber glue (it’s sold as a tape) to reseal the headlights, silicone glue is too much of a mess. Butyl rubber tape is an OEM equivalent material.
11. Reinstall the headlights. I have a tip here too. I don’t know how this is supposed to be done, but lining the headlights back up can be a pain (I’m not talking about the beam, I mean centering the lights in the housing). My method: put all the screws back in and tighten them just to the point that they can hold the headlight but are not tight enough that you can’t move the lights with your hands. Then, close the lid (all the way), use a panel opening tool or something that won't scratch the lights to fidget the lights around until they’re where you want them. Then open the hood again and tighten the screws. Voila, the frustration free method of centering your lights!
And there you go! I only know of one company in Japan that makes carbon fiber headlight inserts. Working with carbon fiber is really not too difficult, save yourself the $1000 and do it yourself!
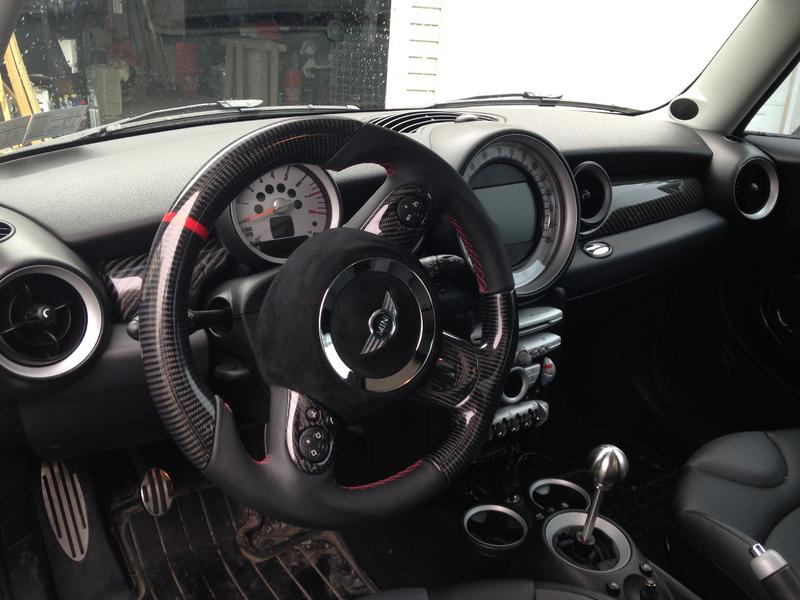
P.s. I've included a few pics of my interior, you can see the carbon fiber dash panels I made, and they are nice and smooth I also upholstered my steering wheel center with suede, goes better with the carbon fiber wheel then the cheap looking plastic stuff from the factory. I can post a how-to on this too if anyone's interested! Also, the chrome ring on the center of the steering wheel is not stock, it's metal--I will have chrome on the air vents once they're covered in carbon fiber. More to come at a later date! Stand by!
This was a painstaking project! The headlights are a big enough pain to just open and disassemble, adding carbon fiber work to the mix makes it… a time consuming mess. This took me about two weeks from beginning to end. I am not really experienced with carbon fibering, but I didn’t like the vinyls available (I’ve tried a few) so I figured, what the heck, I’ll learn how to make my own carbon fiber parts. This is only my second project (I know, a little ambitious)—I’ve only covered my dash panels prior to this. The results are not so perfect that McLaren is going to offer me a job, but I’m very happy with the results. The shape of the headlights are rather complex for a single piece of carbon fiber cloth, but I managed to do it. Getting the weave perfectly straight everywhere is a bit frustrating, but it's straight enough for my liking—the headlights aren’t something you’re going to stare at a lot (like a dash panel).
Given my experience with covering my dash panels, I learned quickly that fraying can be a real pain, and even with tape, carbon fiber doesn’t always want to stay put. I plan on covering several other components of the interior, the center console, control console, air vents, speedo etc., so I invested in a vacuum pump (future posts to come when I finish those parts!). The headlights would have been impossible to do without a vacuum pump, but luckily I knew better than to try it without one.
So, on to the process. There are several other threads on opening the headlights, Red Bull has a good one. I used a heat gun after a little accident with the oven
no harm done, just a little smoke (ok a lot )…. My recommendations for opening the headlights: take your time and be careful! The first one wasn’t too bad to open, but I might have been too confident opening the second one, as it cracked along the edge at the top (not as bad as it sounds, it’s all fixed). If you try to pry too much too quick they can crack…just a warning. There are two clips that have to be removed before you start prying—one is at the top, the other is behind the lens washers in the U shaped part. Once you get the stupid things opened, the inner light plate can be removed by removing 4 screws—no further disassembling is required except to remove the four screws that hold the turn signal lights. Again, be careful, for some reason MINI seems to like to use brittle plastic (I guess they didn't expect me to get in there,
)—loosen the screws carefully. If we were only just painting now this might not be that hard, but on to the carbon fibering…. (I think I’ve created my own verb here).I chose to use a 4x4 twill carbon fiber for my car—it has a more dramatic look than 2x2 carbon fiber and it’s unusual—I like it. Plus, Pagani uses 4x4 twill, so if it’s good enough for them… So, besides a vacuum pump, vacuum bagging, peel ply, bagging tape, laminating brushes, mixing sticks, and a digital gram scale, you’ll need a good epoxy. I used a brand called Raka—mainly because it’s UV resistant! No need to worry about yellowing over time
I’ve found it very easy to work with, it’s good stuff.Steps:
1. lay the carbon fiber on the headlight and conform it to the shape of the headlight, bearing in mind which way you want the weave to lay—don’t trust a tape measure, put it on the part. Allow for enough excess to wrap around the back and tape down. I’ve learned with the way carbon fiber can fray you want a safe margin of error. I also never epoxy pieces that have untaped edges—leave the tape on, it will hold the weave together. Outline your piece with masking tape and cut down the middle of the tape. This will leave some tape on the part you’re using to cover the part, and it will prevent the remaining carbon fiber from unraveling. Watch some youtube videos if you want to learn more about carbon fiber, I’ve found youtube to be the most helpful, especially this one:
2. Add black pigment to some epoxy (30g epoxy per headlight is plenty) to provide a black background for the carbon fiber. If you’re lucky enough to have the black headlights, you can skip this step! Another pointer, you usually use equal amounts of epoxy by weight as carbon fiber, so if your carbon fiber weights 30 grams, use 30 grams of epoxy. I found 30 grams was the right amount for each coat.
3. After the base coat dries, scratch it up with some 120 grit (not wet) so the next layer of epoxy has good contact.
4. Now the fun part. Do one headlight at a time or you will have too much to juggle! The process will involve: 1. preparing your vacuum bag 2. mixing epoxy 3. painting the part with a light coat of epoxy 4. laying the carbon fiber on top of the WET epoxy 5. taping back all the fringe/edges to the back of the headlight 6. painting on TOP of the carbon fiber with the remaining epoxy (it is thus coated from the bottom and the top) 7. place precut pieces of peel ply on top of the WET epoxy (try to avoid loose fringe); place a piece of peel ply under the headlight too—the peel ply will keep the epoxy from sticking to the vacuum bag. You will need a piece of peel ply or breather cloth to run from the part to the vacuum attachment (I used peel ply b/c that’s what I had). 8. Place the part in the vacuum bag, seal it, and then slowly apply vacuum. Stop it occasionally to rearranged the vacuum bag to fit the part well. You do not want a lot of creases on what will be the finished surface, because they can cause the carbon fiber to bunch up in ridges, thus distorting the weave (live and learn…). Assure a good conformity between the carbon fiber, the part, and the bagging material. Check for leaks! Leave the vacuum on until the part dries and don’t remove the part before the epoxy is set!
5. Once you get past step 4, everything else is finishing work! Note that carbon fiber can look pretty bad during the process, but it will turn out alright! You will not need the vacuum pump after step 4. Add one coat of epoxy and dry sand it to assure you have a smooth surface. The remaining process involves layering up the epoxy, do 3-4 coats, waiting for each coat to go tacky before adding the next. You will want to cut out the holes for the projector and turn signal light--up to you when you want to do that. I usually do my trimming after the first coat of epoxy is set.
6. Once you have all your layers of epoxy, it’s sanding time. Prepare for sore arms or get yourself some power tools. Depending on the smoothness of the surface, you may need rougher/finer grit. I used 60 grit just to get rid of drips etc., then moved on to 120. This is a very complex shape to sand and get smooth surfaces! I used a chop stick with a piece of sand paper to get in the little wedge by the light washers---fun! Wet sand through progressively finer grits, 400, 800, 1200, and 1500 if you want.
7. You will have to clear coat the part to make it shine. I used Rustoleum crystal clear enamel and I’m very pleased with it—I’ve used some other clear coats and I like the Rustoleum the best. Spray painting isn’t my forte (again, not much experience), but here’s tips from my limited use: spray a light first coat and wait 5-10 minutes. Once it is set this will give the second coat something to stick to. Don’t go “wet” with the spray until at least the 3rd coat. I’ve learned that a reasonably clean clear coat can be finished to a glass like surface, so don’t worry if it isn’t perfect.
8. Sanding time again! Soak your sandpaper in water before use (make sure it’s wet sandpaper). Depending on how smooth your clear coat is, start with 800 or 1000. Wet sand the surface smooth to at least 1500 grit. I recommend going to 2000 as it will make getting a glass surface easier. Now, the secret bit! I looked all over the internet and found people struggling with how to get a glass smooth clear coat—I didn’t find much help! But I have found the answer! Use a rubbing compound, such as Mothers professional rubbing compound. The bottle says it will remove 1500 grit sanding scratches. I was shocked, this stuff actually works! Apply it with a foam pad and after you've rubbed it a bit, wipe it off with a microfiber cloth.
9. If your arms don’t hurt already, now it’s time to polish—or buy the power tools like I said
Save yourself the trouble and get a 3 inch polishing pad (like you would use on a rotary buffer) and a 3 inch velcro backing plate for a drill. A drill will work better than a buffer, at least for this part, because the surfaces are small. Apply rubbing compound to the whole surface of the pad and buff away. It didn’t take me more than a few minutes to get a glass surface using this method 10. Reassemble the headlights! I rubbed all the surfaces with an anti-static anti-fog spray before reassembling. Use butyl rubber glue (it’s sold as a tape) to reseal the headlights, silicone glue is too much of a mess. Butyl rubber tape is an OEM equivalent material.
11. Reinstall the headlights. I have a tip here too. I don’t know how this is supposed to be done, but lining the headlights back up can be a pain (I’m not talking about the beam, I mean centering the lights in the housing). My method: put all the screws back in and tighten them just to the point that they can hold the headlight but are not tight enough that you can’t move the lights with your hands. Then, close the lid (all the way), use a panel opening tool or something that won't scratch the lights to fidget the lights around until they’re where you want them. Then open the hood again and tighten the screws. Voila, the frustration free method of centering your lights!
And there you go! I only know of one company in Japan that makes carbon fiber headlight inserts. Working with carbon fiber is really not too difficult, save yourself the $1000 and do it yourself!
P.s. I've included a few pics of my interior, you can see the carbon fiber dash panels I made, and they are nice and smooth
I also upholstered my steering wheel center with suede, goes better with the carbon fiber wheel then the cheap looking plastic stuff from the factory. I can post a how-to on this too if anyone's interested! Also, the chrome ring on the center of the steering wheel is not stock, it's metal--I will have chrome on the air vents once they're covered in carbon fiber. More to come at a later date! Stand by!
Last edited by monaco23; Jun 4, 2015 at 01:34 PM.

Thread Starter
|
1st Gear
Joined: Nov 2013
Posts: 39
Likes: 2
Yes it is! The price is a little deceptive though, because there's a $200 core deposit and anything else is extra. I had the button pieces done in a /\ pattern to match what I'm going to do with the rest of the car, and I also had the bottom piece done so it would match the weave on the steering wheel. Expensive, ouch, still hurts.

2nd Gear
Joined: Sep 2006
Posts: 93
Likes: 0
From: Clovis, CA
Trending Topics
Wow! I especially like how this looks. Great job!
-Luccia
-Luccia
__________________
Your Trusted Source For DIY and Parts
FREE SHIPPING over $99 click here
MINI Parts | DIY Help | Facebook | Twitter | Instagram | YouTube | Promos
888.280.7799 | 6am - 5pm PST

FREE SHIPPING over $99 click here
MINI Parts | DIY Help | Facebook | Twitter | Instagram | YouTube | Promos
888.280.7799 | 6am - 5pm PST

-Luccia
__________________
Your Trusted Source For DIY and Parts
FREE SHIPPING over $99 click here
MINI Parts | DIY Help | Facebook | Twitter | Instagram | YouTube | Promos
888.280.7799 | 6am - 5pm PST
FREE SHIPPING over $99 click here
MINI Parts | DIY Help | Facebook | Twitter | Instagram | YouTube | Promos
888.280.7799 | 6am - 5pm PST
Thread Starter
|
1st Gear
Joined: Nov 2013
Posts: 39
Likes: 2
Thanks for the kind words I don't know how it's done in the real world, but the way I figured out worked for me. I made a template of the central part with masking tape (just tape all over the whole thing, leaving 1cm margins, and then remove the tape and you have a template)- then place the tape template on the back side of the leather to cut out, traced around it with a little added margin, cut it out, sewed it at the bottom on the "inside" part, use upholstery glue to adhere it, and voila. Posted some pics of the process, anyone could easily do the same since the template is easily made out of tape!
I don't know how it's done in the real world, but the way I figured out worked for me. I made a template of the central part with masking tape (just tape all over the whole thing, leaving 1cm margins, and then remove the tape and you have a template)- then place the tape template on the back side of the leather to cut out, traced around it with a little added margin, cut it out, sewed it at the bottom on the "inside" part, use upholstery glue to adhere it, and voila. Posted some pics of the process, anyone could easily do the same since the template is easily made out of tape!
Awesome. Thanks so much for sharing that! Might have to do mine sometime now.
-Luccia
-Luccia
__________________
Your Trusted Source For DIY and Parts
FREE SHIPPING over $99 click here
MINI Parts | DIY Help | Facebook | Twitter | Instagram | YouTube | Promos
888.280.7799 | 6am - 5pm PST
FREE SHIPPING over $99 click here
MINI Parts | DIY Help | Facebook | Twitter | Instagram | YouTube | Promos
888.280.7799 | 6am - 5pm PST
Thread Starter
|
1st Gear
Joined: Nov 2013
Posts: 39
Likes: 2
Sure, no problem. The center upholstery is not a difficult project. Here's some tips if anybody wants to do their own wheel:
1. Airbag removal. Disconnect the negative battery lead and then wait a minute or two for the electronics to lose their voltage. The airbag is removed by putting a pointed thin object in a hole at the bottom of the wheel behind the front lower arm of the steering wheel. There is a thread by Alta, I think, that shows how to do this. You'll have to disconnect the clips that provide the power to the airbag.
2. Once you tape over the whole center part to create a template, cut the template straight up from the bottom--this is where the seam will be. Also, because these pieces on the template just "meet" (because you cut them apart) you will need a little extra margin for sewing at this part when you trace your pattern (about a cm). It may be helpful to trace the template on a spare piece of fabric rather than the leather first, as the fabric will provide a better pattern for drawing on the leather than tape would. Leave a little extra margin, as it can always be trimmed off.
3. Leather selection. Suede was easy to work with. Weight will matter! You will need a thin leather. Leather weight is expressed in ounces. 1 oz = 1/64 inch thick (0.4mm). Use a 2oz or less hide--the suede I used was 1.5oz. You could probably also use Alcantara, but I've never worked with it before, I'm not sure how much it can stretch/conform. Also, only put tape (tape template or tape in general) on the non finished side, tape will ruin leather. Suede isn't as sensitive to tape damage as regular leather--I used a little bit to hold the suede down on the back of the steering wheel while the glue was drying. Also note, the difference between regular leather and suede is the side of the leather that is finished--regular leather has the outside finished, suede is when the reverse side is the finished part. The highest quality leather you can get is vegetable tanned--that's what they use in Rolls Royce. My little $30 piece of leather was vegetable tanned You can find nice pieces of leather on ebay. I got 8 sq ft for about 30 dollars, it's a pretty good deal! Custom upholstered steering wheel/airbag for $30!
4. When fitting the leather over the airbag, put it on inside out, joining the two "flaps" at the bottom. I used a red pastel to mark where to sew the stitch line. The line is not straight, it will curve slightly to conform to the airbag. Also, pull it snug, the leather will stretch a little bit and you do not want any slack in the fitment. The type of stitch you sew is illustrated in an attached image. You want to use this type of stitch, along with a weak thread, such as washed cotton. When you use cotton thread to sew leather, it must be preshrunk so that, if it gets wet, it doesn't shrink and pinch the leather. This is why shoemakers use wool thread... but you want a weak thread because this is an airbag. Note also, that the part that is being upholstered does not cover any seams for the airbag, the airbag comes out of the center part where the "ring" is.
5. You will need a template for the center part around the emblem as well. Instead of trying to make a good template, I recommend buying a pre-made sticker. There are decorative stickers (union jacks etc.) on ebay that are meant to be placed over this middle section. They're called "Steering Wheel Console Center Decal Sticker"--makes a perfect template for the leather cutout! Save yourself the trouble, they're only $3-4.
6. Once you have your templates and you've sewed your seam and verified the fitment, you'll need some upholstery glue. The type you use is important! It wasn't a big deal, but I ruined my first leather cover because the glue I used (although it was for upholstering) had an instant and aggressive "tack." You don't want an instant tack glue! You have to slide the leather over the part, and if the glue grips as soon as the leather touches, you won't be able to slide it on! You can use Aleene's tacky glue or Elmer's makes a permanent fabric glue--I used both for different parts, they both work, although the Elmer's allowed me to slide the part on more easily. You can trim the flaps on the sewed part before you put the cover on the airbag. Brush glue on quickly with a brush and then get another person to help you slip the leather on--the leather cutout will have four corners--take one corner in each hand with another person and slide it over--don't want to get any glue on the finished surface! Try to put it on straight (seam at dead bottom)! You should have enough extra margin all around the edges to fold the leather around to the back--but wait for the glue to dry first. You can trim any excess around the central ring.
7. Now glue the flaps around the back. You will need to cut slits in the leather for the curved side parts to make the leather conform to the curve around the back. You'll also need about 30 clothes pins to keep it clamped around the back until the glue dries. Be extra careful with the glue so you don't ruin the finished surface!
8. Glue the center leather piece, again, careful with the glue.
9. The finished part will look better if you buy a trim piece for the center ring. I bought a center stainless steel chrome trim ring from Mini Delta (they ship from Japan)---this is the only place that I could find that makes this part! If you don't want the chrome you can refinish the part. The center ring is also not round! it is slightly elliptical. If you buy the ring, there is an arrow that shows you which direction to place it. It will only fit on one way! Because of the slight thickness of the leather, you will need some double stick tape in addition to what is included with the ring.
10. Lastly, this mod will look best if you also upholster the back part of the steering wheel (see some of the pictures above and below). The airbag is sort of "half" of the center part--the rest is on the steering wheel. I upholstered both for the complete look. The steering wheel was an easier part--I made the template (can be seen in the pics), cut out the leather and had it glued on in a few hours--not as complicated as the front piece.
If you want to upholster other parts in your car, the process will be similar! Have fun
1. Airbag removal. Disconnect the negative battery lead and then wait a minute or two for the electronics to lose their voltage. The airbag is removed by putting a pointed thin object in a hole at the bottom of the wheel behind the front lower arm of the steering wheel. There is a thread by Alta, I think, that shows how to do this. You'll have to disconnect the clips that provide the power to the airbag.
2. Once you tape over the whole center part to create a template, cut the template straight up from the bottom--this is where the seam will be. Also, because these pieces on the template just "meet" (because you cut them apart) you will need a little extra margin for sewing at this part when you trace your pattern (about a cm). It may be helpful to trace the template on a spare piece of fabric rather than the leather first, as the fabric will provide a better pattern for drawing on the leather than tape would. Leave a little extra margin, as it can always be trimmed off.
3. Leather selection. Suede was easy to work with. Weight will matter! You will need a thin leather. Leather weight is expressed in ounces. 1 oz = 1/64 inch thick (0.4mm). Use a 2oz or less hide--the suede I used was 1.5oz. You could probably also use Alcantara, but I've never worked with it before, I'm not sure how much it can stretch/conform. Also, only put tape (tape template or tape in general) on the non finished side, tape will ruin leather. Suede isn't as sensitive to tape damage as regular leather--I used a little bit to hold the suede down on the back of the steering wheel while the glue was drying. Also note, the difference between regular leather and suede is the side of the leather that is finished--regular leather has the outside finished, suede is when the reverse side is the finished part. The highest quality leather you can get is vegetable tanned--that's what they use in Rolls Royce. My little $30 piece of leather was vegetable tanned
You can find nice pieces of leather on ebay. I got 8 sq ft for about 30 dollars, it's a pretty good deal! Custom upholstered steering wheel/airbag for $30!4. When fitting the leather over the airbag, put it on inside out, joining the two "flaps" at the bottom. I used a red pastel to mark where to sew the stitch line. The line is not straight, it will curve slightly to conform to the airbag. Also, pull it snug, the leather will stretch a little bit and you do not want any slack in the fitment. The type of stitch you sew is illustrated in an attached image. You want to use this type of stitch, along with a weak thread, such as washed cotton. When you use cotton thread to sew leather, it must be preshrunk so that, if it gets wet, it doesn't shrink and pinch the leather. This is why shoemakers use wool thread... but you want a weak thread because this is an airbag. Note also, that the part that is being upholstered does not cover any seams for the airbag, the airbag comes out of the center part where the "ring" is.
5. You will need a template for the center part around the emblem as well. Instead of trying to make a good template, I recommend buying a pre-made sticker. There are decorative stickers (union jacks etc.) on ebay that are meant to be placed over this middle section. They're called "Steering Wheel Console Center Decal Sticker"--makes a perfect template for the leather cutout! Save yourself the trouble, they're only $3-4.
6. Once you have your templates and you've sewed your seam and verified the fitment, you'll need some upholstery glue. The type you use is important! It wasn't a big deal, but I ruined my first leather cover because the glue I used (although it was for upholstering) had an instant and aggressive "tack." You don't want an instant tack glue! You have to slide the leather over the part, and if the glue grips as soon as the leather touches, you won't be able to slide it on! You can use Aleene's tacky glue or Elmer's makes a permanent fabric glue--I used both for different parts, they both work, although the Elmer's allowed me to slide the part on more easily. You can trim the flaps on the sewed part before you put the cover on the airbag. Brush glue on quickly with a brush and then get another person to help you slip the leather on--the leather cutout will have four corners--take one corner in each hand with another person and slide it over--don't want to get any glue on the finished surface! Try to put it on straight (seam at dead bottom)! You should have enough extra margin all around the edges to fold the leather around to the back--but wait for the glue to dry first. You can trim any excess around the central ring.
7. Now glue the flaps around the back. You will need to cut slits in the leather for the curved side parts to make the leather conform to the curve around the back. You'll also need about 30 clothes pins to keep it clamped around the back until the glue dries. Be extra careful with the glue so you don't ruin the finished surface!
8. Glue the center leather piece, again, careful with the glue.
9. The finished part will look better if you buy a trim piece for the center ring. I bought a center stainless steel chrome trim ring from Mini Delta (they ship from Japan)---this is the only place that I could find that makes this part! If you don't want the chrome you can refinish the part. The center ring is also not round! it is slightly elliptical. If you buy the ring, there is an arrow that shows you which direction to place it. It will only fit on one way! Because of the slight thickness of the leather, you will need some double stick tape in addition to what is included with the ring.
10. Lastly, this mod will look best if you also upholster the back part of the steering wheel (see some of the pictures above and below). The airbag is sort of "half" of the center part--the rest is on the steering wheel. I upholstered both for the complete look. The steering wheel was an easier part--I made the template (can be seen in the pics), cut out the leather and had it glued on in a few hours--not as complicated as the front piece.
If you want to upholster other parts in your car, the process will be similar! Have fun
Last edited by monaco23; Jun 4, 2015 at 01:48 PM.


Thread
Thread Starter
Forum
Replies
Last Post
JCW_Coupe
MINI Parts for Sale
6
Oct 25, 2015 06:06 PM
dube53
R58 :: Coupé Talk (2012+)
8
Sep 11, 2015 09:30 AM
cdemarco4
R50/R53 :: Hatch Talk (2002-2006)
8
Sep 10, 2015 10:14 AM