
Interior/Exterior Accessory fuse box: powering the lighting MODs!


Thread Starter
|
6th Gear
Joined: Jun 2006
Posts: 5,692
Likes: 2
Accessory fuse box: powering the lighting MODs!
OK, so I put in a used Alta CAI on Sunday (I did othe work myself!  ), and while I was in there, I figured that I'd yank out and clean up all the "organically grown" wiring that you end up with when you add LEDs and other lighting accessories one-by-one. My plan: to add in a 4-fuse circuit box inside the space that would be cleared up by adding the Alta CAI and removing the stock airbox partition that has to be removed as part of the installation.
This project would remove the individual fuse holders that I had used when initially installing things - they work great but with the newly exposed bay revealed by the deleted airbox partition, I wanted a miuch cleaner look. I had three of these babies hidden behind that plastic wall:
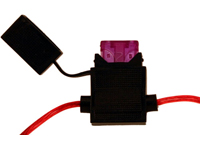
I got the fuse box for $5 at pep Boys (sorry no pic). I only need 5A fuses for everything - LEDs barely draw any current so 5A per circuit is plenty. The box is screwed to the inboard side of the driver's side vent partition.
First, here's the Alta CAI and replacement silicone hose - not bad looking for a used unit, I think! A little foam air filter cleaner and the red foam looks good as new. The new fuse box is just aft (behind) the red foam air filter:

Here's a closer-up view of the fuse box. I put a little black foam "hat" on top of the fuse box, partly to dampen any possible vibration but also to provide a moisture shield. That black split-loom snake leading off from the tip of the air filter is my wiring bundle

View from the driver's side of the engine bay looking inboard - you can see the tip of the air filter on the left. The red wires looping over the top of the CAI shield are the 4 power leads - I made a custom 4-strand cable by weaving 4 red 16-gauge wires together and crimping them into a single spade connector. That in turn is hooked to the battery connection next to the air box (only a single connection now thanks to the fuse box!) All the wires are covered with split-loom material where they come together - looks better and protects my splices. Note the little black "pillow" on the right - that's actually the relay that drives the cold cathodes in my cabin - it's triggered when the doors are open since cathodes cannot handle the undervoltage caused by the dimming cabin lights. The dimming of the circuit makes the relay "buzz" when the lights come up, hence the layers of black felt baffling it:

The wiring's not IMMACULATE yet but it will be eventually - I plan to use black braided covering material when I get my last accessory wire hooked in - only 3 of the 4 fuses are currently in service. The split-loom stuff is just temporary until then. My goal is to have it looking "camera ready" by the Dragon and my lighting clinic!
), and while I was in there, I figured that I'd yank out and clean up all the "organically grown" wiring that you end up with when you add LEDs and other lighting accessories one-by-one. My plan: to add in a 4-fuse circuit box inside the space that would be cleared up by adding the Alta CAI and removing the stock airbox partition that has to be removed as part of the installation. This project would remove the individual fuse holders that I had used when initially installing things - they work great but with the newly exposed bay revealed by the deleted airbox partition, I wanted a miuch cleaner look. I had three of these babies hidden behind that plastic wall:
I got the fuse box for $5 at pep Boys (sorry no pic). I only need 5A fuses for everything - LEDs barely draw any current so 5A per circuit is plenty. The box is screwed to the inboard side of the driver's side vent partition.
First, here's the Alta CAI and replacement silicone hose - not bad looking for a used unit, I think!
A little foam air filter cleaner and the red foam looks good as new. The new fuse box is just aft (behind) the red foam air filter: Here's a closer-up view of the fuse box. I put a little black foam "hat" on top of the fuse box, partly to dampen any possible vibration but also to provide a moisture shield. That black split-loom snake leading off from the tip of the air filter is my wiring bundle
View from the driver's side of the engine bay looking inboard - you can see the tip of the air filter on the left. The red wires looping over the top of the CAI shield are the 4 power leads - I made a custom 4-strand cable by weaving 4 red 16-gauge wires together and crimping them into a single spade connector. That in turn is hooked to the battery connection next to the air box (only a single connection now thanks to the fuse box!) All the wires are covered with split-loom material where they come together - looks better and protects my splices. Note the little black "pillow" on the right - that's actually the relay that drives the cold cathodes in my cabin - it's triggered when the doors are open since cathodes cannot handle the undervoltage caused by the dimming cabin lights. The dimming of the circuit makes the relay "buzz" when the lights come up, hence the layers of black felt baffling it:
The wiring's not IMMACULATE yet but it will be eventually - I plan to use black braided covering material when I get my last accessory wire hooked in - only 3 of the 4 fuses are currently in service. The split-loom stuff is just temporary until then. My goal is to have it looking "camera ready" by the Dragon and my lighting clinic!

 How do you like the intake?
Thread Starter
|
6th Gear
Joined: Jun 2006
Posts: 5,692
Likes: 2
LOVE it, but it's a bit "whistly". When under gentle acceleration (not agressive throttle), I can really hear the thing "breathing". At several points there's this really shrill whistling noise. Obviously, when you really punch it, all you can hear is the whine of the supercharger blades spooling, but I can't drive like that ALL the time. Wonder if that's normal? I was about to post a thread in the Drivetrain forum asking about it...
I believe that is normal for the Alta. Not to discourage you, but when you put your pulley on there you will hear the whine more since you will be spinning the supercharger faster.
I read somewhere on here that the whistle is caused by the silicone intake tube that goes to the throttle body. As an experiment you could easily swap back to the stock piece & see if the whistle goes away.
I read somewhere on here that the whistle is caused by the silicone intake tube that goes to the throttle body. As an experiment you could easily swap back to the stock piece & see if the whistle goes away.


Thread
Thread Starter
Forum
Replies
Last Post
igzekyativ
MINIs & Minis for Sale
34
Jul 16, 2020 12:54 PM
triple5soul
R50/R53 :: Hatch Talk (2002-2006)
21
Jul 29, 2016 04:27 AM
nismo4life
Stock Problems/Issues
3
Aug 5, 2015 08:31 AM