
Interior/Exterior Removal of gas cap housing?


Thread Starter
|
6th Gear
Joined: Mar 2013
Posts: 3,428
Likes: 37
From: Mission Viejo, CA
Removal of gas cap housing?
How does one remove the round housing that (paint matched to the car) the gas cap closes on? I have had my MCS repainted twice already because the collision center was unable or just didn't know how to remove this plastic piece that hold-on to the gas cap, now there's a hard line just under the plastic housing cover for where the cap is located. Now I must return for a third visit because Caliber Collision in Irvine, CA because the painter can't find a way to remove it , so he ends up spraying paint into and around the edge of the rim. If you look closely you can see where the paint gathered up (right side middle) into a crusty ugly pile of paint/crap.
Much appreciated!
Systemlord
Much appreciated!
Systemlord
Last edited by Systemlord; Feb 4, 2014 at 10:28 PM.

6th Gear
Joined: May 2013
Posts: 1,370
Likes: 2
One of my MINIs when I had a repair job from someone running into me cost $1200. That covered the removal of the part and new cap. It didn't include the cost of having the ring painted. Im curious also what it consist of. Because I was shocked at the price but it was done at the dealer.
Thread Starter
|
6th Gear
Joined: Mar 2013
Posts: 3,428
Likes: 37
From: Mission Viejo, CA
One of my MINIs when I had a repair job from someone running into me cost $1200. That covered the removal of the part and new cap. It didn't include the cost of having the ring painted. Im curious also what it consist of. Because I was shocked at the price but it was done at the dealer.

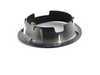
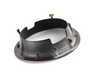
The gas cap cover pot is held in place by two tabs on the rear of the opening. Peer down inside the cavity and you will see the tabs extending below the painted surround at about the 2 and 4 o'clock position. The visible portion of the tabs is about 3/4" by 3/8". To release the pot those tabs need to be gently pulled forward (toward the filler neck) using a hooked tool (made from a coat hanger, etc.) while lifting the rear of the pot away from the body. The pot is then rotated away from the body and removed to the rear. All work is done from the outside of the car; nothing else needs to be removed. The pic below shows the pot removed and inverted. You can see the two tabs extending below the pot at the top and left on the bottom pic. Good luck.
Last edited by ammodave; Feb 5, 2014 at 04:04 PM.
Thread Starter
|
6th Gear
Joined: Mar 2013
Posts: 3,428
Likes: 37
From: Mission Viejo, CA
The gas cap cover pot is held in place by two tabs on the rear of the opening. Peer down inside the cavity and you will see the tabs extending below the painted surround at about the 2 and 4 o'clock position. The visible portion of the tabs is about 3/4" by 3/8". To release the pot those tabs need to be gently pulled forward (toward the filler neck) using a hooked tool (made from a coat hanger, etc.) while lifting the rear of the pot away from the body. The pot is then rotated away from the body and removed to the rear. All work is done from the outside of the car; nothing else needs to be removed. The pic below shows the pot removed and inverted. You can see the two tabs extending below the pot at the top and left on the pic. Good luck.
Thank you ammodave!


Thread
Thread Starter
Forum
Replies
Last Post
igzekyativ
MINIs & Minis for Sale
34
Jul 16, 2020 12:54 PM
Interior/Exterior Need Help With Exterior Decisions (05' MCS PHM/W)
boostedhaze
Interior/Exterior
7
Jan 2, 2018 07:26 PM
mrjolliff
MINI Parts for Sale
3
Oct 9, 2015 05:55 AM