
Interior/Exterior Who Has Installed JCW Sport Gauges Themselves?


1st Gear
Joined: Mar 2011
Posts: 13
Likes: 0
From: Norway
I installed the DRLs, JCW gauges and the driving lamps all at once. When connecting the x14260 and x14261 and x14259 connectors nothing worked and an error message on every single lamp in the car. I disconnected the connectors, pulled out all the plugs and tightened up the cable connectors. I soldiered the cables from instruments and lights on to the cables on the FRM. Still a couple of issues: No high beams and hazard warning lights are working. I have figured out that the hazard warning lights are an issue with the x14259,but not sure if the high beam switch is related to x14259 or x14261. I will check x14259 first as it is easy to access and since all the other controls from the light switches go through x14259 I am hoping this will solve the issues.

Neutral
Joined: Jan 2015
Posts: 6
Likes: 0
Help please. I purchase the Kit and gauge from ECS for my 2012 R60s. There's only one installation guide out there. I follow that. Tap the two wires to the FRM (no problem) . The 4 wires under the steering wheel. red/ yellow - brown / black - yellow / black - yellow / brown. I got 3 match but one. instead of br/blck, I can see blck/br. So I use that one. after everything is install. Fire the car up. Nothing happening to both of the gauge. double check the power coming from FRM. got power from the grey wire. So now I don't know what to do. Trying to return to ECS but they need Invoice from the shop. What's the point buying from ECS and DIY when they asking form invoice from the shop before they allow to return? :( is any out there successfully installing on their R60? please help. thanks.


This thread is for the R56- R59 MINIs with the sport gauges. The pods gauges are shared, but the mount and harness kit have there own part numbers. You might have bought the R56- R59 one : 62112149355
62112183407 for the R60 Countryman
http://www.ecstuning.com/Search/SiteSearch/62112183407/
Save the pods gauges as they are the same. The wireloom must be different in the R60 version. I think that the problem. See the PDF and match up and see the R60 notes. Its attached.
62112183407 for the R60 Countryman
http://www.ecstuning.com/Search/SiteSearch/62112183407/
Save the pods gauges as they are the same. The wireloom must be different in the R60 version. I think that the problem. See the PDF and match up and see the R60 notes. Its attached.
__________________

MINI Guru/ MINI Owner Since 2004 | NEW Lifetime Part Replacement | Local Pickup
Milltek | Genuine MINI | Forge Motorsport | NM Engineering | ECS Performance | M7 Speed
Customer Service Hours: 8am-8pm EST|Sales Team Hours: 8am-11pm | SAT 10am-7pm 800.924.5172
MINI Guru/ MINI Owner Since 2004 | NEW Lifetime Part Replacement | Local Pickup
Milltek | Genuine MINI | Forge Motorsport | NM Engineering | ECS Performance | M7 Speed
Customer Service Hours: 8am-8pm EST|Sales Team Hours: 8am-11pm | SAT 10am-7pm 800.924.5172
Neutral
Joined: Jan 2015
Posts: 6
Likes: 0
This thread is for the R56- R59 MINIs with the sport gauges. The pods gauges are shared, but the mount and harness kit have there own part numbers. You might have bought the R56- R59 one : 62112149355
62112183407 for the R60 Countryman
Save the pods gauges as they are the same. The wireloom must be different in the R60 version. I think that the problem. See the PDF and match up and see the R60 notes. Its attached.
62112183407 for the R60 Countryman
Save the pods gauges as they are the same. The wireloom must be different in the R60 version. I think that the problem. See the PDF and match up and see the R60 notes. Its attached.
I now know exactly where the X1880 Plug are. Is right behind the steering wheel. after you take out the steering column upper and lower shroud section, look behind the steering wheel. You should see a 18-pin X1880 connector there.
Last edited by MCS98; Jan 7, 2015 at 10:03 AM.
Did you get it to work, I don't know if the harness is the same on the kit from R56 to R60. Looks close but there might be a difference. PDF is attached above that all the info I have. Post up some pics. 
__________________
MINI Guru/ MINI Owner Since 2004 | NEW Lifetime Part Replacement | Local Pickup
Milltek | Genuine MINI | Forge Motorsport | NM Engineering | ECS Performance | M7 Speed
Customer Service Hours: 8am-8pm EST|Sales Team Hours: 8am-11pm | SAT 10am-7pm 800.924.5172
MINI Guru/ MINI Owner Since 2004 | NEW Lifetime Part Replacement | Local Pickup
Milltek | Genuine MINI | Forge Motorsport | NM Engineering | ECS Performance | M7 Speed
Customer Service Hours: 8am-8pm EST|Sales Team Hours: 8am-11pm | SAT 10am-7pm 800.924.5172

I have an 05 R53 S convertible and want to install aftermarket oil pressure and and boost gauges. I plan to use 'add-a-tap' fuses for the power source. Anyone see a problem with this?
4th Gear
Joined: Feb 2012
Posts: 399
Likes: 0
From: Exit 9
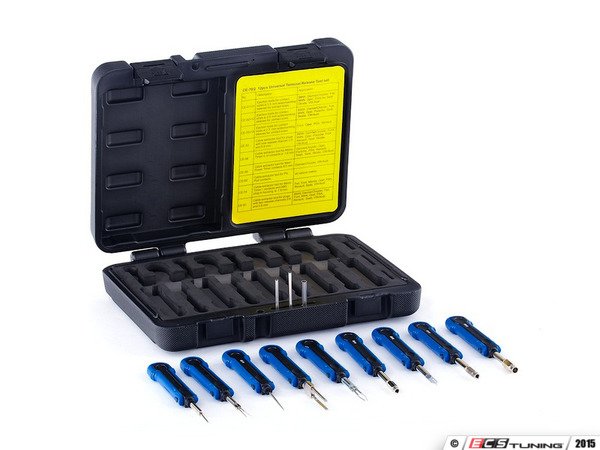
Has anyone who's had trouble with their FRM after this install also have difficulty inserting and removing pins from the connectors? I had to insert some pins in connectors near the fuse panel recently and didnt have any issues. I'm mentally preparing myself to do this mod soon but was worried about all these FRM problems.
__________________
MINI Guru/ MINI Owner Since 2004 | NEW Lifetime Part Replacement | Local Pickup
Milltek | Genuine MINI | Forge Motorsport | NM Engineering | ECS Performance | M7 Speed
Customer Service Hours: 8am-8pm EST|Sales Team Hours: 8am-11pm | SAT 10am-7pm 800.924.5172
MINI Guru/ MINI Owner Since 2004 | NEW Lifetime Part Replacement | Local Pickup
Milltek | Genuine MINI | Forge Motorsport | NM Engineering | ECS Performance | M7 Speed
Customer Service Hours: 8am-8pm EST|Sales Team Hours: 8am-11pm | SAT 10am-7pm 800.924.5172
4th Gear
Joined: Feb 2012
Posts: 399
Likes: 0
From: Exit 9
I've had some practice recently with removing and reinstalling these types of pins in connector housings. When you pull while pressing on the retaining pin the terminal will start to come out but stop half-way because there's a second opening in the housing which allows the pin to spring back up somewhat. It's important that you do NOT use any force to get it past that point. Press on the exposed part of the terminal pin and move it back and forth until you get it out with no resistance.
Yeah, the pin became stuck about half way in the connector when drawing it out, I wasn't being too hard in the pin and cable as it is a very thin fragile connection, but it gave in and snapped after an amount of gentle wiggling and pulling, one of those moments where your heart sinks and you wish you could rewind the last minute!
Calling the dealer in the morning!
Calling the dealer in the morning!
4th Gear
Joined: Feb 2012
Posts: 399
Likes: 0
From: Exit 9
Has anyone who has completed this install have any pointers as to where to mount the control unit? How did you secure it? There's a tab with a hole in it which seems to be for attaching it with a plastic expansion clip (similar to the one which secures the tachometer plug?) but the illustration isn't clear on where to mount and if that's what I need to use.
Looks like zip tied nee the little chubby hole behind the knee panel according to PDF above.
__________________
MINI Guru/ MINI Owner Since 2004 | NEW Lifetime Part Replacement | Local Pickup
Milltek | Genuine MINI | Forge Motorsport | NM Engineering | ECS Performance | M7 Speed
Customer Service Hours: 8am-8pm EST|Sales Team Hours: 8am-11pm | SAT 10am-7pm 800.924.5172
MINI Guru/ MINI Owner Since 2004 | NEW Lifetime Part Replacement | Local Pickup
Milltek | Genuine MINI | Forge Motorsport | NM Engineering | ECS Performance | M7 Speed
Customer Service Hours: 8am-8pm EST|Sales Team Hours: 8am-11pm | SAT 10am-7pm 800.924.5172
4th Gear
Joined: Feb 2012
Posts: 399
Likes: 0
From: Exit 9
FINALLY finished this install!
After months of research and carefully planning out how I was going to do everything, it's completely in and working. I had a 2 gauge set but opted to just install the coolant temp gauge on the left. I didn't really see any need for the relative torque gauge and besides I kind of like having just one on the left, makes it look a little off center which is par for the course with a MINI dashboard anyway.
Since I was only installing one gauge, I had to cut the bracket in half. That metal is very thick and it took some doing. Since I was now only anchoring it with one of the 3 tachometer shell screws, I devised an additional fastening point dead center on the rear of the shell. I used a plastic inner wheel liner screw and spring nut combination, trimmed off the ends of the screw head so it was rectangular, then jammed it between the 2 inner reinforcement bars running along the inside of the tach shell. It looks nice and neat.
I also had to repaint the bracket after all that cutting, drilling and handling, so I used "chalkboard black" paint which gave it a nice matte finish similar to the instrument pods.
Finally, I had used a scotchbrite synthetic sanding pad to smooth out the inner ring bezel on the gauge pod since the whole thing was molded from one piece and was all the same pebble finish. It's subtle, but since the bezel part now looks smooth and slightly matte it's a better match with the tachometer pod its' attached to.
I haven't taken any pics and don't know if I will, so you'll have to use your imagination.
Lastly, when tapping into the 2 wires by the footwell module, I used posi-taps INSTEAD of scotchlocks. Much easier and neater to use IMHO.
ps. I mounted the control unit with heavy duty velcro on a flat spot inside that lower dash support frame the cover snaps over.
Last edited by komet155; May 17, 2015 at 01:44 PM.
Thanks for the update, cant wait to see the pics.
__________________
MINI Guru/ MINI Owner Since 2004 | NEW Lifetime Part Replacement | Local Pickup
Milltek | Genuine MINI | Forge Motorsport | NM Engineering | ECS Performance | M7 Speed
Customer Service Hours: 8am-8pm EST|Sales Team Hours: 8am-11pm | SAT 10am-7pm 800.924.5172
MINI Guru/ MINI Owner Since 2004 | NEW Lifetime Part Replacement | Local Pickup
Milltek | Genuine MINI | Forge Motorsport | NM Engineering | ECS Performance | M7 Speed
Customer Service Hours: 8am-8pm EST|Sales Team Hours: 8am-11pm | SAT 10am-7pm 800.924.5172
Posted this in another thread but it was helpful.
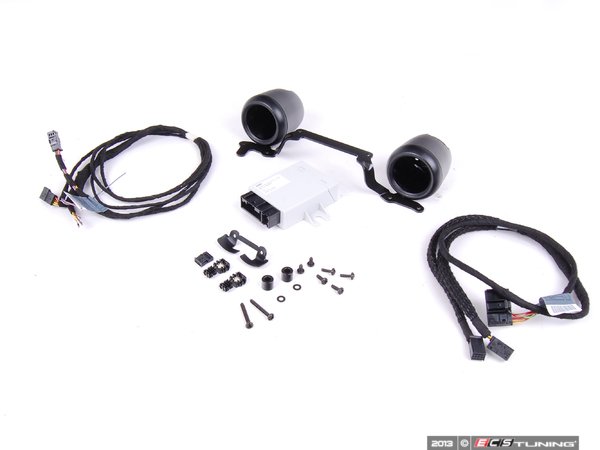
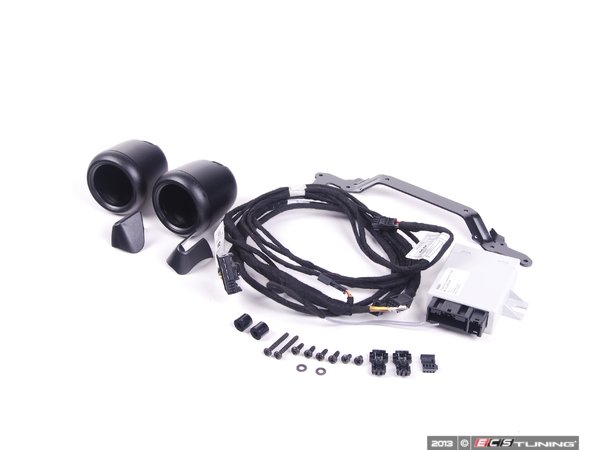
Here is the factory John Cooper Works Sport Gauge Double Pod kit.

#1 Dual version
John Cooper Works Sport Gauge Installation Kit - Double Indicator
http://www.ecstuning.com/Search/SiteSearch/62112149355/
Or
#2 ** Single Pod version, for people who just want to single pod or for R57 MINI Convertible owners with the "Openmeter" on the other side. ** which is in the top pic for the original poster.
John Cooper Works Sport Gauge Installation Kit - Single Indicator Part number 62112150353
http://www.ecstuning.com/Search/SiteSearch/62112150353/
---------------
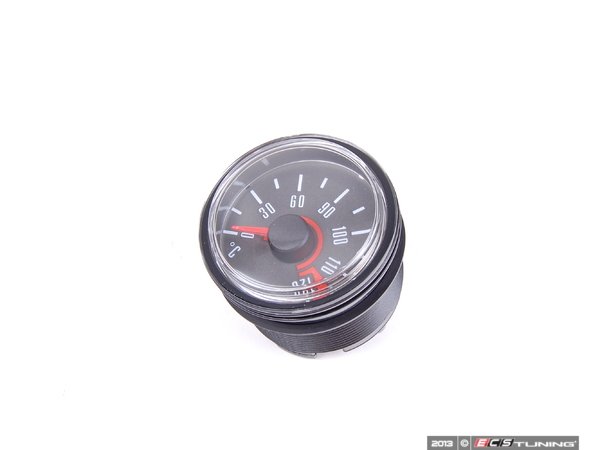
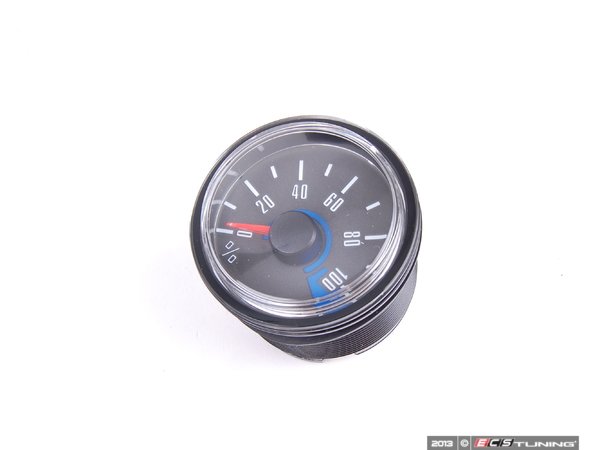
Here is the gauges by themselves for reference. Click on the items links to see additional pics
Indicator Cooling Water Temperature - Celsius
http://www.ecstuning.com/Search/SiteSearch/62110445458/
&
Indicator Relative Torque Gauge - %
http://www.ecstuning.com/Search/SiteSearch/62110445459/
&
Lateral G Force Gauge - G's
http://www.ecstuning.com/Search/SiteSearch/62110426786/ES515302/
--------------
Here is the install guide.
The install guide will help you with the step by step to do the install.
Thanks
Here is the factory John Cooper Works Sport Gauge Double Pod kit.
#1 Dual version
John Cooper Works Sport Gauge Installation Kit - Double Indicator
http://www.ecstuning.com/Search/SiteSearch/62112149355/
Or
#2 ** Single Pod version, for people who just want to single pod or for R57 MINI Convertible owners with the "Openmeter" on the other side. ** which is in the top pic for the original poster.
John Cooper Works Sport Gauge Installation Kit - Single Indicator Part number 62112150353
http://www.ecstuning.com/Search/SiteSearch/62112150353/
---------------
Here is the gauges by themselves for reference. Click on the items links to see additional pics
Indicator Cooling Water Temperature - Celsius
http://www.ecstuning.com/Search/SiteSearch/62110445458/
&
Indicator Relative Torque Gauge - %
http://www.ecstuning.com/Search/SiteSearch/62110445459/
&
Lateral G Force Gauge - G's
http://www.ecstuning.com/Search/SiteSearch/62110426786/ES515302/
--------------
Here is the install guide.
The install guide will help you with the step by step to do the install.
Thanks
Did not see a separate guide from MINI on the LCI+, thats the one they dealership gave me . Do you have one ?
__________________
MINI Guru/ MINI Owner Since 2004 | NEW Lifetime Part Replacement | Local Pickup
Milltek | Genuine MINI | Forge Motorsport | NM Engineering | ECS Performance | M7 Speed
Customer Service Hours: 8am-8pm EST|Sales Team Hours: 8am-11pm | SAT 10am-7pm 800.924.5172
MINI Guru/ MINI Owner Since 2004 | NEW Lifetime Part Replacement | Local Pickup
Milltek | Genuine MINI | Forge Motorsport | NM Engineering | ECS Performance | M7 Speed
Customer Service Hours: 8am-8pm EST|Sales Team Hours: 8am-11pm | SAT 10am-7pm 800.924.5172

Post #53 above. ^^
__________________
MINI Guru/ MINI Owner Since 2004 | NEW Lifetime Part Replacement | Local Pickup
Milltek | Genuine MINI | Forge Motorsport | NM Engineering | ECS Performance | M7 Speed
Customer Service Hours: 8am-8pm EST|Sales Team Hours: 8am-11pm | SAT 10am-7pm 800.924.5172
MINI Guru/ MINI Owner Since 2004 | NEW Lifetime Part Replacement | Local Pickup
Milltek | Genuine MINI | Forge Motorsport | NM Engineering | ECS Performance | M7 Speed
Customer Service Hours: 8am-8pm EST|Sales Team Hours: 8am-11pm | SAT 10am-7pm 800.924.5172


Neutral
Joined: Oct 2020
Posts: 5
Likes: 0
I am not overly bothered with the financial aspect. I am just building the car as stock as it gets.
And this is a stock element that i would appreciate having in 2020. I know E90s don't have the coolant gauge, and I hated that with mine until the very moment I sold it, 5 years ago.
So let's see if someone has one of these in their garage. Price won't be less than 250 EUR / $300 USD for sure
And this is a stock element that i would appreciate having in 2020. I know E90s don't have the coolant gauge, and I hated that with mine until the very moment I sold it, 5 years ago.
So let's see if someone has one of these in their garage. Price won't be less than 250 EUR / $300 USD for sure
Lots of the Gen 2 JCW kits are nla. :( I am seeing more of the Gen JCW body stuff going nla also.
We hope to have some options in the future for the gauges. But for the mounts themselves you might find them at junk yards or other places.
P3 cars has gauges: https://www.ecstuning.com/b-p3-gauges-parts/v-mini/
Alta Performance https://www.ecstuning.com/b-alta-per...terior-gauges/
Prosport Performance ( Mostly aftermarket set up) : https://www.ecstuning.com/b-prosport...-parts/v-mini/
__________________
MINI Guru/ MINI Owner Since 2004 | NEW Lifetime Part Replacement | Local Pickup
Milltek | Genuine MINI | Forge Motorsport | NM Engineering | ECS Performance | M7 Speed
Customer Service Hours: 8am-8pm EST|Sales Team Hours: 8am-11pm | SAT 10am-7pm 800.924.5172
MINI Guru/ MINI Owner Since 2004 | NEW Lifetime Part Replacement | Local Pickup
Milltek | Genuine MINI | Forge Motorsport | NM Engineering | ECS Performance | M7 Speed
Customer Service Hours: 8am-8pm EST|Sales Team Hours: 8am-11pm | SAT 10am-7pm 800.924.5172

Thread
Thread Starter
Forum
Replies
Last Post
igzekyativ
MINIs & Minis for Sale
34
Jul 16, 2020 12:54 PM
minicoclub
MINIs & Minis for Sale
8
Nov 11, 2015 07:25 AM
squawSkiBum
MINI Parts for Sale
15
Oct 2, 2015 09:21 AM