
Interior/Exterior Blacking out the tail lights.


Thread Starter
|
2nd Gear
Joined: Mar 2007
Posts: 89
Likes: 1
Blacking out the tail lights.
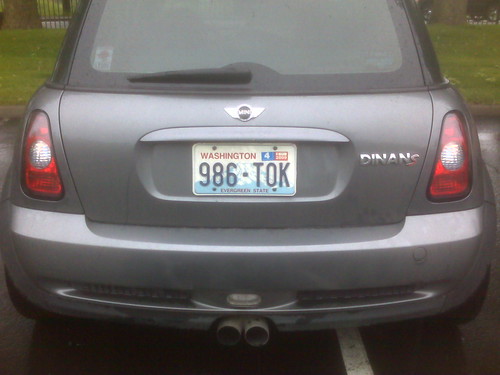
I've never been a fan of tinting the tail lights, it reduces light output. But I also hate chrome.
Well, I had a down afternoon, and decided to try something I read in the forums, here's the result:
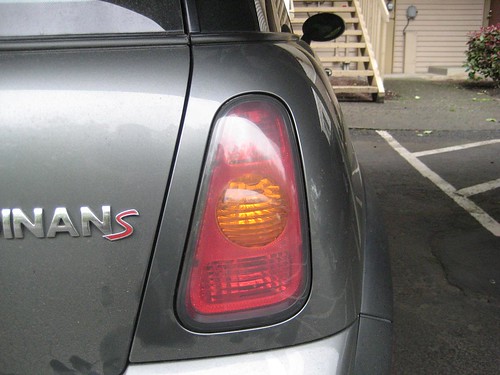
Removing the chrome was super easy, I just put the tail lights in the oven @ 250 for 5 minutes. After that, it was just some light dremeling at the glue, and some scary prying to get the cover off. After that, it was just a liberal use of rubbing alcohol, epoxy them back together, and there ya go.
Yes yes, I know she's dirty, but I live in seattle.
Well, I had a down afternoon, and decided to try something I read in the forums, here's the result:
Removing the chrome was super easy, I just put the tail lights in the oven @ 250 for 5 minutes. After that, it was just some light dremeling at the glue, and some scary prying to get the cover off. After that, it was just a liberal use of rubbing alcohol, epoxy them back together, and there ya go.
Yes yes, I know she's dirty, but I live in seattle.
Last edited by groovetini; Jun 9, 2008 at 04:19 PM.

Thread Starter
|
2nd Gear
Joined: Mar 2007
Posts: 89
Likes: 1
It's not nearly as hard as it sounds, just very scary the 1st time you hear the glue cracking as it separates. Just a reminder, I believe that the post facelift tail lights have white under the chrome as opposed to black.


I did mine recently as well...I'll be working on a better "how to" in the coming week or so. As for it being white underneath, nope...its the same clear red plastic as the rest of the tail light. Also, I didn't bother with the oven. Well, the second time  the first time when trying to put my first tail light back together I cooked it in the oven for about 15 minutes at 225 to sort of seal everything tightly with the silicone...well the clear plastic cover began to melt (it was fine at the 10 minute check) and I was not to happy, but luckily I bought spares before I attempted this. So to avoid the oven just dremel the little slot, and start prying with screwdrivers, I used a "twisting prying" method and it worked quite well...just as well as the first time when I heated the tail light before trying to pry.


the first time when trying to put my first tail light back together I cooked it in the oven for about 15 minutes at 225 to sort of seal everything tightly with the silicone...well the clear plastic cover began to melt (it was fine at the 10 minute check) and I was not to happy, but luckily I bought spares before I attempted this. So to avoid the oven just dremel the little slot, and start prying with screwdrivers, I used a "twisting prying" method and it worked quite well...just as well as the first time when I heated the tail light before trying to pry.
Trending Topics

4th Gear
Joined: Feb 2007
Posts: 405
Likes: 0
From: Wylie, TX
I have mine tinted, but I could still see the chrome underneath and it had green tint during the day. I did this mod several months ago and now it looks great. Just take your time when prying on them. I cracked one of mine and had to get a replacement set.


The cap, along with most of the blacked out trim, is painted using SEM Trim Black spray paint. It takes about 3 days to fully cure, but is extremely durable. It's the best paint (albeit expensive) I have found for this purpose.


Vendor & Moderator :: MINI Camera and Video & c3 club forum
iTrader: (6)
You lose a bit, but it's not as bad as tint film, unless I layered the paint very heavy to completely black it out.
In most lighting conditions, you can't see the chrome because it looks like this.

Which IMO, doesn't really look all that different from the way this chrome looks

In most lighting conditions, you can't see the chrome because it looks like this.
Which IMO, doesn't really look all that different from the way this chrome looks


Thread
Thread Starter
Forum
Replies
Last Post
igzekyativ
MINIs & Minis for Sale
34
Jul 16, 2020 12:54 PM
dyeLucky
MINI Parts for Sale
3
Aug 7, 2015 07:10 AM