
How To Electrical :: HID Projectors in Spyder Headlights


Electrical :: HID Projectors in Spyder Headlights
Picked up some used Spyder headlights in the marketplace and decided to do a proper HID projector retrofit and upgrade the halo ring with a brighter one. This is a time-consuming project. It took way more time than I expected at the onset. Headlights are precise instruments and these will require some patience and attention to detail. Consider yourself warned!
(EDIT 5/3/2018, I'm currently in the process of revising these headlights to add more powerful DRL leds on the side reflectors to look more OEM. I've also decided to remove the LED halo ring, which I though looked a little cheesy/fake BMW-y. Pictures and details coming...)
Here's a summary of what it took with some pictures.
Materials used:
Tools needed:
Procedure:
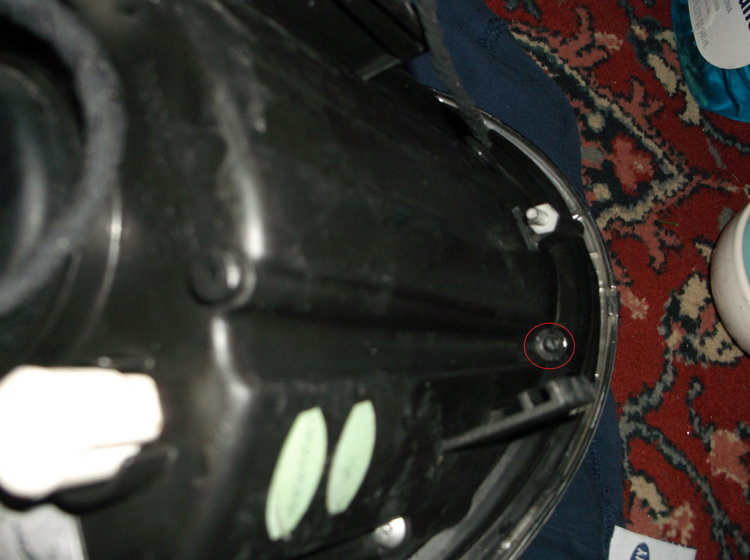
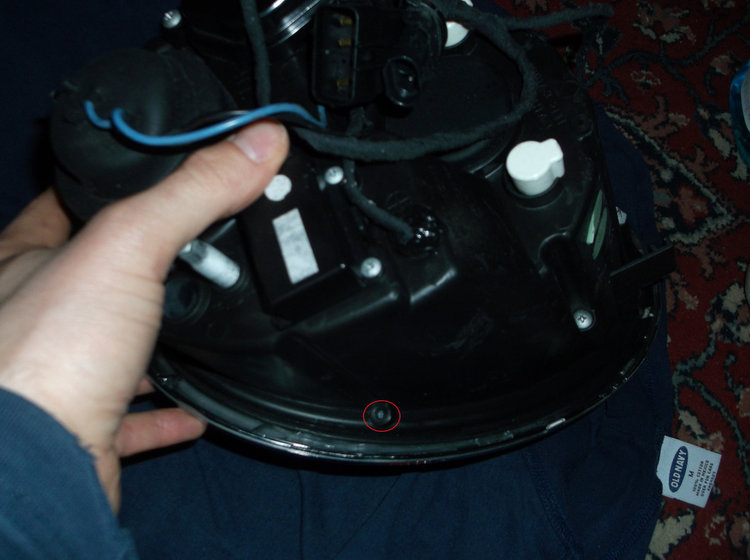
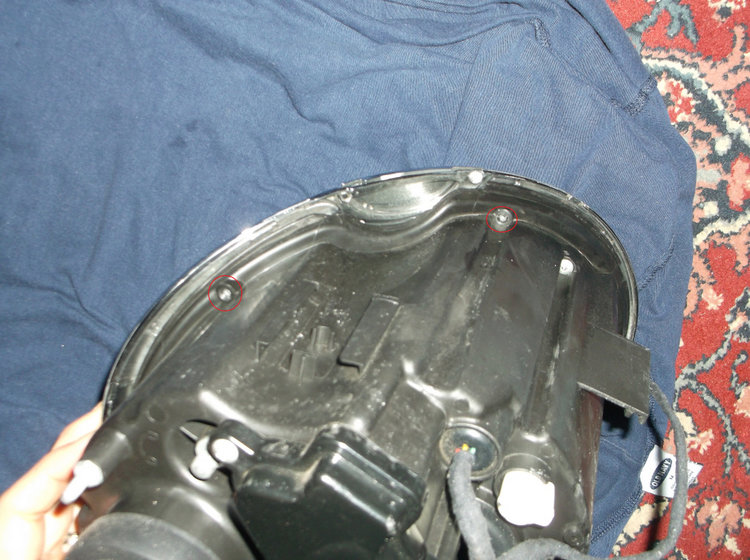
1. To open the headlights, place baking sheet in oven with foil on top and preheat to 250F. There are four outer screws on the back of the housing that hold the clear cover on (see pics). Take these out then carefully place the headlight in the oven making sure non of the wires are touching metal in the oven. Also be careful of the large connector - it has a sealant goop that get runny when heated. Make sure the wires are facing up on it.
It takes some prying and pulling and is still very difficult to get apart because of the sealant used. If you can't get it budge, put it in the oven for another 7-8 minutes and pry and pull a little more. It takes some force to open, but you don't want to break things either. When in doubt, just heat again and try again.
2. Once you have it open, there are three screws on the back to remove the chrome piece inside the housing. Remove connector the side LEDs. If replacing the halo ring like I did, you can just snip those wires. Remove light bulb from projector housing. Unscrew the four screws holding the projector in.
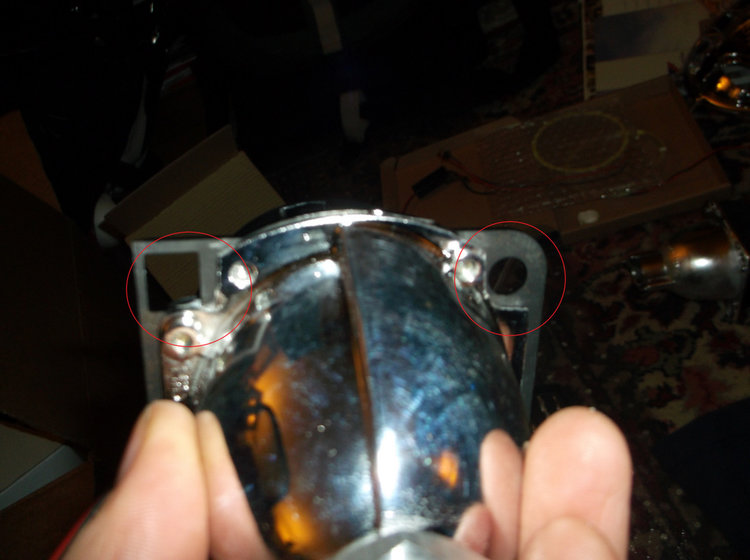
3. Prep the Mini H1 projectors. You'll have to partially dremel off the corners off the reflector bowl housing based on the TRS template. After that, mount Spyder retro-quick bracket between the reflector housing the cutoff shield. Here is the finished product with the parts that needed dremel work circled.


4. Comparing the Spyder projector with the Mini H1, you'll notice the reflector bowl on the Mini H1 is wider. In order for it to fit inside the space in the Spyder headlight, you'll have to some dremel work on the plastic. Dremel away until it will fit.

5. At this point, you may wish to test your projectors and "tune" them before mounting. My bulbs didn't seat completely, and I had to slightly dremel the mounting bracket on the projector bowl.
Tuning the projectors basically involves experimenting with thin washers between the projectors lens legs and the cut-off shield. I used a 12V battery to power the bulbs while inspecting the output on a wall about 30 feet away. You want the cutoff to be well-defined, but you might also be able to get a little more color on the cutoff line. I ended up using thin washers on only the bottom legs of the projector lens.
6. Once you have the projector itself tuned, mount it to the headlight housing. At this point, you may wish to verify the rotation of the projector on the car. Misaligned rotation means the projectors' cutoff is not parallel to the ground and/or each other. Even though it should be fool proof because of the Spyder retro-quick brackets, the rotation can be off slightly. It was on mine, but I didn't test first and I'm not going to be taking everything apart again unless I have too. You can catch before having everything together if you test at this point. Thankfully, it's not too bad on mine. See pic:
7. To wire in the high-beam shield, use the TRS high-beam splitter. You'll connect the splitter to the supply wires for the halogen high-beam, then to the cut-off shield connector and back to the halogen high-beam bulb. Tuck the wires inside the housing and you may want to use some double-sided tape to keep it from wiggling around inside.
8. For the brighter LED rings, I decided to mount the LED ring under the existing plastic piece. It helped to mask the yellow color that white LEDs have when they are off. You'll need to use a soldering iron to remove the wire tips from the plastic ring that comes with the headlight. Then you'll need to slightly dremel down the two outputs for the screws that originally hold the ring down.
I used GE Clear Silicone II from Home Depot to glue the clear plastic ring to the LED ring, and then the LED ring to the chrome reflector housing. The silicone is flexible, waterproof, and UV resistant so it shouldn't yellow, and is good through a variety of temperatures, making a good choice. Goop Glue Max is another good option. Make sure you feed the supply wires through hole in the chrome housing piece before gluing!
I soldered the supply wires for the original halo LEDs to the voltage regulator for the brighter LEDs. Again, use some double-side tape to secure the voltage regulator piece.
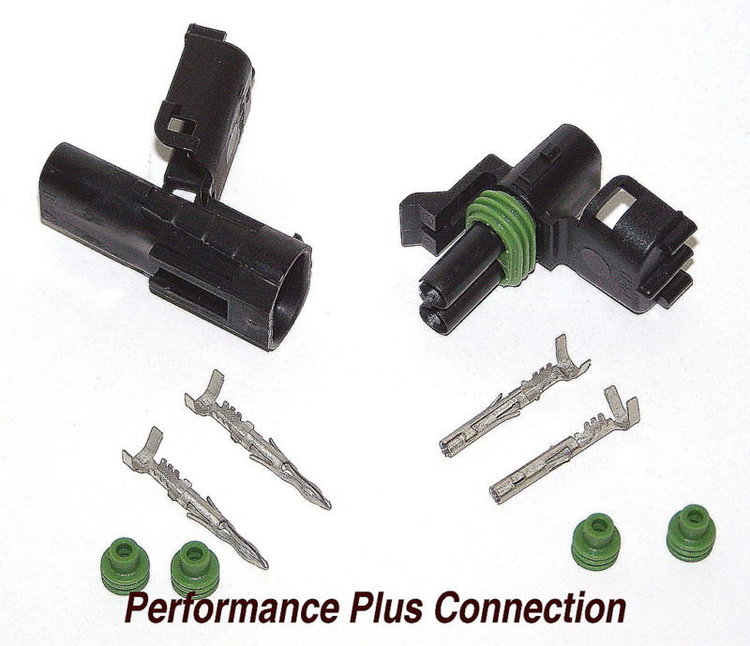
8. You will likely need to do some splicing on the outside of the headlight for the LEDs as well. I combined the side LEDs with the halo ring LED wires. I used a waterproof connector (see pic). To supply the LED as DRLs, I decided to use a fuse tap on the heated seat circuit, which is only live with the ignition is on. You'll need to run the wires from the cabin up through the firewall and to the driver's side of the bonnet. You can use a ground connector to connect the ground to the existing ground on the side of the bonnet.
Obviously, you could add a switch for the DRLs somewhere if you wanted. Who knows, maybe someday I'll add a toggle switch for them next to all the other center toggle-switches....

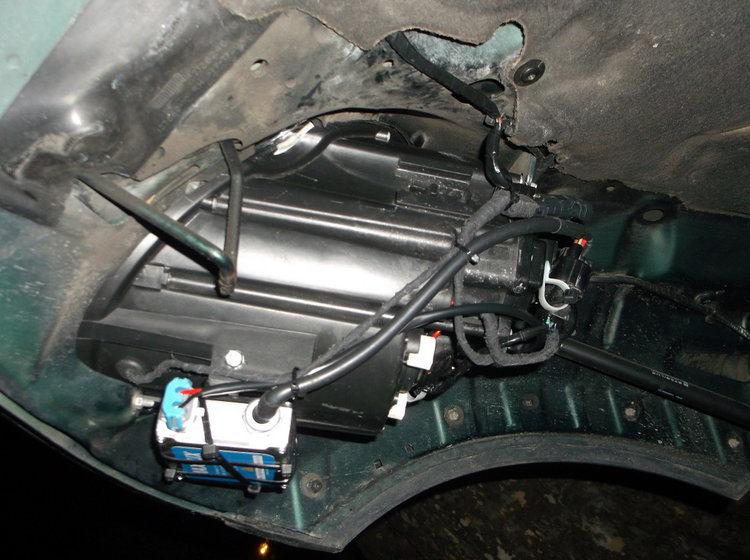
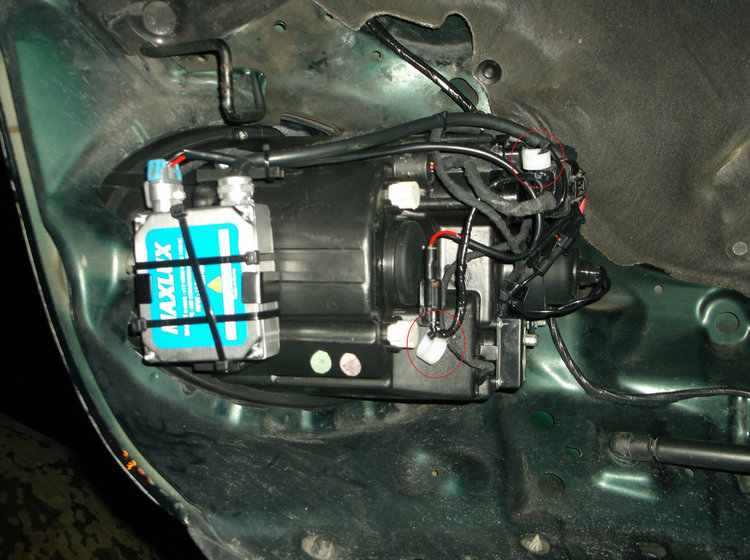
9. Drill holes for mounting the HID ballast brackets to the headlight housing. Don't attach the ballasts yet. Room is tight, so take note of the angle and direction of wires I used - it is mimicking the OEM xenon ballasts. I did it wrong the first time and the wires hit the wheel well housing with the bonnet closed. Here is how I ended up mounting mine:
10. You can also drill and mount some plastic wire organizers to the housing - these will be very helpful later on, as there are a lot of extra wires outside the headlight housing now. I mounted to plastic organizers per headlight. Even a third would have been helpful.
11. Clean the chrome reflector housing. DO NOT USE RUBBING ALCOHOL. It will mess up the chrome finish. I unfortunately made this mistake on one of the housings, but it's not terrible. Glass cleaner, or even just water with a lint free cloth should be enough to get rid of the dust that gathered while it was apart. I also stuck a "BIXENON" logo inside and "TRS" logo.
For the inside of the clear headlight cover, I used Meguiar's PlastX, which is a mild plastic polisher. It worked very well and I recommend it. My spyder headlights were used and it helped remove some minor residue that was on the inside. The PlastX is great to have around for after car washes too...
12. To reseal the headlights, preheat the oven to 250F again and reverse the process we used for removal. If you choose to use the butyl rubber glue, a little bit in the groove goes a long way - don't use too much. Wear oven mitts or work gloves and firmly press the plastic piece to the back of the housing. Make sure it is flush! If it is not mounted all the way down, your headlights will stick out from the bonnet a little!
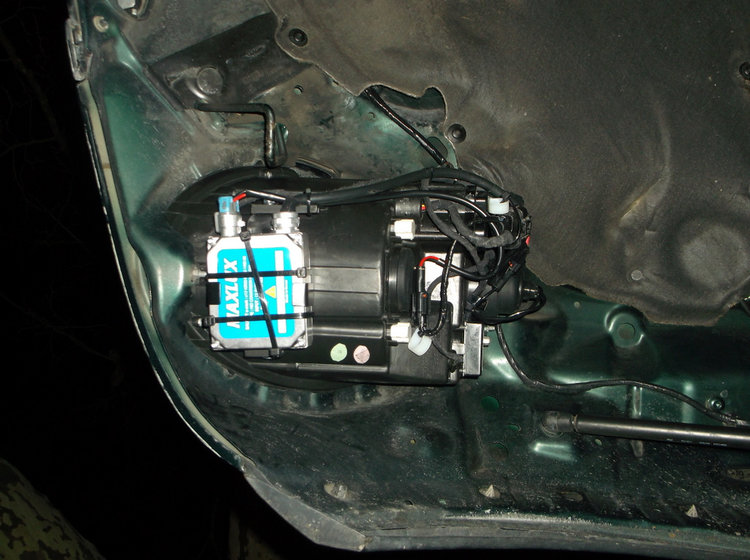
13. Remount the headlights to the car using an 8mm socket and wrench. Now install the ballasts. Make sure they are secure! There is going to be a lot of vibration and you don't them rattling around in the engine bay. I used 11 inch zip ties and double-side tape to secure the ballasts to the ballast brackets.
14. Now secure connect and secure all the wires - easier said than done because you have to make sure they won't hit things with the bonnet shut. Take you time and use zip-ties liberally. Here is my finished result:
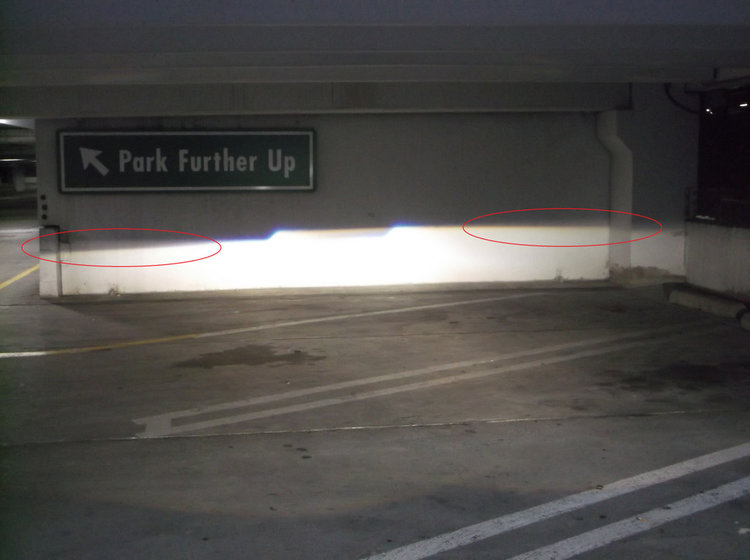
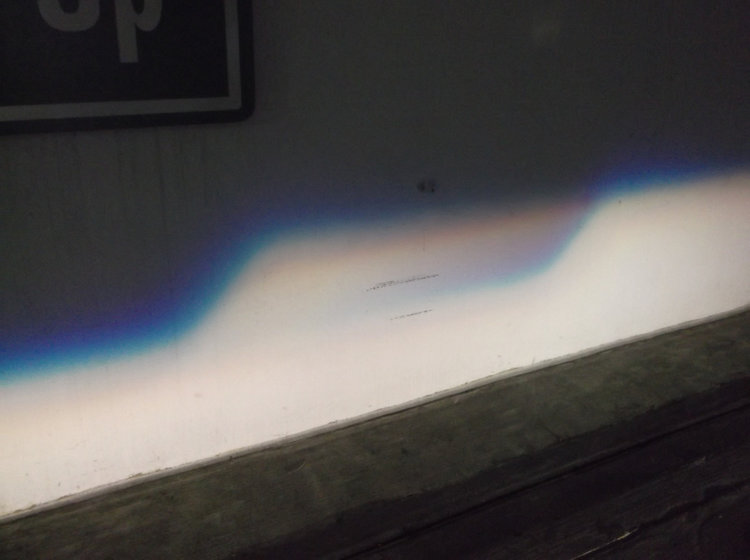
15. The alignment is likely going to be off. Here's a
. For the height adjustment, DOT regulation is the beam cutoff should be 2.1 inches below the center of the projector at 25 feet. Make sure your gas tank is full or you have appropriate weight in the trunk too. These adjustments take a lot of trial and error. Take your time and be precise so you don't blind oncoming traffic.
16. Enjoy the light! These are the best headlights I've driven with. High-beams is almost like driving in daylight! The LED halo rings can also now be seen during daylight and really do act like DRLs.
Some final output pics:


(EDIT 5/3/2018, I'm currently in the process of revising these headlights to add more powerful DRL leds on the side reflectors to look more OEM. I've also decided to remove the LED halo ring, which I though looked a little cheesy/fake BMW-y. Pictures and details coming...)
Here's a summary of what it took with some pictures.
Materials used:
Spyder Headlights
Morimoto Mini H1 Projectors
TRS Spyder Retro-quik brackets
35 Watt H1 HID Kit (Ballasts and Bulbs) - I used a Maxlux kit with 4300K bulbs. I don't recommend getting the cheaper Chinese eBay kits. Maxlux is Korean-made. TRS also produces good, reliable ballasts and bulbs.
Morimoto XB 100mm LED Halo ring
H1 Male to H1/9006 Female High Beam splitter
Zip ties
Plastic wire organizers
Electrical tape
Waterproof connector
Wires for daytime running LEDs
ATC Fuse tap for DRLs
Ground connector piece
Butyl Rubber Glue (the glue on the Spyder housing is not very good, so you may want to use some of this)
Clear Silicone Sealant
PlastX plastic polish
Microfiber cloth
Double-side tape
Shrink wrap
Tools needed:
Oven
Gloves
Pliers, screwdrivers
Dremel tool
Drill/Drill Bits
Soldering Iron
Tape measure (for aligning headlights)
Painter's tape (for aligning)
12V battery (for testing projectors before installing)
8mm wrench and socket
Gloves
Pliers, screwdrivers
Dremel tool
Drill/Drill Bits
Soldering Iron
Tape measure (for aligning headlights)
Painter's tape (for aligning)
12V battery (for testing projectors before installing)
8mm wrench and socket
Procedure:
1. To open the headlights, place baking sheet in oven with foil on top and preheat to 250F. There are four outer screws on the back of the housing that hold the clear cover on (see pics). Take these out then carefully place the headlight in the oven making sure non of the wires are touching metal in the oven. Also be careful of the large connector - it has a sealant goop that get runny when heated. Make sure the wires are facing up on it.
It takes some prying and pulling and is still very difficult to get apart because of the sealant used. If you can't get it budge, put it in the oven for another 7-8 minutes and pry and pull a little more. It takes some force to open, but you don't want to break things either. When in doubt, just heat again and try again.
2. Once you have it open, there are three screws on the back to remove the chrome piece inside the housing. Remove connector the side LEDs. If replacing the halo ring like I did, you can just snip those wires. Remove light bulb from projector housing. Unscrew the four screws holding the projector in.
3. Prep the Mini H1 projectors. You'll have to partially dremel off the corners off the reflector bowl housing based on the TRS template. After that, mount Spyder retro-quick bracket between the reflector housing the cutoff shield. Here is the finished product with the parts that needed dremel work circled.
4. Comparing the Spyder projector with the Mini H1, you'll notice the reflector bowl on the Mini H1 is wider. In order for it to fit inside the space in the Spyder headlight, you'll have to some dremel work on the plastic. Dremel away until it will fit.
5. At this point, you may wish to test your projectors and "tune" them before mounting. My bulbs didn't seat completely, and I had to slightly dremel the mounting bracket on the projector bowl.
Tuning the projectors basically involves experimenting with thin washers between the projectors lens legs and the cut-off shield. I used a 12V battery to power the bulbs while inspecting the output on a wall about 30 feet away. You want the cutoff to be well-defined, but you might also be able to get a little more color on the cutoff line. I ended up using thin washers on only the bottom legs of the projector lens.
6. Once you have the projector itself tuned, mount it to the headlight housing. At this point, you may wish to verify the rotation of the projector on the car. Misaligned rotation means the projectors' cutoff is not parallel to the ground and/or each other. Even though it should be fool proof because of the Spyder retro-quick brackets, the rotation can be off slightly. It was on mine, but I didn't test first and I'm not going to be taking everything apart again unless I have too. You can catch before having everything together if you test at this point. Thankfully, it's not too bad on mine. See pic:
7. To wire in the high-beam shield, use the TRS high-beam splitter. You'll connect the splitter to the supply wires for the halogen high-beam, then to the cut-off shield connector and back to the halogen high-beam bulb. Tuck the wires inside the housing and you may want to use some double-sided tape to keep it from wiggling around inside.
8. For the brighter LED rings, I decided to mount the LED ring under the existing plastic piece. It helped to mask the yellow color that white LEDs have when they are off. You'll need to use a soldering iron to remove the wire tips from the plastic ring that comes with the headlight. Then you'll need to slightly dremel down the two outputs for the screws that originally hold the ring down.
I used GE Clear Silicone II from Home Depot to glue the clear plastic ring to the LED ring, and then the LED ring to the chrome reflector housing. The silicone is flexible, waterproof, and UV resistant so it shouldn't yellow, and is good through a variety of temperatures, making a good choice. Goop Glue Max is another good option. Make sure you feed the supply wires through hole in the chrome housing piece before gluing!
I soldered the supply wires for the original halo LEDs to the voltage regulator for the brighter LEDs. Again, use some double-side tape to secure the voltage regulator piece.
8. You will likely need to do some splicing on the outside of the headlight for the LEDs as well. I combined the side LEDs with the halo ring LED wires. I used a waterproof connector (see pic). To supply the LED as DRLs, I decided to use a fuse tap on the heated seat circuit, which is only live with the ignition is on. You'll need to run the wires from the cabin up through the firewall and to the driver's side of the bonnet. You can use a ground connector to connect the ground to the existing ground on the side of the bonnet.
Obviously, you could add a switch for the DRLs somewhere if you wanted. Who knows, maybe someday I'll add a toggle switch for them next to all the other center toggle-switches....
9. Drill holes for mounting the HID ballast brackets to the headlight housing. Don't attach the ballasts yet. Room is tight, so take note of the angle and direction of wires I used - it is mimicking the OEM xenon ballasts. I did it wrong the first time and the wires hit the wheel well housing with the bonnet closed. Here is how I ended up mounting mine:
10. You can also drill and mount some plastic wire organizers to the housing - these will be very helpful later on, as there are a lot of extra wires outside the headlight housing now. I mounted to plastic organizers per headlight. Even a third would have been helpful.
11. Clean the chrome reflector housing. DO NOT USE RUBBING ALCOHOL. It will mess up the chrome finish. I unfortunately made this mistake on one of the housings, but it's not terrible. Glass cleaner, or even just water with a lint free cloth should be enough to get rid of the dust that gathered while it was apart. I also stuck a "BIXENON" logo inside and "TRS" logo.
For the inside of the clear headlight cover, I used Meguiar's PlastX, which is a mild plastic polisher. It worked very well and I recommend it. My spyder headlights were used and it helped remove some minor residue that was on the inside. The PlastX is great to have around for after car washes too...
12. To reseal the headlights, preheat the oven to 250F again and reverse the process we used for removal. If you choose to use the butyl rubber glue, a little bit in the groove goes a long way - don't use too much. Wear oven mitts or work gloves and firmly press the plastic piece to the back of the housing. Make sure it is flush! If it is not mounted all the way down, your headlights will stick out from the bonnet a little!
13. Remount the headlights to the car using an 8mm socket and wrench. Now install the ballasts. Make sure they are secure! There is going to be a lot of vibration and you don't them rattling around in the engine bay. I used 11 inch zip ties and double-side tape to secure the ballasts to the ballast brackets.
14. Now secure connect and secure all the wires - easier said than done because you have to make sure they won't hit things with the bonnet shut. Take you time and use zip-ties liberally. Here is my finished result:
15. The alignment is likely going to be off. Here's a
16. Enjoy the light! These are the best headlights I've driven with. High-beams is almost like driving in daylight! The LED halo rings can also now be seen during daylight and really do act like DRLs.
Some final output pics:
Last edited by gknorr; May 3, 2018 at 09:22 AM.

Thread
Thread Starter
Forum
Replies
Last Post
Kevdog
Electrical
17
Jun 4, 2016 02:20 PM