
How To R56 Front Crank Seal Replacement Story (First Post)


1st Gear
Joined: Nov 2015
Posts: 12
Likes: 1
From: Vermont
Ugh, so my new corteco seal is leaking as you stated yours did above, took it all apart again and now I need to get another seal, I will see if I can find a fel-pro.
Question... what is the pvc tool you made above, I know the white part is a 2" coupler, but do you have another piece inside that, the black piece or is that part of the gasket?
Also, how did you manage to get around that silver line (is that an AC line) that's in the way to use the pvc? Can it be moved a little out of the way somehow?
I used a pick to get the seal out and will be doing that once again.
Thanks for the help!
6th Gear


Joined: Nov 2014
Posts: 1,787
Likes: 197
Ugh, so my new corteco seal is leaking as you stated yours did above, took it all apart again and now I need to get another seal, I will see if I can find a fel-pro.
Question... what is the pvc tool you made above, I know the white part is a 2" coupler, but do you have another piece inside that, the black piece or is that part of the gasket?
Also, how did you manage to get around that silver line (is that an AC line) that's in the way to use the pvc? Can it be moved a little out of the way somehow?
I used a pick to get the seal out and will be doing that once again.
Thanks for the help!
Question... what is the pvc tool you made above, I know the white part is a 2" coupler, but do you have another piece inside that, the black piece or is that part of the gasket?
Also, how did you manage to get around that silver line (is that an AC line) that's in the way to use the pvc? Can it be moved a little out of the way somehow?
I used a pick to get the seal out and will be doing that once again.
Thanks for the help!
1. I got my money back from ECS Tuning for the peice of ***** Corteco seal. ECS Tuning, stop selling that garbage!
2. Read my post more carefully.The black cup is a disposable guide that FELPRO provides with the seal. The SKU of the coupler is shown.
3. Well you're only using a short PVC coupler so, AS PER THE PICTURE (HINT HINT), you can tap directly on the on the PVC coupler very very lightly to seat the seal and the AC line isn't in the way of PVC coupler. A long section of 2 inch tubing attached to the coupler will however not work so well because the AC line forces you in at an angle which you don't want. You could even use your fist to tap on the coupler, so the AC line should not get in your way. The AC line, has some movement inherent, so don't worry about shifting it around a little bit.
Last edited by Lex2008; Nov 10, 2015 at 08:38 AM.

Neutral
Joined: Nov 2015
Posts: 7
Likes: 0
i am still looking for the Felpro seal in my Country ( Germany). In germany we have other brands and they dont have this black pcv coupler. I hope i can find the Felpro Seal when not i have 2 Possibilities: Going to the Mini Garage and they change the seal or i order the Seal online from America and i do it by myself  Lex2008 did you checked a second time if your Felpro seal is not leak out?
Lex2008 did you checked a second time if your Felpro seal is not leak out?
1st Gear
Joined: Nov 2015
Posts: 12
Likes: 1
From: Vermont
Nobody locally here in VT can even order the front crank seal, I typically order from Pelican Parts, the Fel-Pro is hard to find.
Thanks Lex, good info, I appreciate it! Now I have to wait for a new seal and try again, the good news is it took me like 15 mins to get the car on stands, the belt off and pulley back off this time now I know what I am doing.
Thanks Lex, good info, I appreciate it! Now I have to wait for a new seal and try again, the good news is it took me like 15 mins to get the car on stands, the belt off and pulley back off this time now I know what I am doing.
6th Gear
Joined: Nov 2014
Posts: 1,787
Likes: 197
Nobody locally here in VT can even order the front crank seal, I typically order from Pelican Parts, the Fel-Pro is hard to find.
Thanks Lex, good info, I appreciate it! Now I have to wait for a new seal and try again, the good news is it took me like 15 mins to get the car on stands, the belt off and pulley back off this time now I know what I am doing.
Thanks Lex, good info, I appreciate it! Now I have to wait for a new seal and try again, the good news is it took me like 15 mins to get the car on stands, the belt off and pulley back off this time now I know what I am doing.
Pelican parts is in bloody California. 5 days MINIMUM to get anything from them on east coast by the time they box and ship it.
Ya you become a pro after like 2 tries at this crap. I bought a 21mm ratching box wrench so that I never ever have to put the front end in service mode just to engage the serpentine belt tensioner!
6th Gear
Joined: Nov 2014
Posts: 1,787
Likes: 197
i am still looking for the Felpro seal in my Country ( Germany). In germany we have other brands and they dont have this black pcv coupler. I hope i can find the Felpro Seal when not i have 2 Possibilities: Going to the Mini Garage and they change the seal or i order the Seal online from America and i do it by myself Lex2008 did you checked a second time if your Felpro seal is not leak out?
Lex2008 did you checked a second time if your Felpro seal is not leak out?6th Gear
Joined: Nov 2014
Posts: 1,787
Likes: 197
Nope. Started it and drove right away. Maybe the Elring Klinger seal you bought has some liquid sealant (RTV = room temperature vulcanization) associated with it for the outer edge?
It wouldn't make any sense for a hard seal. Nothing needs to cure.
It wouldn't make any sense for a hard seal. Nothing needs to cure.
We had very few issues with the Corteco version , I will contact them and let them know, thanks for the info.
On the Install of the PTFE seal some things for watch for, I have attached the MINI TIS info, just says the special tool and light oil, but not to touch it as it will damage. The tool looks to help insert it corrcetly. We carry the Elring version also.


All i can think of is the Corteco seal was tapping in and not press in like you did the Felpro. Let me know what you think looking at the TIS.
On the Install of the PTFE seal some things for watch for, I have attached the MINI TIS info, just says the special tool and light oil, but not to touch it as it will damage. The tool looks to help insert it corrcetly. We carry the Elring version also.
All i can think of is the Corteco seal was tapping in and not press in like you did the Felpro. Let me know what you think looking at the TIS.
__________________

MINI Guru/ MINI Owner Since 2004 | NEW Lifetime Part Replacement | Local Pickup
Milltek | Genuine MINI | Forge Motorsport | NM Engineering | ECS Performance | M7 Speed
Customer Service Hours: 8am-8pm EST|Sales Team Hours: 8am-11pm | SAT 10am-7pm 800.924.5172
MINI Guru/ MINI Owner Since 2004 | NEW Lifetime Part Replacement | Local Pickup
Milltek | Genuine MINI | Forge Motorsport | NM Engineering | ECS Performance | M7 Speed
Customer Service Hours: 8am-8pm EST|Sales Team Hours: 8am-11pm | SAT 10am-7pm 800.924.5172
Last edited by ECSTuning; Nov 12, 2015 at 11:53 AM.
I will get them for you.
MINI tool is NLA https://www.ecstuning.com/Search/Sit...h/83300495942/ 11 9 601
119601 / 11 9 601 - Locator nla
119602 / 11 9 602 - Installer Sleeve nla
119603 / 11 9 603 - Forcing Nut nla
Installer:
https://www.ecstuning.com/b-schwaben.../003413sch01a/
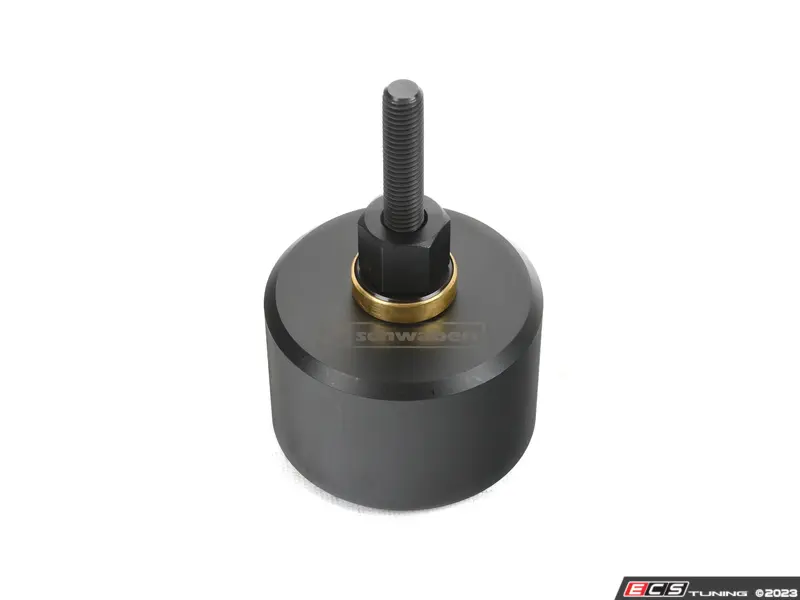
Holder
https://www.ecstuning.com/b-schwaben...mini/lcb31sch/

Timing tools: https://www.ecstuning.com/b-schwaben...engine-timing/
MINI tool is NLA https://www.ecstuning.com/Search/Sit...h/83300495942/ 11 9 601
119601 / 11 9 601 - Locator nla
119602 / 11 9 602 - Installer Sleeve nla
119603 / 11 9 603 - Forcing Nut nla
Installer:
https://www.ecstuning.com/b-schwaben.../003413sch01a/
Holder
https://www.ecstuning.com/b-schwaben...mini/lcb31sch/
Timing tools: https://www.ecstuning.com/b-schwaben...engine-timing/
__________________
MINI Guru/ MINI Owner Since 2004 | NEW Lifetime Part Replacement | Local Pickup
Milltek | Genuine MINI | Forge Motorsport | NM Engineering | ECS Performance | M7 Speed
Customer Service Hours: 8am-8pm EST|Sales Team Hours: 8am-11pm | SAT 10am-7pm 800.924.5172
MINI Guru/ MINI Owner Since 2004 | NEW Lifetime Part Replacement | Local Pickup
Milltek | Genuine MINI | Forge Motorsport | NM Engineering | ECS Performance | M7 Speed
Customer Service Hours: 8am-8pm EST|Sales Team Hours: 8am-11pm | SAT 10am-7pm 800.924.5172
Last edited by ECSTuning; Jun 27, 2025 at 08:53 AM.
1st Gear
Joined: Nov 2015
Posts: 12
Likes: 1
From: Vermont
I'm interested in the tool as well, I just spent the weekend trying to deal with this stupid leak, the Elring Klinger seal was going on nicely until I pushed it in to far with the PVC piece, that went in the trash, then I tried again, very carefully with another Corteco seal, took it for a spin and it's leaking... so now I just ordered two Fel-Pro seals on ebay, I hope I can get the Fel-Pro in properly. I am also wondering if I cam not putting the seal in far enough, does the Fel-Pro come with a piece that puts it in flush at the right depth, I think that's what the black piece you have in the image above but not sure. Ugh!
6th Gear
Joined: Nov 2014
Posts: 1,787
Likes: 197
No, the Felpro guide doesnt set depth, it just helps you guide the inner face of the seal smoothly over the end of the crankshaft.
The seal needs to be set flush wit the engine block.
I checked my Felpro seal this weekend. Its not leaking. But maybe only 150 miles have passed. Too early to tell perhaps.
The seal needs to be set flush wit the engine block.
I checked my Felpro seal this weekend. Its not leaking. But maybe only 150 miles have passed. Too early to tell perhaps.

2nd Gear
Joined: Dec 2013
Posts: 63
Likes: 0
From: Colorado
I need to replace my front crank seal on my 2010 Clubman S. I can get the 30mm wrench on the belt tension nut from the top, but I can't move it. I can't even get it on the nut from the bottom. The Bentley book says I have to remove the passenger headlight and the hood release bracket/support. That seems like a lot of work just to get the accessory belt off. Anyone have any better ideas?
6th Gear
Joined: Nov 2014
Posts: 1,787
Likes: 197
I need to replace my front crank seal on my 2010 Clubman S. I can get the 30mm wrench on the belt tension nut from the top, but I can't move it. I can't even get it on the nut from the bottom. The Bentley book says I have to remove the passenger headlight and the hood release bracket/support. That seems like a lot of work just to get the accessory belt off. Anyone have any better ideas?
30mm ratcheting box wrench. Not a very common wrench unfortunately.$$$.

1st Gear
Joined: Jan 2016
Posts: 11
Likes: 3
From: Austin Texas
In response to vistaracer...
I do!
There is a simple trick to release the tension on the belt. Its free and easy and takes about 30 seconds to lock the tensioner.
Here we go...
Get a 1"x2" piece of wood about 18" long. Pad the end with cloth of cardboard. Feed it up BEHIND the belt until it rests on the UNDERSIDE of the tensioner. Slide your jack under the wooden rod and slowly raise the tensioner. The belt will quickly lose tension and then you simply push the spring loaded pin across. Removal is just the reverse.
Even better, the rod makes the perfect tool to tap in your new seal!!
6th Gear
Joined: Nov 2014
Posts: 1,787
Likes: 197
In response to vistaracer...
I do!
There is a simple trick to release the tension on the belt. Its free and easy and takes about 30 seconds to lock the tensioner.
Here we go...
Get a 1"x2" piece of wood about 18" long. Pad the end with cloth of cardboard. Feed it up BEHIND the belt until it rests on the UNDERSIDE of the tensioner. Slide your jack under the wooden rod and slowly raise the tensioner. The belt will quickly lose tension and then you simply push the spring loaded pin across. Removal is just the reverse.
Even better, the rod makes the perfect tool to tap in your new seal!!
I do!
There is a simple trick to release the tension on the belt. Its free and easy and takes about 30 seconds to lock the tensioner.
Here we go...
Get a 1"x2" piece of wood about 18" long. Pad the end with cloth of cardboard. Feed it up BEHIND the belt until it rests on the UNDERSIDE of the tensioner. Slide your jack under the wooden rod and slowly raise the tensioner. The belt will quickly lose tension and then you simply push the spring loaded pin across. Removal is just the reverse.
Even better, the rod makes the perfect tool to tap in your new seal!!
2nd Gear
Joined: Dec 2013
Posts: 63
Likes: 0
From: Colorado
In response to vistaracer...
I do!
There is a simple trick to release the tension on the belt. Its free and easy and takes about 30 seconds to lock the tensioner.
Here we go...
Get a 1"x2" piece of wood about 18" long. Pad the end with cloth of cardboard. Feed it up BEHIND the belt until it rests on the UNDERSIDE of the tensioner. Slide your jack under the wooden rod and slowly raise the tensioner. The belt will quickly lose tension and then you simply push the spring loaded pin across. Removal is just the reverse.
Even better, the rod makes the perfect tool to tap in your new seal!!
I do!
There is a simple trick to release the tension on the belt. Its free and easy and takes about 30 seconds to lock the tensioner.
Here we go...
Get a 1"x2" piece of wood about 18" long. Pad the end with cloth of cardboard. Feed it up BEHIND the belt until it rests on the UNDERSIDE of the tensioner. Slide your jack under the wooden rod and slowly raise the tensioner. The belt will quickly lose tension and then you simply push the spring loaded pin across. Removal is just the reverse.
Even better, the rod makes the perfect tool to tap in your new seal!!