When you click on links to various merchants on this site and make a purchase, this can result in this site earning a commission. Affiliate programs and affiliations include, but are not limited to, the eBay Partner Network.
I have the same BSH CC setup with the block off and I been having second thoughts about it. I am looking into upgrading to this, but I gotta dig up some dough first
I did the carbon cleaning. After reassembly, car would not idle. I can hold the throttle pedal down and engine will run at 2000 to 3000, but as soon as I let off the pedal motor dies. I have three codes on EScan Gage- U114B, U115B, U115E, which according to Bentely manual, are lost communication with engine control torque 1, lost communication with engine control torque 3, and lost communication with engine data. Anyone have any suggestions? It acts like a big intake manifold leak. I have double checked all the connections.
I also did the carbon cleaning. MCS'10 with 60k (km). Huge difference. Better car idling, more responsive throttle, a bit more powerful. There is some difference in fuel consumption, but I need more time to confirm it.
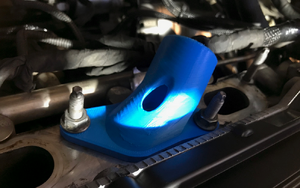
I 3D printed an adapter and made an easier to understand guide
So I handmade an adapter out of PVC and wood and it worked, but using and making it was difficult. For my second cleaning I designed and 3D printed an adapter that is much easier to use. I also created a guide that I will copy and paste below. The file to print it yourself is here. If you don't have a 3D printer (aka most people) send me a PM and I can printer and ship you one.
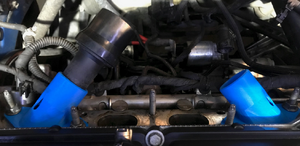
Pictures:
The guide I created: (I couldn't transfer links so the properly formatted guide WITH LINKS IS HERE):
CLICK HERE TO GO TO THE BETTER VERSION OF THIS GUIDE (With links etc.):
About
This is an adapter to make carbon blasting the intake valves on a Mini Cooper R56 / N14 much easier. Normally you have to custom make you own, and that can be very difficult. This replaces a $90 adapter made by mini. If you do not have a 3D printer, you can order the part on various websites, or contact me and I can ship you one for cheap.
I designed this for the N14 engine (The R56 turbo), but it may fit other engines.
Designed for a 1-1/4" vac connection.
If I designed this as one part with 4 mounting holes it would not have fit on the intake ports on the far left and right. Thus, you need two versions. A normal one and a mirrored one.
I made this to fit a cheap homemade blaster. Directions on how to make the blaster are below.
Why carbon clean?
On the N14 engine (and many others) pressure from the crankcase is vented directly into the intake. This pressure includes gasses like oil vapor. This is called the PCV (positive crankcase ventilation) system. The PCV system does a poor job getting rid of the oil vapor before it is vented into the intake. In fact, if you take apart the intake ducting you will often find oil lining the pipes. As a result, these oil droplets hit the hot intake valves and quickly bake on and turn to carbon. In the direct injection engine the gas is injected directly into the cylinder, so nothing ever cleans the intake valves. Over time the carbon builds up on the intake valves and slowly chokes the engine resulting in poor overall performance, misfires, low MPG, and poor idling performance. It can even cause catastrophic failure by allowing the valves to heat up more than normal causing the valve to have a hole burned into the edge resulting in a loss of compression.
If you Mini is over 40K miles, chances are you need it done.
The procedure is done often by Mini, but you are looking at around $600 for that. You save a ton of money by doing it yourself, especially because you will likely have to do this every 40K miles or so to keep it clean and you will already have all of the tools and knowledge from the first time. The first time I did this took me a day because I didn�t know all of the tricks and had a TON of carbon to remove, but I have done it again recently and it only took a few hours.
What you need
Total cost for the whole project should be around $50 assuming you have an air compressor and shop vac. If you don't have an air compressor I bought this one and it worked perfectly. The blaster and media can be used for other projects. This should just take a trip to harbor freight and home depot/lowes.
Air compressor. Ideally 1.5 horse power or higher and 6 gallons or higher. Less is fine, but you will have to take more breaks for it to recharge.
Shop vac with 1-1/4 hose connector.
Socket set and torque wrench. Need up to 17mm socket.
These adapters, bother normal and mirrored.
Portable abrasive blaster kit from harbor freight.
25lbs Fine walnut shell media (Do NOT use sand). This should be almost double what you need.
Air Blow Gun with 2 ft. Extension from Harbor Freight. Item 68257.
Watts A-827 1/2-in x 1/4-in Brass Pipe Fitting or similar
Watts A-390 1/2-in x 1/2-in Barb Fitting or similar
Electrical tape
4 Intake manifold gaskets. Part# 11617528340 for the N14 as well as many other engines. Check realoem.com to find what part number you need. This is not required, but they are cheap and if you have a high mileage mini it�s a good idea to change them out.
If you are not very flexible a mirror is handy.
How to
If you are a DIY�er or someone mechanically savvy then this is a fairly straightforward project. Set aside one day for it, but it should only take an afternoon, especially if you have remove the intake manifold before.
(1. Make the blasting tool.
This is fairly easy. Download this guide and it shows how to make the tool. Here are some pictures of mine that shows how everything fits together. Test and make sure it works before use.
(2. Disconnect the battery.
(3. Remove the intake manifold.
This is the guide I use for removing the intake manifold. Here are some tips:
When removing the noise maker from the firewall (step 8) don�t worry about about breaking it. It�s tough. Just yank it off by hand.
When removing the ducting from the throttle housing (step 12), I leave the ducting connected to the throttle housing. It doesn�t get in the way when removing the manifold. I just remove the ducting connected to the angled ducting going into the throttle housing. This is much easier. The red line shows where I disconnect it.
When removing the purge solenoid tubing (step 13) don�t squeeze both sides of the connector. Only squeeze the top half of it. I use a set of pliers and a long flathead screwdriver to pop it off.
When removing the 10mm bolt bracing the manifold (step 14) I find it easiest to just remove the passenger tire and get to the bolt from that side instead of coming under the car. This is fairly easy so don�t over think it. You will have to remove the wheel later anyway. Here it is
Make sure when putting everything back together that both hoses are connected to EPPC solenoid (seen in step 21). They can fall off easily and you will have no boost if that happens.
(4. Check each intake port by eye or using a mirror to find what valves are closed. It is very important that you do NOT blast into a port that has valves that are open. Stuff a rag into all of the port except the one you are working on.
(5. Attach the 3D printed adapter to the engine head using one or two of the nuts you removed earlier. Make sure not to lose the nuts. Attach the vacuumed and blast for 10 seconds. I used 100 PSI. If there is a ton of carbon I found it helpful to stop blasting after a bit and then use a metal stick or similar to pick off big chunks of the carbon. This gave the walnut shell a better surface to attack. Before removing the wand pinch the media feeding hose so that you can just use the air pressure to blow away remaining walnut shell. Keep it pinched until it is removed so that the vacuumed doesn�t pull more walnut shell out.
(6. Once you have cleaned all of the ports with closed valves, you need to rotate the engine to close the other valves. The easiest / safest way to do this is to turn it by hand. Remove the passenger wheel as well as one of the expanding rivets holding the carpet wheel well liner so that you can get to the engine from inside the wheel well. You should see the serpentine belt attached to a pulley with a big bolt in it (16mm if my memory is correct.) Turn the bolt CLOCKWISE a few rounds. Do NOT turn it counterclockwise. This could lessen the bolt and then your timing will be off. This should not take much effort.
(7. Clean the remaining ports.
(8. Put everything back together. 14.7 ft/lbs for the intake manifold nuts and 100 ft/lbs for the wheel.
(9. When you start the engine. It will likely run rough or may take a while to turn over at all. This is because the engine ECU has slowly adjusted to running with the carbon, so now that it can breathe easier it is not used to that and has to adjust. Disconnecting and reconnecting the battery sometimes helps prevent this. It should run normal after 5 min or so, and then after a while should run much better than before the carbon cleaning.
Good luck and have fun saving around $500!
I copied some of this from this guide. I recommend reading it as well.
I'm gonna do this soon, with brushes, not the walnut blast. my car has 84k miles, doubt its ever been done. should I do a seafoam treatment(described here) first to clean the system so that after I clean the valves, they aren't gunked up by stuff already in the system?
anyone know where I can buy the correct brushes I need to do this job? I have lowes, home depot, walmart around me plus others. I have auto stores around too.
also, are there any gaskets I should replace?
a brush like this that I could put on a drill would be nice:
whats the best way to tell if the valves are closed? and also do I turn the crank bolt clockwise or counter clock wise. I thought I remember reading in a thread that its important to turn clockwise due to the timing chain. but cant remember the thread.
I'll be using brushes and the berryman cleaner. are two valves closed at once and two open at once. or no? I'm wondering if I can start cleaning without turning the engine.
I wish I could find a brush that has bristles on the tip. like a paint brush but with thick bristles. the only way I've been able to clean the valve is with a flat blade screw driver and a pick. both are near impossible to get behind the valve's shaft.
I wish I could find a brush that has bristles on the tip. like a paint brush but with thick bristles. the only way I've been able to clean the valve is with a flat blade screw driver and a pick. both are near impossible to get behind the valve's shaft.
Maybe a set of long picks with hook ends could get around behind it? Like this:
Ullman Devices CHP8-L Individual Hook and Pick Set, 9-3/4", 8-Piece
(Sorry, I can't say from experience; I did the walnut blast method.)
I did use a pick like one of those from harbor freight.
finally finished the cleaning and went for a short drive today. didnt really notice any power increase. when I first started the car I let it run for a bit then scanned for faults and found a pending P0304 fault, which is cylinder #4 misfire. some berryman cleaner leaked into cylinder 4 while I was cleaning.
maybe new plugs and coils would fix the low performance. not sure what else I could do. the car seems to get more power after driving for like 20 minutes. any idea what that would point to?
I did use a pick like one of those from harbor freight.
finally finished the cleaning and went for a short drive today. didnt really notice any power increase. when I first started the car I let it run for a bit then scanned for faults and found a pending P0304 fault, which is cylinder #4 misfire. some berryman cleaner leaked into cylinder 4 while I was cleaning.
maybe new plugs and coils would fix the low performance. not sure what else I could do.
The performance is going to be off for a little while until all of the trims adjust. The engine is used to running with all of the crap in there and it has slowly adjusted to it. Now that it can breath freely air fuel mixtures and timing will be off. Just drive it for awhile and it should adjust. You can also try disconnecting the battery for 20 min to reset some of the trims like long term fuel trim.
The performance is going to be off for a little while until all of the trims adjust. The engine is used to running with all of the crap in there and it has slowly adjusted to it. Now that it can breath freely air fuel mixtures and timing will be off. Just drive it for awhile and it should adjust. You can also try disconnecting the battery for 20 min to reset some of the trims like long term fuel trim.
ok, thanks for the info. maybe I just need to drive it more then. I disconnected the positive to the battery while I did this job.
the car always seemed to get more power after driving for like 20 minutes. any idea what that would point to? I havn't been on a trip that long after cleaning yet.
the car always seemed to get more power after driving for like 20 minutes. any idea what that would point to? I havn't been on a trip that long after cleaning yet.
Not sure. I dont really push the gas until everything is warmed up anyway.
Hi everyone, I have started walnut blasting to my 73k km '11 jcw, but I couldn't achieve a %100 clean valve. I have tried cylinder 1 and 4, but the thing is walnuts couldn't go behind the valve and the visible surface of the valve is half clean. I have a 2.5hp compressor, but I can only achieve 8bar for at most 8-10 secs. Can this be the problem?
What can I use to maybe pour to the housing and wait some time to soften it?
I had to use a mix of time with the blaster as well as a pick to get behind the valve stems.
the car always seemed to get more power after driving for like 20 minutes. any idea what that would point to? I havn't been on a trip that long after cleaning yet.
I would imagine it's just like most cars in that it's monitoring engine temps and such and stays in closed loop mode until everything reaches the desired settings. Then it goes into open loop and unleashes the ponies.
Hi everyone, I have started walnut blasting to my 73k km '11 jcw, but I couldn't achieve a %100 clean valve. I have tried cylinder 1 and 4, but the thing is walnuts couldn't go behind the valve and the visible surface of the valve is half clean. I have a 2.5hp compressor, but I can only achieve 8bar for at most 8-10 secs. Can this be the problem?
What can I use to maybe pour to the housing and wait some time to soften it?
I found that my valves were being stubborn as well. My 5hp, 30gallon compressor cranked up to 125psi (8.6bar) was taking forever. So filled the two intake ports at TDC with solvent and let them soak overnight. This made a huge difference in speed but obviously took longer to complete the entire job.
The performance is going to be off for a little while until all of the trims adjust. The engine is used to running with all of the crap in there and it has slowly adjusted to it. Now that it can breath freely air fuel mixtures and timing will be off. Just drive it for awhile and it should adjust. You can also try disconnecting the battery for 20 min to reset some of the trims like long term fuel trim.
power did end up increasing after a few drives.
Originally Posted by fasfury
Hi everyone, I have started walnut blasting to my 73k km '11 jcw, but I couldn't achieve a %100 clean valve. I have tried cylinder 1 and 4, but the thing is walnuts couldn't go behind the valve and the visible surface of the valve is half clean. I have a 2.5hp compressor, but I can only achieve 8bar for at most 8-10 secs. Can this be the problem?
What can I use to maybe pour to the housing and wait some time to soften it?
Berryman B‐12 Chemtool. it was listed in the pdf guide in the first post of this thread. I used it, and did my valves with picks and brushes. they didn't turn out nearly as pretty as some of the photos in this thread but my power did go up so I'm happy.
wondering if I should do seafoam in the pcv from time to time to keep them clean or does that not do anything?
I would imagine it's just like most cars in that it's monitoring engine temps and such and stays in closed loop mode until everything reaches the desired settings. Then it goes into open loop and unleashes the ponies.
You've got that backwards; if you have narrow band sensors then it will run open loop whenever running other than stoich, so that is during cold start and WOT especially. It can only run closed loop whenever trying to hold stoich, so that's at most other times than cold enrichment and WOT. I don't know all the mini engines well, but the price on my N18 sensor makes me think (and hope) that it is wideband, so there's no reason it can't run closed loop for all conditions after a few seconds are needed to heat the sensor. When I wrote ECU software, I would have it run the wideband all the time. No idea what the exact calibration tries to do and when for these cars though, but as far as what is possible, this is true.
I had to use a mix of time with the blaster as well as a pick to get behind the valve stems.
I will pick up some usefull ones too for the next try!
Originally Posted by hidperf
I found that my valves were being stubborn as well. My 5hp, 30gallon compressor cranked up to 125psi (8.6bar) was taking forever. So filled the two intake ports at TDC with solvent and let them soak overnight. This made a huge difference in speed but obviously took longer to complete the entire job.
What kind of solvent did you use?
Originally Posted by Gabe3
power did end up increasing after a few drives.
Berryman B‐12 Chemtool. it was listed in the pdf guide in the first post of this thread. I used it, and did my valves with picks and brushes. they didn't turn out nearly as pretty as some of the photos in this thread but my power did go up so I'm happy.
wondering if I should do seafoam in the pcv from time to time to keep them clean or does that not do anything?
Great, I will try this too or a similar product which I can find around here.
By the way, my walnut has a polishing paste on it according to the spec sheet. Is it really necessary or should I use bare walnut? Is this can be my reason that I couldnt achieve the perfect result in blasting?
You've got that backwards; if you have narrow band sensors then it will run open loop whenever running other than stoich, so that is during cold start and WOT especially. It can only run closed loop whenever trying to hold stoich, so that's at most other times than cold enrichment and WOT. I don't know all the mini engines well, but the price on my N18 sensor makes me think (and hope) that it is wideband, so there's no reason it can't run closed loop for all conditions after a few seconds are needed to heat the sensor. When I wrote ECU software, I would have it run the wideband all the time. No idea what the exact calibration tries to do and when for these cars though, but as far as what is possible, this is true.
I always did get those two confused. The naming convention always seemed backwards to me.
I don't know about these ECUs either, but the Honda stuff I used to tune on would take quite a while before you could use the full potential. Not 20 minutes, but longer than I would've thought.
Originally Posted by fasfury
What kind of solvent did you use?
Acrysolv is what I used. But any solvent like it should work.
Originally Posted by fasfury
By the way, my walnut has a polishing paste on it according to the spec sheet. Is it really necessary or should I use bare walnut? Is this can be my reason that I couldnt achieve the perfect result in blasting?
I always did get those two confused. The naming convention always seemed backwards to me.
At the risk of derailing the thread but because I think it is helpful (and sorta related). the naming convention comes from the controls industry. When you have a controller that does something, checks with a sensor, and then corrects itself, that is closed loop because the self-checking process "closes" the loop. If the controller just commands something and then *hopes* it happened correctly, this is open loop. When using a narrow band O2 sensor, the ECU cannot check anything other than stoich, but stoich is rarely the best AFR to run other than light loads. For this reason, the ECU transitions to open loop when the target is outside of what the sensor can read, but then the ECU may be running more poorly than it realizes. This also happens during warmup like what you saw with your Hondas most likely; you were wanting to run a little rich and the O2 sensor couldn't be used for that. That brings us to modern times where wideband sensors are getting used. This allows the ECU to run both rich AND closed loop, so it is far more precise. This leads to better efficiency but also less soot buildup (told you it was related!). It even gives better power and reliability - one of those few win/win scenarios. You are still limited during transients due to the speed of the sensor, but some are getting fast enough to detect cylinder-individual AFRs.