
How To HOW TO: R56 - Thermostat Housing + Thermostat


1st Gear
Joined: Feb 2012
Posts: 26
Likes: 0
From: Central Ky
The sensor comes with the thermostat housing in most cases. With that said. I've got a brand new one that I didn't end up needing to use that I'll sell you for $100 including shipping if you're in the states.

3rd Gear
Joined: Nov 2013
Posts: 151
Likes: 1
From: W. Los Angeles, CA
Nice! I'm in socal. Is it the metal one or plastic?


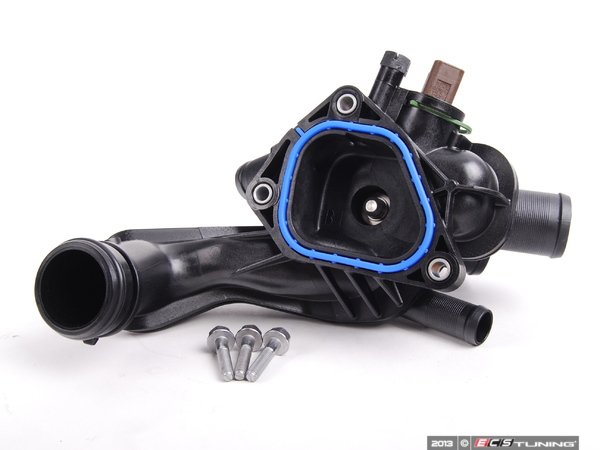
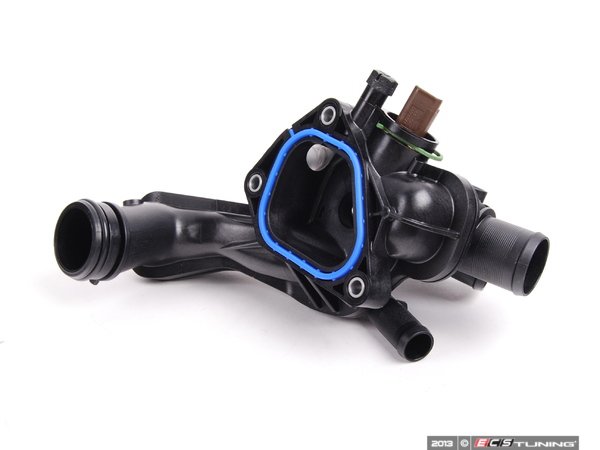
Should look like this ,plastic one, minus the bolts in our kit.
http://www.ecstuning.com/Search/SiteSearch/11537534521/
thanks
http://www.ecstuning.com/Search/SiteSearch/11537534521/
thanks
__________________

MINI Guru/ MINI Owner Since 2004 | NEW Lifetime Part Replacement | Local Pickup
Milltek | Genuine MINI | Forge Motorsport | NM Engineering | ECS Performance | M7 Speed
Customer Service Hours: 8am-8pm EST|Sales Team Hours: 8am-11pm | SAT 10am-7pm 800.924.5172
MINI Guru/ MINI Owner Since 2004 | NEW Lifetime Part Replacement | Local Pickup
Milltek | Genuine MINI | Forge Motorsport | NM Engineering | ECS Performance | M7 Speed
Customer Service Hours: 8am-8pm EST|Sales Team Hours: 8am-11pm | SAT 10am-7pm 800.924.5172

1st Gear
Joined: Aug 2013
Posts: 20
Likes: 2
From: MA
2010 R56 S with 75K miles. Was leaking, no code. All hoses seemed fine and could not see the leak, so figured it was from the t stat housing. Took 3.5 hours out and in taking my time. Then another hour to fill and let it settle. Went well and as stated in this thread. Some connectors are difficult to release especially if you cannot see them. Probe under with a pick and you'll get it. I think you do not have to take the wiring harness cover off as I did, as stated by another post it would have been fine to just pull it and the harness straight up off of the t stat housing and you can work underneath it. I think I did not need to unplug the ECU cables. Might have given a bit more room for the wiring harness to move, but might not be necessary. A thin wall 10mm socket is needed, especially for the bottom front t stat housing bolt. Removing the airbox helps to see the clip on the rear hose to the water pump. I used water pump pliers and needle nose vise grips for all the hose clamps. Bought the MINI t stat housing from Turner Motorsports for $100. MINI said they would do it for $500.

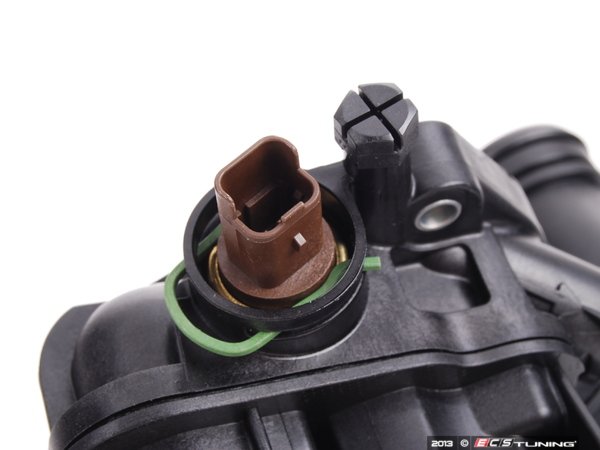
Don't forget to bleed it once it is full. If you look at the pictures from ECS above, the bleed screw is next to the brown electrical connector at the top of the thermostat housing. It will probably take about 3 turns to get the air to start coming out.
Have fun,
Mike
Have fun,
Mike
+1 on the bleed. Good advice. Hex head with a philips head in the center. Long Phillips head reaches it pretty good. Don't back it off all the way, keep a tiny bit pressure on it as you unscrew so it does not pop off on the last threads and loose it in the engine bay.
__________________
MINI Guru/ MINI Owner Since 2004 | NEW Lifetime Part Replacement | Local Pickup
Milltek | Genuine MINI | Forge Motorsport | NM Engineering | ECS Performance | M7 Speed
Customer Service Hours: 8am-8pm EST|Sales Team Hours: 8am-11pm | SAT 10am-7pm 800.924.5172
MINI Guru/ MINI Owner Since 2004 | NEW Lifetime Part Replacement | Local Pickup
Milltek | Genuine MINI | Forge Motorsport | NM Engineering | ECS Performance | M7 Speed
Customer Service Hours: 8am-8pm EST|Sales Team Hours: 8am-11pm | SAT 10am-7pm 800.924.5172
Last edited by ECSTuning; Sep 22, 2014 at 08:10 AM.

3rd Gear
Joined: May 2012
Posts: 174
Likes: 6
From: West Sussex, UK
I found 3 turns is easily enough to get a good result.
I think I read somewhere on here that after 4 full turns you risk losing the plastic screw. I didn't want to find out the hard way though!
BTW nice pic ECSTuning; you're pretty good at sharing info, thanks for that...
I think I read somewhere on here that after 4 full turns you risk losing the plastic screw. I didn't want to find out the hard way though!
BTW nice pic ECSTuning; you're pretty good at sharing info, thanks for that...
cjm - you are welcome. 
__________________
MINI Guru/ MINI Owner Since 2004 | NEW Lifetime Part Replacement | Local Pickup
Milltek | Genuine MINI | Forge Motorsport | NM Engineering | ECS Performance | M7 Speed
Customer Service Hours: 8am-8pm EST|Sales Team Hours: 8am-11pm | SAT 10am-7pm 800.924.5172
MINI Guru/ MINI Owner Since 2004 | NEW Lifetime Part Replacement | Local Pickup
Milltek | Genuine MINI | Forge Motorsport | NM Engineering | ECS Performance | M7 Speed
Customer Service Hours: 8am-8pm EST|Sales Team Hours: 8am-11pm | SAT 10am-7pm 800.924.5172

Neutral
Joined: Sep 2014
Posts: 2
Likes: 0
Hey guys, I have a 2008 Mini cooper S R56, 40,000miles on the clock.
I have had the thermostat housing replaced as it was leaking by a recomended mechanic, turns out he's not the best!?
He has fitted the housing but the car keeps overheating and blowing coolent out of one of the ports on the housing, i belive its the one that goes to the water pump. I have had a look at it myself (though repairing cars isnt my thing!) I watched a few you tube videos on the fitting of this part and learnt there is a bleed valve on the housing itself, i opened this and alot of air came out and coolent level in the res dropped as expected. i started the car and let it get to temp and repeated this process to let any remaining air out the system.
I took the car for a spin and very quickly the car started steaming from under the bonnet, i could identify the leak from the same spot as before on the the thermostat housing. Also the coolant in the res was really hot to the point it was bubbling!
Hopefully someone out there can give me some advise before i take it to the dealership and have to pay hefty repair bills!
Thanks guys let me know if you need any other info!
Thanks again!
Check the first post in this thread: Sounds like an install went wrong. Show it to the mechanic. If you don't trust him you can take it to a MINI Dealer , it might be a quick fix. There is an o-ring ( black one ) on the back side, that goes to the coolant pipe and held in with a clip #3 on the coolant pipe. There is also the main gasket ( blue which buts up ) against the head. Also you have to fill/ bleed the coolant system correctly, see links.
If you read the start of this post , you might be able to tell whats wrong. Please don't let it overheat, you will damage your engine.
Here is some more info on the whole coolant system and where to look and how it all connects.
https://www.northamericanmotoring.co...8-no-heat.html
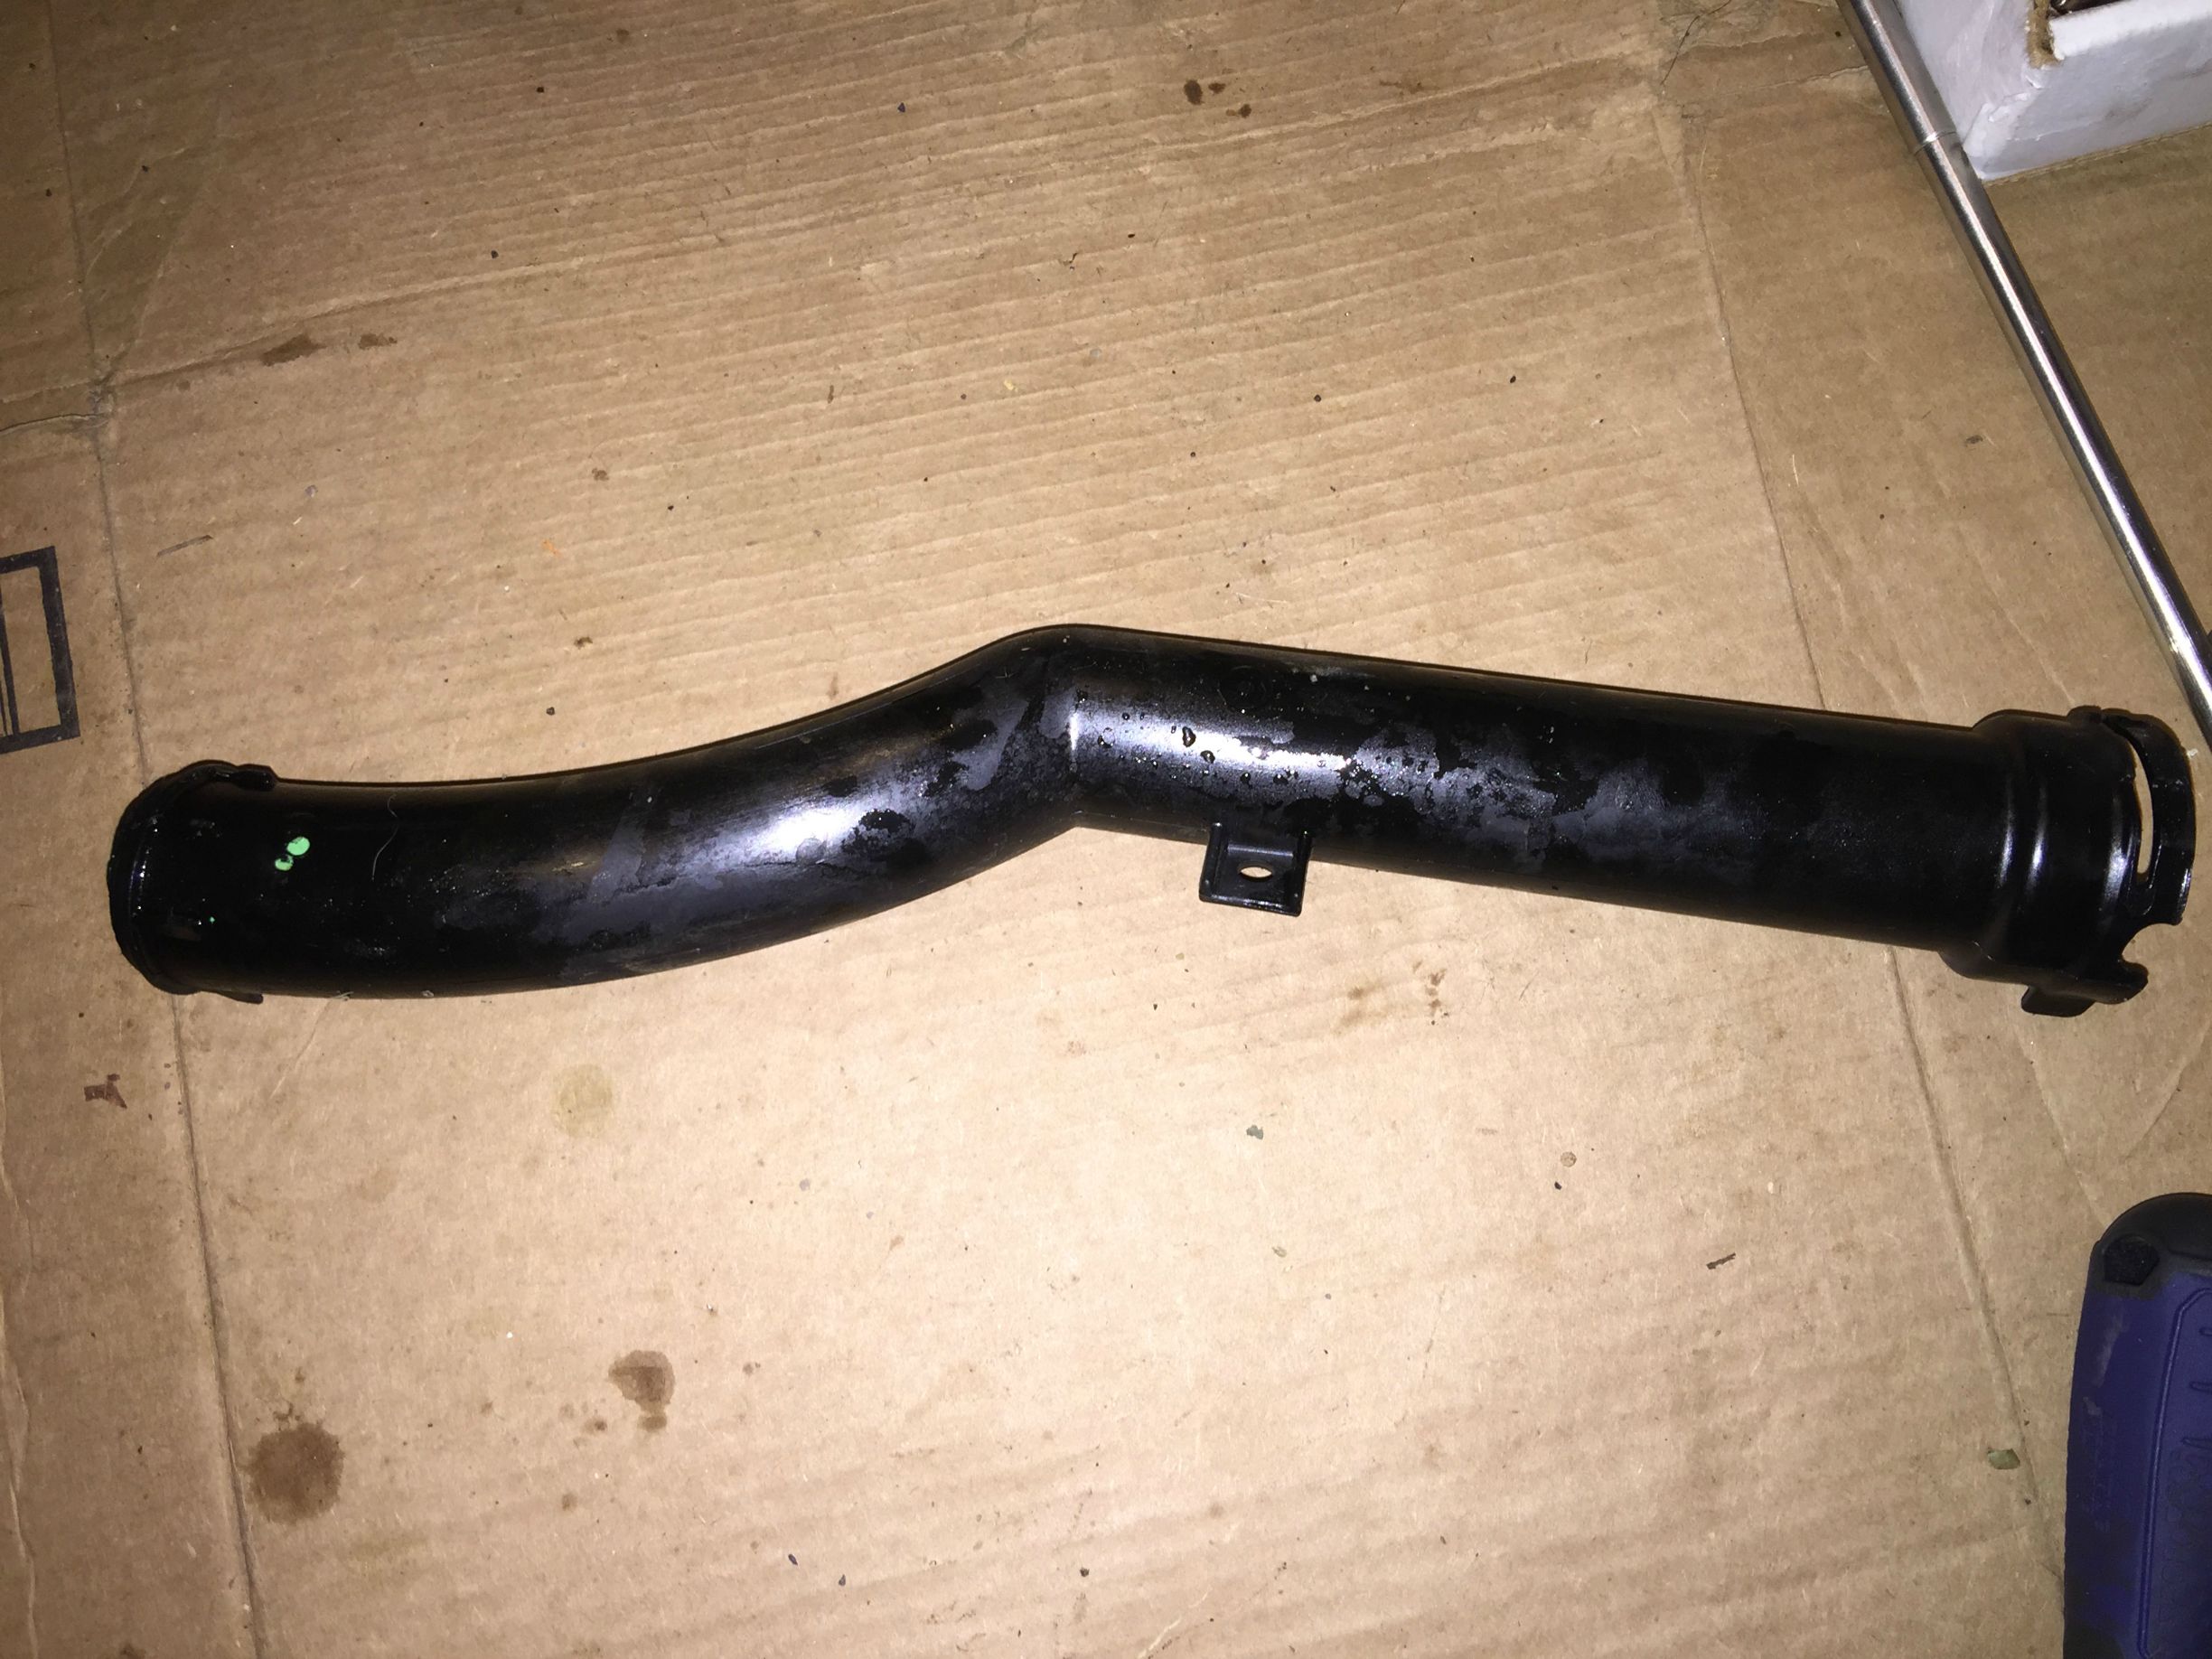
Water pipe to water pump and thermostat:

Thanks
If you read the start of this post , you might be able to tell whats wrong. Please don't let it overheat, you will damage your engine.
Here is some more info on the whole coolant system and where to look and how it all connects.
https://www.northamericanmotoring.co...8-no-heat.html
Water pipe to water pump and thermostat:
Thanks
__________________
MINI Guru/ MINI Owner Since 2004 | NEW Lifetime Part Replacement | Local Pickup
Milltek | Genuine MINI | Forge Motorsport | NM Engineering | ECS Performance | M7 Speed
Customer Service Hours: 8am-8pm EST|Sales Team Hours: 8am-11pm | SAT 10am-7pm 800.924.5172
MINI Guru/ MINI Owner Since 2004 | NEW Lifetime Part Replacement | Local Pickup
Milltek | Genuine MINI | Forge Motorsport | NM Engineering | ECS Performance | M7 Speed
Customer Service Hours: 8am-8pm EST|Sales Team Hours: 8am-11pm | SAT 10am-7pm 800.924.5172
1st Gear
Joined: Jul 2013
Posts: 44
Likes: 1
From: Greater St Louis Metro
Thanks for all the helpful hints and linked video. My 2008 R56 S @58,xxx miles threw the two Thermostat codes. No leaks that I could see. Ordered the kit from ECS and swapped it out yesterday. Took about 30 minutes to pull out and 15 to put back together. I did not touch the Canbus or any of the wires going to it. Nor did I remove the plastic cover to the wires. Manual transmission so no issues with getting to any of the 3 bolts. Overall a very easy job. Again thanks for all the great information NAM!
Chinfanpoe - "Ordered the kit from ECS and swapped it out yesterday."
Awesome and thanks. Nothing feels better then saving and DIY'ing it yourself.
Awesome and thanks. Nothing feels better then saving and DIY'ing it yourself.
__________________
MINI Guru/ MINI Owner Since 2004 | NEW Lifetime Part Replacement | Local Pickup
Milltek | Genuine MINI | Forge Motorsport | NM Engineering | ECS Performance | M7 Speed
Customer Service Hours: 8am-8pm EST|Sales Team Hours: 8am-11pm | SAT 10am-7pm 800.924.5172
MINI Guru/ MINI Owner Since 2004 | NEW Lifetime Part Replacement | Local Pickup
Milltek | Genuine MINI | Forge Motorsport | NM Engineering | ECS Performance | M7 Speed
Customer Service Hours: 8am-8pm EST|Sales Team Hours: 8am-11pm | SAT 10am-7pm 800.924.5172

2008 R56:
I also recently found a leak. Couldn't figure out where until coming across this info about the thermo housing. Thank you all.
Though, after ordering the thermo housing just the other day, I found a small hole under a hose over the gear shift linkage. Hose 17122754221 from ECS Tuning. For all those with a manual Mini, please check that hose because it basically sits right on top of the linkage. Second gear is the culprit as it rubs right under there. It has a sharp metal clip on it also. I ended up having to zip tie it up and will do the same when the new hose comes in. I don't know why the engineers put a moving part so close (sitting on) to the hose.

1st Gear
Joined: Jan 2013
Posts: 12
Likes: 0
Limp Mode
Replaced thermostat housing today with parts from ECS.
Everything went well, went for a test drive and car seemed to not be making much power. I put it in sport mode, accelerated and the yellow engine half full light came on (limp mode)
I drove the car home, took all connectors apart, and put them all back together. I am certain I have them all in the locations they came off.
I also did a walnut blast valve cleaning at the same time I did the thermostat. I pulled the intake manifold back off to see if I could find a hose or plug in the wrong place. I found one of the very small vacuum hoses at the bottom was disconnected. I connected it and drove the car. It seemed to be making a normal amount of power, yet the limp mode light was still on.
When I got home I disconnected the battery, re-connected it, and when I started the car it still pulled up the limp mode light.
I'm stumped, any suggestions would be greatly appreciated!

" Replaced thermostat housing today with parts from ECS. "
Thanks for the order. Hope the cycling cleared the code. +1 on clearing the code and checking things.
Thanks for the order. Hope the cycling cleared the code. +1 on clearing the code and checking things.
__________________
MINI Guru/ MINI Owner Since 2004 | NEW Lifetime Part Replacement | Local Pickup
Milltek | Genuine MINI | Forge Motorsport | NM Engineering | ECS Performance | M7 Speed
Customer Service Hours: 8am-8pm EST|Sales Team Hours: 8am-11pm | SAT 10am-7pm 800.924.5172
MINI Guru/ MINI Owner Since 2004 | NEW Lifetime Part Replacement | Local Pickup
Milltek | Genuine MINI | Forge Motorsport | NM Engineering | ECS Performance | M7 Speed
Customer Service Hours: 8am-8pm EST|Sales Team Hours: 8am-11pm | SAT 10am-7pm 800.924.5172

1st Gear
Joined: Dec 2014
Posts: 20
Likes: 0
From: SF Bay Area
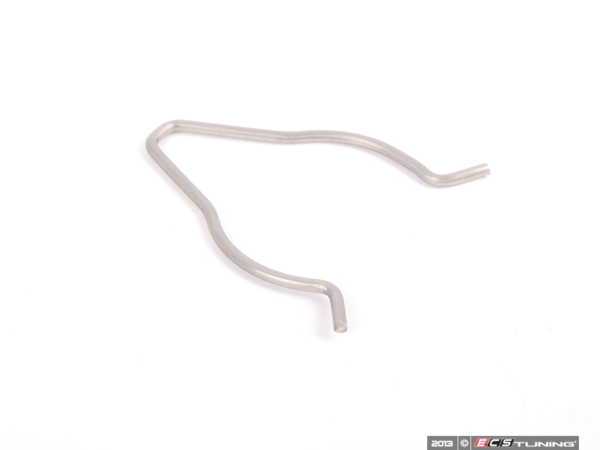
Anyone know what the part number is for #3?
I dropped it somewhere on the backside, with no hope of getting it out. The hose isn't going anywhere with everything bolted up, but I still want to get another and give it a second shot at getting the clip on (maybe removing the intake box on my wife's base hardtop).
Thanks for the help!
Joshua.
I dropped it somewhere on the backside, with no hope of getting it out. The hose isn't going anywhere with everything bolted up, but I still want to get another and give it a second shot at getting the clip on (maybe removing the intake box on my wife's base hardtop).
Thanks for the help!
Joshua.
It holds the thermostat to the tube in place. See if you can find it. Don't want to get a leak, even though the pipe sandwiches between the two. It gripes it just a hair.
Clip - Priced Each 11537548652
http://www.ecstuning.com/Search/SiteSearch/11537548652/
Thanks
Clip - Priced Each 11537548652
http://www.ecstuning.com/Search/SiteSearch/11537548652/
Thanks
__________________
MINI Guru/ MINI Owner Since 2004 | NEW Lifetime Part Replacement | Local Pickup
Milltek | Genuine MINI | Forge Motorsport | NM Engineering | ECS Performance | M7 Speed
Customer Service Hours: 8am-8pm EST|Sales Team Hours: 8am-11pm | SAT 10am-7pm 800.924.5172
MINI Guru/ MINI Owner Since 2004 | NEW Lifetime Part Replacement | Local Pickup
Milltek | Genuine MINI | Forge Motorsport | NM Engineering | ECS Performance | M7 Speed
Customer Service Hours: 8am-8pm EST|Sales Team Hours: 8am-11pm | SAT 10am-7pm 800.924.5172

I spent some time on a thermostat replacement over the past few days and snapped a few photos that I thought would be relevant to anyone attempting this repair. It's really not too difficult provided everything goes well. The hardest part for me was getting the old thermostat to separate from the water pipe going to the waterpump. More on that later.
Here is a photo of where the coolant was leaking from on my car. The color is a little funny because I had dye in the cooling system to help me pinpoint the leak.

First up was removing the intake. I removed the entire intake including the intake box just to give more space to work.
Removing the intake tube from airbox to turbo. This has one electrical connector.


Removing the fresh air pipe that brings air from the grill area to the airbox just sucks. There seems to be no way around it. I've had to remove it a couple times now and it's a huge pain every time. You do have to remove it to get to the thermostat. So wrestle it out of there and declare victory.

Now you should have no intake and good access to the thermostat

There are two electrical connectors on the thermostat housing. There are also a chunk of wires that are in the way along with two vacuum hoses. The wires you do not have to disassemble the wiring "housing" like other people in this thread have mentioned. Just lift it up and you'll be able to move it out of the way enough to get to everything.
Electrical connectors. You can also see the wiring and hoses that are in the way.

One of the vacuum hoses

The other vacuum hose

Now you can start removing the coolant hoses. I hope you've drained the coolant system already. You'll still probably make a huge mess.
These are the three coolant pipes connected to the thermostat housing that face towards the front of the car. The two bigger ones are fairly easy to get off. The one going to to the turbo just move the clamp and you can pull the thermostat housing out of this hose once you have disconnected everything else. For the clamps I used pliers for most of the hose clamps although I do have a pair of those special cable-operated hose clamp pliers. They can come in super handy.

There are two hoses that go from teh back of the thermostat housing to the firewall. These are the hoses for the heater core. remove those also and tuck them out of the way.
Next you'll want to remove the three bolts holding the thermostat housing to the block. Look at your new thermostat housing to help you figure out where the bolts are since you probably won't be able to see them and you'll have to undo them by feel.
This is the connection from the thermostat housing to the water pipe that goes to the water pump. Just pull the clip out and the thermostat housing "should" just pull out of the water pipe. Mine was really stuck and was a huge nightmare separating. Hopefully yours won't be too bad.

Installation of the new housing is just reverse of removal. Nothing fancy here. Connect the new housing to the short coolant hose running to the turbo first. Then connect it to the water pipe to the water pump but don't install the clip yet because you probably won't be able to. Torque down the thermostat housing first and then you should be able to get the clip into the water pipe/thermostat connection. Bleeding instructions are elsewhere in this thread.
One thing to note. I broke the water pipe on my car where it goes into the water pump. It sounds like this is a pretty unusual failure. I noticed it because after replacing the thermostat I now had a much worse leak on the drivers side of the car. I noticed it pretty much right away when I was bleeding the coolant system after replacing the thermostat. You have to remove the thermostat again to get it out. Once you have the thermostat removed you can pull it free from the water pump. It's just stuck in there. There is one wire clipped to a tab on the water pipe that you'll have to reach in with a long screwdriver to pop loose. I'm not sure how I managed to break it since I was trying to be careful when removing the thermostat. I didn't wiggle it much side to side when I was trying to release the thermostat from the water pipe. It was like 35 degrees in the garage so maybe the plastic was cold and brittle. Either way... be careful and don't do this. It's really annoying to have to remove the thermostat after you just put it all back together.

Here is a photo of where the coolant was leaking from on my car. The color is a little funny because I had dye in the cooling system to help me pinpoint the leak.
First up was removing the intake. I removed the entire intake including the intake box just to give more space to work.
Removing the intake tube from airbox to turbo. This has one electrical connector.
Removing the fresh air pipe that brings air from the grill area to the airbox just sucks. There seems to be no way around it. I've had to remove it a couple times now and it's a huge pain every time. You do have to remove it to get to the thermostat. So wrestle it out of there and declare victory.
Now you should have no intake and good access to the thermostat
There are two electrical connectors on the thermostat housing. There are also a chunk of wires that are in the way along with two vacuum hoses. The wires you do not have to disassemble the wiring "housing" like other people in this thread have mentioned. Just lift it up and you'll be able to move it out of the way enough to get to everything.
Electrical connectors. You can also see the wiring and hoses that are in the way.
One of the vacuum hoses
The other vacuum hose
Now you can start removing the coolant hoses. I hope you've drained the coolant system already. You'll still probably make a huge mess.
These are the three coolant pipes connected to the thermostat housing that face towards the front of the car. The two bigger ones are fairly easy to get off. The one going to to the turbo just move the clamp and you can pull the thermostat housing out of this hose once you have disconnected everything else. For the clamps I used pliers for most of the hose clamps although I do have a pair of those special cable-operated hose clamp pliers. They can come in super handy.
There are two hoses that go from teh back of the thermostat housing to the firewall. These are the hoses for the heater core. remove those also and tuck them out of the way.
Next you'll want to remove the three bolts holding the thermostat housing to the block. Look at your new thermostat housing to help you figure out where the bolts are since you probably won't be able to see them and you'll have to undo them by feel.
This is the connection from the thermostat housing to the water pipe that goes to the water pump. Just pull the clip out and the thermostat housing "should" just pull out of the water pipe. Mine was really stuck and was a huge nightmare separating. Hopefully yours won't be too bad.
Installation of the new housing is just reverse of removal. Nothing fancy here. Connect the new housing to the short coolant hose running to the turbo first. Then connect it to the water pipe to the water pump but don't install the clip yet because you probably won't be able to. Torque down the thermostat housing first and then you should be able to get the clip into the water pipe/thermostat connection. Bleeding instructions are elsewhere in this thread.
One thing to note. I broke the water pipe on my car where it goes into the water pump. It sounds like this is a pretty unusual failure. I noticed it because after replacing the thermostat I now had a much worse leak on the drivers side of the car. I noticed it pretty much right away when I was bleeding the coolant system after replacing the thermostat. You have to remove the thermostat again to get it out. Once you have the thermostat removed you can pull it free from the water pump. It's just stuck in there. There is one wire clipped to a tab on the water pipe that you'll have to reach in with a long screwdriver to pop loose. I'm not sure how I managed to break it since I was trying to be careful when removing the thermostat. I didn't wiggle it much side to side when I was trying to release the thermostat from the water pipe. It was like 35 degrees in the garage so maybe the plastic was cold and brittle. Either way... be careful and don't do this. It's really annoying to have to remove the thermostat after you just put it all back together.
Nice write up. Very in depth.
First time i seen one break at the flange on the water pipe. Most of the time its not inserted correctly on re-install and it leaks. Or they pop the clip off and it falls down in the engine bay. urghhh.
On the fresh air intake tube, the pinch method ( as the connection ) on the lower elbow connect works but the engine has to be warm or at least the tube. Then you have to rotate it while pull it out. Kind of a pain.
Glad you got it done.
__________________
MINI Guru/ MINI Owner Since 2004 | NEW Lifetime Part Replacement | Local Pickup
Milltek | Genuine MINI | Forge Motorsport | NM Engineering | ECS Performance | M7 Speed
Customer Service Hours: 8am-8pm EST|Sales Team Hours: 8am-11pm | SAT 10am-7pm 800.924.5172
MINI Guru/ MINI Owner Since 2004 | NEW Lifetime Part Replacement | Local Pickup
Milltek | Genuine MINI | Forge Motorsport | NM Engineering | ECS Performance | M7 Speed
Customer Service Hours: 8am-8pm EST|Sales Team Hours: 8am-11pm | SAT 10am-7pm 800.924.5172

1st Gear
Joined: Feb 2013
Posts: 25
Likes: 0
Broken Water Pipe?
I attempted the job today and all was going well until I was trying to separate the housing from tube that runs behind the engine to the water pump. I pulled the small pin out easily but just couldn't get separation and when it finally broke loose I realized the tube was still connected and it was actually the other end of the tube that came loose from the water pump.
Looks like I broke the end the connects to the water pump? I noticed an earlier poster did the same thing but I'm not sure how to get access to the water pump connection to reconnect the pipe. Any ideas?


Looks like I broke the end the connects to the water pump? I noticed an earlier poster did the same thing but I'm not sure how to get access to the water pump connection to reconnect the pipe. Any ideas?


I attempted the job today and all was going well until I was trying to separate the housing from tube that runs behind the engine to the water pump. I pulled the small pin out easily but just couldn't get separation and when it finally broke loose I realized the tube was still connected and it was actually the other end of the tube that came loose from the water pump.
Looks like I broke the end the connects to the water pump? I noticed an earlier poster did the same thing but I'm not sure how to get access to the water pump connection to reconnect the pipe. Any ideas?
Looks like I broke the end the connects to the water pump? I noticed an earlier poster did the same thing but I'm not sure how to get access to the water pump connection to reconnect the pipe. Any ideas?
Sent from my phone using NAMotoring
1st Gear
Joined: Feb 2013
Posts: 25
Likes: 0
Thanks for the advice. By getting under the car and using a telescoping mirror I confirmed there is still a bit of plastic and the o ring lodged inside the water pump port. I fooled around for a couple hours making various extended picks to try and remove what's leftover but progress is very slow because of the lack of access.
I thought about removing the wheel well cover but from under the car it looks like that wouldn't help much unless I removed the water pump itself. It looks like removing the big air hose at the back left corner of the engine would provide sufficient access but I'm not comfortable straying from diy guides and improvising on my own. Any Advice on how to get the remaining bits out?
I thought about removing the wheel well cover but from under the car it looks like that wouldn't help much unless I removed the water pump itself. It looks like removing the big air hose at the back left corner of the engine would provide sufficient access but I'm not comfortable straying from diy guides and improvising on my own. Any Advice on how to get the remaining bits out?