
How To R56 :: Drivetrain :: DIY Water Pump Replacement


Great thread folks, this can be a consuming DIY!
__________________
Your Trusted Source For DIY and Parts
FREE SHIPPING over $99 click here
MINI Parts | DIY Help | Facebook | Twitter | Instagram | YouTube | Promos
888.280.7799 | 6am - 5pm PST

FREE SHIPPING over $99 click here
MINI Parts | DIY Help | Facebook | Twitter | Instagram | YouTube | Promos
888.280.7799 | 6am - 5pm PST

Neutral
Joined: Dec 2013
Posts: 3
Likes: 0
Very Fantastic thread, just what I have been searching for!!
I sure appreciate all this info. with pictures from ' boosted mini ', his replies, and the later follow up by ' nikki cooper '. I am facing the same task in my 2009 Cooper S Clubman.(R55) Haynes manual says to take off the right inner wheel well, but nothing about raising the engine. Then it is can be gotten to supposedly, any body know anything about that? At least it is not like the earlier ones that you had basically to remove the whole front bumper, etc., etc...
Thanks indeed!
djtriceflt
PS With so many failures is there a way to unite and get Mini to do a recall?
6th Gear
Joined: Feb 2008
Posts: 2,358
Likes: 1
From: Graham, NC
Very Fantastic thread, just what I have been searching for!!
I sure appreciate all this info. with pictures from ' boosted mini ', his replies, and the later follow up by ' nikki cooper '. I am facing the same task in my 2009 Cooper S Clubman.(R55) Haynes manual says to take off the right inner wheel well, but nothing about raising the engine. Then it is can be gotten to supposedly, any body know anything about that? At least it is not like the earlier ones that you had basically to remove the whole front bumper, etc., etc...
Thanks indeed!
djtriceflt
PS With so many failures is there a way to unite and get Mini to do a recall?
I sure appreciate all this info. with pictures from ' boosted mini ', his replies, and the later follow up by ' nikki cooper '. I am facing the same task in my 2009 Cooper S Clubman.(R55) Haynes manual says to take off the right inner wheel well, but nothing about raising the engine. Then it is can be gotten to supposedly, any body know anything about that? At least it is not like the earlier ones that you had basically to remove the whole front bumper, etc., etc...
Thanks indeed!
djtriceflt
PS With so many failures is there a way to unite and get Mini to do a recall?
I was doing this with my MINI on jackstands. It was very tight and most of the work had to be done by touch as I could not contort myself to where I could see what I was doing. It was very slow work. At times I think I was only able to turn the wrench about a sixth of a turn at a time. Part of my fear was I would not be able to get the bolts lined back up properly, started, and then tightened down.
If you can get your MINI up on a lift or at least high enough to slide up under it, it can probably be done without lifting the engine. And the proper tools to get to bolts in really tight places.
Neutral
Joined: Dec 2013
Posts: 3
Likes: 0
Appreciate that additional info...
When I tried to do mine, I followed the manual and tried to do it without lifting the engine. I succeeded in getting as far as removing the old water pump. While test fitting the replacement unit (aftermarket) I ran into the same problem as others with the spindle being too long. Unfortunately the unit got wedged in place. At that point I decided my best course of action was to turn it over to a pro to complete the job.
I was doing this with my MINI on jackstands. It was very tight and most of the work had to be done by touch as I could not contort myself to where I could see what I was doing. It was very slow work. At times I think I was only able to turn the wrench about a sixth of a turn at a time. Part of my fear was I would not be able to get the bolts lined back up properly, started, and then tightened down.
If you can get your MINI up on a lift or at least high enough to slide up under it, it can probably be done without lifting the engine. And the proper tools to get to bolts in really tight places.
and headlamp and still have that difficulty and did you use the Graf pump which has the slightly longer spindle? I'll have to invest in some torx drives and sockets but I have all else needed I believe. Hopefully, I'll be up to it as a passion of mine is wrenching on old British iron...Knowing what lies ahead is 90% of the job and I sure appreciate your input. .

6th Gear
Joined: Feb 2008
Posts: 2,358
Likes: 1
From: Graham, NC
Thanks for the heads up. Did you remove the passenger inner wheel well
and headlamp and still have that difficulty and did you use the Graf pump which has the slightly longer spindle? I'll have to invest in some torx drives and sockets but I have all else needed I believe. Hopefully, I'll be up to it as a passion of mine is wrenching on old British iron...Knowing what lies ahead is 90% of the job and I sure appreciate your input. .
It was not the Graf pump, but I don't remember the brand. If I were doing it now, I'd probably spring for the new OEM version as MINI has now switched to an aluminum housing like all the aftermarket units instead of the plastic they were using.
I would recommend looking up the part numbers for the different plastic fasteners used to keep the wheel liner in place. If yours is like mine, some will inevitably destruct when you are removing them. I ordered a bunch when I was doing some bumper work and they have proven to be quite handy. They are really cheap.
If you have a lot of miles, you might want to replace the serpentine belt as you will be working in the same area and will have access to it.
Neutral
Joined: Dec 2013
Posts: 3
Likes: 0
Yes on removing the wheel liner and headlight. iirc the manual also calls for the upper engine mount or bracket to be removed. I did not do that as I approached everything from underneath. Had I done that I might have had better access to some of the bolts. I think the manual also calls for the front bumper to be put into the service position, something I did not do.
It was not the Graf pump, but I don't remember the brand. If I were doing it now, I'd probably spring for the new OEM version as MINI has now switched to an aluminum housing like all the aftermarket units instead of the plastic they were using.
I would recommend looking up the part numbers for the different plastic fasteners used to keep the wheel liner in place. If yours is like mine, some will inevitably destruct when you are removing them. I ordered a bunch when I was doing some bumper work and they have proven to be quite handy. They are really cheap.
If you have a lot of miles, you might want to replace the serpentine belt as you will be working in the same area and will have access to it.


There is quite a bit of available "play" with all those components. The exhaust is hung with rubber mounts and there is also a flexible mesh coupler after the header that allows for engine movement. The engine mounts are rubber, and the axles extend/slide and have universal joints. When one jacks the motor up for this job, it only involves lifting it a matter of inches...not jacking it out of the car or anything like that.


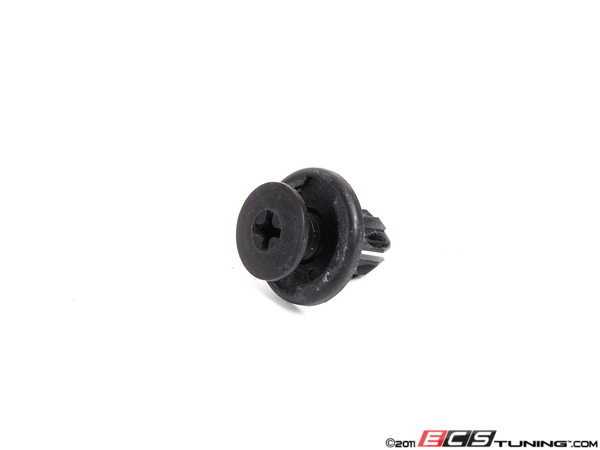
jcauseyfd - Good mention on the expanding rivets that go around the wheel well. Make it allot easier when trying to fiddle with the old ones with the damaged philips head or will not retract. I got a bunch of these and replaced them when needed.

#8 Plastic Rivet - Priced Each Part # 07130702966
http://www.ecstuning.com/Search/SiteSearch/07130702966/ES16370/
All the water pumps that we have a metal housing as well as the OEM Genuine MINI ones. There a little trick which is for the drive wheel back on an aftermarket pump. Once the pump itself is in. The Hepu and others are a little tight to fit the original drive wheel on when placing it back in place on the new pump ( see picture of hepu below ). I was able to squeeze it in place by starting the lip of the pulley or drive wheel on the side of the pump drive wheel mount. Then I used a small pry bar and wood shims ( to protect engine and side frame ) to just nudge the engine towards driver side and that was enough for the drive wheel to clear the rest and the side metal wall of the engine bay. Then you can line it up and tighten down the three bolts. And put the belt back on and everything.
Drive Wheel # 11517619020
http://www.ecstuning.com/Search/SiteSearch/11517619020/ES2101887/
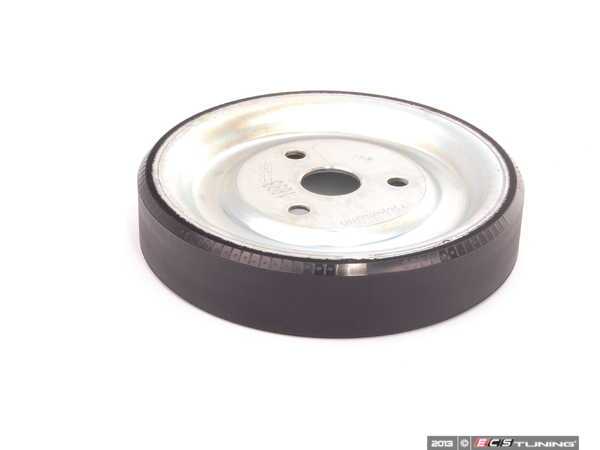
&&
Water Pump Part # 11517550484
http://www.ecstuning.com/Search/SiteSearch/11518604888/
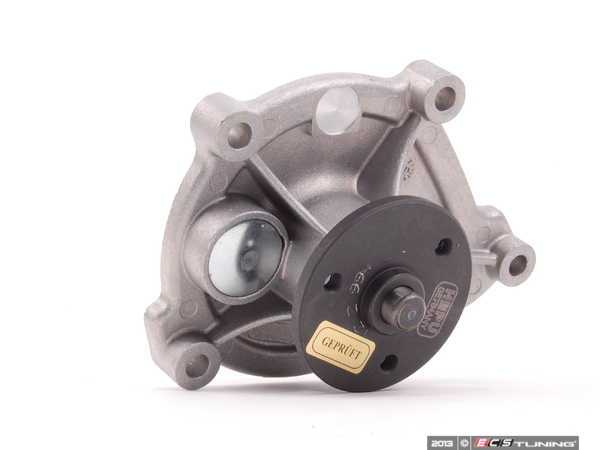
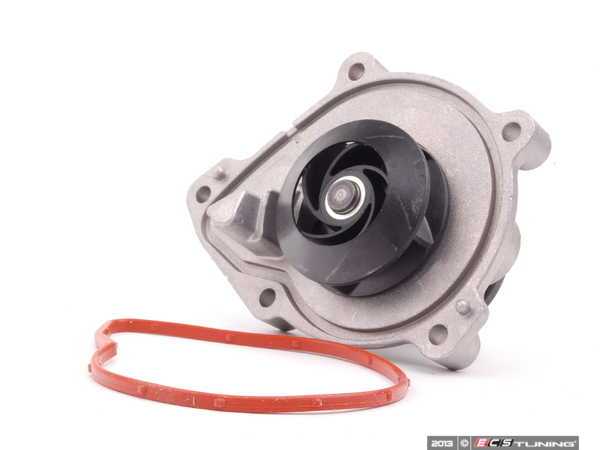
Here is the thread which I mention the locations. Also a great time to check the other locations and the thermostat housing as well as the drive belt, drive wheel, and the friction wheel ( which is right beside it ) for the water pump.
https://www.northamericanmotoring.co...8-no-heat.html
Thanks and hope that helps.
#8 Plastic Rivet - Priced Each Part # 07130702966
http://www.ecstuning.com/Search/SiteSearch/07130702966/ES16370/
All the water pumps that we have a metal housing as well as the OEM Genuine MINI ones. There a little trick which is for the drive wheel back on an aftermarket pump. Once the pump itself is in. The Hepu and others are a little tight to fit the original drive wheel on when placing it back in place on the new pump ( see picture of hepu below ). I was able to squeeze it in place by starting the lip of the pulley or drive wheel on the side of the pump drive wheel mount. Then I used a small pry bar and wood shims ( to protect engine and side frame ) to just nudge the engine towards driver side and that was enough for the drive wheel to clear the rest and the side metal wall of the engine bay. Then you can line it up and tighten down the three bolts. And put the belt back on and everything.
Drive Wheel # 11517619020
http://www.ecstuning.com/Search/SiteSearch/11517619020/ES2101887/
&&
Water Pump Part # 11517550484
http://www.ecstuning.com/Search/SiteSearch/11518604888/
Here is the thread which I mention the locations. Also a great time to check the other locations and the thermostat housing as well as the drive belt, drive wheel, and the friction wheel ( which is right beside it ) for the water pump.
https://www.northamericanmotoring.co...8-no-heat.html
Thanks and hope that helps.
__________________

MINI Guru/ MINI Owner Since 2004 | NEW Lifetime Part Replacement | Local Pickup
Milltek | Genuine MINI | Forge Motorsport | NM Engineering | ECS Performance | M7 Speed
Customer Service Hours: 8am-8pm EST|Sales Team Hours: 8am-11pm | SAT 10am-7pm 800.924.5172
MINI Guru/ MINI Owner Since 2004 | NEW Lifetime Part Replacement | Local Pickup
Milltek | Genuine MINI | Forge Motorsport | NM Engineering | ECS Performance | M7 Speed
Customer Service Hours: 8am-8pm EST|Sales Team Hours: 8am-11pm | SAT 10am-7pm 800.924.5172
Last edited by ECSTuning; Dec 27, 2013 at 08:20 AM.

Neutral
Joined: Mar 2014
Posts: 2
Likes: 0
I went to a local shop (not MINI) and had a Water Pump leak. Quoted over $850, but that was $250 for pump, including the flywheel, $450 for labor, and $250 for a flush (including thermostat). The point is to compare apples with apples. Are they including the pump alone, or the full pump with housing? Also including thermostat without telling you those details? Flush or dumping the old fluid back in? I mistakenly bought my pump from Pelican, simply because I couldn't find one here in Houston to pick up other than expensive dealer or other expensive shops. Hated waiting 4 days. Then found a local Bap-Geon that had both the water pump and thermostat with housing ($115). They also had the BMW antifreeze for cheaper than the dealer. Altogether $75 for pump, $115 for thermostat, $22 for coolant, $8 for radiator flush, $8 for WaterWetter, $30 for incidentals = $258 instead of the $850 from the shop. Dealer probably would have been $1,500 for all.

4th Gear
Joined: Aug 2008
Posts: 470
Likes: 1
From: Harleysville PA
Yesterday, I replaced the original factory water pump with a new MINI pump @ 89,900 miles. Was adding a little bit of coolant occasionally and need to work outside so I thought it was time. I also wanted to replace my coolant, so I thought I'd try and get as many things done at one time as possible.
I replaced the thermostat previously in January, so I didn't want to do that again! I did it by myself on jack stands and lifting the motor. My biggest issue was that the tensioner tab wanted to keep going back in as I was working on the pulley and pump. But I got it done!
While I had things apart, I installed a NM Air Charge Pipe and got rid of the noise maker. I'm anxious to see if I notice any performance difference!
Thank you guys for all your help with the how to and additional posts with information!
I replaced the thermostat previously in January, so I didn't want to do that again!
I did it by myself on jack stands and lifting the motor. My biggest issue was that the tensioner tab wanted to keep going back in as I was working on the pulley and pump. But I got it done!While I had things apart, I installed a NM Air Charge Pipe and got rid of the noise maker. I'm anxious to see if I notice any performance difference!
Thank you guys for all your help with the how to and additional posts with information!
Glad you got it fixed and welcome.
__________________
MINI Guru/ MINI Owner Since 2004 | NEW Lifetime Part Replacement | Local Pickup
Milltek | Genuine MINI | Forge Motorsport | NM Engineering | ECS Performance | M7 Speed
Customer Service Hours: 8am-8pm EST|Sales Team Hours: 8am-11pm | SAT 10am-7pm 800.924.5172
MINI Guru/ MINI Owner Since 2004 | NEW Lifetime Part Replacement | Local Pickup
Milltek | Genuine MINI | Forge Motorsport | NM Engineering | ECS Performance | M7 Speed
Customer Service Hours: 8am-8pm EST|Sales Team Hours: 8am-11pm | SAT 10am-7pm 800.924.5172

Neutral
Joined: Apr 2013
Posts: 2
Likes: 0
From: Tucson, AZ
I'm partway through this right now. Has anyone else experienced problems removing the bolts that hold the top flange of the passenger side motor mount to the bracket that bolts to the motor? The front 3 came off just fine, but the back one feels like it's seized. I don't see any corrosion on it and as far as I can tell it's not bent. Before I whip out the prybar on it, I wanted to see if anyone else had this issue. I can get it to rotate about 2.5 turns and then it just stops.
edit. Yes the motor is supported with a jack underneath. The whole weight of the motor is not resting on this bolt. I've also tried tightening all the bolts and starting over with this one with no luck.
This pic is just for reference. This is not an actual pic of my car.
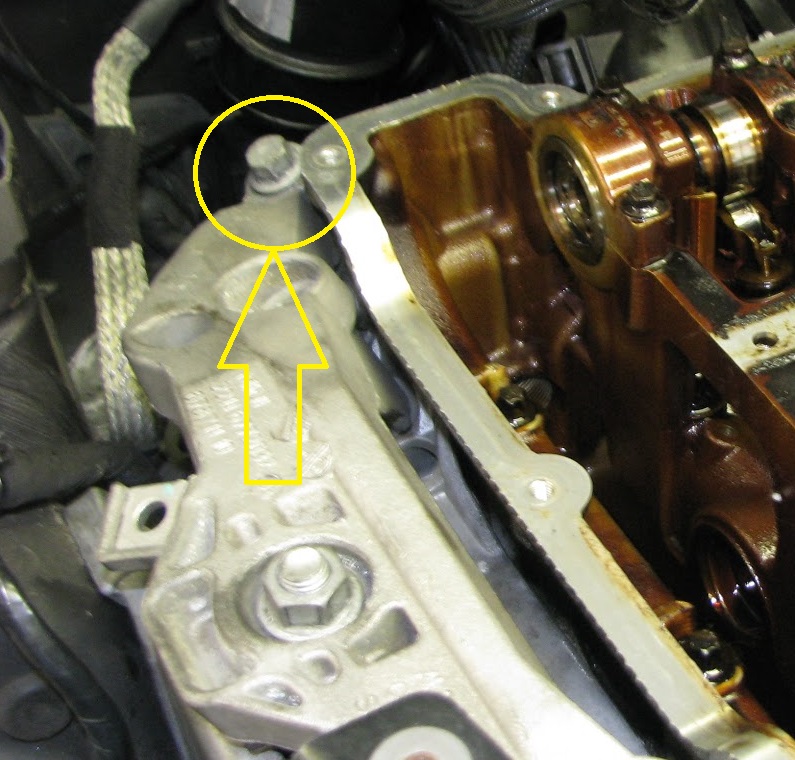
edit. Yes the motor is supported with a jack underneath. The whole weight of the motor is not resting on this bolt. I've also tried tightening all the bolts and starting over with this one with no luck.
This pic is just for reference. This is not an actual pic of my car.
4th Gear
Joined: Aug 2008
Posts: 470
Likes: 1
From: Harleysville PA
No, the bolts came loose and out easily fit me. I loosened them all a turn or so, then removed them. I don't know why it is giving you trouble. I guess I would spray some penetrating oil on it and try and work it out. Good luck!
Neutral
Joined: Apr 2013
Posts: 2
Likes: 0
From: Tucson, AZ
So I soaked the bolt over night and came back with my giant 1/2 drive and got the bolt out. I don't know what happened way down there , but this was the result. The good news is I believe there was enough thread left in that hole to be used in the interim until I can find a new bracket. If experience with Mini has taught me anything, it's that part is probably $600 from Mini and can can only be purchased when you buy a new head.
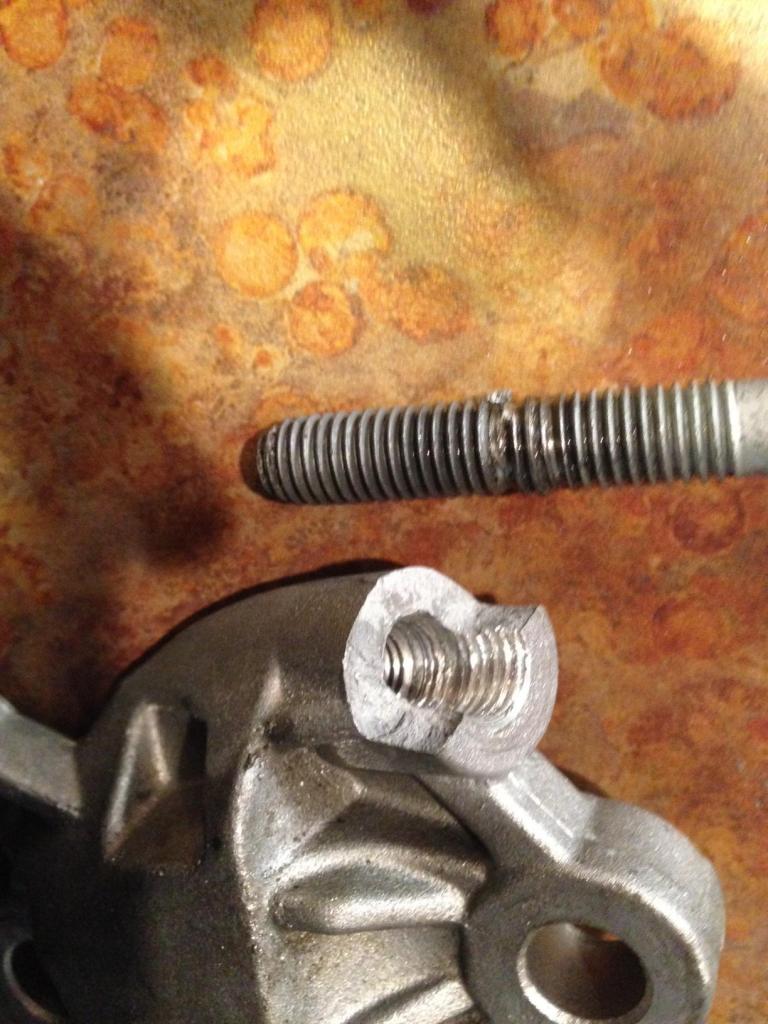
Have not seen that before on that bracket.
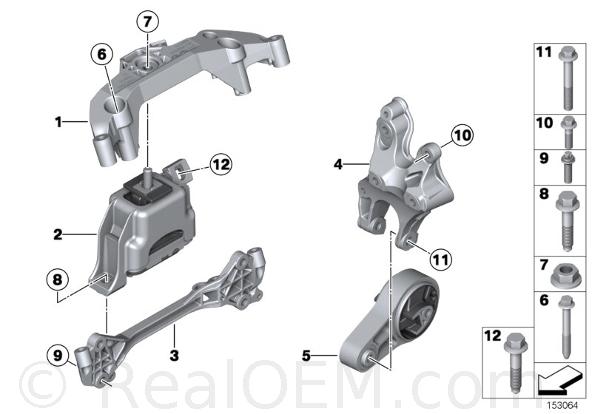
#3 in the diagram
Adapter Plate For Engine Support - Passenger Side Is what the bolt holds onto.
http://www.ecstuning.com/Search/SiteSearch/22116772034/
#6 looks like the bolt because it takes 4 and two go in the inner and two on the outer.
http://www.ecstuning.com/Search/SiteSearch/22116793713/
Thanks
__________________
MINI Guru/ MINI Owner Since 2004 | NEW Lifetime Part Replacement | Local Pickup
Milltek | Genuine MINI | Forge Motorsport | NM Engineering | ECS Performance | M7 Speed
Customer Service Hours: 8am-8pm EST|Sales Team Hours: 8am-11pm | SAT 10am-7pm 800.924.5172
MINI Guru/ MINI Owner Since 2004 | NEW Lifetime Part Replacement | Local Pickup
Milltek | Genuine MINI | Forge Motorsport | NM Engineering | ECS Performance | M7 Speed
Customer Service Hours: 8am-8pm EST|Sales Team Hours: 8am-11pm | SAT 10am-7pm 800.924.5172
4th Gear
Joined: Aug 2008
Posts: 470
Likes: 1
From: Harleysville PA
Unpatient Wow, sorry to see that happen!
That should not have broken like that, it seems as though it was really bound up for some reason. I hope it goes together better than it came apart. Good Luck!
That should not have broken like that, it seems as though it was really bound up for some reason. I hope it goes together better than it came apart. Good Luck!

5th Gear
Joined: Mar 2008
Posts: 678
Likes: 0
From: Phila, PA
Just completed mine today. Took me the better part from 1 - 8 pm, working at a leisurely pace. 60k on the clock. It wasnt hard, the turbo oil line replacement was much, much worse.
Not much I can add but, PLEASE be careful when the car is on the jack stands, what a horrible design for jack points. I hate working under this thing, I always have a jack, and the stands. Today, I had two jacks under there one for the engine and the other one in case the car moved and slipped off the jack stands.
Thanks to the original poster for demystifying this repair. And thanks to everyone who clarified/contributed to make this diy as easy as possible.
Also a special thanks to Detroit Tuned for always shipping my parts FAST and accurate. You might as well put me on a subscription plan....what's next the clutch?!


2nd Gear


Joined: Dec 2014
Posts: 109
Likes: 0
From: Ohio
I am getting ready to replace my water pump. The coolant that is leaking out is green in color. From what I have read on here the Mini coolant is blue? Is it ok to put another kind of coolant in other than Mini coolant?