
How To Interior :: Dual Gauge Bracket for $4.88 (+ gauge install)


Interior :: Dual Gauge Bracket for $4.88 (+ gauge install)
Greetings all.
This is my third DIY project for my lovely 02 MCS, Meg Ryan. I couldn't bring myself to pay the price for Alta or similar mounts and cups, so I decided to make one myself for a fraction of the cost.
I was originally planning on mounting the two gauges hanging underneath the console switches, but soon realized boosting 15lbs and looking down isn't the safest solution. Instead, I removed the bases of the two 52mm cups and mounted them to my custom bracket.
Here is a rundown of the cost for this project:
Bracket
$4.88 - 1" x 36", 1/8" thick steel bar from the hardware store
FREE - Gray primer & black paint (laying around the house)
Misc.
FREE - 52mm Glowshift Boost and Oil Pressure gauges (my sister had bought them years ago for her car and never installed them)
FREE - extra wires, plug ends, airline hose, etc. (had them all laying around)
$2.97 - T-Fitting and 1ft vacuum hose
$6.99 x 2 - 52mm Glowshift Mounting Cups
$12.99 - Glowshift Oil Pressure Sender (original one was lost)
Only part missing is the fittings for the sender, which shouldn't be more than $5 from the hardware store
EDIT: Turns out the fittings were $11.12 including tax. Still beats $50! Bought a 3/8 T, 3/8 x 1.5" thread, and 3/8 to 1/8 adapter:
Total Cost = $31.85 plus fittings ($11.12) = $42.97
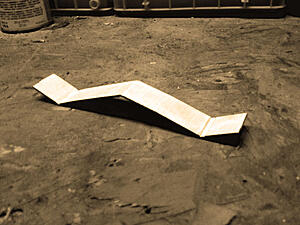
1. Start off by making a template with cardboard to get a rough length and shape:
2. Take the steel bar stock, grab both ends, and bend it over the steering column plastic in front of the tachometer to get a nice curve (no pictures of this process, sorry)
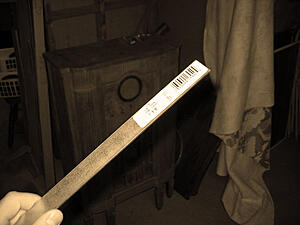
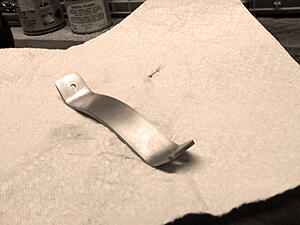
3. Cut the bar to length with a hacksaw, put the ends in a vice, and bend ends up to the desired shape. A hammer helps with this process:

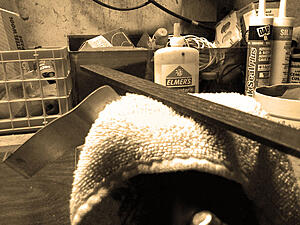
4. Use a metal file to round the edges:
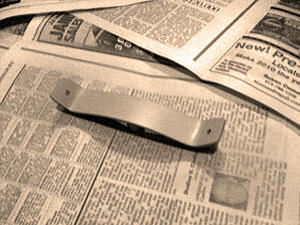
5. Drill two 1/8" holes in the bracket ends. Here is how the cups are mounted (using an 1/8" washer on each side of the bracket fits perfectly):
6. Sand down the bracket, in one direction, with low grit sand paper (I used 120 grit and had no issues at all)
7. Prime two coats on each side:
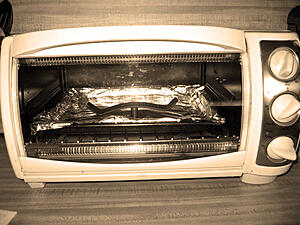
8. Paint two or three coats, wait until its hand dry, and bake in oven on 150 for 2-3 hours:
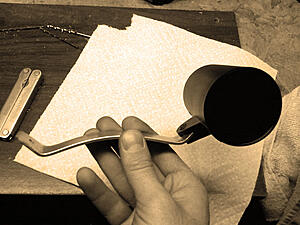
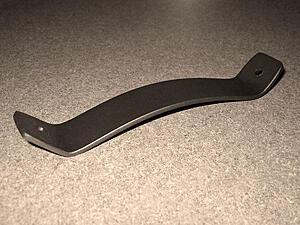
9. Final product!:
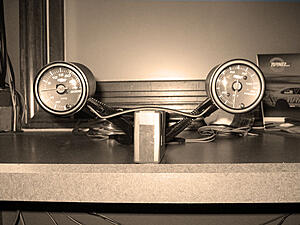
10. Mockup. Here you can see the nylon wire sleeves that I salvaged from an old computer power supply. Makes for a very professional install:
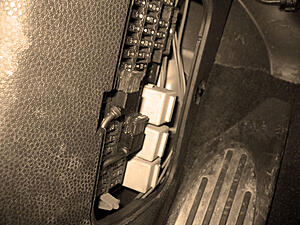
11. Here you can see the power source for the gauges. I plugged one add-a-circuit into a constant 12v, and another into a switched 12v. I then spliced three connectors off each for future projects:
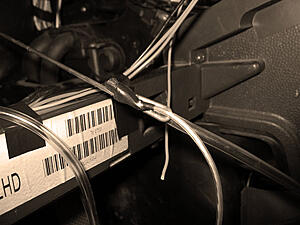
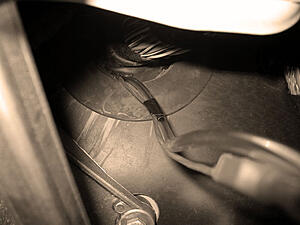
12. In order to snake the airline tubing and oil pressure wire through the firewall grommet, I extended a clothing hanger, sharpened the end, and poked it through the engine bay side of the grommet until it popped out in the driverside footwell. I then looped back the tip, crushed the tube and wire end in it, and pulled it back through the grommet. It took a little force, but worked well:
13. Here you can see the routing of the wires and the extra connectors. During this time I cleaned up my footwell LED strip wiring and mounted a switch on top of the stock footwell light housing. I also took the opportunity to spray down the steering column bushing with white lithium grease. No more clicking!
Each gauge had a ground, constant 12v and switched 12v. I took both wires from each gauge, put them into one connector, and attached them to their corresponding connectors coming from the add-a-circuits. As it sits right now, I have 1 constant 12v plug used by the gauges, and 2 switched 12v plugs used by the gauges and led strips:

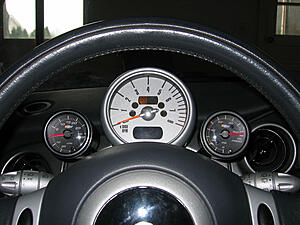
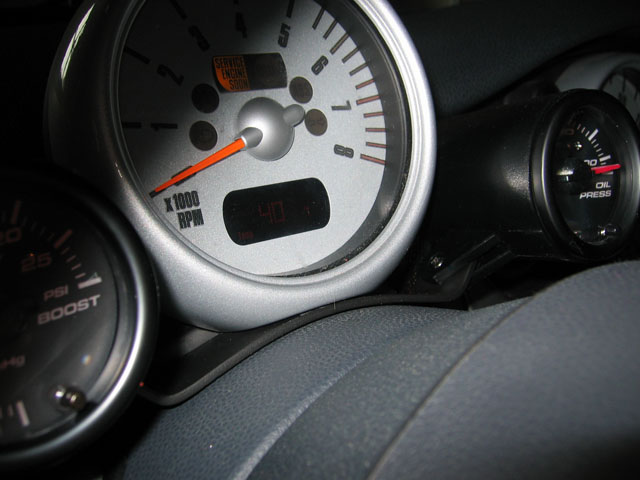
14. Here they are mounted up. In order to mount it on the plastic, I removed the two torx screws holding on the tachometer. I then put double sided tape on the bottom of my bracket, and stuck to the plastic directly underneath the tach. Once the tach is remounted, the pressure from it plus the tape hold the bracket firmly in place:

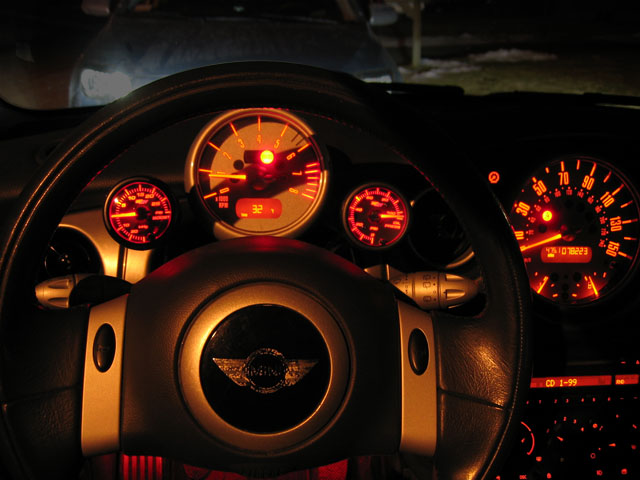
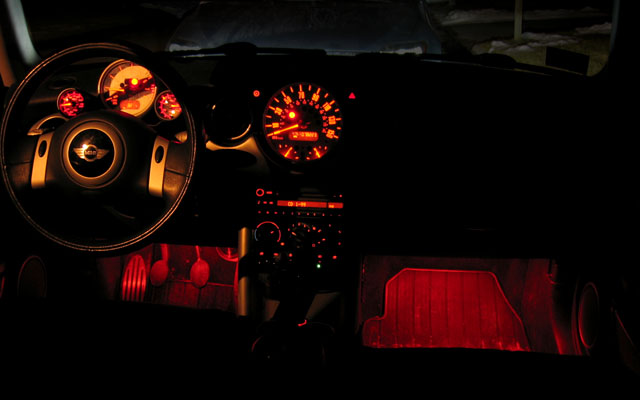
15. Illuminated pictures!


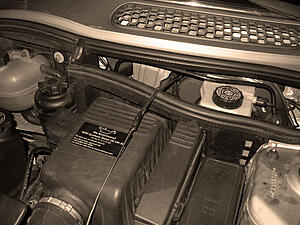
Only thing left for me to do the engine bay work. Pull the intercooler and tap the vac line. Unscrew the stock oil sensor, screw in fittings and attach both the stock sensor and Glowshift sender. Should be completing that in the next few days.
Thanks for reading!
This is my third DIY project for my lovely 02 MCS, Meg Ryan. I couldn't bring myself to pay the price for Alta or similar mounts and cups, so I decided to make one myself for a fraction of the cost.
I was originally planning on mounting the two gauges hanging underneath the console switches, but soon realized boosting 15lbs and looking down isn't the safest solution. Instead, I removed the bases of the two 52mm cups and mounted them to my custom bracket.
Here is a rundown of the cost for this project:
Bracket
$4.88 - 1" x 36", 1/8" thick steel bar from the hardware store
FREE - Gray primer & black paint (laying around the house)
Misc.
FREE - 52mm Glowshift Boost and Oil Pressure gauges (my sister had bought them years ago for her car and never installed them)
FREE - extra wires, plug ends, airline hose, etc. (had them all laying around)
$2.97 - T-Fitting and 1ft vacuum hose
$6.99 x 2 - 52mm Glowshift Mounting Cups
$12.99 - Glowshift Oil Pressure Sender (original one was lost)
Only part missing is the fittings for the sender, which shouldn't be more than $5 from the hardware store
EDIT: Turns out the fittings were $11.12 including tax. Still beats $50! Bought a 3/8 T, 3/8 x 1.5" thread, and 3/8 to 1/8 adapter:

Total Cost = $31.85 plus fittings ($11.12) = $42.97
1. Start off by making a template with cardboard to get a rough length and shape:

2. Take the steel bar stock, grab both ends, and bend it over the steering column plastic in front of the tachometer to get a nice curve (no pictures of this process, sorry)

3. Cut the bar to length with a hacksaw, put the ends in a vice, and bend ends up to the desired shape. A hammer helps with this process:

4. Use a metal file to round the edges:

5. Drill two 1/8" holes in the bracket ends. Here is how the cups are mounted (using an 1/8" washer on each side of the bracket fits perfectly):

6. Sand down the bracket, in one direction, with low grit sand paper (I used 120 grit and had no issues at all)

7. Prime two coats on each side:

8. Paint two or three coats, wait until its hand dry, and bake in oven on 150 for 2-3 hours:

9. Final product!:

10. Mockup. Here you can see the nylon wire sleeves that I salvaged from an old computer power supply. Makes for a very professional install:

11. Here you can see the power source for the gauges. I plugged one add-a-circuit into a constant 12v, and another into a switched 12v. I then spliced three connectors off each for future projects:

12. In order to snake the airline tubing and oil pressure wire through the firewall grommet, I extended a clothing hanger, sharpened the end, and poked it through the engine bay side of the grommet until it popped out in the driverside footwell. I then looped back the tip, crushed the tube and wire end in it, and pulled it back through the grommet. It took a little force, but worked well:


13. Here you can see the routing of the wires and the extra connectors. During this time I cleaned up my footwell LED strip wiring and mounted a switch on top of the stock footwell light housing. I also took the opportunity to spray down the steering column bushing with white lithium grease. No more clicking!
Each gauge had a ground, constant 12v and switched 12v. I took both wires from each gauge, put them into one connector, and attached them to their corresponding connectors coming from the add-a-circuits. As it sits right now, I have 1 constant 12v plug used by the gauges, and 2 switched 12v plugs used by the gauges and led strips:

14. Here they are mounted up. In order to mount it on the plastic, I removed the two torx screws holding on the tachometer. I then put double sided tape on the bottom of my bracket, and stuck to the plastic directly underneath the tach. Once the tach is remounted, the pressure from it plus the tape hold the bracket firmly in place:

15. Illuminated pictures!
Only thing left for me to do the engine bay work. Pull the intercooler and tap the vac line. Unscrew the stock oil sensor, screw in fittings and attach both the stock sensor and Glowshift sender. Should be completing that in the next few days.
Thanks for reading!
Last edited by plasticknives; Feb 6, 2010 at 12:06 PM.


2nd Gear
Joined: Jun 2009
Posts: 83
Likes: 0
super clean setup! Hey, does anyone know where i can get some good gauges. I know they are everywhere, but i have the chrome interior, and i was wondering where i could find 4 to branch off my tach. does anybody know where i might be able to find any? Thanks
Trending Topics

No they don't. I just use an add-a-circuit on a switched 12v and a constant 12v to power them. The brightness of them is pretty equal to the max brightness of the oem instruments so I just leave it on that.

Neutral
Joined: Apr 2010
Posts: 5
Likes: 0
Nice mod Plasticknives. I found this thread on the "ULTIMATE R53 Newbie, DIY, and Performance Guide" thread.
I've done several mods and this one looks like something I'd like to try. Any chance you could provide the length dimension you cut the metal bar to?
Thanks.
I've done several mods and this one looks like something I'd like to try. Any chance you could provide the length dimension you cut the metal bar to?
Thanks.
6th Gear
Joined: Apr 2009
Posts: 1,361
Likes: 4
From: Yorktown, VA
That's a good, clean, inexpensive mod!
The shop guy that installed my My GReddy gauges in my old '02 MCS back in '06 tapped into a grey/red wire for the illumination pickup. When I removed them, I notated all leads he used so I could install the gauges in my '06 MCS as easy as possible. I ended up tapping three grey/red leads before finding the right one. Trying to do it easier, the first was in the wiring harness behind the stereo; no good. I then had to unwrap and tap into the lead in the main harness near the fuse box (like the shop guy did). 3rd time was the charm.
The grey/red lead can be found/referenced by looking in the diagrams at the back of the Bentley manual.

3rd Gear
Joined: Jan 2010
Posts: 294
Likes: 0
From: I live in Webster, NY (just east of Rochester)
Dimming your add on gauges
I just installed the Marshall MINI oil pressure & boost gauges. If you want to dim your add on gauges with the stock gauges disconnect the plug on the back of your tach and tap into the middle wire. That is the backlight power for the Tachometer. Hook that to your backlight wire on your new gauges and they will dim the same as the stock gauges.
Rapid drying/curing.
I have another bracket project in the works that you all might be interested in.
Stay tuned...
Is it just for faster drying or does the paint stay on better and look better? Im planning on painting some parts of my cars exterior and Im wondering what paint should I use and how should I do it. Im going to paint the handle on the trunk black. Also, the bonnet scoop and the back badges! Suggestions?
Thanks
Thanks
I wouldn't put any plastic pieces in the oven for that long though, even with the low heat. Max I would leave plastic in the oven is 20-25 minutes, like when you crack open a headlight.

WoW i never did think i would be using this piece of steel. But after seeing your thread i had to do what you did......this piece of steel has been under my bed for over two years now. i knew if i kept it long enough it would come in handy.
time to follow your steps & make a gauge mount myself.
pics with nav.....turned out pretty good.
time to follow your steps & make a gauge mount myself.
pics with nav.....turned out pretty good.
Last edited by ROC; Oct 22, 2013 at 08:50 AM.
3rd Gear
Joined: May 2004
Posts: 229
Likes: 0
From: Temple City
here is my variation of plasticknives' DIY bracket using the Autometer gauge cups with my Marshall Instrument gauges. I still have to hook up the oil pressure sender and signal wire in the engine bay.


5th Gear


Joined: Nov 2009
Posts: 1,086
Likes: 116
From: Mount Doom, Mordor
C ya,
Dutch
3rd Gear
Joined: May 2004
Posts: 229
Likes: 0
From: Temple City
the mounting bolts does not rub against the steering column. I made sure to not over bend the bracket bar too much to accomodate for this. The dimension of the bar is the one specified by plasticknives in the original post. As for the length, I didn't write down the specific length. I used a cardboard template and cut/trim the piece to my own preference.

Neutral
Joined: May 2012
Posts: 7
Likes: 0
From: Norman, OK
OP/boost install
Great job, guys! Very inspirational - I've been wanting to do this ever since I bought my MCS and now I think it's doable.
One question - any suggestions on which gauges would best match the OEM tach as far as the chrome rim, white face, markings, etc?
I know I should be more worried about how they work/quality/etc but I want it to look good too, y'know?
TIA!
One question - any suggestions on which gauges would best match the OEM tach as far as the chrome rim, white face, markings, etc?
I know I should be more worried about how they work/quality/etc but I want it to look good too, y'know?
TIA!
6th Gear
Joined: Apr 2009
Posts: 1,361
Likes: 4
From: Yorktown, VA
Back when I did my gauges, the only OEM-like ones with silver faces were the GReddy warning series. You can click on my Garage link to the right to see pictures. The air/fuel gauge is not worth it, as it's a narrow-band (you want a wideband gauge, and I don't know of a silver analog version on the market). GReddy does not make these gauges anymore, so you have to hunt around. If you decide to use them, I now recommend boost and EGT (exhaust gas temperature). You can use the EGT to help gauge your air/fuel mixture if you go to a dyno and tune your MINI.
The gauge company to go to now is Marshall Instruments. I have not seen an air/fuel or EGT gauge from them. If you pick Marshall, get boost and oil pressure or water temp.
The gauge company to go to now is Marshall Instruments. I have not seen an air/fuel or EGT gauge from them. If you pick Marshall, get boost and oil pressure or water temp.
Last edited by JumpingJackFlash; Oct 20, 2013 at 09:06 AM. Reason: change Garage link info