
Electrical Vent Pod

Thread Starter
|
1st Gear
Joined: May 2005
Posts: 23
Likes: 0
From: Pasadena Ca
Vent Pod
hello all,
I am looking to install a gauge into one of my AC ducts using a Vent Pod made by ATI. Does anyone have any info on how to run the wiring through the duct and get into the bonnet and into the interior of the car? I have searched the forums but can not find anything. Thanks for your help!
I am looking to install a gauge into one of my AC ducts using a Vent Pod made by ATI. Does anyone have any info on how to run the wiring through the duct and get into the bonnet and into the interior of the car? I have searched the forums but can not find anything. Thanks for your help!


You will need to put the ducts out and drill a small hole in them to run the wires thru. Then use a little silicon to hlod the wires in place in the hole
Put the ducts back in place an you are all set to follow the alta instructions for getting thru the fire wall.
Put the ducts back in place an you are all set to follow the alta instructions for getting thru the fire wall.
Thread Starter
|
1st Gear
Joined: May 2005
Posts: 23
Likes: 0
From: Pasadena Ca
Thanks for the info guys. I can get through the firewall no problem now. What I was hoping someone had posted before is how to actually get through the ac duct and where the duct is located inside the car. I will just get under the dash and check it out, it can't be too difficult. I just didn't want to re-invent the wheel if someone had already done it.
thanks
thanks
Question so I can steer you in the right direction.
Which vent to do you wan to install in?
There is a good video in the How To Section on taking the dash apart. You will need to remove the plastic panel around the steering column and the vent housings to get to the vents.
See post two of this thread
https://www.northamericanmotoring.co...sh-videos.html
Thread Starter
|
1st Gear
Joined: May 2005
Posts: 23
Likes: 0
From: Pasadena Ca
I'm going to install into the drivers side just above the key fob. I'm going to install an Aeroforce Interceptor ODBll gauge which can also be set up to do oil pressure also, which is why I needed to get into the engine compartment also.

6th Gear
Joined: Jul 2007
Posts: 2,881
Likes: 6
I originally had the Aeroforce gauge on the right side of the tach (double Cravenspeed pod) but moved it to the left side due to glare from the rear sunroof. You may see similar glare with it in the vent above the key slot. Made it really difficult to see. With it on the the left side, there are no issues with glare or sunlight hitting it (it's readable in sunlight). You might want to "mock it up" in the vent to make sure it's easily readable before cutting up the duct.
Trending Topics
Thread Starter
|
1st Gear
Joined: May 2005
Posts: 23
Likes: 0
From: Pasadena Ca
I have the same gauge but in a Cravenspeed Pod. If you wanted to put the gauge in the left drivers vent, it's very easy since you just take one cover off the end of the dash to access the duct. Not sure about the vent above the key.
thanks for your help
6th Gear
Joined: Jul 2007
Posts: 2,881
Likes: 6
I don't think you can use the outside vents because they are slightly bigger and the ATI vent pod will not fit. I will definitly mock up the vent before I hack into anything. How did you power your gauge? Did you use an add a circuit? or something else? Also is the gauge always illuminated or do you tap into a circuit for that?
thanks for your help
thanks for your help
This is the power lead I used.
http://www.newministuff.com/new/shop...uctshow&id=472
The gauge is always illuminated and doesn't have a light wire connection. You have 1 connection to the OBDII port and a second wire harness with 2 analog inputs and a power connection. It's gets the ground side of the connection from the OBDII port.
I've had this gauge for a few months now and love it. Especially nice is the super quick refresh rate on it. Boost display is right in time with your right foot.
I have the red display gauge but wish I bought the blue, along with a blue V1 remote display. The red is ok but doesn't match the Mini orange. The V1 display is orange which matches perfectly. Having the tach and V1 display in matching orange and the red of the Aeroforce is odd to me but it's growing on me.
I'm considering adding an oil pressure and temp through the analog inputs so if you do those, I would be interested in seeing pictures.
Thread Starter
|
1st Gear
Joined: May 2005
Posts: 23
Likes: 0
From: Pasadena Ca
[QUOTE]I used a power take off lead that connects to the cig lighter socket wiring. It has OEM connectors so I didn't need to cut any of the factory wiring. You pull that jumper off the gauge and use the second wire harness (same one you use with the 2 analog inputs) so it's not powered by the OBDII port.
This is the power lead I used.
http://www.newministuff.com/new/shop...uctshow&id=472/QUOTE]
Dang thats an expensive little goodie there! I think I will just use an add a circuit. I think I am going to go with the red display also since it seems like its the closest match. I will definitely post pics of the oil pressure install along with the other pics of the vent install. Thanks for answering all of my questions.
6th Gear
Joined: Jul 2007
Posts: 2,881
Likes: 6
Dang thats an expensive little goodie there! I think I will just use an add a circuit. I think I am going to go with the red display also since it seems like its the closest match. I will definitely post pics of the oil pressure install along with the other pics of the vent install. Thanks for answering all of my questions.
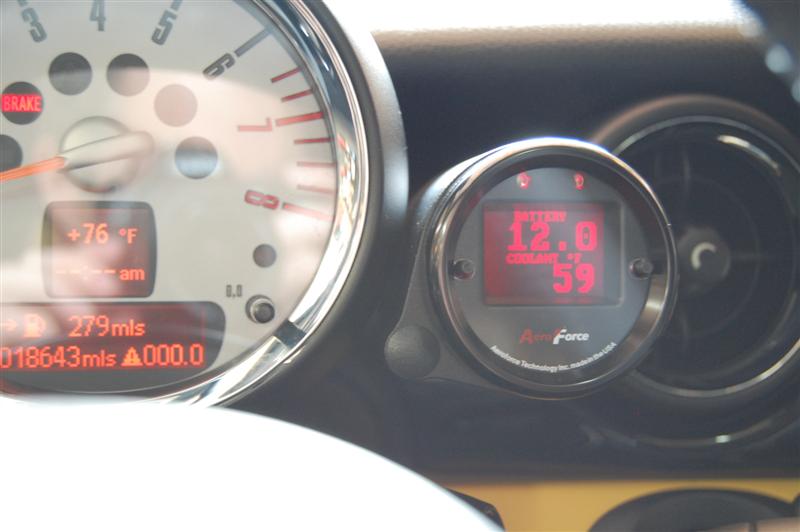
Posted this in another thread but here's how the red compares in color to the tach colors. This was before I moved it to the other side of the tach.
Thread Starter
|
1st Gear
Joined: May 2005
Posts: 23
Likes: 0
From: Pasadena Ca
Dang thats an expensive little goodie there! I think I will just use an add a circuit. I think I am going to go with the red display also since it seems like its the closest match. I will definitely post pics of the oil pressure install along with the other pics of the vent install. Thanks for answering all of my questions.
Watch the video above and it will tell you how to remove the dash parts to get to the vent you are wanting to use. It will be a lot harder than the one closest to the door. And according to all info I have the vents are all the same size.

Thread
Thread Starter
Forum
Replies
Last Post
molala
MINIs & Minis for Sale
1
Oct 2, 2015 01:53 PM
Interior/Exterior Getting Through the Firewall
papawhiskey
Interior/Exterior
1
Sep 30, 2015 02:50 PM
silence2-38554
R50/R53 :: Hatch Talk (2002-2006)
6
Sep 24, 2015 05:34 AM