Electrical Driving Lights

2nd Gear
Joined: Apr 2012
Posts: 82
Likes: 1
From: Melbourne
Anyone know if these will work?
Hella Rallye FF 4000 CELIS
http://www.ebay.com.au/itm/HELLA-RAL...ht_5390wt_1192
Hella Rallye FF 4000 CELIS
http://www.ebay.com.au/itm/HELLA-RAL...ht_5390wt_1192
The 4000s are quite large - I've seen them in-person on an SUV. Just an observation.
Even the 1000s are pretty big on the Countryman. As far as actually *working*, though - there should not be an issue with the proper wiring and the VIP mounts. Can't possibly imagine the stock mounts would work.
Even the 1000s are pretty big on the Countryman. As far as actually *working*, though - there should not be an issue with the proper wiring and the VIP mounts. Can't possibly imagine the stock mounts would work.
I see those now - It appears these 4000 compacts are 24% smaller than the 1000s.
As far as the wiring goes, you'll just wire the harness into the main power (battery lead) and throw a relay in there. All of that comes with those lights.
The mounts are really simple to install, and will certainly hold the weight. The only thing you'll want to make sure of is the depth required for the 4000s.
I'd love to help you out, but I'm not home right now to measure. If nobody else gets around to it, I'll try to do it for you as soon as I get back.
I can tell you from memory that I have around 0.75" of clearance behind the 500s.
I can tell you from memory that I have around 0.75" of clearance behind the 500s.


2nd Gear
Joined: Apr 2012
Posts: 82
Likes: 1
From: Melbourne
Electrical noob here.
Those with the VIP kit, when you say tap into fogs/high beams, do you actually need to cut any wires?
What do you have to do to tap? Does the kit come with the components to do the tapping?
Those with the VIP kit, when you say tap into fogs/high beams, do you actually need to cut any wires?
What do you have to do to tap? Does the kit come with the components to do the tapping?
2nd Gear
Joined: Apr 2012
Posts: 82
Likes: 1
From: Melbourne
Anyone to share some wisdom?


4th Gear
Joined: Jul 2010
Posts: 379
Likes: 1
From: Boulder, CO
I just used a hot knife and a dremel bit on it. Then a file to clean up the rough edges.

Neutral
Joined: Aug 2012
Posts: 3
Likes: 0
Hi all,
I picked up the R60 MINI OEM driving light kit and am eager to get going. Locating the MINI instructions was no big deal, but I'm stuck on one key step.
I need to locate the footwell module. I'm guessing that it's behind the trim panel that houses the hood/bonnet release, as it's where severl wire bundles dissapear once the lower dashboard trim is off. I've tried to pop the trim panel (have removed the fastener at the rear end of the panel) but having no joy removing it. Am I in the right place? The instructions reference ISTA No 61 35 015
TIA for your assistance
Thx,
kents
If you still are holding off on this -- you're on the right track.
You're going to remove the long trim panel extending from the middle of the door sill all the way to the front of the footwell. There is a screw on the sill-end, there should be another screw at the tip of the footwell section, and the rest of the panel is held on by large clips. You will want to pull either up or out - you will see the clips after it's out.
You're going to remove the long trim panel extending from the middle of the door sill all the way to the front of the footwell. There is a screw on the sill-end, there should be another screw at the tip of the footwell section, and the rest of the panel is held on by large clips. You will want to pull either up or out - you will see the clips after it's out.

My 500's have been mounted to the VIP brackets for awhile now & 95% wired since the initial install. I havent decided on a switch location/configuration yet.
Tomorrow I'm just going to tap into the factory fog wire near the panel switch (for the 12v+ relay trigger wire).
I really want to run a separate switch for these & thats why I havent completed the wiring yet. I want a switch so I can run the factory fogs w/o the Hellas. The Hellas are mostly covered but I like using the factory fogs a bit more often. A 2nd switch allows me to independently run the Hella's as well.
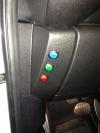
I'm thinking a toggle switch in the panel somewhere(similar metal toggle design) or possibly under the column clamshell to keep it with in reach & out of site/discreet.
Has anyone else mounted any sort of independent fog switch?
if so, what type & where? pics please
Tomorrow I'm just going to tap into the factory fog wire near the panel switch (for the 12v+ relay trigger wire).
I really want to run a separate switch for these & thats why I havent completed the wiring yet. I want a switch so I can run the factory fogs w/o the Hellas. The Hellas are mostly covered but I like using the factory fogs a bit more often. A 2nd switch allows me to independently run the Hella's as well.
I'm thinking a toggle switch in the panel somewhere(similar metal toggle design) or possibly under the column clamshell to keep it with in reach & out of site/discreet.
Has anyone else mounted any sort of independent fog switch?
if so, what type & where? pics please
4th Gear
Joined: Jul 2010
Posts: 379
Likes: 1
From: Boulder, CO
My 500's have been mounted to the VIP brackets for awhile now & 95% wired since the initial install. I havent decided on a switch location/configuration yet.
Tomorrow I'm just going to tap into the factory fog wire near the panel switch (for the 12v+ relay trigger wire).
I really want to run a separate switch for these & thats why I havent completed the wiring yet. I want a switch so I can run the factory fogs w/o the Hellas. The Hellas are mostly covered but I like using the factory fogs a bit more often. A 2nd switch allows me to independently run the Hella's as well.
I'm thinking a toggle switch in the panel somewhere(similar metal toggle design) or possibly under the column clamshell to keep it with in reach & out of site/discreet.
Has anyone else mounted any sort of independent fog switch?
if so, what type & where? pics please
Stopping there works just fine, but then I also re-coded my car to allow the fog lights to stay on even without the headlights; I like this option as I can switch to just the fog+driving lights if I want.
Thx.
I have VIP brackets but got my Hellas elsewhere do only hella general instructions.
My CM allows me to run factory fogs w/ parking lights. No need for HLs to be on to run them.
I like this, allows me to use just factory fogs or factory + Hella w/o either needs the HL's on.
I didn't do any coding for this.
I ended up just tapping into the fog wire near the housing for the relay source. Now all fogs come on at once. I might interrupt this w/ a separate switch later on the independently control fogs.
I also swapped the in 2500K Yellow bulbs(halogen) in my Hella's & OEM fogs.
For a more consistent look upfront I might change the parking lights to an LED to better match the Xenons color.
I also swapped the in 2500K Yellow bulbs(halogen) in my Hella's & OEM fogs.
For a more consistent look upfront I might change the parking lights to an LED to better match the Xenons color.
Last edited by SmithWerks; Jan 12, 2013 at 03:09 PM.