
Cooper S Gas Cap

Thread Starter
|
3rd Gear
Joined: Aug 2007
Posts: 273
Likes: 1
From: Montreal, Qu�bec
Cooper S Gas Cap
Purchased the Cooper S Gas Cap and Ring.
Found the instructions for the removal of the R53 online
( http://homepage.mac.com/rv6a/minisgascap.html )
I tried turning the Cap Clockwise 10 degree`s and it just wont come off. Im scared to break something. I dont think this is the way on a R56!
Does anyone know how to remove the Gas Cap Cover??
Found the instructions for the removal of the R53 online
( http://homepage.mac.com/rv6a/minisgascap.html )
I tried turning the Cap Clockwise 10 degree`s and it just wont come off. Im scared to break something. I dont think this is the way on a R56!
Does anyone know how to remove the Gas Cap Cover??


Thread Starter
|
3rd Gear
Joined: Aug 2007
Posts: 273
Likes: 1
From: Montreal, Qu�bec
Thanks!
I noticed that there was opening there.
Actually tried using a screw driver but was not sure if this would help so I stopped trying!
Now that I know this is the way, Ill keep working at it!!!!
I noticed that there was opening there.
Actually tried using a screw driver but was not sure if this would help so I stopped trying!
Now that I know this is the way, Ill keep working at it!!!!
4th Gear
Joined: Feb 2009
Posts: 367
Likes: 0
From: Midwest
Did you ever finish this project? If you did how was it, and where did you get the ring painted? A lot places locally will not paint it due to the ring being so small. They don't want to bother mixing paint for such a small item.
Thread Starter
|
3rd Gear
Joined: Aug 2007
Posts: 273
Likes: 1
From: Montreal, Qu�bec
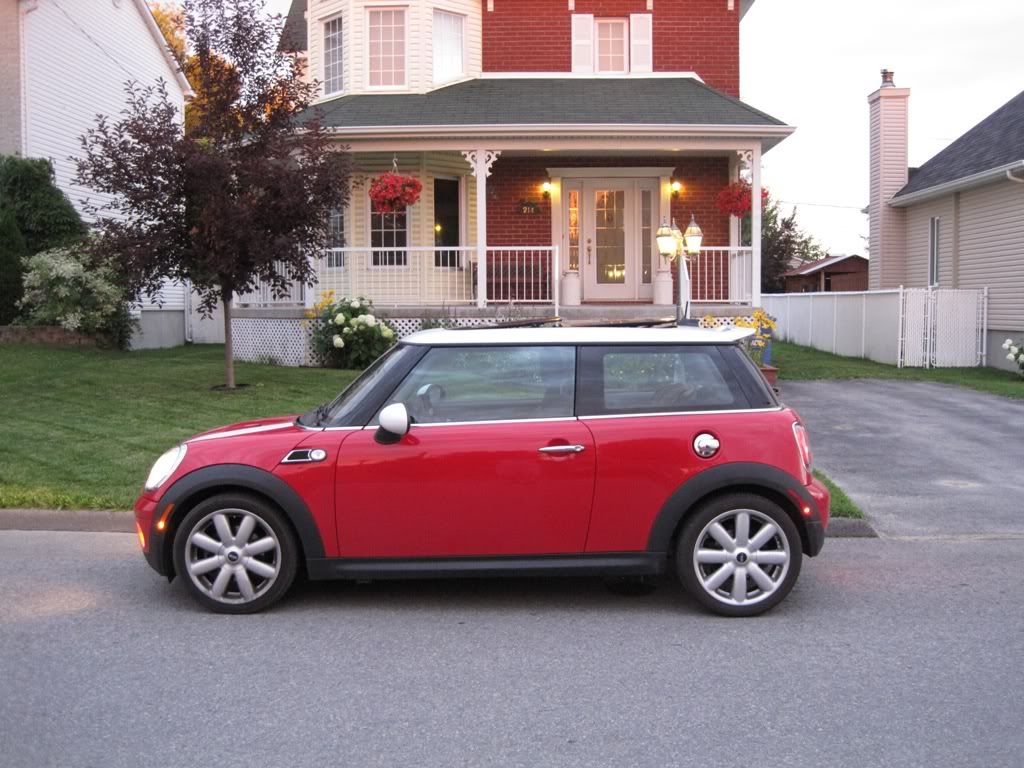
Ya, i did finally get the project finished. I had added the pictures in the Show your NON S Mini thread, but here is the final product.
I ended up putting a thin 4 inch long screwdrive down that hole to be able to pop it off.
Getting the whole piece out was quite an adventure!
I didnt get it out with out destroying it around the edges I had cardboard holding down the clips but you still need to tug on it, and the slightest tug you give on the exterior ring it rips off!
Once a chunk was off I said, well its too late now and destroyed all around it by tugging on it with a pair of vice grips.
I thought I prefer to destroy the old filler than scratch the Mini, so that is how I did it.
Stress level was at a all time 10/10
I have NO mechanical know how, and the job FOR ME, i would give it a 8/10
But mind you, I have NO talent around a car!
Im happy I did it, but knowing now what I didnt know then, i would have paid to get it changed out! (That is my own personal opinion)
As for the paint, I was lucky and when I called my Local BMW/Mini dealer, they already had one painted Chili Red as someone purchased and painted it for their Cooper Convertible (and as we all know, you cant change it out on a convertible)
Lucky me, got a sick price on it also since it was painted and just sitting there taking up space!
Hope that helps, if you need any advice let me know.
I was going to do a HOW TO, but after destroying the ring, I didnt think i could show ANYBODY what I did!
I ended up putting a thin 4 inch long screwdrive down that hole to be able to pop it off.
Getting the whole piece out was quite an adventure!
I didnt get it out with out destroying it around the edges
I had cardboard holding down the clips but you still need to tug on it, and the slightest tug you give on the exterior ring it rips off!Once a chunk was off I said, well its too late now and destroyed all around it by tugging on it with a pair of vice grips.
I thought I prefer to destroy the old filler than scratch the Mini, so that is how I did it.
Stress level was at a all time 10/10
I have NO mechanical know how, and the job FOR ME, i would give it a 8/10
But mind you, I have NO talent around a car!
Im happy I did it, but knowing now what I didnt know then, i would have paid to get it changed out! (That is my own personal opinion)
As for the paint, I was lucky and when I called my Local BMW/Mini dealer, they already had one painted Chili Red as someone purchased and painted it for their Cooper Convertible (and as we all know, you cant change it out on a convertible)
Lucky me, got a sick price on it also since it was painted and just sitting there taking up space!
Hope that helps, if you need any advice let me know.
I was going to do a HOW TO, but after destroying the ring, I didnt think i could show ANYBODY what I did!

The gas cap the Cooper has is one thing that's nicer about our cars than the MCS. I don't understand why anyone would want to get rid of that nice clean look. Our cars already have so many broken up lines as it is.
My opinion of course, but I just don't get it.
My opinion of course, but I just don't get it.
Thread Starter
|
3rd Gear
Joined: Aug 2007
Posts: 273
Likes: 1
From: Montreal, Qu�bec
As I dont get what you dont get. 
What is it that Mom's always say, If you dont have anything nice to say.....
What is it that Mom's always say, If you dont have anything nice to say.....
Trending Topics

Call me crazy but I like the S gas cap. I'd change mine in a minute if I thought I could get the oem lid off without destroying it. I tried removing it, including removing the inner panel and filler tube, but I just couldn't get the oem housing to come off. I prefer to make mods that are easily reversible in case I change my mind or sell the car to a purist who wants everything to be stock. Surely someone must know how to do this without destroying anything.

5th Gear
Joined: Oct 2008
Posts: 752
Likes: 1
From: Emmitsburg, MD
Jim
5th Gear


Joined: May 2009
Posts: 678
Likes: 144
From: 514
Woot! Go Montreal! Way to go Kirk. Looks great. Dont worry about the tire kickers. Everyone knows the best way to spend your money. Too bad Drewster doesnt have an 'S', he could have bought your stock cover.
Thread Starter
|
3rd Gear
Joined: Aug 2007
Posts: 273
Likes: 1
From: Montreal, Qu�bec
Well its what I like. Im not trying to be a "S", i just like the chrome cap, goes with the rest of my chrome on my car!
4th Gear
Joined: Feb 2009
Posts: 367
Likes: 0
From: Midwest
Looks great! I'll let you know, when I finally tackle this project. The cover pot is at the paint shop.
I'm not doing this because I want a "wannabee S." I am doing it because I like the look of the gas cap. It's one of the quirks that makes MINI what is MINI. I also did the JCW grille mod, and not only do I think it looks better, but the engine is getting better air flow to the stock intake. The stock "Justa" grill does not have enough ventilation.
Thread Starter
|
3rd Gear
Joined: Aug 2007
Posts: 273
Likes: 1
From: Montreal, Qu�bec
Looks great! I'll let you know, when I finally tackle this project. The cover pot is at the paint shop.
I'm not doing this because I want a "wannabee S." I am doing it because I like the look of the gas cap. It's one of the quirks that makes MINI what is MINI. I also did the JCW grille mod, and not only do I think it looks better, but the engine is getting better air flow to the stock intake. The stock "Justa" grill does not have enough ventilation.
Aaah, if I could only convience my wife! LOL
Are you trying to convert a justa to an "S" fuel cap? I did mine about 6mos ago and it's a little complicated. It will involve removing the fender liner and the filler tube connected to the fuel tank. The insert mounted in the fender with the filler door attached is removed by drilling 2 small holes (1/8") in the dimples on the perimeter of the insert and inserting a small phillips screwdriver thru the holes to release the hidden clips inside the fender well. It's much easier to visualize if you already have the replacement "S" filler cap so you can see how the unit snaps into the fender. I'm no mechanic but I managed it without breaking anything.
Last edited by ammodave; Mar 19, 2011 at 12:06 PM.
Pictures Added:
In case my previous post was a little cryptic, I've added some pictures. The holes are drilled in the dimples provided by Mini that show you exactly where the clips are located. The 1st pic shows 2 holes drilled in roughly the 10 and 2 o'clock position. The 2nd pic is a close-up of the clip on the backside of the fuel door housing. The 3rd pic shows a small screwdriver inserted thru the hole to lever the clip out of position so the housing can be withdrawn from the fender. These holes will be completely covered by the fuel flap should you decide to reinstall the justa fuel door.
In case my previous post was a little cryptic, I've added some pictures. The holes are drilled in the dimples provided by Mini that show you exactly where the clips are located. The 1st pic shows 2 holes drilled in roughly the 10 and 2 o'clock position. The 2nd pic is a close-up of the clip on the backside of the fuel door housing. The 3rd pic shows a small screwdriver inserted thru the hole to lever the clip out of position so the housing can be withdrawn from the fender. These holes will be completely covered by the fuel flap should you decide to reinstall the justa fuel door.
Last edited by ammodave; Mar 19, 2011 at 02:01 PM.

2nd Gear
Joined: Feb 2011
Posts: 149
Likes: 24
well i fitted the cap today and what a job that was 
I ended up cutting the rubber to pieces as it wouldn't come out and i couldn't push the filler neck in far enough.
Well got it all together but the outer bezel isn't sitting perfectly flush at the bottom (sticks out approx 2-3mm) but it is flush at the top?
I've tried knocking the plastic assembly further in but it wont budge?
That's why I removed the filler neck entirely from the tank. Once you've removed the fender liner and disconnected the filler neck at the top it's not that much extra work just to remove it from the tank. My old justa fuel door assembly came out easily then (without any damage). I installed the new "S" fuel cap assembly before I reinstalled the filler neck. It popped right in and is flush top and bottom.

Did the gas cap and ring come together? Is that all that is needed for the conversion?
Purchased the Cooper S Gas Cap and Ring.
Found the instructions for the removal of the R53 online
( http://homepage.mac.com/rv6a/minisgascap.html )
I tried turning the Cap Clockwise 10 degree`s and it just wont come off. Im scared to break something. I dont think this is the way on a R56!
Does anyone know how to remove the Gas Cap Cover??
Found the instructions for the removal of the R53 online
( http://homepage.mac.com/rv6a/minisgascap.html )
I tried turning the Cap Clockwise 10 degree`s and it just wont come off. Im scared to break something. I dont think this is the way on a R56!
Does anyone know how to remove the Gas Cap Cover??
Order this kit http://www.ebay.com/itm/MINI-Cooper-...f54ba4&vxp=mtr and it will provide everything you need. You will have to paint the trim ring that goes under the gas cap.
4th Gear
Joined: Feb 2012
Posts: 399
Likes: 0
From: Exit 9
Installed my S-cap retrofit kit today. Thanks for the valuable info on how to neatly and (relatively) painlessly remove the old filler door assembly, AmmoDave!
I was able to get it out after a great deal of wrestling and rocking it back and forth once those 2 plastic spring clips were released from the body.
In other news, I found it wasnt necessary to remove the rear wheel as described in the .pdf file posted in the forums. That procedure was done on a 1st generation justa. I was able to remove the splash shield by jacking up the car until the wheel was just off the ground. There was ample clearance to reach all the fasteners AND work inside the body cavity there with the wheel at full droop.
Thanks also to IronTree for the tip on how to remove the flat gas door. Again, the .pdf one finds when searching on here describes how to remove one from a 1st gen, by rotating the door. That would NOT have worked on my Justa!
One thing I'm not 100% pleased with is how the painted trim is not uniformly flush all around...it's slightly more recessed around the "9 o-clock" position. I tend to notice these things. Here is a pic...don't know why there's no thumbnail visible.
Pictures Added:
In case my previous post was a little cryptic, I've added some pictures. The holes are drilled in the dimples provided by Mini that show you exactly where the clips are located. The 1st pic shows 2 holes drilled in roughly the 10 and 2 o'clock position. The 2nd pic is a close-up of the clip on the backside of the fuel door housing. The 3rd pic shows a small screwdriver inserted thru the hole to lever the clip out of position so the housing can be withdrawn from the fender. These holes will be completely covered by the fuel flap should you decide to reinstall the justa fuel door.
In case my previous post was a little cryptic, I've added some pictures. The holes are drilled in the dimples provided by Mini that show you exactly where the clips are located. The 1st pic shows 2 holes drilled in roughly the 10 and 2 o'clock position. The 2nd pic is a close-up of the clip on the backside of the fuel door housing. The 3rd pic shows a small screwdriver inserted thru the hole to lever the clip out of position so the housing can be withdrawn from the fender. These holes will be completely covered by the fuel flap should you decide to reinstall the justa fuel door.
Last edited by komet155; May 28, 2013 at 05:03 PM.
4th Gear
Joined: Feb 2009
Posts: 367
Likes: 0
From: Midwest
Alright fellas. After having the gas cap sitting in my shed for the past three years, I am finally going to attempt to install it this spring. My first order of business is swinging by a couple of body shops to get quotes for the cover pot insert. I will keep you guys updated. Thanks to the trailblazers that finished this conversion and posted their pointers on the install.
Last edited by Kimbo80; Mar 29, 2014 at 05:17 AM.
4th Gear
Joined: Feb 2009
Posts: 367
Likes: 0
From: Midwest
I just came back from the paint shop. They did a pretty good job. There is one spec that has adhered to the paint, but I will clay bar that out down the road, once the paint has fully cured.
One question I had for you guys is when you did the install, did you have the doors unlocked or unlocked? I heard stories where some people left the doors unlocked, and when they removed the old assembly, they had a heck of a time fishing out the lock assembly from the body of the car. Any suggestions will be greatly appreciated. I will post more pics as I move along, but unfortunately, this is going to be a slow process for me.
Here are some pics:
When I did mine, I had the doors locked to prevent losing the end of the gas lid locking plunger inside the rear fender. If you lose the end of the plunger you can retrieve it working thru the access panel inside the boot without too much difficulty. Be careful and you should be able to get the old bits off without any damage.
Last edited by ammodave; May 28, 2015 at 12:08 PM.