
How To Electrical :: Radar Detector Hardwiring (12v Line) Above the Rearview Mirror...


2nd Gear
Joined: Jun 2009
Posts: 132
Likes: 0
From: Frisco, TX
Alrighty-o - I followed the initial instructions in this thread and it appears to have worked perfectly. Was pretty much a snap and took about 10 minutes. I couldn't get a couple machine screws to work in that spare hole, but did manage to get a sheet metal screw to work.


2nd Gear
Joined: Jun 2009
Posts: 132
Likes: 0
From: Frisco, TX
LOL.
Re: the screws - I was talking about for the ground wire. I took advantage of that "spare hole" that is pictured somewhere in the middle of this thread. Some mentioned that a #10 machine screw worked. But I couldn't get it to thread.
Re: the screws - I was talking about for the ground wire. I took advantage of that "spare hole" that is pictured somewhere in the middle of this thread. Some mentioned that a #10 machine screw worked. But I couldn't get it to thread.

2nd Gear
Joined: Jun 2009
Posts: 90
Likes: 0
From: San Diego, CA
Where to put safe-n-sound mute button?
Right now it's under the passenger seat. When I get the time and motivation I'll figure out somewhere to stick it in the center console. My first choice right now is on the empty "button" between the Sport and DTC buttons. But the mute on the top of the unit works for now.
I had bought the escort smartwire kit (I have one in my other car), but returned it when I read about I bought the safe-n-sound kit ($15.99 with the round mute button!) http://www.safe-n-sound1.com/Escort%...nd%20Mute.html .... ZERO velcro and wires

I was thinking of installing the mute button in one of those 'empty' buttons like Fishbert (Sunday's project)... has anyone done that yet? Where else have people put their mute buttons?... pics and tips please

6th Gear
Joined: Jul 2008
Posts: 1,174
Likes: 13
From: Ohio
lacning74 has a nifty smartcord console install back on post #92, but I like (the idea of, anyway) using one of the free buttons better.
Let me know how it goes if you attempt something with that button.

Mute button under driver's side window switch. Not visible and easily reachable.

2nd Gear
Joined: Jun 2009
Posts: 90
Likes: 0
From: San Diego, CA
@toolazyforalogin: Nice!
I might still lift the center console areas to see about dremeling out one of those switches, but if it gets at all scary, that's my plan B!
I started to look at taking the other side panel off yesterday while I was working out how to thread the wire... but it seemed to get stuck so I just snapped it back in place... is there a particular trick to removing them? (the ones facing the footwells).
(btw I love forums... I posted an obscure question at 11:30pm and by 7:30am I've got pictures... thanks guys! Makes me feel so much better about taking a machete to my new baby)
2nd Gear
Joined: Jun 2009
Posts: 90
Likes: 0
From: San Diego, CA
OK, I did it
I was sweating bullets as I'm a newbie (this was the first time I'd lifted the center console on my new MINI)... but it was worth it.
Step by step
Remove the center console (pinch the leather boot around e-break in the center and lift; remove 3 screws from cupholder). Underneath it will look like this...

There are two electrical connectors that you�ll have to undo (one for the 3 buttons, and one for the cigarette lighter).
There are 3 screws that hold the 3 button thing in place (you see one here, there�s a matching one on the right and one towards the cigarette lighter).
TIP: When doing the screws put a TOWEL under console� that way you�ll catch the screws on the way down to oblivion.
The 3 button assembly comes in an upper and lower part which simply unclip from eachother. DON�T drill all the way through the bottom piece, it has electrical connections under the rubber layer.
Removing the �blank� button is a pain� I managed to pry it off with two small screwdrivers.

Drill a hole in the back (facing the back of the car) of the inside. Dremel out a small section of the blank at the bottom (so that it will simply go over the hole that you drilled).
I cut the wire about 12 inches away from the button and spliced it back together again when all was said and done�made life a LOT easier.
Drill a hole in the top of the blank and fix the button. Put it all together.
(Again.. this button is http://www.safe-n-sound1.com/Escort%...nd%20Mute.html ).

Enjoy!
Two surprise benefits
- I was worried I�d hit the Sport or DSC buttons by mistake� but the button is �raised�� it really is very easy to reach and hit
- I manage to �tune out� the radar detector, but it drives my wife nuts; the �central� location of that button makes everyone happy.
The end result... (pretty much unnoticeable
(in case you were wondering, in the cig lighter is just one of those little LED flashlights).

I was sweating bullets as I'm a newbie (this was the first time I'd lifted the center console on my new MINI)... but it was worth it.
Step by step
Remove the center console (pinch the leather boot around e-break in the center and lift; remove 3 screws from cupholder). Underneath it will look like this...
There are two electrical connectors that you�ll have to undo (one for the 3 buttons, and one for the cigarette lighter).
There are 3 screws that hold the 3 button thing in place (you see one here, there�s a matching one on the right and one towards the cigarette lighter).
TIP: When doing the screws put a TOWEL under console� that way you�ll catch the screws on the way down to oblivion.
The 3 button assembly comes in an upper and lower part which simply unclip from eachother. DON�T drill all the way through the bottom piece, it has electrical connections under the rubber layer.
Removing the �blank� button is a pain� I managed to pry it off with two small screwdrivers.
Drill a hole in the back (facing the back of the car) of the inside. Dremel out a small section of the blank at the bottom (so that it will simply go over the hole that you drilled).
I cut the wire about 12 inches away from the button and spliced it back together again when all was said and done�made life a LOT easier.
Drill a hole in the top of the blank and fix the button. Put it all together.
(Again.. this button is http://www.safe-n-sound1.com/Escort%...nd%20Mute.html ).
Enjoy!
Two surprise benefits
- I was worried I�d hit the Sport or DSC buttons by mistake� but the button is �raised�� it really is very easy to reach and hit
- I manage to �tune out� the radar detector, but it drives my wife nuts; the �central� location of that button makes everyone happy.
The end result... (pretty much unnoticeable
(in case you were wondering, in the cig lighter is just one of those little LED flashlights).
Last edited by paul_voorn; Jun 29, 2009 at 08:01 AM.


3rd Gear
Joined: May 2009
Posts: 278
Likes: 0
From: Colorado at 7500'
MAN I would love to be able to do this but the wife would have to OK it. Would probably look at putting the fuse extension tab so that I could remove it if dealer work was necessary though.
2nd Gear
Joined: Jun 2009
Posts: 90
Likes: 0
From: San Diego, CA
What is a fuse extension tab?
FWIW:
a) add-a-fuse is the way to go. I figure I can make this install 'disappear' from the fuse box in about 3 minutes if I need to.
b) I talked to my local mini dealer and it looked like you >could< order the whole assembly for about $50. Never did find out if I could JUST order the blank button. If I sell the car I'd leave it in.
2nd Gear
Joined: Jun 2009
Posts: 90
Likes: 0
From: San Diego, CA
Ahh.... Do you mean the "Blade Fuse Tap" listed in the http://www.safe-n-sound1.com/Escort%...nd%20Mute.html
I ordered it with that option. It works, but...
a) the Fuse panel area on the mini is very small
b) the wires will be going straight up or straight down
c) so you feel like to need to 'bend' the tap 'blade' 90-degrees
d) the metal doesn't feel strong enough to sustain several bends
e) I don't want it to come loose and then having a wire flapping around in my fuse box...
So I snipped it off and crimped the wire into an Add-A-Fuse. Feels much 'safer'/'more robust'... and it will take you about 30 seconds more to assemble OR dismantle if you need to.
6th Gear
Joined: Jul 2008
Posts: 1,174
Likes: 13
From: Ohio
You, sir, are my hero! What with festooning your post with pictures and a step-by-step.
Maybe now I'll get off my duff and finish it myself... I'm certain the girlfriend will make me do it with your unexpected benefit.
I want to find a more streamlined button, though. Maybe something with an LED built in.
Digikey had a few candidates a couple months back.
Maybe now I'll get off my duff and finish it myself... I'm certain the girlfriend will make me do it with your unexpected benefit.
I want to find a more streamlined button, though. Maybe something with an LED built in.
Digikey had a few candidates a couple months back.
OK, I did it
I was sweating bullets as I'm a newbie (this was the first time I'd lifted the center console on my new MINI)... but it was worth it.
- I manage to ‘tune out’ the radar detector, but it drives my wife nuts; the ‘central’ location of that button makes everyone happy.
I was sweating bullets as I'm a newbie (this was the first time I'd lifted the center console on my new MINI)... but it was worth it.
- I manage to ‘tune out’ the radar detector, but it drives my wife nuts; the ‘central’ location of that button makes everyone happy.
2nd Gear
Joined: Jun 2009
Posts: 90
Likes: 0
From: San Diego, CA
Hey Fishbert,
You're welcome... I was just returning the favor... without your photos (and video and the tips from others like Lacning and TooLazy I wouldn't even have attempted it.
Group high-5 (Zamboni-fan style ? ).
).
By the way, I saw that you had taken all that panelling off around the fuse box... sorry to say, but didn't need to do all that and could have done it slightly cleaner too. For others that may follow...:-
a) there's a grounding point behind the panel that is exposed when you open the door (remove little circle piece, then pull out bigger plastic piece)... that's also nicely placed to get it up the A-pillar.
b) and to get the wire to the fuse box, shine a light from the floor up the fuse box and peer into that same hole... you'll see a straight shot...
Now onto the next project (replacing the speakers... I'm getting indigestion from the 64 pages on the 'how-to' post... need someone to post a nice 2-minute 'highlights' video)
Re: mute button with LED... I don't know about Digikey's (unless he is the guy that did that >amazing< job embedding the standard Escort doodad into his dash), but safe-n-sound do have an LED version. As I have the Escort one with a blue LED in my other car and it bugs me (too bright, don't need another flashing light) I went without it. It also wasn't clear to me what it would look like. I'm going to email SafeNSound and ask them to post a picture (there was another problem on their website and they were incredibly quick to fix it and thankful when I pointed it out; props for that)
http://www.safe-n-sound1.com/Escort%...nd%20Mute.html
You're welcome... I was just returning the favor... without your photos (and video
and the tips from others like Lacning and TooLazy I wouldn't even have attempted it.Group high-5 (Zamboni-fan style ?
).By the way, I saw that you had taken all that panelling off around the fuse box... sorry to say, but didn't need to do all that and could have done it slightly cleaner too. For others that may follow...:-
a) there's a grounding point behind the panel that is exposed when you open the door (remove little circle piece, then pull out bigger plastic piece)... that's also nicely placed to get it up the A-pillar.
b) and to get the wire to the fuse box, shine a light from the floor up the fuse box and peer into that same hole... you'll see a straight shot...
Now onto the next project (replacing the speakers... I'm getting indigestion from the 64 pages on the 'how-to' post... need someone to post a nice 2-minute 'highlights' video)
Re: mute button with LED... I don't know about Digikey's (unless he is the guy that did that >amazing< job embedding the standard Escort doodad into his dash), but safe-n-sound do have an LED version. As I have the Escort one with a blue LED in my other car and it bugs me (too bright, don't need another flashing light) I went without it. It also wasn't clear to me what it would look like. I'm going to email SafeNSound and ask them to post a picture (there was another problem on their website and they were incredibly quick to fix it and thankful when I pointed it out; props for that)
http://www.safe-n-sound1.com/Escort%...nd%20Mute.html

I used a little different method. I have the remote display right below my key fob holder.

It has a mute button on it but I found it was still a pain in the butt to hit. I like to drive with one hand on the wheel and the other on the shifter ****. So I installed a mute switch on the shifter itself.


Here is a shot with my hand on the shifter.

It fits perfect. I do autocross and shift pretty hard and it has never got in the way.
I found this switch on ebay for a few bucks. I had to cut a small hole in the boot of the shifter to feed it through but it fits just fine
It has a mute button on it but I found it was still a pain in the butt to hit. I like to drive with one hand on the wheel and the other on the shifter ****. So I installed a mute switch on the shifter itself.
Here is a shot with my hand on the shifter.
It fits perfect. I do autocross and shift pretty hard and it has never got in the way.
I found this switch on ebay for a few bucks. I had to cut a small hole in the boot of the shifter to feed it through but it fits just fine
6th Gear
Joined: Jul 2008
Posts: 1,174
Likes: 13
From: Ohio

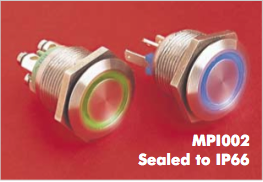
Candidates one two three four five
Those are all things I briefly looked at a few months back, right after I got the basic install done. And I haven't looked too closely, so some (all?) may not even fit. It's in my "to-do" bookmarks (that I never look at).
Actually, now that I look at them more, only 1 and 2 are momentary switches; the others won't work for this. But look at the style on options 3 through 5... sexy!
I got the safe-n-sound cable with LED and button as well (though they gave a square button similar to what's on phxsteele's shifter, rather than the round one I asked for). But both the button and LED are under the passenger floor mat, as I've only ever intended to snip them off and use the wires once I found a suitable replacement.
Last edited by fishbert; Jul 7, 2009 at 11:23 PM.
2nd Gear
Joined: Jun 2009
Posts: 90
Likes: 0
From: San Diego, CA
Yeah, all right, razz the newbie
(I did find Digi-Key when you mentioned it, but they had 4 bazillion products and I found nothing for radar detectors :( ).
These are just generic switches, right?
I DO like the 'red' LED button you found; that would look very cool and 'finished'; but one question: the LED on the normal Escort OEM remote flashes to indicate the radar detector is going off (even when muted)... what does the LED on safe-n-sounds do? And what would this one do?
(there are only two wires going to the switch).
I DO like what Phxsteele did... very 'ergonomic' (even though I have an automatic, I like keeping my hand on my stick too ).
).
By the way... what you mentioned about safe-n-sound sending you the wrong button... that was the bug I noticed in their website. I told them about it in the 'special notes' section during my order and they were awesome in their response (unlike 'OutMotoring' who totally spaced a similar issue). Give safe-n-sound a shout and they might rectify.
(I did find Digi-Key when you mentioned it, but they had 4 bazillion products and I found nothing for radar detectors :( ).
These are just generic switches, right?
I DO like the 'red' LED button you found; that would look very cool and 'finished'; but one question: the LED on the normal Escort OEM remote flashes to indicate the radar detector is going off (even when muted)... what does the LED on safe-n-sounds do? And what would this one do?
(there are only two wires going to the switch).
I DO like what Phxsteele did... very 'ergonomic' (even though I have an automatic, I like keeping my hand on my stick too
).By the way... what you mentioned about safe-n-sound sending you the wrong button... that was the bug I noticed in their website. I told them about it in the 'special notes' section during my order and they were awesome in their response
(unlike 'OutMotoring' who totally spaced a similar issue). Give safe-n-sound a shout and they might rectify.
6th Gear
Joined: Jul 2008
Posts: 1,174
Likes: 13
From: Ohio
Yeah, all right, razz the newbie
(I did find Digi-Key when you mentioned it, but they had 4 bazillion products and I found nothing for radar detectors :( ).
These are just generic switches, right?
I DO like the 'red' LED button you found; that would look very cool and 'finished'; but one question: the LED on the normal Escort OEM remote flashes to indicate the radar detector is going off (even when muted)... what does the LED on safe-n-sounds do? And what would this one do?
(there are only two wires going to the switch).
LED behavior of a given switch varies. Some appear to just toggle on/off with a press of the switch, some (like candidate 1 in my previous post) give independent control over the switch and LED. That's the main reason I've been putting it off: I'd have to sort through so many to find something that's functionally correct, looks nice, has the right size, and is compatible with the characteristics of the normal button/LED, etc. It's not particularly hard, but it's time consuming.
By the way... what you mentioned about safe-n-sound sending you the wrong button... that was the bug I noticed in their website. I told them about it in the 'special notes' section during my order and they were awesome in their response (unlike 'OutMotoring' who totally spaced a similar issue). Give safe-n-sound a shout and they might rectify.
(unlike 'OutMotoring' who totally spaced a similar issue). Give safe-n-sound a shout and they might rectify.
4th Gear
Joined: Feb 2009
Posts: 317
Likes: 0
From: Irvine CA
This is a GREAT post, bump bc i might want to do this when I get my clubby
Oh, has anybody had experience buying a Valentine One on Ebay? I found a few USED ones on ebay starting at $335.00, they ok to get used? New ones of course around $400 or so.
Here's the link to the ebay search with these deals: Ebay - Valentine One Radar Detector
Jeff
Oh, has anybody had experience buying a Valentine One on Ebay? I found a few USED ones on ebay starting at $335.00, they ok to get used? New ones of course around $400 or so.
Here's the link to the ebay search with these deals: Ebay - Valentine One Radar Detector
Jeff
