Mini Cooper 2007-Present: Fuse Box Diagram
The fuse box holds a series of fuses for all your electronic components in the Mini Cooper. Read on to learn more about your fuses.
This article applies to the Mini Cooper (2007-Present).
The Mini Cooper is equipped with two fuse boxes. Each fuse box holds various fuses that are responsible for many electrical components. The fuses are designed to break and create a shortage whenever there is an electrical overheat. It's a safety feature that prevents any types of fire from happening whenever you get more voltage than you need. It's recommended you always check the fuses whenever one of your electrical components fail, this could end up saving you a lot of diagnostic time. Read on to learn more about your fuse box in the Mini Cooper.
Locating Fuse Box
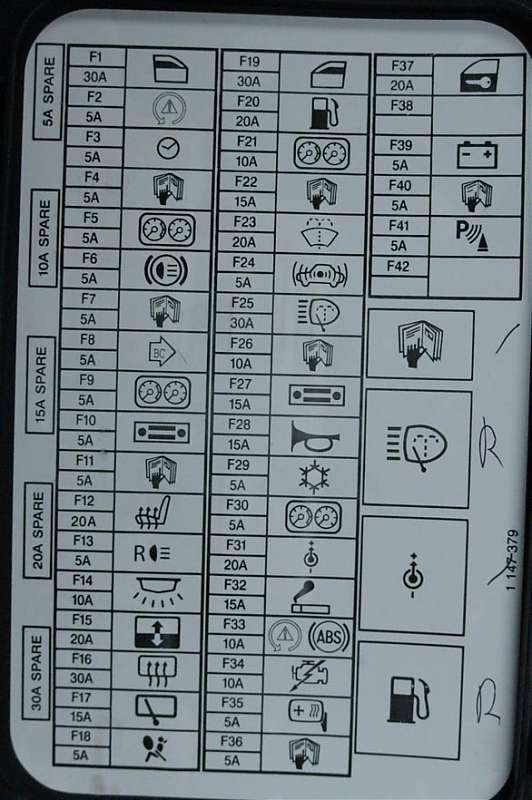
There are two fuse boxes in the Mini Cooper: one under the hood and the second one is inside the car, by the driver's side footwell. Each car type distributes its fuses differently, so the fuse location is in a different place from one model to the next. The fuse box in the engine compartment is located to the right of the battery; you just have to lift the battery cover to reveal it. Both fuse boxes are covered, so you will have to remove the cover to access the fuses.

Locating Desired Fuse
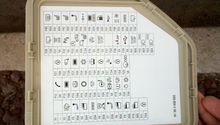
There are fuses dedicated for each of your electronic components. Sometimes more than one component can be connected to the same fuse. Whenever your dome light stops working, it's easier to check the fuse before checking the bulb and having to remove the cover. Since every car, every model, and every year has a different fuse box diagram, the best way to locate the specific desired fuse is to check the owner's manual for the actual map of the fuse box. However, there is an even easier way to locate the fuse you want, when you open the plastic fuse box cover, flip it to locate the diagram on the back side of it. The diagram will lead you to any fuse you may need. They are all numbered and labeled, so all you have to do is find the fuse you want on the diagram, then find it in the fuse box.
Inspecting Fuse
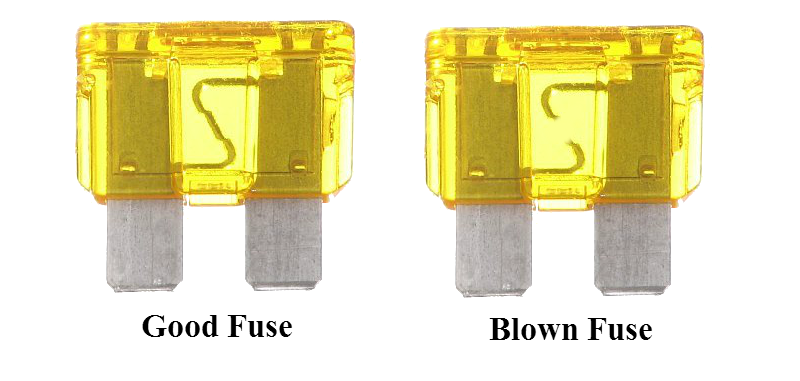
Once you locate the desired fuse, there is only one thing to do, inspect it to see if it's the culprit or not. Each fuse box will have a fuse removal tool; however, you don't necessary need it to remove a fuse, it just makes the process easier. You can also remove a fuse with your fingers by just pulling it straight out. Once you remove the fuse, you need to inspect it to see if it's blown or not. Blown fuses don't necessary look burnt and black, but there is a way that will accurately tell you whether the fuse is working properly or needs changing. Each fuse has a metal bar inside of it, this is where the electricity goes through. If the metal bar is properly connected to itself, then the fuse is working properly; however, if the metal bar looks broken, then you need to replace the fuse, and it's probably what's causing your issue.
Related Discussions
- Hot or Not - NorthAmericanMotoring.com
- Fuse Number - NorthAmericanMotoring.com