Mini Cooper 2001-2006: How to Install Radar Detector
Speeding tickets aren't cheap, and neither is your car insurance once you get one. Give yourself a heads up and prevent getting pulled over by installing a radar detector.
This article applies to the 1st Gen Mini Cooper (2001-2006).
Radar detectors certainly aren't foolproof in the days of instant radar, but they are an effective tool for reminding you to check your speed. We often get distracted these days, so sometimes it's hard to tell just how fast we are driving until it's too late and you have flashing blue lights behind you. Installing a radar detector can help, but you certainly don't want to just plug it in and have a bunch of ugly cords hanging everywhere. With minimal effort and time, you can have a clean, integrated installation. Keep reading and we'll walk you through the process.

Materials Needed
- Radar detector and antenna (this article covers the Escort 8500 and S7 antenna)
- Drill and drill bits
- Dremel
- (2) 3ft lengths of wire
- Glue
- Add-a-fuse kit
Step 1 – Modify the plastic dash piece
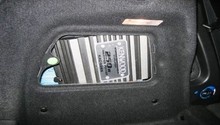
Pull off the plastic dash trim piece located behind the steering wheel and tachometer. Remove the rubber seal from the trim piece, then remove the parcel shelf. Mark and drill holes in the trim piece for the radar detector's LED lights and the mute button. Use a Dremel to cut off some of the supporting plastic on the rear of the trim piece to make room for the smart cord box.

Figure 1. Remove the trim piece behind the steering wheel and tachometer, then drill holes for the LED lights and mute button. 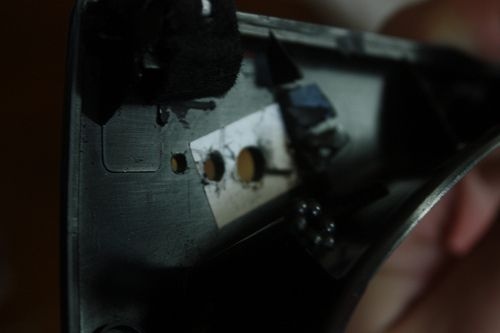
Figure 2. Cut out space for the radar detector's smart cord box.
Step 2 – Modify and install the smart cord
Use your Dremel to cut off the plug on the end of the smart cord, then remove the coiled up cord and twist it. This will make it easier to re-route the cord through the rear of the box. Remove the plug's components and attach the extension wires to the red and green wires. Run the red wire to the fuse box and install an add-a-fuse. Use a nearby bolt to ground the green wire. Once everything is wired up, secure the box to the back of the trim piece with glue.
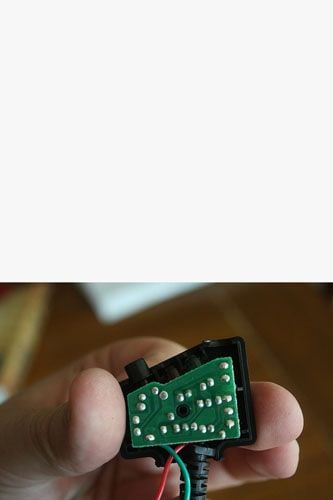
Figure 3. Cut the plug off the end of the smart cord. 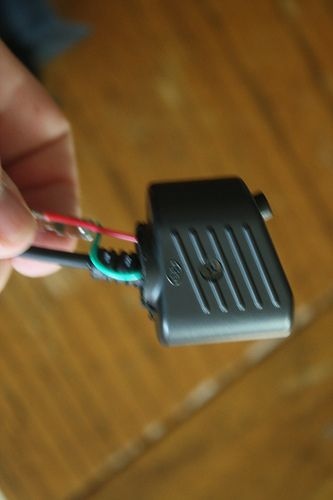
Figure 4. Attach the extension wires to the smart cord's power and ground. 
Figure 5. Glue the box to the back of the trim panel.
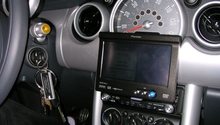
Step 3 – Install the radar detector
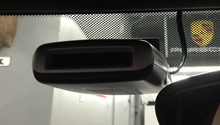
Run the wire up through the driver's side pillar and behind the headliner to the rear view mirror area. You can choose to simply attach the radar detector to the windshield at this point, or you can purchase a visor or rear view mirror mount for a cleaner installation. Use a phone cord coupler to attach the smart cord. Install the ground wire and add-a-fuse into the fuse box, making sure to use a fuse position that is switched so that it turns on and off with the key. Once finished, reinstall the trim panel and fuse panel.

Figure 6. Run the wire up through the pillar and headliner, then install the radar detector. 
Figure 7. Install the smart cord. 
Figure 8. Install the ground wire. 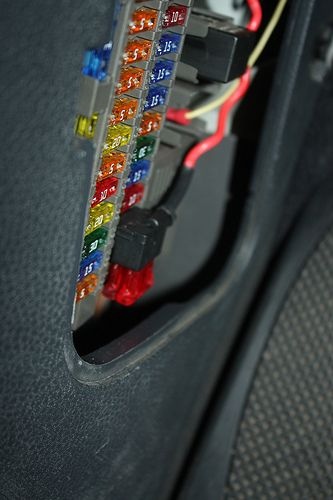
Figure 9. Install the power wire and add-a-fuse into the fuse box.
Related Discussion
- Installing an Escort Radar Detector with SmartCord - NorthAmericanMotoring.com