Drivetrain Aquamist HFS-4

Thread Tools
 
Search this Thread
 
  #1  
Old 04-05-2014, 08:08 AM
wzabrouski's Avatar
wzabrouski
wzabrouski is offline
5th Gear
Thread Starter
iTrader: (6)
Join Date: Jan 2008
Location: Keller, TX
Posts: 1,012
Likes: 0
Received 1 Like on 1 Post
Aquamist HFS-4

Anyone have the HFS-4 meth kit installed in an R60?
 
  #2  
Old 04-13-2014, 07:14 AM
wzabrouski's Avatar
wzabrouski
wzabrouski is offline
5th Gear
Thread Starter
iTrader: (6)
Join Date: Jan 2008
Location: Keller, TX
Posts: 1,012
Likes: 0
Received 1 Like on 1 Post
Ordered my kit last week. Should be here next week.
 
  #3  
Old 04-13-2014, 07:49 AM
pidge1114's Avatar
pidge1114
pidge1114 is offline
Banned
Join Date: Nov 2012
Posts: 709
Likes: 0
Received 1 Like on 1 Post
LOL you're talking to yourself in this thread.
 
  #4  
Old 04-13-2014, 07:53 AM
wzabrouski's Avatar
wzabrouski
wzabrouski is offline
5th Gear
Thread Starter
iTrader: (6)
Join Date: Jan 2008
Location: Keller, TX
Posts: 1,012
Likes: 0
Received 1 Like on 1 Post
I realized that. Nobody was responding so I figured that would get a response. lol
 
  #5  
Old 05-23-2014, 12:37 PM
CPap's Avatar
CPap
CPap is offline
4th Gear
Join Date: Nov 2013
Location: JRZ
Posts: 350
Likes: 0
Received 3 Likes on 3 Posts
Originally Posted by wzabrouski
I realized that. Nobody was responding so I figured that would get a response. lol
So self How did the install go? pics? impressions?
 
  #6  
Old 05-23-2014, 02:55 PM
youthanasia's Avatar
youthanasia
youthanasia is offline
3rd Gear
Join Date: Apr 2011
Location: Oh Canada!
Posts: 257
Likes: 0
Received 1 Like on 1 Post
Are you using this with the JB+?
 
  #7  
Old 05-23-2014, 07:33 PM
wzabrouski's Avatar
wzabrouski
wzabrouski is offline
5th Gear
Thread Starter
iTrader: (6)
Join Date: Jan 2008
Location: Keller, TX
Posts: 1,012
Likes: 0
Received 1 Like on 1 Post
I am
 
  #8  
Old 05-23-2014, 07:40 PM
wzabrouski's Avatar
wzabrouski
wzabrouski is offline
5th Gear
Thread Starter
iTrader: (6)
Join Date: Jan 2008
Location: Keller, TX
Posts: 1,012
Likes: 0
Received 1 Like on 1 Post
Originally Posted by CPap
So self How did the install go? pics? impressions?
The install is not horrible if you take your time. It was a little different on the countryman as Jeff from Howerton custom fit a CTS-V tank to fit below the trunk deck to fit the countryman. The hardest part is running all the wires. ECU connections are not bad. I thought this would be the hardest part. I did it over two weekends since with the wife and kids, the only time is after they all go to bed. I have been driving around for a couple of days with the jet under the wiper blade to see when it sprays on the stock settings and I am going to be adjusting as it does not spray when I thought it would and I would like it to spray a little sooner. All in all smooth. When you order, you get a R56 specific install which walks you through each step. These instructions are a lot no better than the generic ones. Jeff from Howerton is amazing and emails back almost instantly when is had any question. With the Texas heat in the 100s, this is going to make a huge difference.

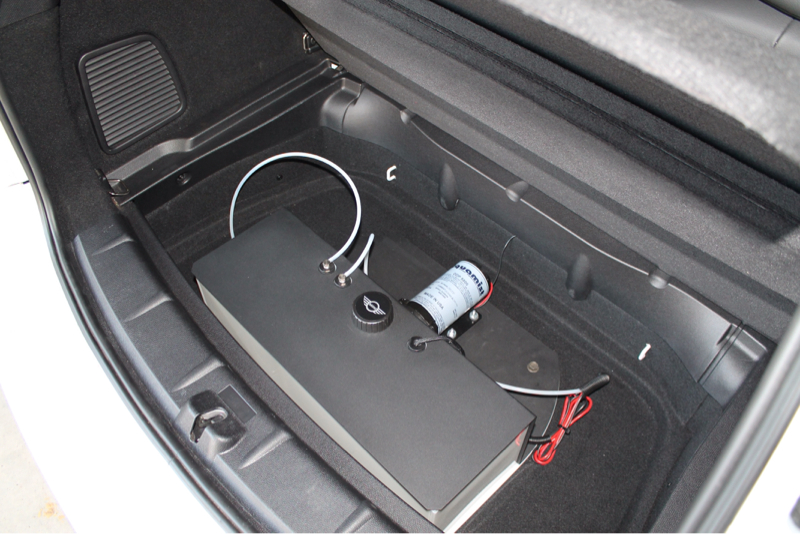
Attached is a pic of the CTS-V tank custom fit to fit below the countryman trunk deck. Best part is you can't even tell it there...
 
Attached Thumbnails Aquamist HFS-4-image-1952677540.jpg   Aquamist HFS-4-image-543647308.jpg  
  #9  
Old 05-23-2014, 07:43 PM
wzabrouski's Avatar
wzabrouski
wzabrouski is offline
5th Gear
Thread Starter
iTrader: (6)
Join Date: Jan 2008
Location: Keller, TX
Posts: 1,012
Likes: 0
Received 1 Like on 1 Post
Better pic after I installed pump.
 
Attached Thumbnails Aquamist HFS-4-image-1589337528.jpg  
  #10  
Old 05-23-2014, 07:58 PM
wzabrouski's Avatar
wzabrouski
wzabrouski is offline
5th Gear
Thread Starter
iTrader: (6)
Join Date: Jan 2008
Location: Keller, TX
Posts: 1,012
Likes: 0
Received 1 Like on 1 Post
Anyone gauge jump around at idle? Jeff said its wire noise and to try and keep the flow sensor wire away from the other wires if possible or wrap it in wire shielding.
 
  #11  
Old 05-24-2014, 11:21 AM
CPap's Avatar
CPap
CPap is offline
4th Gear
Join Date: Nov 2013
Location: JRZ
Posts: 350
Likes: 0
Received 3 Likes on 3 Posts
Looks great. Very discreet. Made the meaningless(to me) storage meaningful. Well done. I may be down this road next year.
 
  #12  
Old 06-25-2014, 07:56 PM
CPap's Avatar
CPap
CPap is offline
4th Gear
Join Date: Nov 2013
Location: JRZ
Posts: 350
Likes: 0
Received 3 Likes on 3 Posts
I will be installing the same kit in my countryman in a few days. Any helpful tips?
 
  #13  
Old 06-26-2014, 08:08 PM
wzabrouski's Avatar
wzabrouski
wzabrouski is offline
5th Gear
Thread Starter
iTrader: (6)
Join Date: Jan 2008
Location: Keller, TX
Posts: 1,012
Likes: 0
Received 1 Like on 1 Post
Take your time. Plan for a 3-4 hours over two days. There is no hole in the trunk to route the wires from the inside to the outside so buy a 1 inch stepped drill bit to make the hole. I then used an rubber grommet and roofing waterproofing to seal the whole completely. When you get the kit you will get very detailed instructions that will help make everything easy. Don't be nervous about tapping the ECU. Believe it or not, this is the easiest part. The posi-taps are easy to use. I used the craven speed vent pod for the gauge and it worked well. When drilling the hole in the pipe to put the jet in, start with small bits and work your way up. I disconnected the pipe at the top by the intake temp sensor and put a huge ball of blue painters tape on a hanger and fed it into the pipe to catch any plastic that that fell while drilling the hole for the jet adapter. Jeff suggested this and it worked great. I used probably 8-10 different drill bits working up the the final size for the adapter.

If I can be any help, let me know. Take your time and you will be fine.
 
  #14  
Old 06-27-2014, 05:58 AM
CPap's Avatar
CPap
CPap is offline
4th Gear
Join Date: Nov 2013
Location: JRZ
Posts: 350
Likes: 0
Received 3 Likes on 3 Posts
Thanks for the tips.

I did some poking around and noticed there wasn't any access to the trunk too. I will utilize my step drill bit as suggested. did you have to drill the enclosure to mount the pump? my enclosure didn't come with the holes pre-drilled. No big deal to do, just wondering. I plan on taking a few days to do this as the kids will be all over me on the weekends.

Thanks again.
Chris
 

Last edited by CPap; 06-27-2014 at 06:08 AM.
  #15  
Old 06-27-2014, 06:14 AM
wzabrouski's Avatar
wzabrouski
wzabrouski is offline
5th Gear
Thread Starter
iTrader: (6)
Join Date: Jan 2008
Location: Keller, TX
Posts: 1,012
Likes: 0
Received 1 Like on 1 Post
Yes, you have to drill the holes for the pump.
 
  #16  
Old 06-28-2014, 08:39 AM
wzabrouski's Avatar
wzabrouski
wzabrouski is offline
5th Gear
Thread Starter
iTrader: (6)
Join Date: Jan 2008
Location: Keller, TX
Posts: 1,012
Likes: 0
Received 1 Like on 1 Post
Another thought. Make sure you keep the flow sensor wire separate from the others when you route the wires into the cabin by the battery. I did not do this initially and was getting wire noise causing the gauge to give false readings. Once I routed it separately around the battery, it was fine. Also, I just used Velcro to attach the controller to the panel that comes off to change the in cabin micro filter. Works perfectly.
 
  #17  
Old 06-30-2014, 02:04 PM
CPap's Avatar
CPap
CPap is offline
4th Gear
Join Date: Nov 2013
Location: JRZ
Posts: 350
Likes: 0
Received 3 Likes on 3 Posts
Originally Posted by wzabrouski
Another thought. Make sure you keep the flow sensor wire separate from the others when you route the wires into the cabin by the battery. I did not do this initially and was getting wire noise causing the gauge to give false readings. Once I routed it separately around the battery, it was fine. Also, I just used Velcro to attach the controller to the panel that comes off to change the in cabin micro filter. Works perfectly.
OK. Got it. Thanks again. I didn't make any progress this weekend... just placed the tank enclosure and drilled a hole in the trunk. Also, mounted the gauge and started running a few wires. I'm too distracted installing my sprinkler system at home right now.... grrr... need more hours in the day!
 
  #18  
Old 07-26-2014, 10:55 AM
CPap's Avatar
CPap
CPap is offline
4th Gear
Join Date: Nov 2013
Location: JRZ
Posts: 350
Likes: 0
Received 3 Likes on 3 Posts
Originally Posted by wzabrouski
Better pic after I installed pump.
I'm about ready to finish install this week. Finally have some time. How did you get the lid to close in the trunk bed? The tank cap is too high and the lid doesn't close. Did you cut out the mat and insulation for more clearance or just don't use the lid any longer?
 
  #19  
Old 07-26-2014, 05:19 PM
wzabrouski's Avatar
wzabrouski
wzabrouski is offline
5th Gear
Thread Starter
iTrader: (6)
Join Date: Jan 2008
Location: Keller, TX
Posts: 1,012
Likes: 0
Received 1 Like on 1 Post
Are you referring to the CTS tank that I used from Howerton? Did not need to do anything to make the deck lid close perfectly?
 
  #20  
Old 07-26-2014, 05:32 PM
CPap's Avatar
CPap
CPap is offline
4th Gear
Join Date: Nov 2013
Location: JRZ
Posts: 350
Likes: 0
Received 3 Likes on 3 Posts
Originally Posted by wzabrouski
Are you referring to the CTS tank that I used from Howerton? Did not need to do anything to make the deck lid close perfectly?
Yes, I have the same tank as you... What I thought anyhow. It is the CTS tank from howertown. I can't close the deck lid with the tank installed. Does your countryman have padding between the carpet and sheet metal? Mine does and it seems if I remove that padding, I may be able to get the deck lid to close.
 
  #21  
Old 07-26-2014, 06:07 PM
wzabrouski's Avatar
wzabrouski
wzabrouski is offline
5th Gear
Thread Starter
iTrader: (6)
Join Date: Jan 2008
Location: Keller, TX
Posts: 1,012
Likes: 0
Received 1 Like on 1 Post
That's strange. When I get home I can take some measurements. I did not have to make any modifications. Did you bolt the tank to the floor? Should not matter as when I fit the tank before truly installing I had no clearance issues with the cap.

Aquamist HFS-4-image-2529132131.jpg
 
  #22  
Old 07-26-2014, 06:12 PM
CPap's Avatar
CPap
CPap is offline
4th Gear
Join Date: Nov 2013
Location: JRZ
Posts: 350
Likes: 0
Received 3 Likes on 3 Posts
Originally Posted by wzabrouski
That's strange. When I get home I can take some measurements. I did not have to make any modifications. Did you bolt the tank to the floor? Should not matter as when I fit the tank before truly installing I had no clearance issues with the cap.
That would be very helpful. Thank you. Was thinking that they may have added padding in the trunk since 2011.
 
  #23  
Old 07-28-2014, 05:48 PM
CPap's Avatar
CPap
CPap is offline
4th Gear
Join Date: Nov 2013
Location: JRZ
Posts: 350
Likes: 0
Received 3 Likes on 3 Posts
Just figured out why mine doesn't fit. Your deck lid in the trunk sits higher than mine. They must have changed things up over the years. My lid sits about an inch lower. Check out the pics. Yours is the top pic. Mine is the next. You will see what I mean compared to yours. I will have to cut a hole in my lid.

 
  #24  
Old 07-29-2014, 01:57 PM
wzabrouski's Avatar
wzabrouski
wzabrouski is offline
5th Gear
Thread Starter
iTrader: (6)
Join Date: Jan 2008
Location: Keller, TX
Posts: 1,012
Likes: 0
Received 1 Like on 1 Post
What year is yours?
 
  #25  
Old 07-29-2014, 06:17 PM
CPap's Avatar
CPap
CPap is offline
4th Gear
Join Date: Nov 2013
Location: JRZ
Posts: 350
Likes: 0
Received 3 Likes on 3 Posts
Originally Posted by wzabrouski
What year is yours?
2014. I may try an order a 2011 lid if the hole ends up going all the way through. May look a little botched that way.


Quick Reply: Drivetrain Aquamist HFS-4


All times are GMT -7. The time now is 01:15 AM.