Mini Cooper 2001-2006: How to Replace Thermostat
The thermostat is vital to engine operation. It is the part most responsible for keeping your engine temperature in its normal operating range. Whenever you suspect your engine overheating with normal coolant levels/mixture, it's a good idea to inspect and change the thermostat.
This article applies to the Mini Cooper R50 and R53 (2001-2006).
The Mini Cooper R50 and R53 are known throughout the community for the occasional coolant leak. Most often this leak originates from the thermostat housing and thermostat gasket. It's identified as coolant leaking down onto the transmission, caused by corrosion build-up and the plastic thermostat housing design. To combat this problem, an updated thermostat housing and bolts have been made available. ECS tuning is one source for the updated parts (part number 2587245).

Materials Needed
- Phillips head screwdriver
- 1/4" and 3/8" ratchet with 3" extension
- Metric socket set (8mm - 17mm)
- Torx driver set
- Needle nose pliers
- Flat head screwdriver
- Diagonal cutters
- Drain pan
- Pliers
- Torque wrench
- Gasket scraper
- Safety glasses
- Rubber gloves
Some steps differ between the Mini Cooper (R50) and Mini Cooper S (R53). These differences will be designated using the abbreviations "R50" or "R53" at the beginning of the description.
Step 1 – Remove the front under tray
Remove the two Phillips screws at the rear corners and the 10mm bolt at the front center. Pull the tray rearward to remove it from the front bumper.
Step 2 – Disconnect the negative battery cable
R53
Remove the carpet flooring in the trunk to access the battery. DO NOT close the trunk once the battery is disconnected.
R50
You'll find the battery box on the driver's side of the engine bay. Remove the weatherstripping at the rear of the box and squeeze the retaining clips on the sides to remove the cover.
Wrap the cable with electrical tape or a rag to prevent accidental contact with the battery,
Step 3 – Remove the intercooler (R53 only) and air box covers
R53
- Remove the four intercooler cover Torx screws.
- Unclip the hose from the front airbox.
- Remove the two Torx screws at the front corners of the airbox.
- Disconnect the electrical connector at the left rear by squeezing the metal clip inward and pulling upward.
- Push back on the cover then lift the front up.
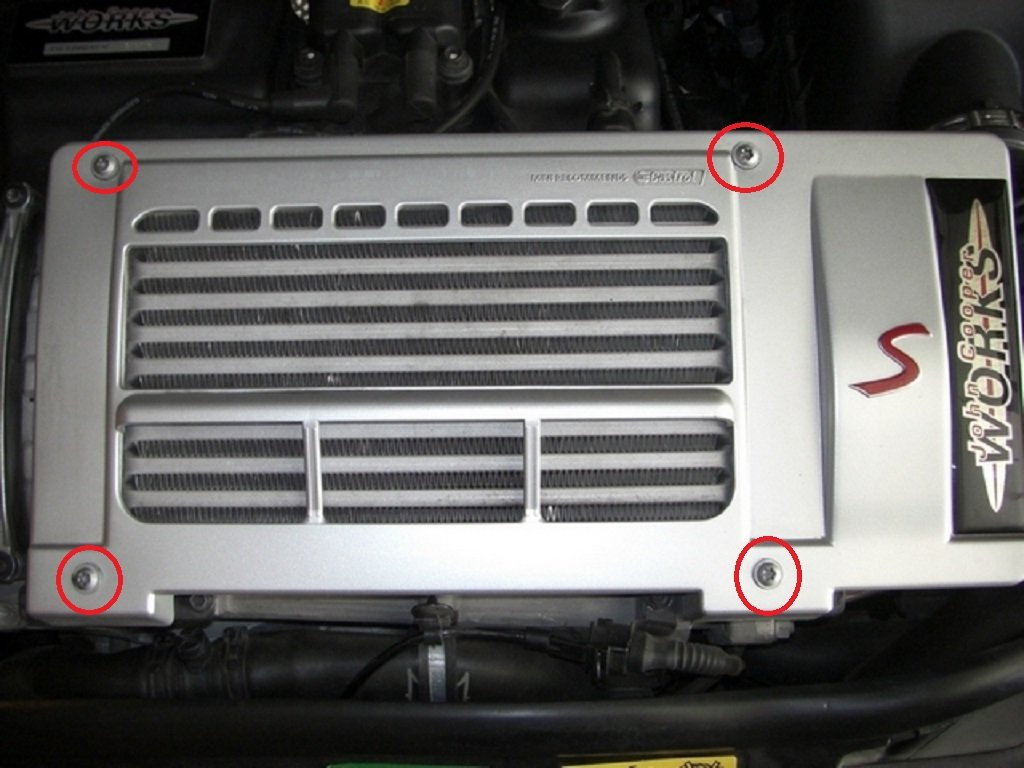
Figure 1. The intercooler cover. 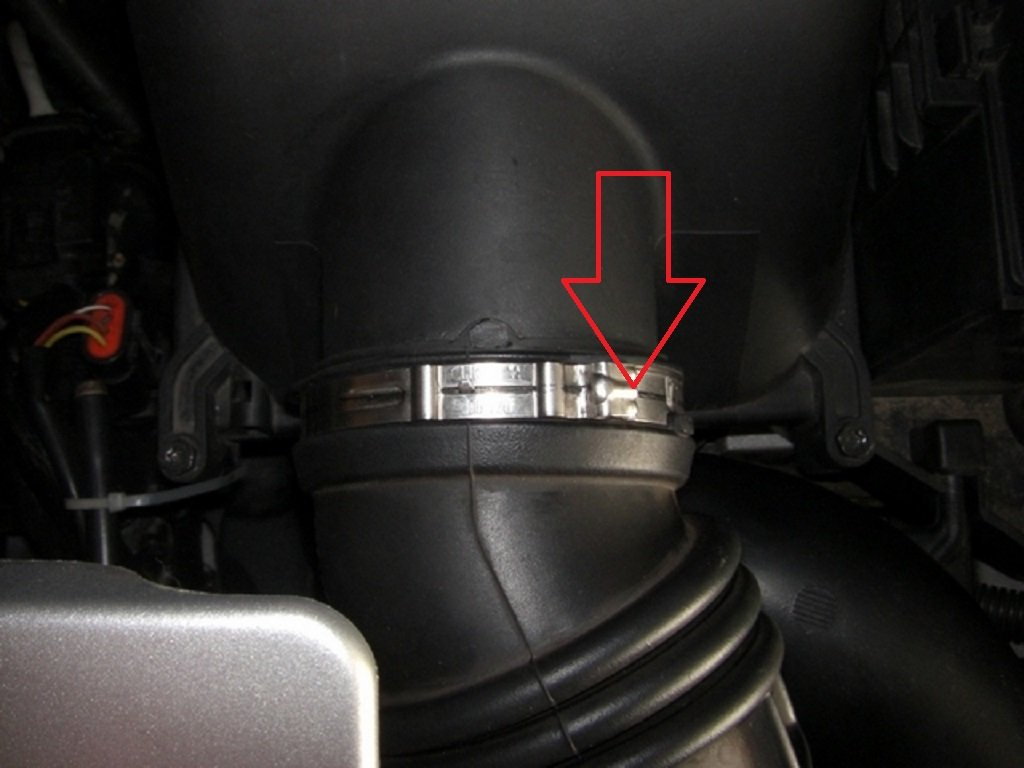
Figure 2. The front air hose. 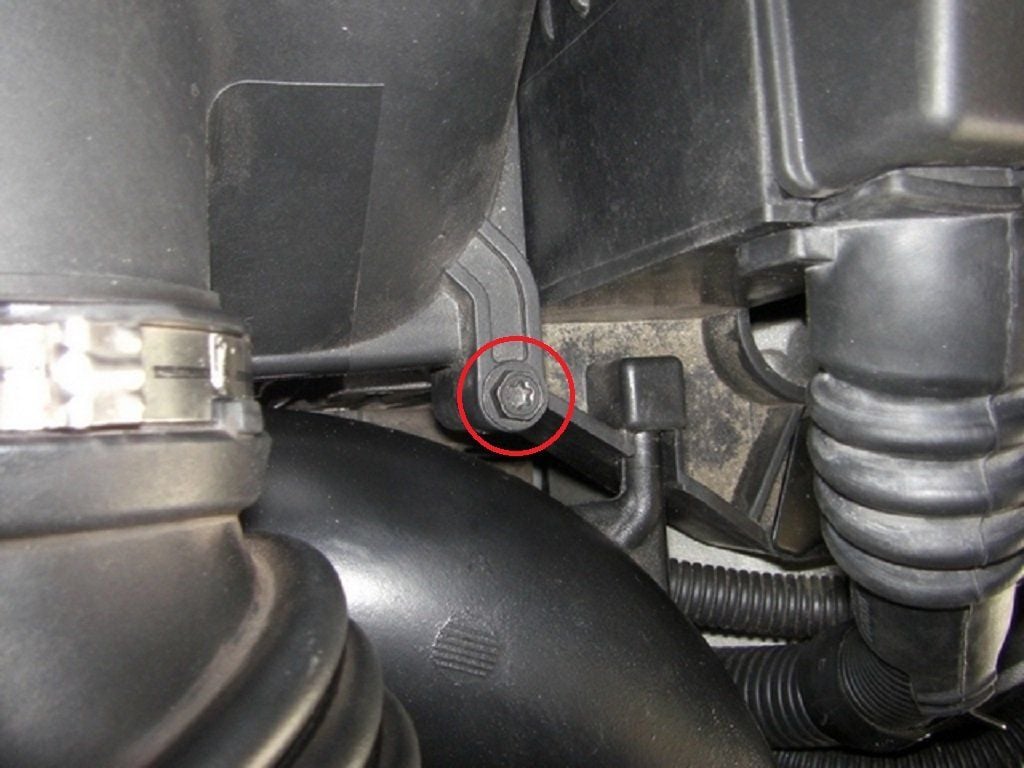
Figure 3. The Torx screws on the air box. 
Figure 4. The electrical connector at the back of the airbox.
R50
- Unplug the vent tube from the side of the battery.
- Remove the battery from the vehicle.
- Cut the zip-tie holding the wiring harness to the side of the airbox.
- Pull the circular electrical connector on the side of the airbox off the clip and twist the upper half counter-clockwise to disconnect.
- Remove the 10mm bolt near the electrical connector holding the two ground wires to the frame.
- Remove the two 10mm bolts holding the airbox to the body at the rear of the airbox.
- Pull the airbox forward and up to disconnect it from the intake pipe below.
Step 4 – Remove the ECM
R53
Begin by removing the snorkel tube. Remove the hose clamp by the radiator cowl intake and rotate the snorkel up. Pull it towards you to release the pin on the snorkel from the slot in the airbox.
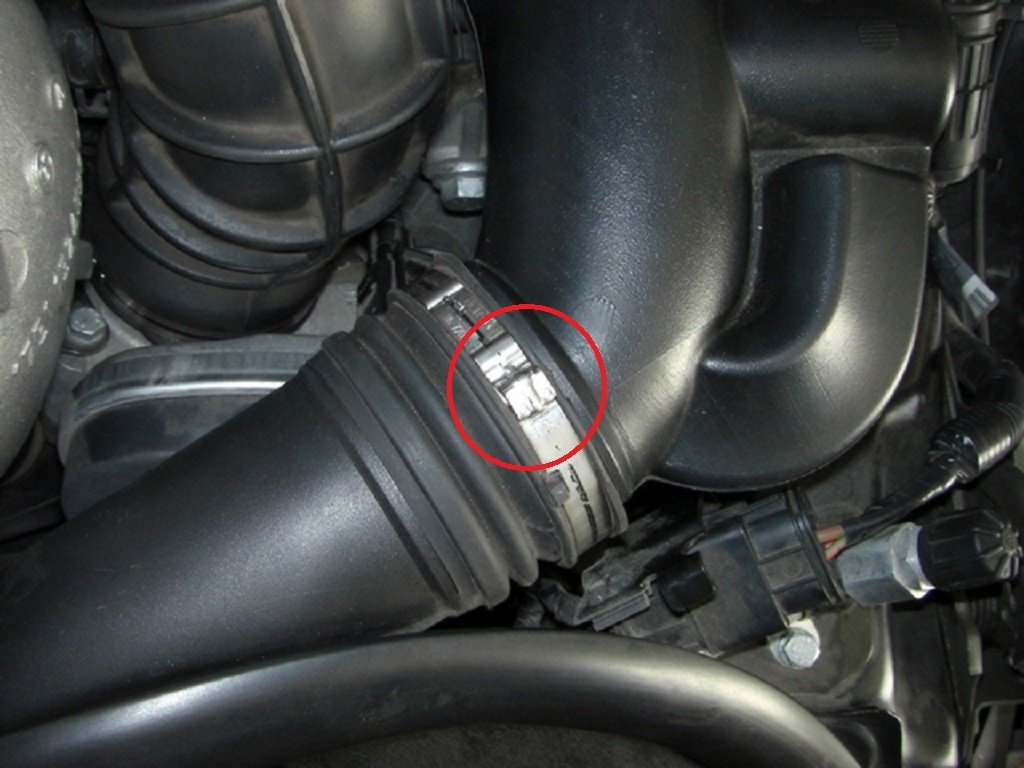
Figure 5. The snorkel tube. 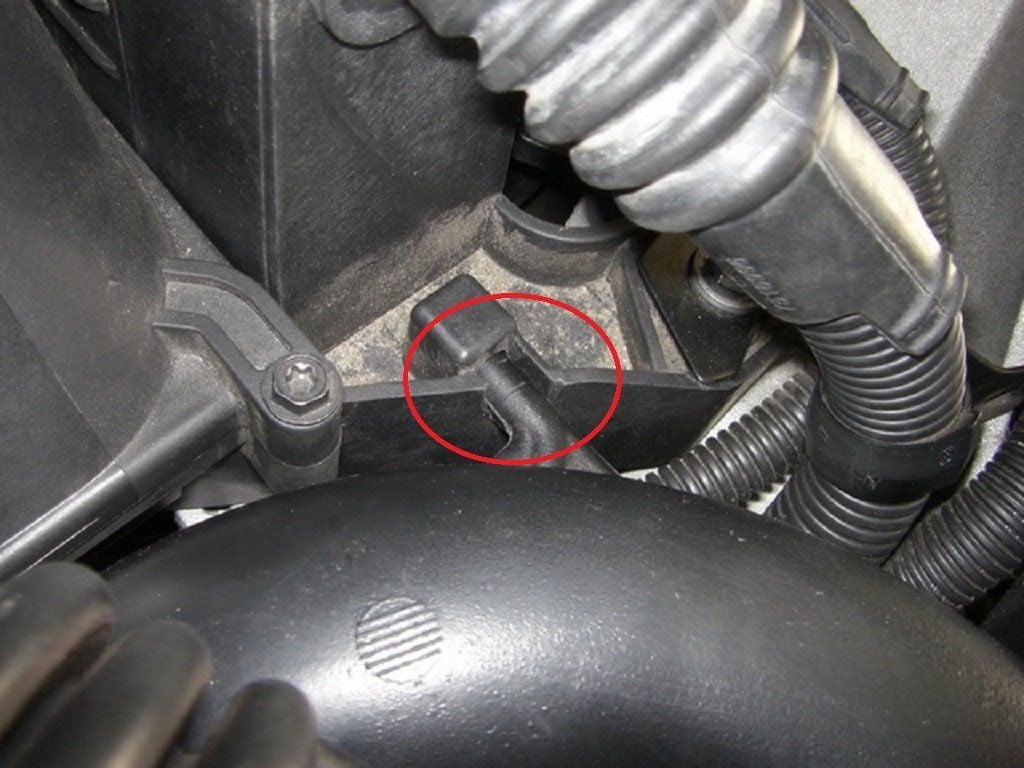
Figure 6. The pin on the snorkel tube.
R53 and R50
You can simply lift the ECU out of the slot next to the airbox and lay it towards the side of the engine. Do not let the weight of the ECU pull against the wiring. You can use a piece of wire or bungie cord to secure the ECU in place. Pinch the clips on the ECU cover to remove it. There are retaining clips/pegs on each side of the ECU at the top. Push these towards the wiring harness while pulling the ECU out of the box.
If you need to disconnect the ECU from the wiring, slide the connector tabs outward.
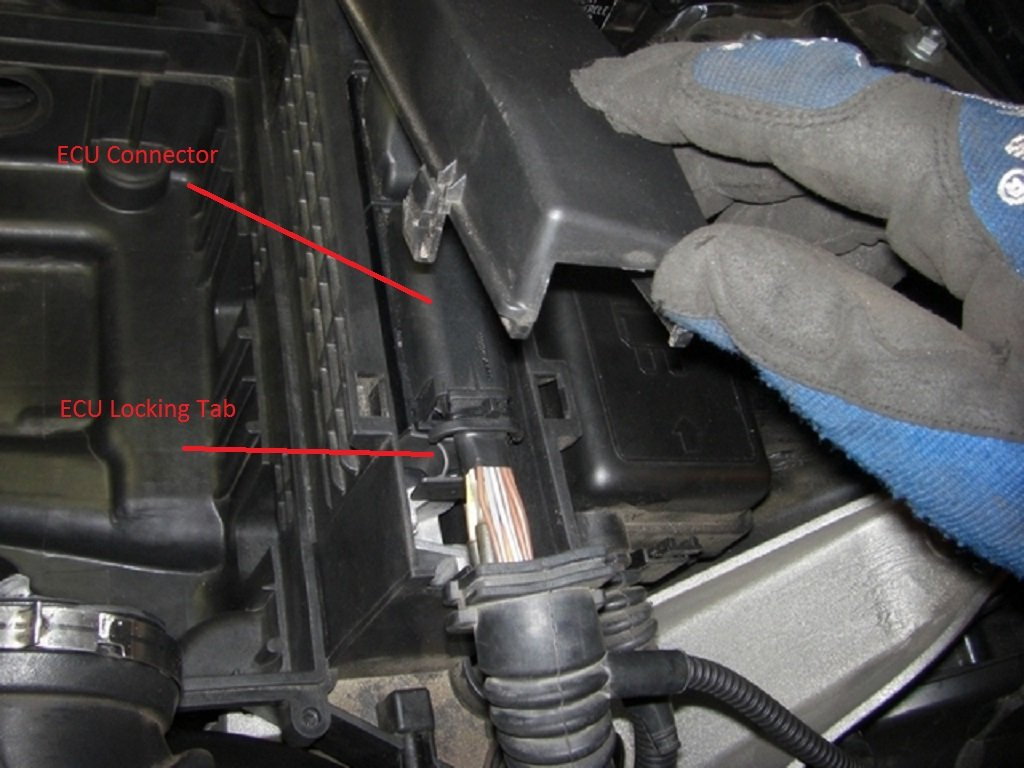
Figure 7. Removing the ECU cover and ECU. 
Figure 8. Laying the ECU to the side.
Step 5 – Remove the air box bottom
R53
- Remove the bolt at the right front cover.
- Pull the airbox bottom up at the front then forward to release the rubber grommets from the pins below. Re-install the pins into the airbox bottom for easy installation.

Figure 9. The bolt at the right front of the airbox bottom. 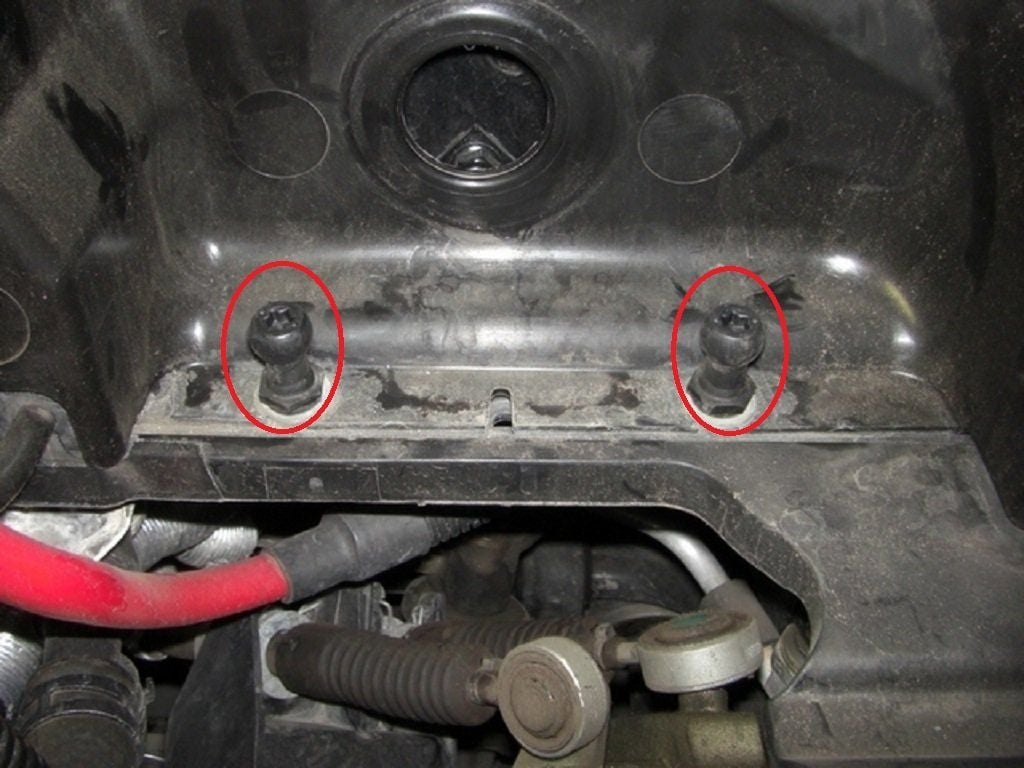
Figure 10. The two pins at the rear of the airbox.
R50
- Remove the three bolts at the bottom of the box.
- Remove the bolt at the front holding the airbox bottom to the transmission.
- Cut the zip-ties holding the red battery cable underneath.
Step 6 – Remove the MAP sensor (R53 only)
- Locate the map sensor above the thermostat housing.
- Disconnect the map sensor and 02 sensor connectors. You'll need to pull up on the map sensor tab and squeeze the 02 sensor connector tab to unlock them.
- Remove the two screws holding the map sensor to the mounting bracket.
- There's a rubber hose attached to the bottom side of the map sensor that must be removed.
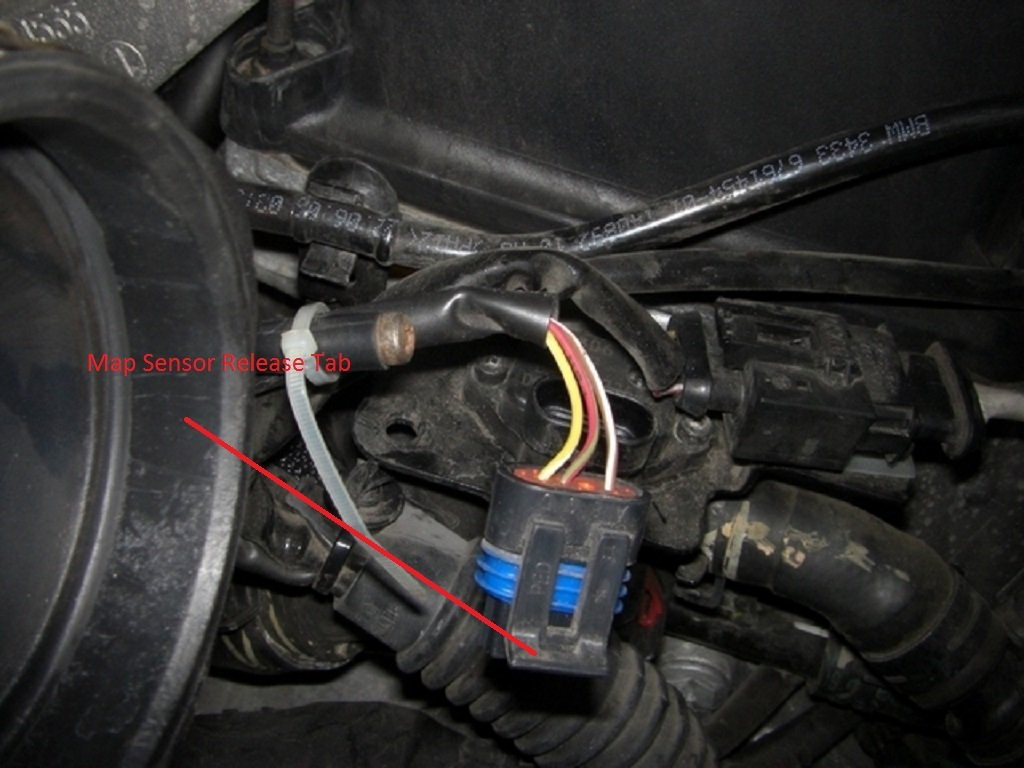
Figure 11. Disconnecting the map sensor. 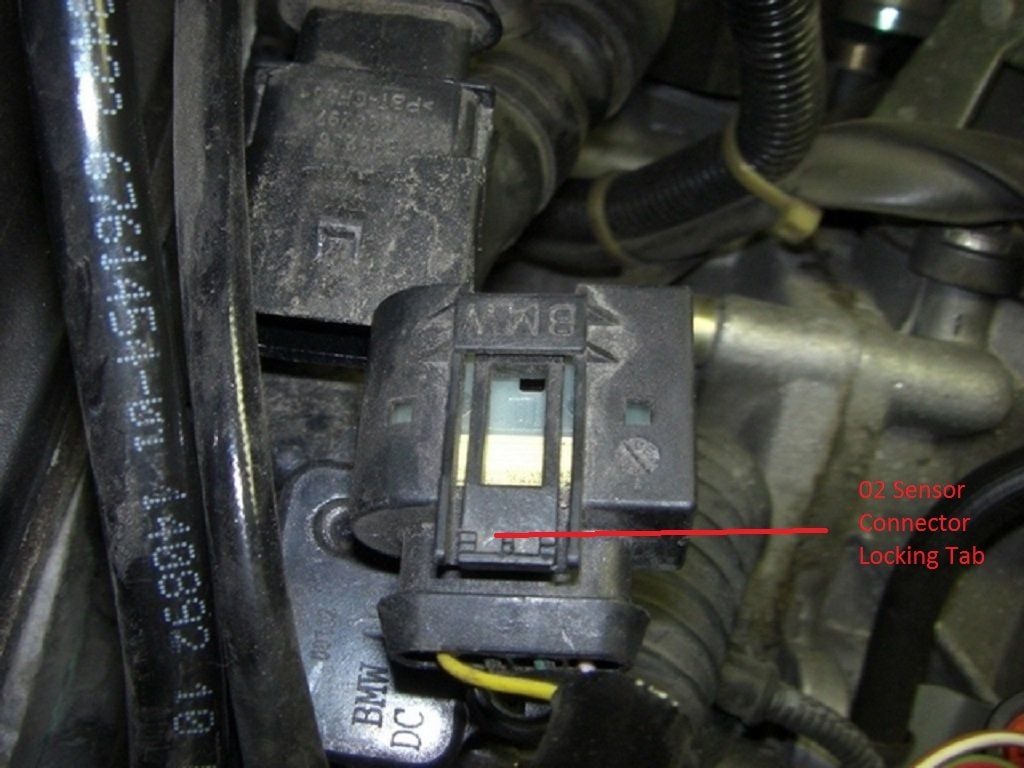
Figure 12. Disconnecting the 02 sensor connector. 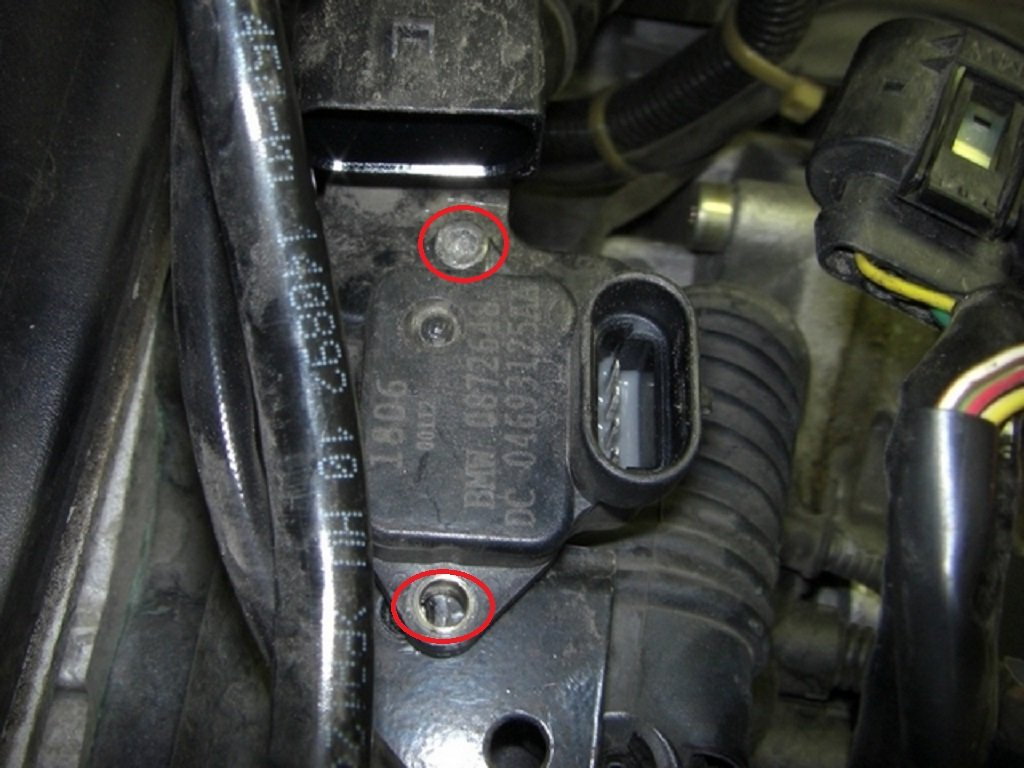
Figure 13. Removing the map sensor bolts.
Step 7 – Remove the thermostat housing hoses
R53
- Place a drain pan below the vehicle. If it's clean, you can re-use the coolant.
- Some owners have had success removing the thermostat without removing the hoses, but you may need the extra room.
- The hoses are held onto the housing with spring clamps. Squeeze the clamp and slide it off the housing, then twist the hose off.
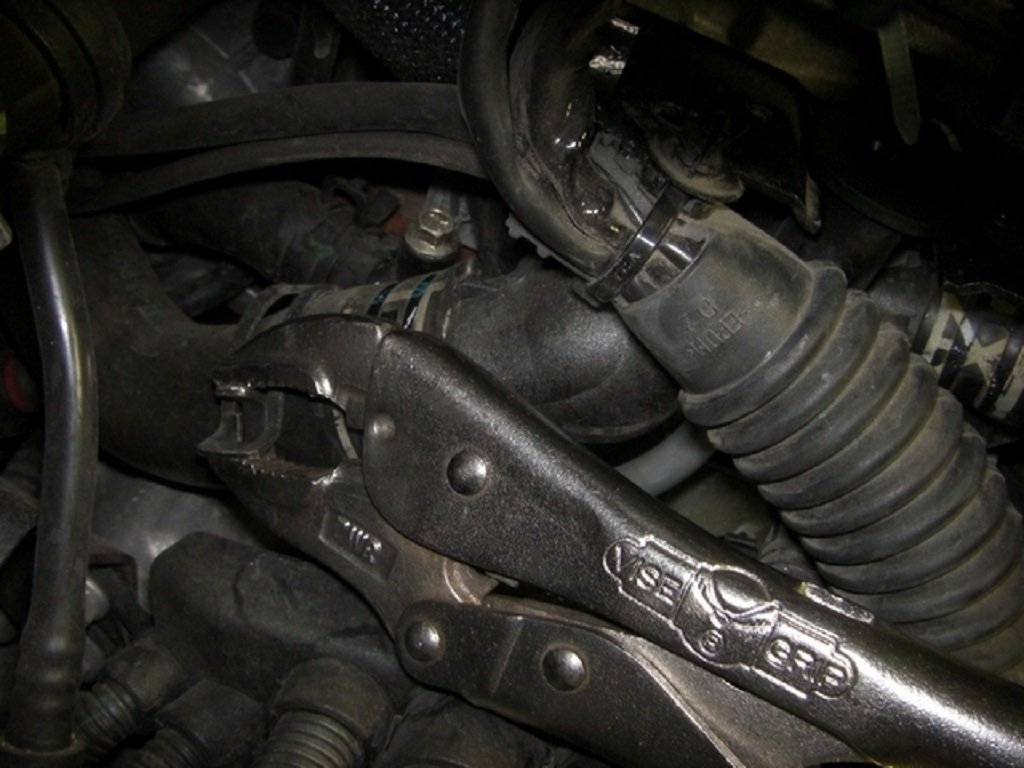
Figure 14. Removing hose clamps from the thermostat. 
Figure 15. Removing the thermostat housing bolts.
R50
- Place a drain pan below the vehicle. If it's clean, you can re-use the coolant.
- Remove the three hoses connected to the thermostat housing. The larger hoses closer to the housing use spring clamps.
Step 8 – Remove the thermostat
R53
- Use a 10mm socket with extension to reach the two upper thermostat housing bolts.
- With the bracket and 02 sampling pipe moved, you have access to the lower housing bolt.
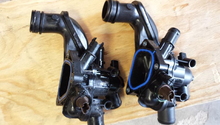
- The thermostat housing is ready to be removed.
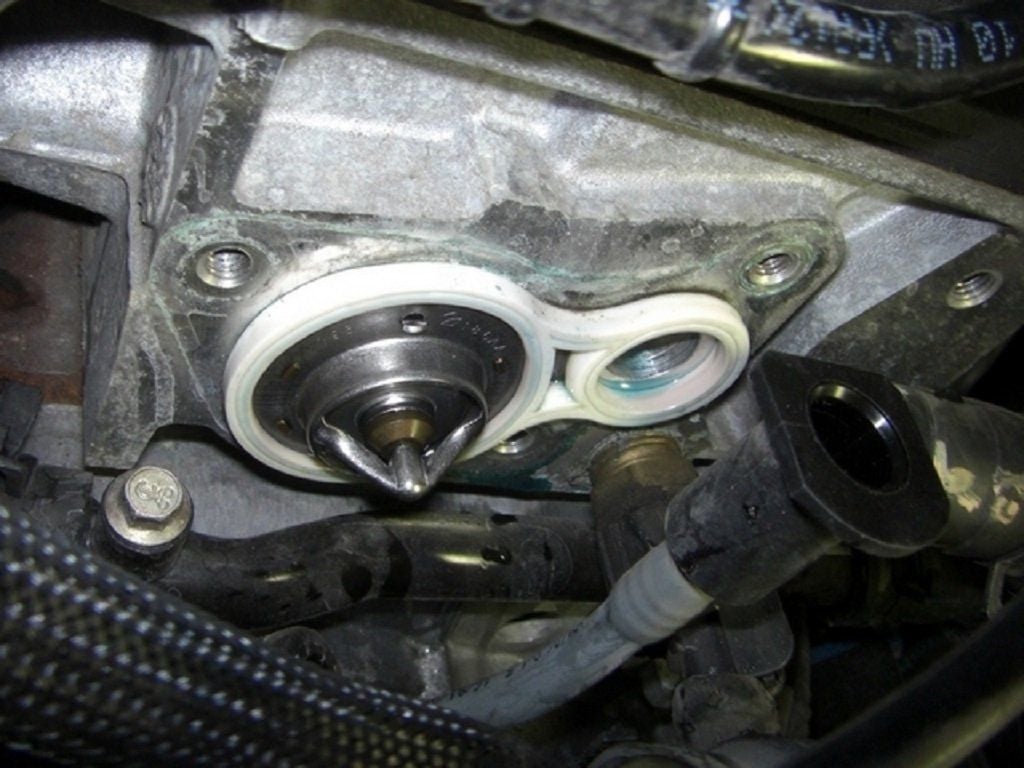
Figure 16. The thermostat with the housing removed. 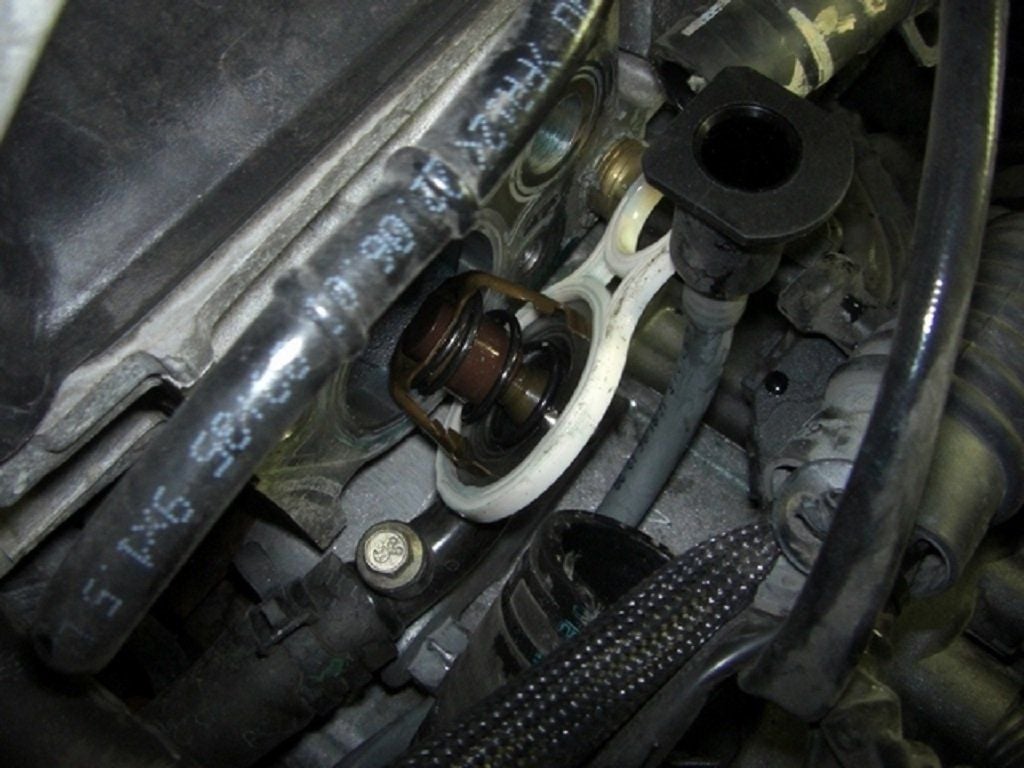
Figure 17. The thermostat removed.
R50
- Remove the three bolts on the housing. There are two on the right side and one on the left.
- You'll need an extension with your 10mm socket to reach them.
Step 9 – Install the thermostat
- Remove any gasket material and corrosion on the surface of the cylinder head. A gasket scraper and Scotch-brite make for a good combination.
- Be careful not to gouge into the aluminum cylinder head.
- Install the thermostat spring side towards the engine with the bypass hole at the twelve o'clock position.
- Make sure the gasket is fully seated into the housing groove. Vaseline can be applied to keep the gasket seated while installing.
- Finger tighten the thermostat housing bolts then torque to 9 ft./lbs.
- Re-assemble in the reverse order of removal.
- Reassemble the MAP sensor.
- Reassemble the intake system.
- Reinstall the ECU/ECM.
- Reinstall the supercharger and engine covers.
Add any lost coolant to thermostat housing filler neck (R50) or overflow tank (R53), turn the heat setting to max, and start the engine with the bleed valve on the upper radiator hose open. Close the valve once coolant leaks from it. Check for leaks around the housing while the engine warms up. Top off the coolant level in the expansion tank as needed during warm up.
Keep an eye on the coolant temp during warm up. If the temperature rises near the 3/4 hot mark, turn off the engine. Wait for it to cool and perform the bleeding procedure again.
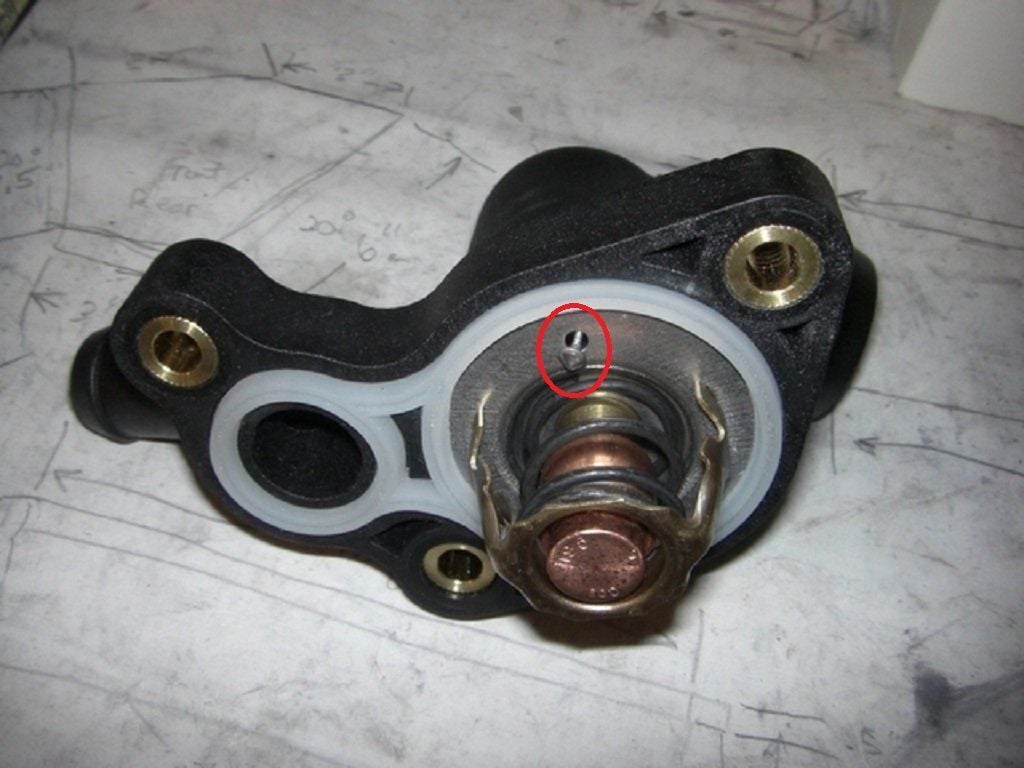
Figure 18. The thermostat bypass hole. 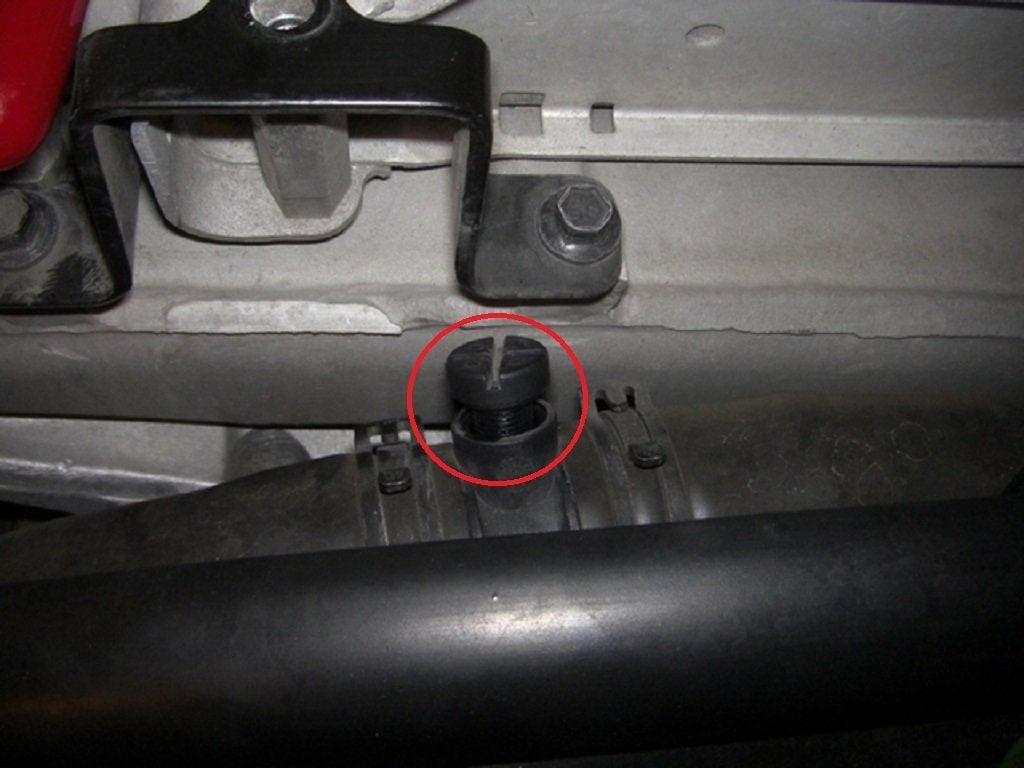
Figure 19. The bleed screws on the upper radiator hose.
Featured Video: R53 Mini Cooper S Thermostat Replacement
Related Discussions
- Have You Replaced Your Thermostat Housing - NorthAmericanMotoring.com
- Help with Coolant Leak - NorthAmericanMotoring.com
- How to Replace Thermostat - NorthAmericanMotoring.com
- 2F07 OBD Trouble Code - NorthAmericanMotoring.com