
Oil Change + new Tip... maybe kind long

Joined: Apr 2003
Posts: 1,808
Likes: 2
From: Ellicott City, Maryland USA
Oil Change + new Tip... maybe kind long
To start you need the right stuff.
Hopefully the pictures will be in order with the comments.
I use ramps just because my oil drain pan is so huge. < old steam table stainless steel pan 24"X24"X4"
Last oil change was done at the dealership 3,000 miles ago. I had to use my foot and leg to break loose the stupid oil plug.
 Thank goodness they didn't strip the threads
 WTF is with these guys?
Drained the dealership oil out, loosen the canister until you break the vacuum seal and hear more oil draining into the pan stop loosening the canister, leave it there. Go inside and have a snack or do something else for a while, just let it drain.
Never again, we got the fix, Fumoto oil drain valve, sweet I had my doubts about these but was just curious enough to buy one. Nice piece of work, quality stuff. Now I recommend them.
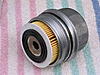
Okay now remove the canister, with practice you can let it pivot between two fingers just as you lift it off so that the filter element is facing up and you won't spill a drop.
Remove the old filter element and O ring. I use a plastic letter opener to remove the O ring from it's groove, you don't want any scratches in the groove so a metal tool isn't the best idea.
Clean up the canister, I use Brake Clean and air pressure. Gas works to, but be careful< on second though, don't use gas it could somehow kill you or burn your house down or, just don't use it cause I'm not real sure who might be reading this then screw up and blame me.
Anyway here's my TIP for the day. Look at that canister, no I mean really look at it. Pay attention to those threads, now take your finger nail and trace those threads, is it kind of rough? You my friend have just discovered why it is so darned hard to tell when you have got the thing started when your putting the thing back on. Well, some of the reason why.
So I spent 15 min. of my day with some 220 grit wet & dry paper, cleaned and polished up those threads. You will see that they are cast, not cut threads. I polished the threads outer edge and folded the paper to get into the grooves, also pay attention to casting flash line smoothing that out too.
Clean the canister up again, don't want any metal particles getting into the engine. Install the new O ring that came with the OEM filter in the box on the canister. Now put some oil on the O ring, coat it good. I like to also put some oil around the hole's on the new filter element at both ends. Take the filter element and push it down on the tube to pre-fit it with a twisting action, on and off. Now with the canister on a firm surface with the black seal of the element facing you, press it into the canister with your palm, all the way in.
Secret weapons < shortie 1/2 drive ratchet, cut down craftsman 36mm socket.
Screw the canister back on, check to make sure you replaced the oil drain plug or closed the drain valve. Now fill with your favorite oil. Start your engine with the bonnet up and check for leaks, let it run a min. or two then check again. Motor on: grin:
I don't think all the attachments got uploaded, may have to patch this up
Hopefully the pictures will be in order with the comments.
I use ramps just because my oil drain pan is so huge. < old steam table stainless steel pan 24"X24"X4"
Last oil change was done at the dealership 3,000 miles ago. I had to use my foot and leg to break loose the stupid oil plug.
Thank goodness they didn't strip the threads WTF is with these guys?Drained the dealership oil out, loosen the canister until you break the vacuum seal and hear more oil draining into the pan stop loosening the canister, leave it there. Go inside and have a snack or do something else for a while, just let it drain.
Never again, we got the fix, Fumoto oil drain valve, sweet
I had my doubts about these but was just curious enough to buy one. Nice piece of work, quality stuff. Now I recommend them.Okay now remove the canister, with practice you can let it pivot between two fingers just as you lift it off so that the filter element is facing up and you won't spill a drop.
Remove the old filter element and O ring. I use a plastic letter opener to remove the O ring from it's groove, you don't want any scratches in the groove so a metal tool isn't the best idea.
Clean up the canister, I use Brake Clean and air pressure. Gas works to, but be careful< on second though, don't use gas it could somehow kill you or burn your house down or, just don't use it cause I'm not real sure who might be reading this then screw up and blame me.
Anyway here's my TIP for the day. Look at that canister, no I mean really look at it. Pay attention to those threads, now take your finger nail and trace those threads, is it kind of rough? You my friend have just discovered why it is so darned hard to tell when you have got the thing started when your putting the thing back on. Well, some of the reason why.
So I spent 15 min. of my day with some 220 grit wet & dry paper, cleaned and polished up those threads. You will see that they are cast, not cut threads. I polished the threads outer edge and folded the paper to get into the grooves, also pay attention to casting flash line smoothing that out too.
Clean the canister up again, don't want any metal particles getting into the engine. Install the new O ring that came with the OEM filter in the box on the canister. Now put some oil on the O ring, coat it good. I like to also put some oil around the hole's on the new filter element at both ends. Take the filter element and push it down on the tube to pre-fit it with a twisting action, on and off. Now with the canister on a firm surface with the black seal of the element facing you, press it into the canister with your palm, all the way in.
Secret weapons < shortie 1/2 drive ratchet, cut down craftsman 36mm socket.
Screw the canister back on, check to make sure you replaced the oil drain plug or closed the drain valve. Now fill with your favorite oil. Start your engine with the bonnet up and check for leaks, let it run a min. or two then check again. Motor on: grin:
I don't think all the attachments got uploaded, may have to patch this up


Thanks for going to the trouble to post this. With pictures & everything! I haven't changed my oil yet, not enough miles, but when I do your tip will certainly come in handy.
Chuck
I haven't changed my oil yet, not enough miles, but when I do your tip will certainly come in handy.Chuck

2nd Gear
Joined: May 2005
Posts: 109
Likes: 0
From: Scottsdale, AZ, USA
Here's a $7 socket that works on the oil canister.
http://www.autopart.com/TOOLS/TOOLSMAIN/tool/T_2574.htm
http://www.autopart.com/TOOLS/TOOLSMAIN/tool/T_2574.htm
for those lazy ***** like me that just want to get a 36mm socket locally
and get it done with, i had no problems using the standard craftsman
36mm (about 2in deep) 1/2" drive. i used the same long handle ratchet
norm shows on one of his picts above to get extra leverage to loosen
the filter cover.
the tip of the day from me is to line up the flat thread on the
filter cover at 12 o'clock, then screw the cover back on.
Originally Posted by gjpundsack
Here's a $7 socket that works on the oil canister.
http://www.autopart.com/TOOLS/TOOLSMAIN/tool/T_2574.htm
http://www.autopart.com/TOOLS/TOOLSMAIN/tool/T_2574.htm
VERY good find. Gr8 price.
Trending Topics
Joined: Apr 2003
Posts: 1,808
Likes: 2
From: Ellicott City, Maryland USA
Originally Posted by kenchan
for those lazy ***** like me that just want to get a 36mm socket locally
and get it done with, i had no problems using the standard craftsman
36mm (about 2in deep) 1/2" drive. i used the same long handle ratchet
norm shows on one of his picts above to get extra leverage to loosen
the filter cover.
the tip of the day from me is to line up the flat thread on the
filter cover at 12 o'clock, then screw the cover back on.
and get it done with, i had no problems using the standard craftsman
36mm (about 2in deep) 1/2" drive. i used the same long handle ratchet
norm shows on one of his picts above to get extra leverage to loosen
the filter cover.
the tip of the day from me is to line up the flat thread on the
filter cover at 12 o'clock, then screw the cover back on.
The canister doesn't have to be that tight, just snug, the O ring does all the sealing. I didn't mention it but if your having a problem with the O ring grabbing or tearing when installing the canister you could use grease to lube it. A little dab of wheel bearing grease goes a long way and is an accepted practice in other applications. By the way I save my used O rings just in case I'm down to my last filter and have a problem with the new one, you never know. If my kids find them, they will become bracelets, I'm sure.
A friend told me about a paint mark for alignment purposes of the canister, I could not find it. If you pre-fit every thing and clean up those canister threads there is very little resistance when starting to screw the canister on. If you take a little mirror and have a look at the base you will see a spring (I believe it is the oil bypass spring) that is the only thing your compressing.
The only drag I could feel was the O ring on the housing while I was screwing it down by hand.
Something else I didn't include was that I first drained the dealership oil and replaced it with Castrol 5w30w regular because it has a high detergent index. I ran that for 60 miles exactly to flush the engine. You would be surprised to see how dark it came out, I was. And of course, always change oil when it is warmed up to HOT.
"An ounce of prevention is worth a pound of cure" as my Grandmother used to say...


Originally Posted by chaincoopers
So I take it I'm not the only one thats ended up dipping into my profanity bucket when reinstalling my oil filter canister. I feel less stupid now.
but the thread would either not catch at all or catch in a cross thread
pattern. i wasn't sure if i had to put more pressure on it or not...but
anyway, being a lazy **** that i am, i just took my finger around the
opening on the block and felt for the flat part of the thread at the top...
then just looked at the case, aligned the flat part, and screwed it
back on.
 it was quite easy.
norm03s- the ~2" deep standard Sears 36mm socket works just fine.
it does get a tad tight just before the case is off the thread, but there's
so much play between the case and the socket itself that you can just
move it around and the socket will let go of the case.

4th Gear
Joined: Jun 2005
Posts: 350
Likes: 1
From: Princeton, NJ
Do some searching - you can find 36 mm sockets for much less than 20 bucks. I found the one I use for $4 on the web.
Originally Posted by MiniKJ
Has anyone tried using the 36mm "shallow" socket from MiniMania? I am considering buying one.

Neutral
Joined: Mar 2010
Posts: 1
Likes: 0
From: Florida
Cooling the canister worked!!
I never post but I am happy to report that I did the following and the oil filter canister came off vey easily after not budging one bit.
-ran engine for 15 minutes.
-turned car off
-sprayed the keyboard duster into the seam where the canister meets the block (I suppose) 4 sprays
-used my wrench and 36mm socket with a little extra torque via a galvanized pipe (24 in)
-Bingo!!!!'
Thanks for the suggestion!!!
-ran engine for 15 minutes.
-turned car off
-sprayed the keyboard duster into the seam where the canister meets the block (I suppose) 4 sprays
-used my wrench and 36mm socket with a little extra torque via a galvanized pipe (24 in)
-Bingo!!!!'
Thanks for the suggestion!!!

Thread
Thread Starter
Forum
Replies
Last Post
Kimolaoha
R56 :: Hatch Talk (2007+)
70
Jul 5, 2023 01:04 PM