When you click on links to various merchants on this site and make a purchase, this can result in this site earning a commission. Affiliate programs and affiliations include, but are not limited to, the eBay Partner Network.
N14/N18 High Pressure Fuel Pump teardown and refresh
Stock Problems/IssuesDiscussions related to warranty related issues and repairs, or other problems with the OEM parts and software for MINI Clubman (R55), Cooper and Cooper S(R56), and Cabrio (R57).
MiniToBe -- I saw your earlier question about gradual vs hard acceleration. In working with 3 different HPFPs on my Mini, hard acceleration is a guaranteed way to trigger the half-CEL and stumbling if the HPFP is at issue.
I say *if* because I have a new wrinkle in my own situation. I was hyperfocused on the HPFP because when I bought the car used, it was throwing all kinds of CCID and MIL-illuminating trouble pointed at the HPFP, and I had to beat/baby/cajole/bribe the car into getting through a drive cycle without throwing one in order to pass emissions. Now that I'm done with all that and have been troubleshooting HPFP #3 -- which normally has great fuel pressure and the ongoing symptoms sans-MIL weren't making sense -- I fell back to "ok, I already know this car needs a serious tuneup from other things I've noticed." Replaced the spark plugs, found 2 in markedly less than ideal shape (I'm surprised one of them was firing at all). That improved things a lot, but was still throwing CCID-029 if I pushed the car. Replaced the post-cat oxygen sensor, and things improved again. Then remembered to clear data (didn't have an MIL but there was still accumulated data to consider) and the half-engine light at startup didn't return. Hmmm. So I thought, "wait a minute, let me stop trying to push this car around, and just put it in 'D'" (I have an automatic). Also changed the pre-cat oxygen sensor as soon as it got delivered this evening.
So far, in normal boring "D" driving, the CCID-029/half engine light is not coming back. Had it occurred to me that the plugs and O2 sensors were out of whack on day one I would have knocked those out first and possibly gotten a different result.
What I may do is this -- I want to push the car around a bit more. Drive it in sport mode, then nudge it around while moving through the gears manually (which is how I had been driving it before getting the bright troubleshooting ideas). If it continues to behave, I can call the issue vanquished -- and then swap the original HPFP back in to get an apples-apples comparison before trying to rebuild it.
I replaced all three of those o rings, however I could not find any part numbers and used some out of a kit so not the best. What was interesting though was that the issue was worse after the o ring change. It could potentially be an o ring issue but there are valves inside I couldn't get to.
Also I didn't know what oil to use, I used normal engine oil lol it only needs a very small amount.
Another thing I found interesting was that when you get fuel leak in the system at idle, the car will run rich and create much more carbon. It is potentially worth ordering those correct o rings and going from there, if I can find someone to supply them here I will give it a shot.
I would love to know (1) what oil to use (or at least some recommendations and logic behind same), (2) how much oil the HPFP needs, and (3) where to put it, having not torn mine down yet.
TurbodTurtle, the O-rings I ordered from McMaster-Carr got here yesterday. Inexpensive and within the US at least, shipping seems to be pretty brisk. They won't ship to the UK?
The logic behind using the same oil as the engine as if there was a leak through me cocking it up in some way then I wouldn't contaminate my engine oil.
to measure, and this is in no way scientific, I added oil and pushed the plate on top and then kept removing a little oil a bit at a time until no more was forced out and it all remained with the pistons, I'd say engine oil is too thick though. What I pulled out was more fuel like consistency, very watery.
The oil only goes in the side with the pistons, the side with the o rings is the fuel side. You won't need to change the oil if you only pull apart that one side.
When I get a chance I'll talk to McMaster-Carr to see if they will ship here
to measure, and this is in no way scientific, I added oil and pushed the plate on top and then kept removing a little oil a bit at a time until no more was forced out and it all remained with the pistons, I'd say engine oil is too thick though. What I pulled out was more fuel like consistency, very watery.
The oil only goes in the side with the pistons, the side with the o rings is the fuel side. You won't need to change the oil if you only pull apart that one side.
That is *really* helpful, especially since I only planned to fiddle with the O-rings. Thank you!
Re the oil type -- I think the first poster used a racing oil and reported that post-reinstall, the HPFP was a bit persnickety but seemed to get smoother over time?
That is *really* helpful, especially since I only planned to fiddle with the O-rings. Thank you!
Re the oil type -- I think the first poster used a racing oil and reported that post-reinstall, the HPFP was a bit persnickety but seemed to get smoother over time?
I'd potentially look to use transmission oil next time, it's probably more suited to the application as it's designed to not be changed as often.
I'm going to email the links to a dealer in the UK and see if they can get matching ones. I'm also picking up another HPFP soon which is confirmed faulty, I'm quite interested to see inside that one and see if it differs to mine.
Well, I have an update: my in-car HPFP, which is the fourth to come into my possession (don't ask), purchased as "new" (aftermarket -- and a rebuild) via eBay and turned out to be from China being moved through a US warehouse, failed today in exactly the same fashion as the one that came with the car. Kept intermittently throwing a CC-ID 029, finally threw a pending P0087 that wouldn't stick, and a couple of starts/stops after that as well as some interesting occasional shuddering I recognized, the P0087 stuck for real and kept returning despite clearing codes. And then fuel rail pressure dropped below 100 psi at startup and stayed there (meaning: it dropped to the LPFP pressure).
Also as with the original:
(1) the first start of the day -- cold -- was really spotty and eventually stalled when I gave it gas; and
(2) after pulling the car off road, stopping it, letting it sit for a sec, and then giving it gas assertively right after starting to get the HPFP to bump its way up, it broke 600 PSI and with some feathering back down, stayed up. "For now."
One interesting note -- things seemed to get hinky as I emptied the fuel tank. Got pretty low, lower than preferred and lower than I normally would (still learning what "low" before it bloops at you really is on that fuel gauge), and it seemed to get pickier the lower the level went. I was in the red zone at fuelup with a projected range of maybe 55-60 miles, and when I started the car post-fuelup the HPFP clearly was not happy.
I also know my LPFP is not at issue. I replaced it with the genuine BMW MINI part months ago, before replacing the HPFP. New LPFP, same HPFP behavior, LPFP isn't the issue (barring one heck of a coincedence).
On this same trip I happened to have my original HPFP with me, and the O-rings I bought, intending to use a friend's vise to hold the HPFP in place to help get the screws off the pressure valve. So I did the rebuild, and I have pics for you.
I have NOT put the original HPFP back in the car. Obviously, I will. Tomorrow maybe.
Some notes:
(1) The bottom O-ring -- the blue one -- I don't have a replacement for that. It's a seal against the main body to keep fuel from coming out. There were never any signs of leak on this HPFP -- no liquid, no odor. That said, the ring is definitely showing its age -- it just felt wrong to the touch -- and it decided to take a trip through the air when I got the valve out. Good thing it was a very visible blue. Anyway, I would recommend figuring out what size this ring is and what to replace it with from McMaster-Carr's offerings. Eventually it's going to wear out so just replace it while you've got the thing taken apart.
(2) Getting the screws off was not hard. I expected more difficulty.
(3) Getting the valve off was not hard. Took some thoughtful, firm but nuanced wiggling and gentle twisting, but it came off. Actually, it kind of popped off. On reassembly, there's a point after you get it to rest just so where you just sort of pop it back down into place. Or at least mine did. Guess I'm going to find out if that was a good thing soon...
(4) I used petroleum jelly to lube all three O rings for replacement. Not a ton of it, didn't want any excess getting into any of the ports on the valve AT ALL.
(5) There is a ring made of some other material seated immediately below the topmost O-ring (top of the valve stem that is). That ring may be fragile. Mine definitely seemed fragile. It has a diagonal cut whose purpose I do not know -- and I thought I had damaged the ring until I realized that the cut was far too precise and deliberate an angle to have come from me prying the O-ring off. Main thing here is: BE CAREFUL. Until/unless you can replace that ring, complete with diagonal cut, damaging it is going to leave you really unhappy. See photos, you'll know it when you see it.
(6) In the photos you'll notice two things about the old O-rings. One, they are bigger. Squashed *and* stretched. Mine were not square-edged, they were donut-shaped, but you could feel that they were well past prime. The one that is broken in the pictures didn't get pulled apart. It *tore* apart, like slightly damp paper. The old rings were clearly toast. Again, see photos.
(7) There was no need to fiddle with oil here. There is oil in the HPFP, yes, but this sub-part clearly deals with gasoline and that's it.
Ok. Pics. These have their resolution lowered. If you want the full 3024x4032 uncropped versions let me know and I'm happy to share.
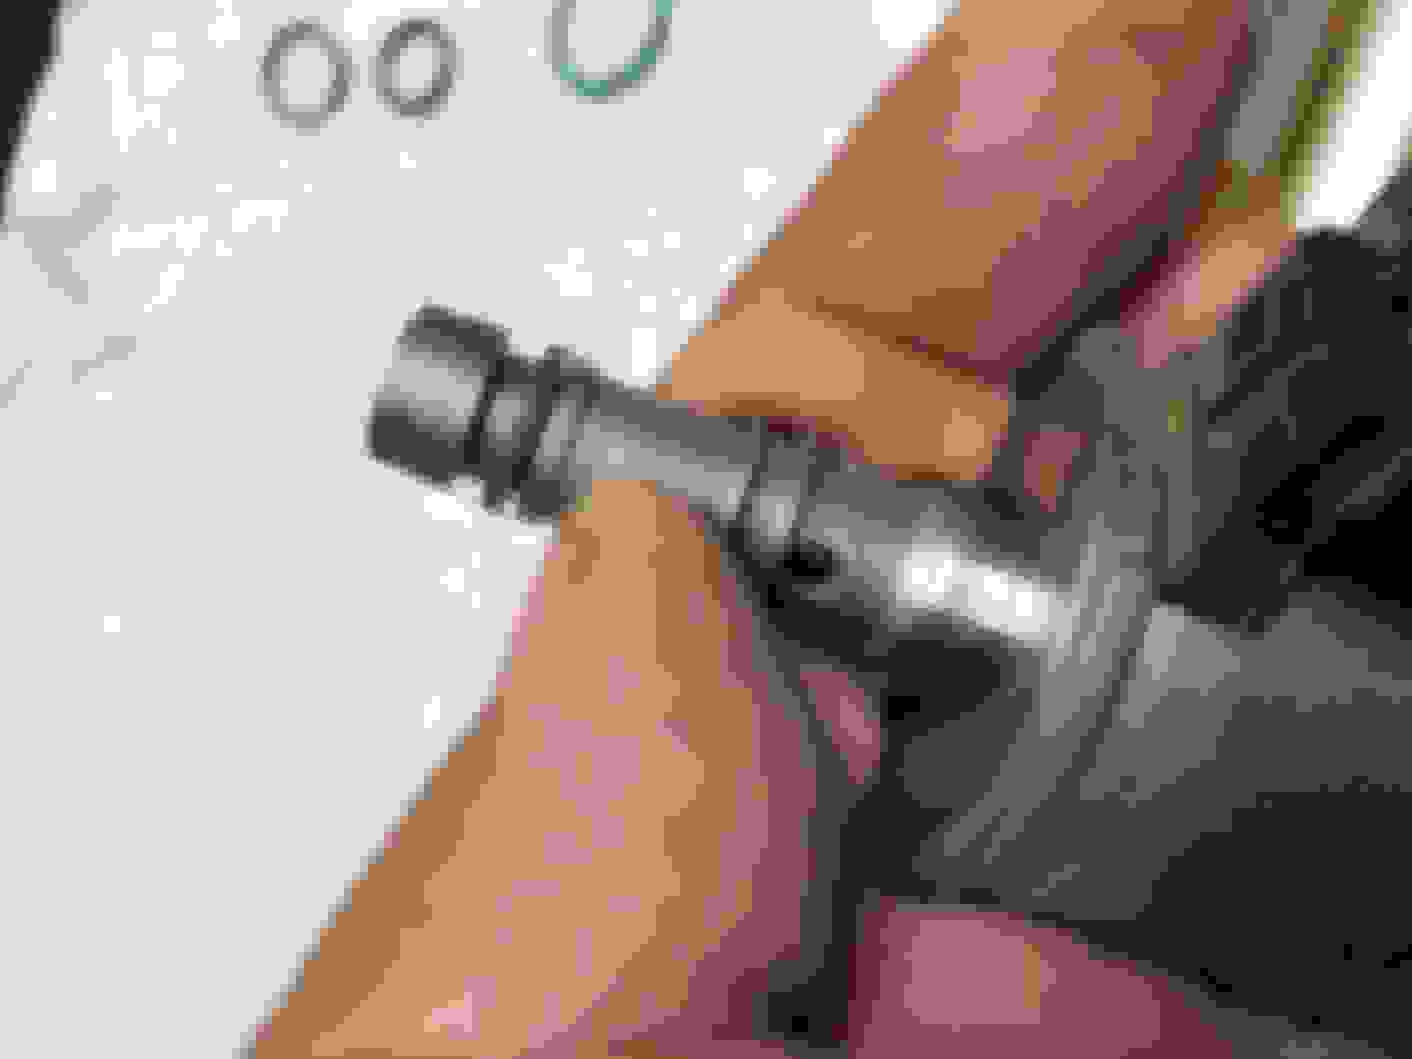
This is the hex bit used for the 2 screws holding the pressure valve together. Basically, used it with a t-handle screwdriver (gather whatever you need to make this happen, you get the idea). 5/32", perfect fit. The screws came out easily. I was expecting to have to use a ratchet but it wasn't needed.
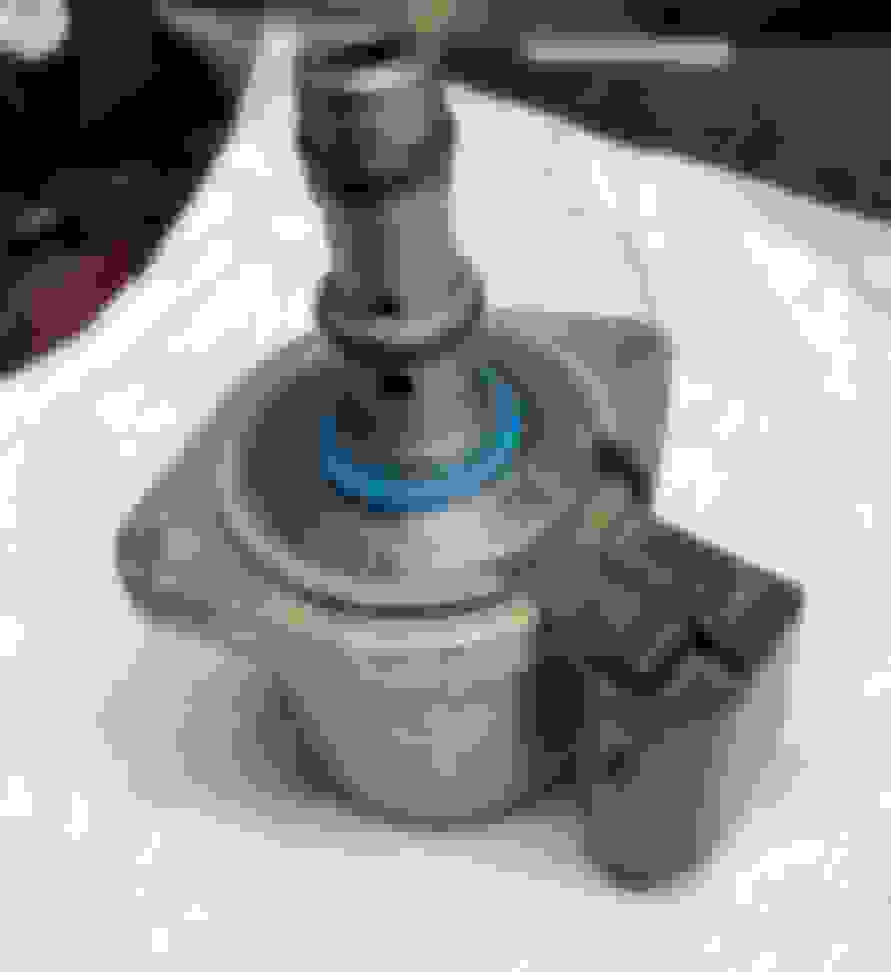
The valve after removal from the HPFP. Note its collar is not sitting flush where it is when installed. It is not a molded part of the valve, and comes off pretty much all by itself. Also note the visibly mashed-donut-looking blue O-ring. I did not replace it but it was visibly worn. If someone with the needed background can figure out the right part to buy, let us know here in the forum... also note the small unknown-material ring immediately below the topmost O-ring. Presume that it's fragile! See later shots.
Another view of the valve. Googled that number on there and didn't turn up much. May need to Google harder, or it may be a serial number.
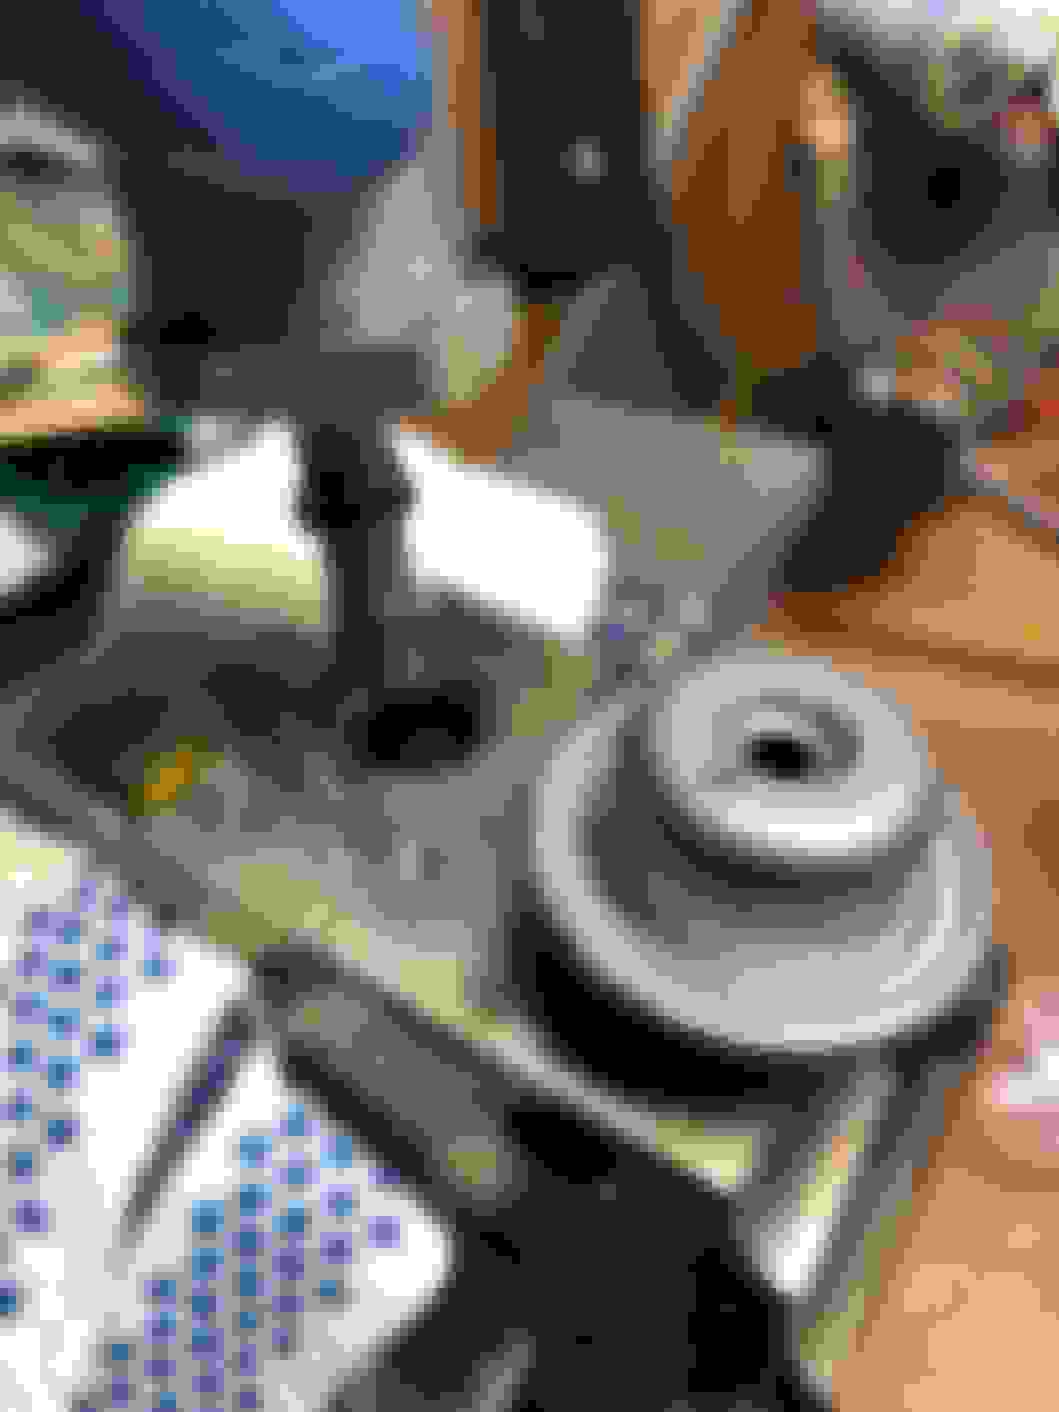
Where that valve inserts into, view #1.
Where that valve inserts into, view #2.
The seals from McMaster-Carr. 2 sizes. These are for the black O-rings. You'll know which one goes where because... 2 sizes. See prior post by geofox784 for the links. USD $5 or so per bag and you get 25 rings in each. You won't need all 25 of each, they go on easy.
The collection of stuff. Leftmost black rings are the larger ones (they go midshaft). Rightmost black rings are the smaller ones (they go on the top of the shaft). Note the old torn ring. It pretty much just... tore. Not much elasticity or strength in any of the old rings.
View 1 of 2 of the unknown-material ring that sits below the topmost O-ring (see prior photos). Note the diagonal cut. Clearly by design. Also very fragile. Be very gentle when you remove the O-ring that this shares space with, lest you break/tear its not-O-ring partner.
View 2 of 2 of the unknown-material ring that sits below the topmost O-ring (see prior photos). Note the diagonal cut. Clearly by design. Also very fragile. Be very gentle when you remove the O-ring that this shares space with, lest you break/tear its not-O-ring partner.
New black O-rings (and original blue one) in place. I used petroleum jelly to lube up all 3 rings -- coat them, wipe off ALL the excess so it doesn't get into those tiny ports, and install. If your blue ring is like mine it will just drop into place, requiring no stretching (better idea is to get a replacement, yikes).
Closer view post-O-ring-install. Note the holding collar, back in place. It's not a press-fit, it just sort of parks there and will be secured by the 2 screws anyway.
Reinstalling the valve. Just lowering it into place gently until there is resistance.
Reinstalling the valve. There is friction with the O-rings here. Applying gentle pressure, not forcing it. Don't want the O-rings to roll, crack, other. But clear that the O-rings need to be lubricated as noted, not dry, unless you want to take some risks here.
Reinstalling the valve. There is friction with the O-rings here. Applying gentle pressure, not forcing it. As noted, don't want the O-rings to roll, crack, other.
Last push before the valve bottoms out, requiring pressure to get it fully inserted.
Figured I'd get this shot so you can see how it rests in place, before getting a final push. You'll know this resting spot when you feel it. Note that the valve is aligned so that all you have to do is get it seated and then put the screws back.
After giving the valve a push with my thumb. It pops right into place. Insert and twist the screws down by hand. As far as torquing them down, this is a by-feel thing. Personally, I think we need a torque spec so as to neither strip the threads nor set up a fuel leak -- but I do not know how to arrive at/determine that spec. Chime in, folks.
Tomorrow (hopefully) I'll install this rebuilt HPFP.
Awesome photos. I can't wait for the results. All that should be needed to find the blue ring size is a set of digital calipers.
Do you think that blue color signifies a different material than the black ones? It's functioning as a gasket, getting squashed between the valve and the main body for a full seal, so it's got me wondering.
Do you think that blue color signifies a different material than the black ones? It's functioning as a gasket, getting squashed between the valve and the main body for a full seal, so it's got me wondering.
I'm sure it does, but it seems like you can't go wrong with just using another Viton ring.
When i was going crazy with my countryman and trying 3 hpfp, i came to the realization that my fuel rail pressure sensor was out!
I suggest replacing that one too. Who knows, you might have 4 or 5 good working hpfp ;-)
Hadn't thought about that! Good call! Off I go to find the part number...
EDIT: Do you have a part number I can at least use to dig out a diagram/cross-ref? Or did you replace the entire fuel rail, pressure sensor included? Might be this... https://www.aliexpress.com/item/Orig...666093403.html
EDIT 2: Looks like they don't sell the part separately from the fuel rail in the US (!), but found this in the UK. Have to see if I can get a visual from my Mini to validate the part number but this looks to be it: https://www.ebay.com/itm/BMW-MINI-CO...W/251566932742
The sensor is not sold separately. I would be concerned that the part you linked is just someone removing it from a used car to sell. It may be impossible to find the proper seals for it and torque specs. Keep in mind you are dealing with almost 2000 PSI of fuel. If that fails you are looking at a very quick engine fire.
The sensor is not sold separately. I would be concerned that the part you linked is just someone removing it from a used car to sell. It may be impossible to find the proper seals for it and torque specs. Keep in mind you are dealing with almost 2000 PSI of fuel. If that fails you are looking at a very quick engine fire.
Good point, unfortunately. Well, that fuel rail+sensor being close to $400 USD, I guess I'm going to stick with original plan to get the rebuilt HPFP in first and see what it does. Probably for the better -- it will give me an apples to apples comparison, so even if it flunks, I'll have multiple same-behavior HPFPs and can move to the fuel rail+sensor to see if it fixes both.
Thanks for all the input. Very much appreciate it.
Change in plan -- given the 2000PSI question, my lack of changeout of that bottom o-ring -- which is the last seal between gasoline and the open air -- and the lack of torque spec on the 2 screws holding the pressure valve in place, I decided it best to proceed as follows:
(1) Size that O-ring and get a replacement in. Gonna take a few days to get that part in.
(2) Ask you guys what you think I should torque those two holddown screws to. Suggestions?
Separately, my Mini is P0087-ing at startup as a matter of routine now at cold start, and at warm start it's being finicky too. Even managed to throw a misfire on a cylinder while it was fuel supply kvetching. I can get it to behave (usually) by revving the engine immediately at start to get the reported pressure up into HPFP-normal range -- once that's done it will stay stable for even long rides, without even throwing a CC-ID 029 as long as I don't push it -- but it's telling. The consistency of this misbehavior across three separate HPFPs, 1 originally on car, one randomly acquired, and 1 relatively new doesn't add up if the HPFP is the sole or even central issue on my Mini. I think MiniToBe's hunch about my fuel pressure sensor is correct and am now planning to replace it (by way of replacing the fuel rail, which includes it).
In the meantime, let me know your thoughts about those holddown screws while I get the last o-ring in. The upside of all this fighting with the car is that it's telling me the HPFPs are behaving in an apples-to-apples way whether the o-rings are old or new, which in turn tells me I have variables in play in addition to the HPFP itself.
Change in plan -- given the 2000PSI question, my lack of changeout of that bottom o-ring -- which is the last seal between gasoline and the open air -- and the lack of torque spec on the 2 screws holding the pressure valve in place, I decided it best to proceed as follows:
(1) Size that O-ring and get a replacement in. Gonna take a few days to get that part in.
(2) Ask you guys what you think I should torque those two holddown screws to. Suggestions?
Separately, my Mini is P0087-ing at startup as a matter of routine now at cold start, and at warm start it's being finicky too. Even managed to throw a misfire on a cylinder while it was fuel supply kvetching. I can get it to behave (usually) by revving the engine immediately at start to get the reported pressure up into HPFP-normal range -- once that's done it will stay stable for the ride as long as I don't go crazy -- but it's telling. I think geofox784's hunch about my fuel pressure sensor is correct and am now planning to replace it (by way of replacing the fuel rail, which includes it).
I don't have a hunch about the fuel pressure sensor. That was somebody else.
I doubt the O ring is seeing the high pressure side of the pump.
If anything is causing the bad HPFP one after another its the LPFP not giving enough PSI, just a guess.
I don't have a hunch about the fuel pressure sensor. That was somebody else.
I doubt the O ring is seeing the high pressure side of the pump.
If anything is causing the bad HPFP one after another its the LPFP not giving enough PSI, just a guess.
Re sensor -- woops, that was MiniToBe. Edited/corrected. Thanks.
Noted re the O ring. Sensible conclusion.
Re possibility of a bad LPFP, I actually replaced the LPFP with the genuine BMW MINI part as part of my troubleshooting, before twice replacing the HPFP. And I've been watching the reported fuel rail pressure like a hawk with every change, including pre-crank and in limp mode (where the only pressure you get reported is the LPFP pressure). Old LPFP and new LPFP report the same way down to some pretty serious nuancing, so I've either got a heck of a coincidence or both LPFPs are fine. The common ground that all the complaints my Mini has had, no matter what I change, is the P0087. Two LPFPs, three HPFPs, and while with some components it is less frequent, once it settles in it's apparently around to stay in some form.
Aside from the 2 pumps, the in-tank filter (replaced), fuel lines in the vehicle, the fuel rail itself, the fuel pressure sensor, the computer monitoring and controlling it all, and the electrical connections themselves... I can't think of anything else that would be an obvious cross-check?
The original HPFP is now back in the Mini. Initial startup was stumbly as heck, as expected -- but held. Didn't stall out.
Then cleared the codes, turned the car off and back on, and did some drivearound. Maybe 10-15 minutes including highway. Stopped the car at least 3 times altogether to clear the check engine light, re-baseline, you get the idea.
Fuel pressure just wasn't budging. Wouldn't top 100 PSI.This was improved from this HPFP's pre-rebuild behavior, which tended to float in the high 70s, but I was about to give up. It didn't crack into normal range even once. Half-engine light kept coming on shortly after starting without even putting the car in gear. Even after the expected stumbles from getting air out of the fuel line square, pressure stabilized, all the usual stuff, it just wasn't cooperating.
And then, after the last stop/clear/turn off/start engine...
Someone replaced my Mini with another Mini! :
Hey... I think that was my turbo!
That last one was captured when I... got tired of someone tailgating me.
I have *never* seen *any* HPFP on this car tap 1700 PSI. This one did. And I actually felt the turbo kick in for *real* for the first time since I bought the car used in August.
The half-engine light (CC-ID 029) has NOT come back. The check engine light has NOT come back. I have pushed the car around, including flooring it and moving it up through the gears (auto, Steptronic) manually -- doesn't skip a beat. I was driving for nearly an hour and a half end to end.
I've got the car parked outside -- temps are in the 20s -- we'll see how cold start does in the AM.
I'll post more observations and details later but I wanted to say: HAPPY NEW YEAR! We got something here!
This is amazing, but before I get excited... let see how it holds after a week or so. Looking VERY good.
Right there with you. Historically it has taken a few days to get weird(er). That said, the baseline for this combination -- meaning this Mini and its original HPFP -- it has never done this even momentarily. From that alone I would say the rebuild has at least accomplished some level of reconditioning.
I'll post in the AM after a cold start, and will also recap the replacement -- had some observations about the "new" HPFP that I yanked out, it's got visible problems.
More to come! And big thanks to everybody in the thread!


 Anyway, I would recommend figuring out what size this ring is and what to replace it with from McMaster-Carr's offerings. Eventually it's going to wear out so just replace it while you've got the thing taken apart.