When you click on links to various merchants on this site and make a purchase, this can result in this site earning a commission. Affiliate programs and affiliations include, but are not limited to, the eBay Partner Network.
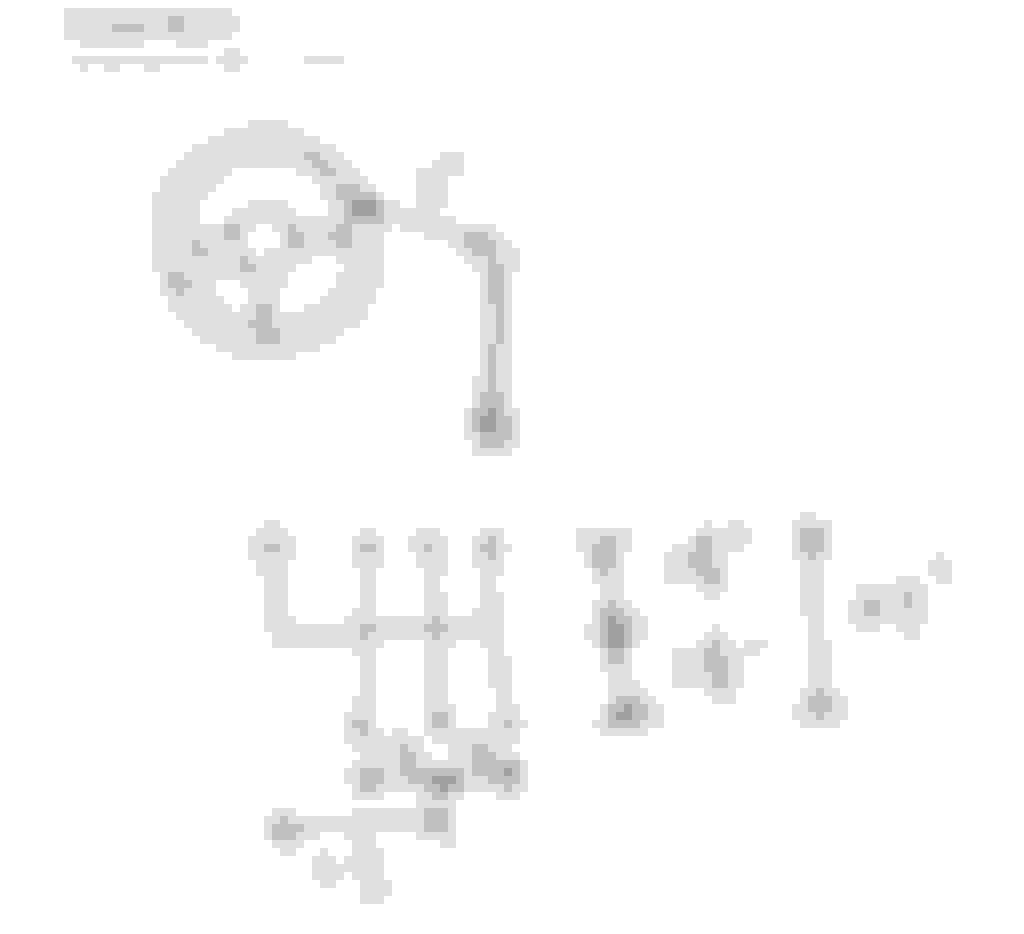
So what is the appeal of the long shifter when others go with a short shifter? What is the ring just below the **** used for? Does this lock the shifter in place?
I have taken a few short trips since installed the new shifter. I left the sound system off in all these drives and I didn't realize that affected my perception of the shifter in a negative way because of the increased road and drivetrain noise since there is no console on the floor as well as the shifter boot. Tonight I went for a short shopping trip and I listen a few tracks of Mills Davis set at moderate volume. What a difference that made. I was trying too hard to get the impressions of the new shifter before.
Tonight I was more relaxed and just paid attention doing the driving during the increment weather. I enjoyed the clear definition of the gear positions as well as the hard lateral stops. It is more race car all business like. It is like the installation of the Milltek exhaust. An incremental step of rawness and connectedness without ruining the good things. The trip gave plenty of opportunity running through the 4 lower gears up and down. With the sound system on, I can get a feel of how the shifter will feel like once the console pieces are reinstalled. I know I would want to fabricate a gear shift boot for it as oppose to leaving the mechanism exposed like most owners have done.
Wow perfect.
Now I have to start dream.
My mini (little booger) needs one of coolworx toys to play with.or my other s after a good detail...but wait mine is tiptronic lol
Ben
Wow perfect.
Now I have to start dream.
My mini (little booger) needs one of coolworx toys to play with.or my other s after a good detail...but wait mine is tiptronic lol
Ben
Funny man. I sincerely hope your "other S" has a Doppelkupplung (aka PDK) instead of a Tiptronic. I thought Porsche had Tiptronic in the air cooled era only.
Mine is not an S so no Doppelkupplung was offered. I'd liked to think PDK is for amputees. (please don't ban me for this not so PC joke)
For completeness sake I went and measure the fore/aft throws as well as the lateral displacements. I was a bit surprised that the lateral displacement for the forward gears are not tighter than the stock shifter based on my visual inspection of the dogleg arm ratio plus the longer outrigger arm that actuates it.
For throw displacements. It is easy to think shorter is good, and a lot shorter must be better. No. They should be balanced with shifting effort and tactile feedbacks. I did a lot more driving yesterday and I have to say the shifter increases the fun factor of the already very fun Mini another notch or two. Barring any unanticipated issues I am ready to begin plastic surgery on the floor console and the trim rings.
what I didn't anticipate is the base piece (right) also need to have a notch cut out where the mounting screw holes for the consoles fore section fastens to
I begun the disassembling of the floor console. The trim rings came off without much fanfare. I am very impressed with the design and material of plastic trim parts. In some other autos that I worked on, something bounds to break whenever you mess with them.
the key is to unclip one barb at a time; noticed the texture consists of a dense colony of amoebae - so cool
this CAD template is only somewhat useful to do a rough check of how much I need to cut the main piece
Measure 3 times and cut once. As I more carefully think through as well as looking more closely the features of the shifter base and the two plastic console pieces I realize the cuts on the base support does not need to be one big rectangle slot. Rather two narrow slots will clear the steel frame of the shifter base. The console however would be hard to avoid cutting a big chunk out. I might try a complex cut to obscure the butchered appearance. One can play some tricks with the cup holder trim rings and the large circular shifter trim ring. I am taking one small step at a time. I think I will use the Fein Multimaster for the job. Before I start cutting there would be measurements done more than thrice owning to the 3 dimensional nature of the beast. Failure is not an option.
the best that I can estimate now the extend of the cut into the cupholders; I want to do my best to preserve the two fasteners but that may not be possible; I can still relocate them well within the cup holders
Long before I plan how to make these cuts I search the web. One one has taken any photo of their WIP installation of the CoolerWorx or CAE shifter on the modification of the plastic pieces. Even the finish photos are not too useful except to give some rough idea how much area of the cup holders is lost.
Last edited by pnwR53S; 03-27-2018 at 07:58 PM.
Reason: change photo
I gathered some courage and just do it. Because of the difference in elevations of the planes you cannot just scribe out where the cut lines are. It took a lot of eyeballing and recheck countless times before I felt comfortable to make the first few cuts.
I made the small cuts at the two intended slots first
well it turns out the two narrow slots were not enough because of the diagonal brace at the front vertical plane of the shifter base
I then try to cut an angle but still didn't clear the base
it would turn out I had to cut out this whole notch
Only after cutting the notch and able tilt it in that one can see any other cut would just be futile.
Once this support base is cut it can be use as reference to know where to cut the console. It is still not going to be a breeze to properly transfer the cut lines in 3 dimensions.
The most challenging steps are over. Finished trimming the console. The process is best called cut and then file to fit as there are compound angles. I managed to retain all 4 screws holding the plastic console down. That is a major relief. There is not one mm of space to spare. I have to say I am impressed with the dimensional tolerances of the CoolerWorx shifter.
Taking an intermission as I want to take the opportunity to fit the wideband O2 gauge and route the cable harness utilizing the shifter's metal cable cassette. I also want to fabricate a dual position gauge pod like the NLA JCW one. Much easier to do CAD work while the console and the center downtubes are out.
I haven't decide how to route the reverse lockout cable - hinges on how the dual gauge pod design; I also haven't tackle cutting the trim rings yet
the towel is to muffle the road noise; it isn't bad (without the shifter boot) unless the road is wet
Mini is drivable. Just no reverse lockout, just like stock.
I purchased my CoolerWorx from the US seller. I first contacted him that I would organize a group buy here at NAM. He told me to send him an email and I did with my thought and suggestion with quantity breaks increments. Days would go by and he never follow up. I would soon resign that it would be a waste of my time. I contacted the Canadian seller about taking advantage of the remaining stock he has. Instead of passing me the saving, he initiated a group buy on Fartbook and gave me song and dance that the US seller drop ship from Lithuania, and that there will be import duty. I knew right away that is BS. I immediately went order one from the US seller.
The problem with the US seller is, he does not have his acts together. He is not responsive to inquiries nor do what he promise. Nonetheless I decided to give him a chance as the price is right compared to the "group buy" price schedule of the Canadian seller. After my order almost a week had gone by and I have no shipping update. Could it be a scam? I was not too worry as I never lost a single cent with internet purchase - including my Mini sight unseen.
Cut to the chase, I finally got an update from him that my shifter was on the way. Again he lapse in sending the shipping update as he promised. Only upon my pressing that he belatedly sent it. A few days later the shifter arrived. Of course there is no import duty as the Canadian seller tried to BS me. I must came across as a 3-years old on FB.
Why do I type all these. Well, I grudgingly order mine from the US seller's crappy website which does not give me the option of color of the **** or cable jacket color (which I don't care for). I would have picked like an orange color **** for visibility. With all the colors you can choose as long as it is black, now I am very happy that it is black. My original thought that orange may be easier to see in the dark is totally unfounded.
If you have to look for the shift **** in the dark, you should drive an automatic. I never care for in-your-face embellishments and now I am glad it is all black that is in keeping of the understated interior decor. May be I would try to put an LED on top of the shift ****.
Tired of wasting time looking for the JCW twin gauge pod, I spent a bit of time making the first cut of CAD model to make one with my 2 hands. With the aid of the rubber coin tray got the initial rough trace of the triple curve bottom.
If you never seen one of this gauge pod first hand, it is tiny. Measures about 6.5 inch wide by 4.75 inch tall.
I desperately need a home for this wideband A/F gauge
this is the intended home for the gauge pod
the rubber pad makes the initial rough shape easy
the middle lob needs to be deeper
pulled out the trusty French curve
the middle lob is a bit too deep
I am pondering my options as to what material to fabricate it with:
3/8" plywood - easy but provisioning of anchor points is not ideal
fiberglass - harder and messier and involves cutting, sanding, and finishing
sheet aluminum - a bit harder than plywood, but easier to provision anchor points
Have you looked into using a crafting thermo plastic? I have been debating picking some up to see how resilient it is, I know alot of people use it for costume design which leads me to believe it could be durable and easy to work with.
Have you looked into using a crafting thermo plastic? I have been debating picking some up to see how resilient it is, I know alot of people use it for costume design which leads me to believe it could be durable and easy to work with.
Interesting. I am only aware of the acrylic plastic of old where people do heat forming. The problem with making something that is symmetrical and uniform shape nearly always involves a mold of sort. Making costumes gives you a free rein that uniformity is not much of a concern.
I know I can craft something very good only if I am willing to invest the time. Here is a gauge panel that I made out of fiberglass using CAD/CAM (cardboard aided design/cardboard aided manufacturing).
I used everything I have at home. Never went to a store. It repurposed the heater air vent opening for a battery power gauge. It involves compound angles. I could easily made it out for carbon fiber for appearance.
a problem statement - what to do with the gaping hole left by the defunct air vent?
I made a simple cardboard mold
the one on the left was made using a part sorting tray but didn't have the right dimensions
I painted it with a left over spray bomb so the color wasn't deliberately chosen
This made the choice easy. Scanning the garage and this sheet AL was taunting me. Use me, use me, it shouted. Track days are coming up fast and furious.
Me, ain't got nu'thin to noose. Yo no what I am saing?
A bit of CAD/CAM magic, and design on the fly the JCW (Just Copy Werk) twin gauge pod is taking shape.
The sheet AL is a bit thin but it is what I have, and I don't feel like putting a ton of effort into it. I have thicker stock but not wanting to use it for this. Also being a quick CAD the dimensions and design needs to be proven first. Once I test fit it, I might wrap it in fiber glass, or even CF to add to the featherlight look.
ready to transfer the CAD database
I vaguely thought of needing these two tabs for fastening the base to the console
being so thin it was hard to cut with a saber saw; I bent a top corner
as the JCW gauge pod will be tilted making it difficult to tighten the two screws at the tabs, my idea is to cut two small slots into the console so it can be tipped in
next is to bore our two 52mm holes for two gauges; though I might just do one for now as I have not decided what the other gauge would be; a fun-O-meter might be in order
One thing that I only just realize, with CAE or CoolerWorx shifter, you cannot reinstall the console after the shifter is mounted. Instead you have to test fit everything like I have done, and then re-install the console and follower by the shifter. Precision, precision is the password. It is the price we pay for fun.
One thing that I only just realize, with CAE or CoolerWorx shifter, you cannot reinstall the console after the shifter is mounted. Instead you have to test fit everything like I have done, and then re-install the console and follower by the shifter.
These statements might be wrong. While how you slip the console onto the shifter would be a lot more constrained with these two long shifter than the stock one, there might just be enough space to maneuver the two downtubes and foam spacers into place. I haven't try as the silver paint on the downtubes scuffs up very easily.
I plan to drill a hole into the driver side cupholder to route the reverse gear lockout cable. Each time you remove the console you have to unhook the cable, and you have to renew the cut end of the steel cable as it is crushed by the fastener. You will lose about 7mm each time. You know what I am referring to if you wrench your own bicycles.
I am pretty sure it is just a common bicycle derailleur cable so I plan for the replacement of this consumable. Scrounging feaBay I found 2 for just under $1 USD shipped from HK so two is on the way in slow boat from Asia.


 03-21-2018, 05:34 PM


 I sincerely hope your "other S" has a Doppelkupplung (aka PDK) instead of a Tiptronic. I thought Porsche had Tiptronic in the air cooled era only.
 I'd liked to think PDK is for amputees. (please don't ban me for this not so PC joke)