R59 Interior Changes


Thread Starter
|
1st Gear
Joined: Mar 2015
Posts: 30
Likes: 0
From: Tun Tavern
Interior Changes
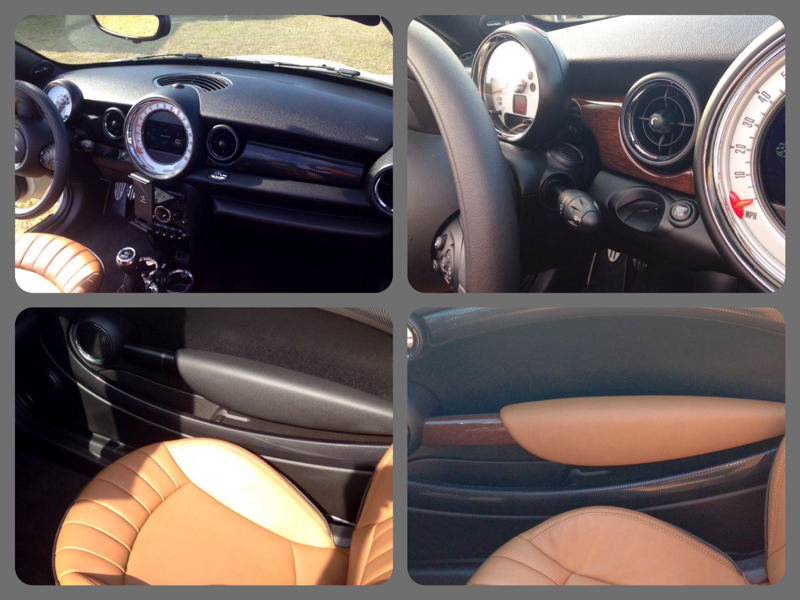
I've had the car a week now. an absolute BLAST! I ordered the wood dash and door handles last night (thanks ECS Tuning). I also ordered Toffee Arm rests to replace the black ones I have and to match the currently installed seats. What I didn't order was the "COVER, DOOR TRIM PAN" $505 for four pieces of plastic!  I'm not saying I won't end up purchasing them, just not today. I really need a better education before I spend that money.
Here is what I have now.
I am trying to change out the black checkerboard inlays (or what MINI Parts calls COVER, DOOR TRIM PAN) with Pepper White to match the exterior of the car. I also think it will go well with the new pieces I ordered.
I found the part numbers for these pieces (all four of them), so I know that in theory it is doable, but that doesn't mean that it's a good idea! I have watched lots of videos that go into removing the door panel, but I can't find anything on removing these inlays. Is it realistically doable, or did I just save myself a $500 headache?
I also debated about ordering paint from Sherwin Automotive and having somebody who knew what they were doing paint these pieces. I figure this would be a lot cheaper than $500. Of course, I would still want to remove them first, which puts me back at my previous question - is this doable? Does anybody have experience with painting them? I would rather pay $500 and have them look right, then try to save a couple of hundred dollars and have them look like crap after a few months..
If anybody has any input or thoughts, I would appreciate it.
Better yet, if you have Pepper White ones you want to trade...
I'll post pictures of the new interior once the parts on order get in and are installed.
-Semper Fidelis
I'm not saying I won't end up purchasing them, just not today. I really need a better education before I spend that money.Here is what I have now.
I am trying to change out the black checkerboard inlays (or what MINI Parts calls COVER, DOOR TRIM PAN) with Pepper White to match the exterior of the car. I also think it will go well with the new pieces I ordered.
I found the part numbers for these pieces (all four of them), so I know that in theory it is doable, but that doesn't mean that it's a good idea!
I have watched lots of videos that go into removing the door panel, but I can't find anything on removing these inlays. Is it realistically doable, or did I just save myself a $500 headache? I also debated about ordering paint from Sherwin Automotive and having somebody who knew what they were doing paint these pieces. I figure this would be a lot cheaper than $500. Of course, I would still want to remove them first, which puts me back at my previous question - is this doable? Does anybody have experience with painting them? I would rather pay $500 and have them look right, then try to save a couple of hundred dollars and have them look like crap after a few months..
If anybody has any input or thoughts, I would appreciate it.
Better yet, if you have Pepper White ones you want to trade...
I'll post pictures of the new interior once the parts on order get in and are installed.
-Semper Fidelis


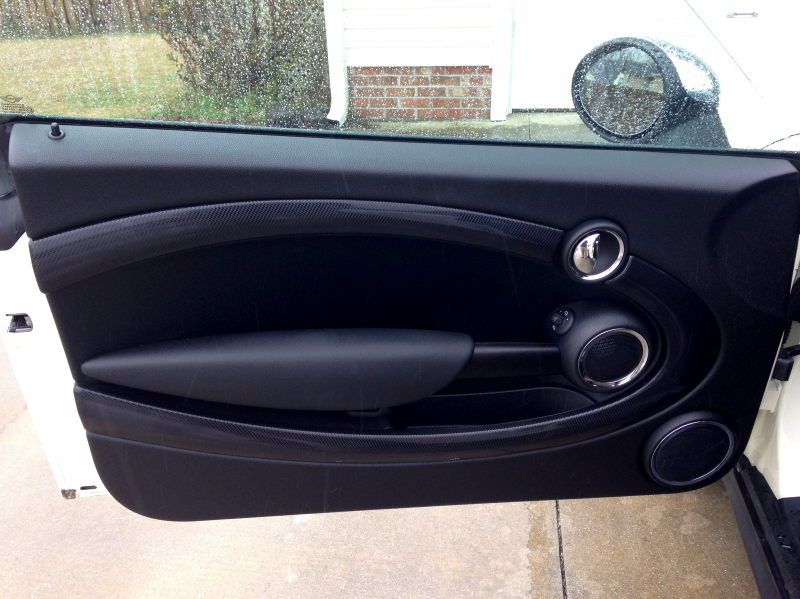
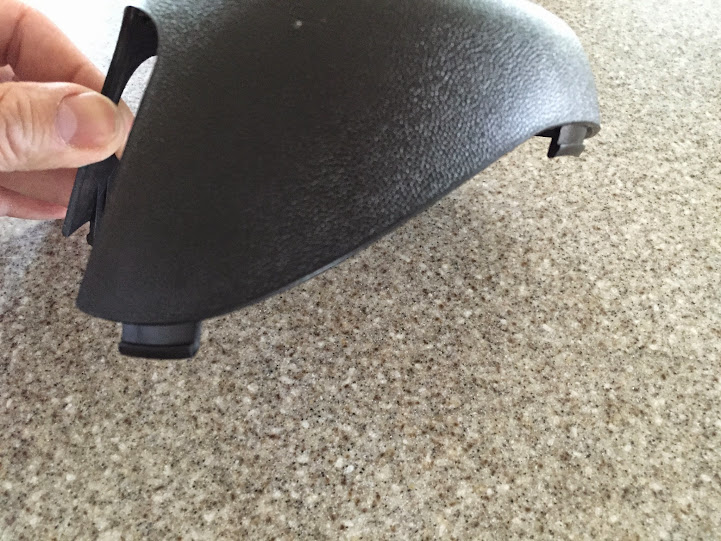
I had the checkerboard pieces and I replaced mine with piano black. It is actually easy to remove the door panels. Remove the puddle light, the trim around the interior door pull, then pry off the door panel. I do recommend getting a generic trim removal kit. This can be ordered from ECS.
The pieces that you want to replace are heat staked on (they melted the plastic mounting posts to form a rivet). You have to drill them out to remove them. It's plastic so it's easy. Just a warning... do so will make it impossible, or nearly so, for them to be reinstalled so no you can't take them off to be painted. To install the new ones, I used push nuts and epoxy on the plastic mounting posts (that are supposed to be melted to form a rivet). Got the push nuts at a local hardware store for like $0.15 each. I used epoxy only on the push nuts to make sure they didn't come loose or rattle. They are fastened on as good if not better than factory.
Warning, when you pull the door panel off, be careful not to knock the door lock plunger rod off, it is a bear to reinstall, ask me how I know, lol.
I also replaced the speaker grill will the chrome line. They are also heat staked on. I used #4 sheet metal screws to reattach the new ones.
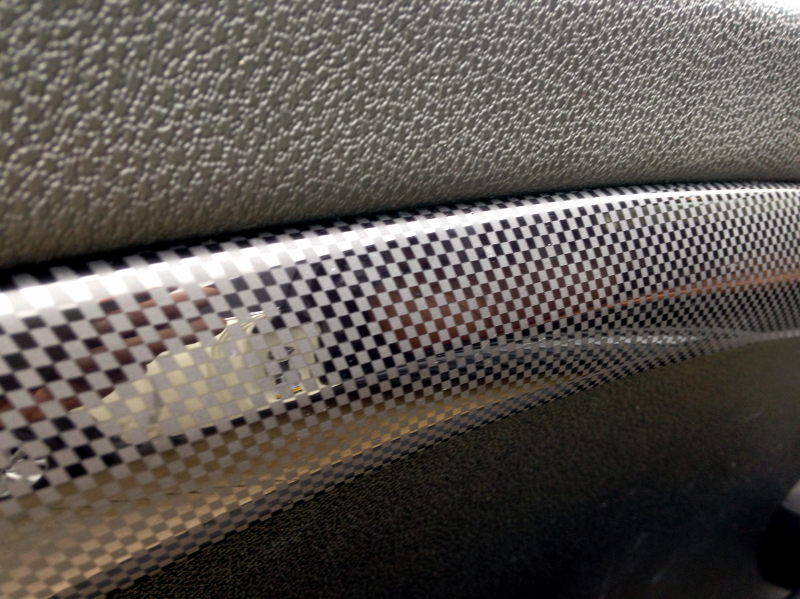
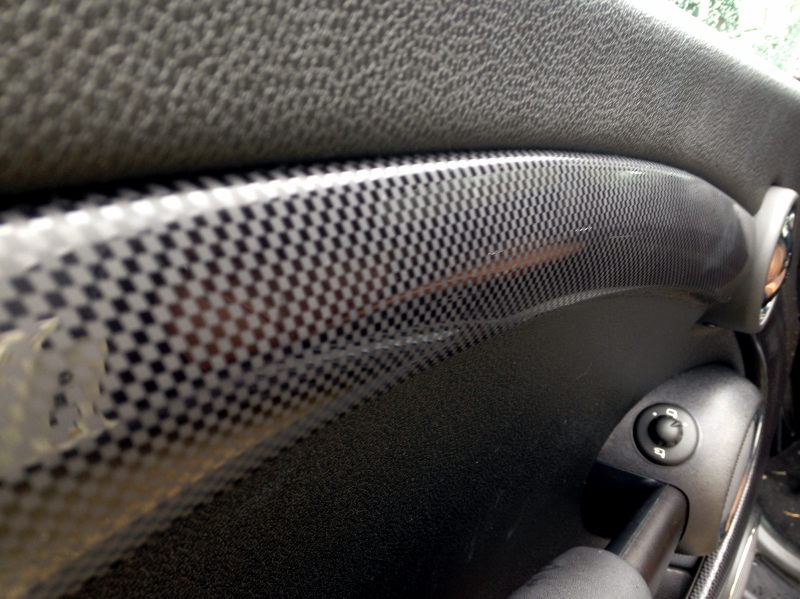
Here is a picture of the back side.

The pieces that you want to replace are heat staked on (they melted the plastic mounting posts to form a rivet). You have to drill them out to remove them. It's plastic so it's easy. Just a warning... do so will make it impossible, or nearly so, for them to be reinstalled so no you can't take them off to be painted. To install the new ones, I used push nuts and epoxy on the plastic mounting posts (that are supposed to be melted to form a rivet). Got the push nuts at a local hardware store for like $0.15 each. I used epoxy only on the push nuts to make sure they didn't come loose or rattle. They are fastened on as good if not better than factory.
Warning, when you pull the door panel off, be careful not to knock the door lock plunger rod off, it is a bear to reinstall, ask me how I know, lol.
I also replaced the speaker grill will the chrome line. They are also heat staked on. I used #4 sheet metal screws to reattach the new ones.
Here is a picture of the back side.
Thread Starter
|
1st Gear
Joined: Mar 2015
Posts: 30
Likes: 0
From: Tun Tavern
Cerenkov,
Thank you for the reply. This has been extremely helpful. I did order a set of trim tools when I ordered the new dash.
So - was it worth the work? At this point, I think the cost is the most prohibitive factor. I've been looking on eBay, and I have found some complete indoor panels for $100-$200. Not in the color I need, but at this point, I'm tempted to give it some time and see what I want becomes available. Who knows - I might save a few bucks AND some time.
At least I feel better about not ordering the inserts yesterday.

I've had the car a week now. an absolute BLAST! I ordered the wood dash and door handles last night (thanks ECS Tuning). I also ordered Toffee Arm rests to replace the black ones I have and to match the currently installed seats. What I didn't order was the "COVER, DOOR TRIM PAN" $505 for four pieces of plastic! I'm not saying I won't end up purchasing them, just not today. I really need a better education before I spend that money.
Here is what I have now.
I am trying to change out the black checkerboard inlays (or what MINI Parts calls COVER, DOOR TRIM PAN) with Pepper White to match the exterior of the car. I also think it will go well with the new pieces I ordered.
I found the part numbers for these pieces (all four of them), so I know that in theory it is doable, but that doesn't mean that it's a good idea! I have watched lots of videos that go into removing the door panel, but I can't find anything on removing these inlays. Is it realistically doable, or did I just save myself a $500 headache?
I also debated about ordering paint from Sherwin Automotive and having somebody who knew what they were doing paint these pieces. I figure this would be a lot cheaper than $500. Of course, I would still want to remove them first, which puts me back at my previous question - is this doable? Does anybody have experience with painting them? I would rather pay $500 and have them look right, then try to save a couple of hundred dollars and have them look like crap after a few months..
If anybody has any input or thoughts, I would appreciate it.
Better yet, if you have Pepper White ones you want to trade...
I'll post pictures of the new interior once the parts on order get in and are installed.
-Semper Fidelis
I'm not saying I won't end up purchasing them, just not today. I really need a better education before I spend that money.Here is what I have now.
I am trying to change out the black checkerboard inlays (or what MINI Parts calls COVER, DOOR TRIM PAN) with Pepper White to match the exterior of the car. I also think it will go well with the new pieces I ordered.
I found the part numbers for these pieces (all four of them), so I know that in theory it is doable, but that doesn't mean that it's a good idea!
I have watched lots of videos that go into removing the door panel, but I can't find anything on removing these inlays. Is it realistically doable, or did I just save myself a $500 headache? I also debated about ordering paint from Sherwin Automotive and having somebody who knew what they were doing paint these pieces. I figure this would be a lot cheaper than $500. Of course, I would still want to remove them first, which puts me back at my previous question - is this doable? Does anybody have experience with painting them? I would rather pay $500 and have them look right, then try to save a couple of hundred dollars and have them look like crap after a few months..
If anybody has any input or thoughts, I would appreciate it.
Better yet, if you have Pepper White ones you want to trade...
I'll post pictures of the new interior once the parts on order get in and are installed.
-Semper Fidelis
You are welcome. Looks like a great project. Waiting to see pics of the mod.

__________________

MINI Guru/ MINI Owner Since 2004 | NEW Lifetime Part Replacement | Local Pickup
Milltek | Genuine MINI | Forge Motorsport | NM Engineering | ECS Performance | M7 Speed
Customer Service Hours: 8am-8pm EST|Sales Team Hours: 8am-11pm | SAT 10am-7pm 800.924.5172
MINI Guru/ MINI Owner Since 2004 | NEW Lifetime Part Replacement | Local Pickup
Milltek | Genuine MINI | Forge Motorsport | NM Engineering | ECS Performance | M7 Speed
Customer Service Hours: 8am-8pm EST|Sales Team Hours: 8am-11pm | SAT 10am-7pm 800.924.5172
Thread Starter
|
1st Gear
Joined: Mar 2015
Posts: 30
Likes: 0
From: Tun Tavern
*sigh*. So many decisions.
Trending Topics
You can also take the door panel off and have them painted. They can easily mask everything off but a professional paint job does not come cheap. People have been known to plasti dip them with good results. If you don't like it then it peels right off.
Don't rush it. For me half the fun is the planning and thinking phases. Then I like to order parts one or two at a time because it stretches the project out and makes the fun last longer.
Don't rush it. For me half the fun is the planning and thinking phases. Then I like to order parts one or two at a time because it stretches the project out and makes the fun last longer.

6th Gear


Joined: Jun 2013
Posts: 1,614
Likes: 56
From: Western PA
Not to make everything more complicated BUT I'd be taking the time to remove those door panels you can be sure it would be to replace the trim with real leather or something custom like that of sort 

ps: I'm actually quite happy with the checker board trim. It's a nice touch I found. I'm much less happy with the arm rest... It has crossed my mind to do something about it...
And boy! they have a tone of clips to remove to get these panels out. I guess it's to manage vibration over time... but that's going to be painful to remove :p
Thread Starter
|
1st Gear
Joined: Mar 2015
Posts: 30
Likes: 0
From: Tun Tavern
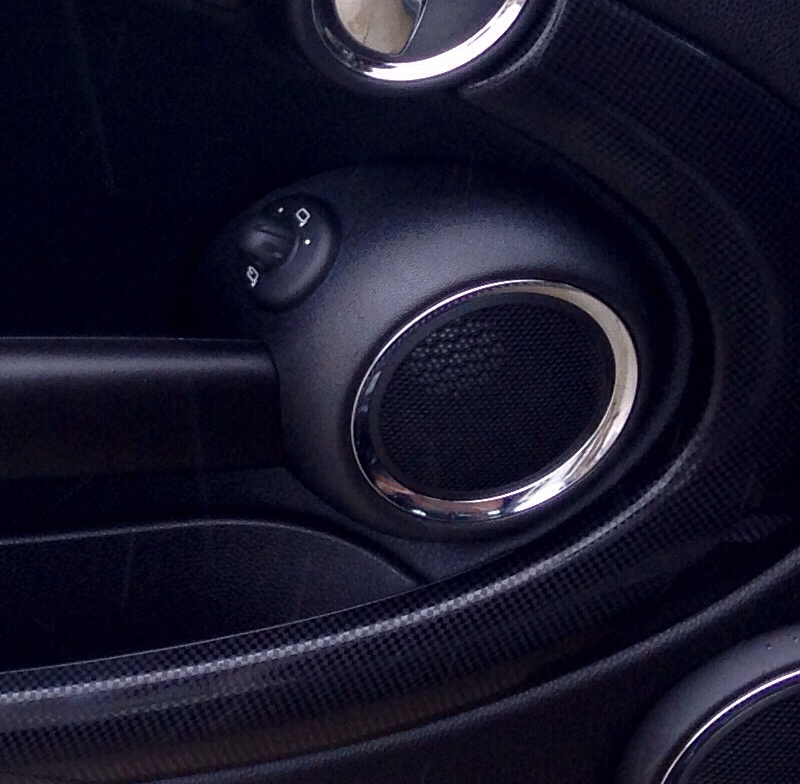
So my trim is arriving today. Or at least the stuff that's not on back order. Does anybody know how to remove this speaker cover?
I can find info on removing the panels, but not these.

I can find info on removing the panels, but not these.

Thread Starter
|
1st Gear
Joined: Mar 2015
Posts: 30
Likes: 0
From: Tun Tavern
Cerenkov - Thank you so much for your help! Do I have to take the door panel off the remove these? Or can I get them off without the removal of the door panel?

6th Gear
Joined: Aug 2014
Posts: 1,134
Likes: 40
From: Port Townsend, WA
So my trim is arriving today. Or at least the stuff that's not on back order. Does anybody know how to remove this speaker cover?
I can find info on removing the panels, but not these.
Attachment 107794
I can find info on removing the panels, but not these.
Attachment 107794
Thread Starter
|
1st Gear
Joined: Mar 2015
Posts: 30
Likes: 0
From: Tun Tavern
Success! I'll post pictures later. I'm still recovering from my day as this was only one of many many projects today (refinished the roof and installed new AC and new radio on the RV).
Thank you Cerenkov and everybody else that provided photos and helped me figure out how to get everything apart,
Thank you Cerenkov and everybody else that provided photos and helped me figure out how to get everything apart,
STEP 1: Remove the arm rests. These just pull off. Feel with your finger tips along the top for the edge and pry them off (using your finger tips)
STEP 2: Remove the speaker cover. It does help having plastic trim removal tools. Just push in where the clips are and pry them off (see previous photo).
STEP 3: The two torx are now accessible (one on each end). Remove and install.
The first side will take longer but once you figure it out the second side will take 5 minutes max.
Thread Starter
|
1st Gear
Joined: Mar 2015
Posts: 30
Likes: 0
From: Tun Tavern
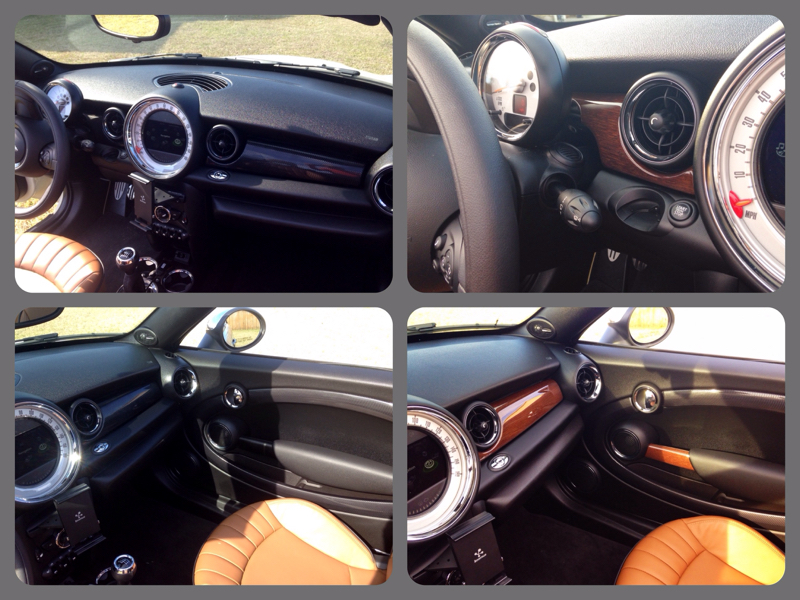
Here are the pictures. Before is on the left, After is on the right. The arm rests are on back order, but when they come in they will match the seats. I am extremely pleased with the look. It goes great with the Pepper White! I'm still on the fence about what I'm going to do to the oval inlays. Nothing really jumps out at me, so I'm continuing to look for ideas. I also saw a leather overlay from RedLine for the passenger and driver side knee knockers (or whatever they are called). That's down the road, but I can see it somewhere in the future.
Attachment 107970
Attachment 107970
Last edited by Semper1775; Mar 23, 2015 at 12:24 PM.
Cant see then attachment, not working for me.
__________________
MINI Guru/ MINI Owner Since 2004 | NEW Lifetime Part Replacement | Local Pickup
Milltek | Genuine MINI | Forge Motorsport | NM Engineering | ECS Performance | M7 Speed
Customer Service Hours: 8am-8pm EST|Sales Team Hours: 8am-11pm | SAT 10am-7pm 800.924.5172
MINI Guru/ MINI Owner Since 2004 | NEW Lifetime Part Replacement | Local Pickup
Milltek | Genuine MINI | Forge Motorsport | NM Engineering | ECS Performance | M7 Speed
Customer Service Hours: 8am-8pm EST|Sales Team Hours: 8am-11pm | SAT 10am-7pm 800.924.5172

6th Gear
Joined: Apr 2013
Posts: 2,070
Likes: 3
From: Plainfield, IL
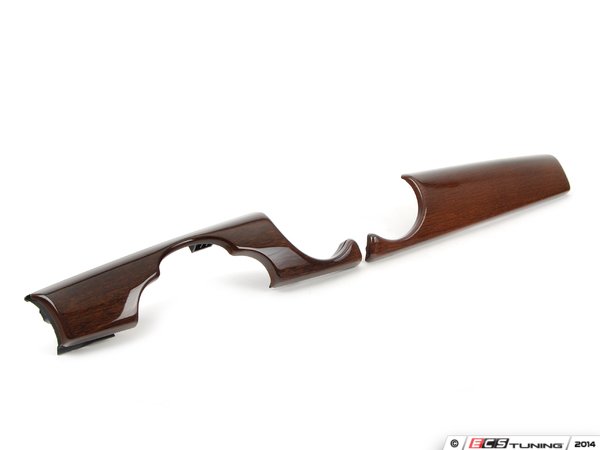
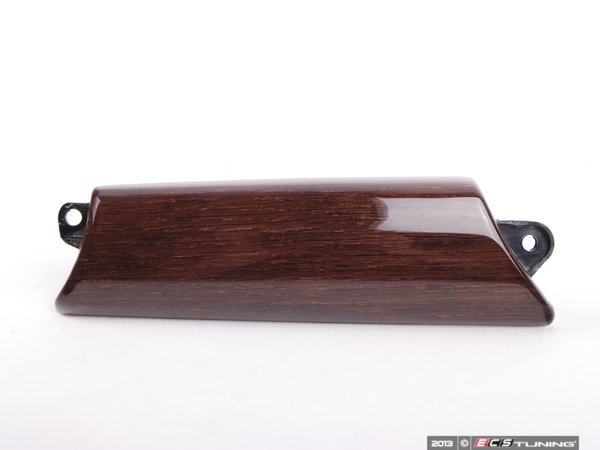
English Oak 51452752878 KT , looks like the light is hitting it pretty hard on thye one pic.
http://www.ecstuning.com/Search/SiteSearch/51452752878KT/
&
Door handle trim. 51412753329 & 51412753330
http://www.ecstuning.com/Search/SiteSearch/51412753329/
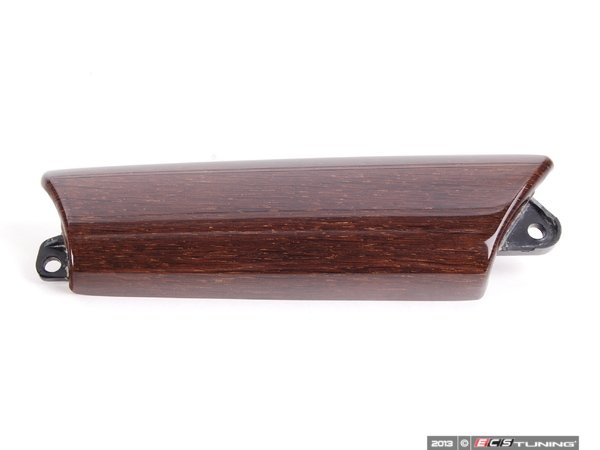
and
http://www.ecstuning.com/Search/SiteSearch/51412753330/
http://www.ecstuning.com/Search/SiteSearch/51452752878KT/
&
Door handle trim. 51412753329 & 51412753330
http://www.ecstuning.com/Search/SiteSearch/51412753329/
and
http://www.ecstuning.com/Search/SiteSearch/51412753330/
__________________
MINI Guru/ MINI Owner Since 2004 | NEW Lifetime Part Replacement | Local Pickup
Milltek | Genuine MINI | Forge Motorsport | NM Engineering | ECS Performance | M7 Speed
Customer Service Hours: 8am-8pm EST|Sales Team Hours: 8am-11pm | SAT 10am-7pm 800.924.5172
MINI Guru/ MINI Owner Since 2004 | NEW Lifetime Part Replacement | Local Pickup
Milltek | Genuine MINI | Forge Motorsport | NM Engineering | ECS Performance | M7 Speed
Customer Service Hours: 8am-8pm EST|Sales Team Hours: 8am-11pm | SAT 10am-7pm 800.924.5172
Looks good.
__________________
MINI Guru/ MINI Owner Since 2004 | NEW Lifetime Part Replacement | Local Pickup
Milltek | Genuine MINI | Forge Motorsport | NM Engineering | ECS Performance | M7 Speed
Customer Service Hours: 8am-8pm EST|Sales Team Hours: 8am-11pm | SAT 10am-7pm 800.924.5172
MINI Guru/ MINI Owner Since 2004 | NEW Lifetime Part Replacement | Local Pickup
Milltek | Genuine MINI | Forge Motorsport | NM Engineering | ECS Performance | M7 Speed
Customer Service Hours: 8am-8pm EST|Sales Team Hours: 8am-11pm | SAT 10am-7pm 800.924.5172