

4th Gear
Quote:
I also have developed kits for the R56 that have the foglights that will enable the foglights as additional running lights and brake lights with a diode to allow the fog lights to work also. Peter will have this kit soon also.
Awesome....so technically I can retro-fit the rear fogs (assuming that the re-program through the dealer will work) and then get this kit and have all 3!?!Originally Posted by mini-rolls
I also have developed kits for the R56 that have the foglights that will enable the foglights as additional running lights and brake lights with a diode to allow the fog lights to work also. Peter will have this kit soon also.
Any idea how soon the kit will be available?

5th Gear
Quote:
That's the part that has me concerned. Every time I see "gently pry" in the instructions, I usually gently break that item. Originally Posted by Mark Kurzius
It is as simple as the instructions make it out to be,the only tricky part is removing the rear light assembly,If your not comfortable with it any body shop or mechanic could do it in a few minutes...Pete can walk you through it as well,He's a great guy,always helpful...Take care

I think I'll give this one a shot though.
Former Vendor
Quote:
Any idea how soon the kit will be available?
I have this kit now and Peter will have it by next week. And yes if you retro-fit your rear fogs and they are working the new kit will then work.Originally Posted by Ambrosia
Awesome....so technically I can retro-fit the rear fogs (assuming that the re-program through the dealer will work) and then get this kit and have all 3!?!Any idea how soon the kit will be available?
Former Vendor
Quote:
I think I'll give this one a shot though.
The trim piece is actually pretty tough. But gently pry it with a plastic tool or a screwdriver woth tape around it. I get more worried about damaging the paint then breaking the trim ring.Originally Posted by tjtull
That's the part that has me concerned. Every time I see "gently pry" in the instructions, I usually gently break that item. I think I'll give this one a shot though.

I was the person who opened this thread. Thanks to everyone's advice and input I have found the best solution for me.
I just finished installing the brake light kit from Minispeed. The whole operation took me about a half hour. The directions were very clear. The parts provided with the kit were top quality.

I just finished installing the brake light kit from Minispeed. The whole operation took me about a half hour. The directions were very clear. The parts provided with the kit were top quality.
5th Gear
Quote:
I just finished installing the brake light kit from Minispeed. The whole operation took me about a half hour. The directions were very clear. The parts provided with the kit were top quality.
Nice!! I'm going to be ordering mine soon. Do you have any pics, post-install?Originally Posted by mikein254
I was the person who opened this thread. Thanks to everyone's advice and input I have found the best solution for me. I just finished installing the brake light kit from Minispeed. The whole operation took me about a half hour. The directions were very clear. The parts provided with the kit were top quality.

Quote:
Originally Posted by tjtull
Nice!! I'm going to be ordering mine soon. Do you have any pics, post-install?
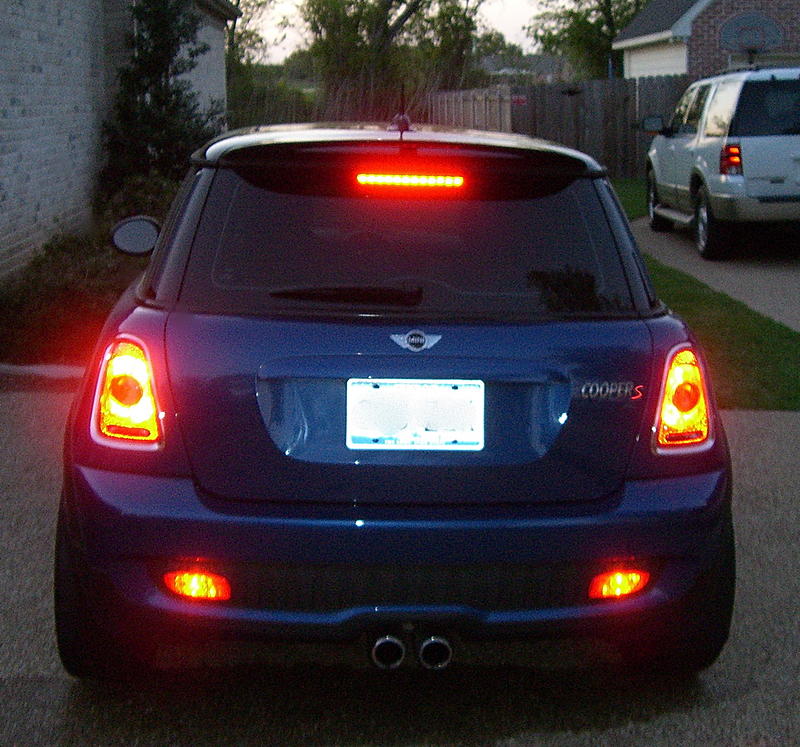
Here are two shots after the install of the wire kit. First with brake lights on. The second is with the running lights on (notice upper brake light not lit). They get brighter when the pedal is pushed - just like the tail lights.

5th Gear
Quote:
Thanks for the pics mikein254 and mini-rolls. I'm heading to gominigo.com right now to order!!Originally Posted by mikein254
Here are two shots after the install of the wire kit. First with brake lights on. The second is with the running lights on (notice upper brake light not lit). They get brighter when the pedal is pushed - just like the tail lights.
5th Gear
All I need now is a torx T-20 screwdriver or socket. Looks like a trip to the hardware store is in order.
Former Vendor
Quote:
Sears has a nice set.....and they are Craftsman. I think the set was not to expensive. I know the Stantley Brand is 2.99Originally Posted by tjtull
All I need now is a torx T-20 screwdriver or socket. Looks like a trip to the hardware store is in order.
5th Gear
Quote:
Sears hardware dept. is a dangerous place. I could spend $5 or $500 without even thinking about it. Originally Posted by mini-rolls
Sears has a nice set.....and they are Craftsman. I think the set was not to expensive. I know the Stantley Brand is 2.99

5th Gear
I'll post some pics whenever I get my kit and install it. I'm really excited to see how it will look with the lights.
5th Gear
I just bought a really nice set of torx head sockets that comes with a screwdriver extension from Auto Zone...$14 (not to advertise for Auto Zone mind you). Now all I need is my kit...which I see shipped yesterday!! I may get it in time for this weekend!!
5th Gear
Well, today I installed the kit and rear lights from gominigo and minispeed. I followed the directions to a tee and completed the job in about an hour. The only really difficult part was fishing the wires from the lights into the brake light assembly. After I got the hang of it with the first one, the second one went very smoothly. Works perfectly!! No now more blank spaces on my bumper.

6th Gear
Quote:
That is awesome, congrats! You mentioned previously that you were concerned about removing the trim rings around the lights - so post-install how would you say that went?Were they in fact difficult to remove? Any specific tools that you would suggest for this part?Originally Posted by tjtull
Well, today I installed the kit and rear lights from gominigo and minispeed. I followed the directions to a tee and completed the job in about an hour. The only really difficult part was fishing the wires from the lights into the brake light assembly. After I got the hang of it with the first one, the second one went very smoothly. Works perfectly!! No now more blank spaces on my bumper.
So I'm leaning towards yes on this mod too. I swear if I never found NAM it probably wouldn't be an issue but for some reason 50+ different people pointing out the blanks in the bumpers drove me to this insanity

Former Vendor
To help route the wires, you can just push on the wheel well housing it is plastic and will move pretty easily. Then you put your whole arm up in the hole to route the wires. I did a few of these at AMVIV.
5th Gear
Quote:
So I'm leaning towards yes on this mod too. I swear if I never found NAM it probably wouldn't be an issue but for some reason 50+ different people pointing out the blanks in the bumpers drove me to this insanity
The trim was, in fact, the easiest part. I used a small-tipped flat-head screwdriver with the tip wrapped in duct tape. They came right off and are not as easy to break as you might think. I was careful to make sure the tape didn't slip on the head of the screwdriver, so as not to mar the paint. No scratches anywhere. Originally Posted by DrewN
That is awesome, congrats! You mentioned previously that you were concerned about removing the trim rings around the lights - so post-install how would you say that went?Were they in fact difficult to remove? Any specific tools that you would suggest for this part?So I'm leaning towards yes on this mod too. I swear if I never found NAM it probably wouldn't be an issue but for some reason 50+ different people pointing out the blanks in the bumpers drove me to this insanity
It really was easy. The first light took a LOT longer than the second light...kind of a steep learning curve.
5th Gear
Quote:
Now ya tell me Originally Posted by mini-rolls
To help route the wires, you can just push on the wheel well housing it is plastic and will move pretty easily. Then you put your whole arm up in the hole to route the wires. I did a few of these at AMVIV.
Excellent service from both gominigo and minispeed. I'm totally satisfied with this mod!!
Thanks for all the help!!

6th Gear
Quote:
It really was easy. The first light took a LOT longer than the second light...kind of a steep learning curve.
That's great to hear, thanks tj. That was the big fear for me - damaging the paint. You can hide everything else Originally Posted by tjtull
The trim was, in fact, the easiest part. I used a small-tipped flat-head screwdriver with the tip wrapped in duct tape. They came right off and are not as easy to break as you might think. I was careful to make sure the tape didn't slip on the head of the screwdriver, so as not to mar the paint. No scratches anywhere. It really was easy. The first light took a LOT longer than the second light...kind of a steep learning curve.
. I'm much more confident I can get this done now.Quote:
Wait, you mean you got a dealer to install it? Were you quoted a price by them?Originally Posted by abcjh4
I ordered the kit from Minspeed - I'm having the kit installed by Patrick MINI. I can't wait! :D
5th Gear
Quote:
. I'm much more confident I can get this done now.
Wait, you mean you got a dealer to install it? Were you quoted a price by them?
Drew...it is very simple and very easy to avoid damage to your paint. You do need to be cautious but with the screwdriver wrapped in tape, you'll have no problem.Originally Posted by DrewN
That's great to hear, thanks tj. That was the big fear for me - damaging the paint. You can hide everything else . I'm much more confident I can get this done now.Wait, you mean you got a dealer to install it? Were you quoted a price by them?
I wouldn't have a dealer install this...it's VERY easy. I have little to no mechanical ability and I got it done in an hour. Had I known the wheels wells could be pushed in for easy access to the brake light assembly, I would have gotten it done in much less time. Seriously, do this one yourself...it will make it feel that much better knowing you did it yourself. You will need a torx T20 bit to get the light assebly out, but they are easy to find and cheap.
6th Gear
Yeah, I'm definitely gonna install myself. The only thing that might make me pause is if I'm avoiding any potential warranty issues if the dealer installs it for me 

2nd Gear
I installed the rear light kit from Minspeed yesterday and it looks great. The red lenses really do improve the look of the rear bumper valence vs. the blanking plates that were there before, and when the lights are on they look fantastic at night. It gives the Mini a rear light pattern that is unlike any other car on the road. Best of all, the extra brake lights should increase the awareness of other drivers and hopefully reduce the chance of a rear-end collision. I instaled mine while I had my rear bumper off to add a receiver hitch. That certainly isn't necessary to install this light kit, but it was interesting to see the rear of the car disassembled - bumper off, tail lights removed, parts and tools all over the ground, etc. Several neighbors in my condo passed me in the garage while I was doing this and gave me concerned looks ("Why is his car in pieces on the ground? 'Great', we've got this guy running a body repair shop in our garage now! Some people can't leave well enough alone!", etc.....)
4th Gear
I also installed the extra brake light kit, albeit with some help and it looks great!
However, we ended up breaking/bending two of the tabs on the tail light housing while prying off the first chrome trim piece/ring. Were a bit too rough I guess and found that it was much easier to gently pry on the inside the trim piece - between the light and the trim piece and not the trim piece and the body of the car.
We also found that the harness was too short for us after we had spliced about as close up to the connector as you see in the pic in the instructions. Not sure why we had that issue but we had to re-splice much lower down the wires and that solved the problem.
Anyway, I'm very pleased with the final result...the car looks great and no more annoying black spots where the rear fogs should have been! Though, I still wonder about the legality of the extra tail and brake lights (more so the extra tail lights) it does give the car a unique look that will hopefully keep tailgaters slightly off my rear.