R52 HELP! Top won't open
#26
 04-21-2008, 05:32 PM

 There are many threads in this forum about roof wear.
 My cabrio did the same thing last summer. It was a broken cable also. Fixed under warranty

Lois


#28
04-22-2008, 11:51 AM
 So, please, no hard feelings. We're lovers not fighters here in the Cabrio threads

#29
04-22-2008, 12:33 PM
3rd Gear
Join Date: Mar 2008
Location: Madison, MS
Posts: 180
Likes: 0
Received 0 Likes
on
0 Posts
Sorry
 ,Sorry.
Just trying to get as much info cramed into my wee little brain as I can before the warranty expires. Can't even think about all of the potential problems owning a auto drop top.

Can anyone recall: age, date, mileage, etc. when cables/mechanical showed symptoms of failure?
Not sitting on my owners manual, so if it stops working in the open position is there a manual way to get it back up? Then I would be blue,
 and sitting in the rain.
#30
04-22-2008, 01:06 PM
Yep, Me 2 ,Sorry.
Just trying to get as much info cramed into my wee little brain as I can before the warranty expires. Can't even think about all of the potential problems owning a auto drop top.
Can anyone recall: age, date, mileage, etc. when cables/mechanical showed symptoms of failure?
Not sitting on my owners manual, so if it stops working in the open position is there a manual way to get it back up? Then I would be blue, and sitting in the rain.
,Sorry.Just trying to get as much info cramed into my wee little brain as I can before the warranty expires. Can't even think about all of the potential problems owning a auto drop top.
Can anyone recall: age, date, mileage, etc. when cables/mechanical showed symptoms of failure?
Not sitting on my owners manual, so if it stops working in the open position is there a manual way to get it back up? Then I would be blue,
and sitting in the rain. It showed NO signs of anything wrong. We had put the top up to shop, came out to put it down & bingo the cable snappedLois

#31
04-23-2008, 04:15 PM

This is my second cabrio - my 05 had a similar issue - it would start to retract and only release from one side (while the roof motor was still trying to open it). Before you tear the whole thing apart look for one thing - if the latch looks like it opened but the top is still stuck on one side, you can pop the corner out (DON'T TRY IF THE LATCH DID NOT RELEASE). Once it has popped out, see if the post on the end of the top has come loose (screws in w/ an allen key). It is the black piece that fits into the metal holes above the windshield. Mine came loose over time, but one shot tightened it up, and did not have the problem again.
#32
12-14-2008, 08:03 PM

1st Gear
Join Date: Dec 2008
Location: Pearland, TX
Posts: 15
Likes: 0
Received 0 Likes
on
0 Posts
AHHRG! I think my cable may have broken.
My 05 Cooper Cabrio's top has malfunctioned. It is way out of warranty (89,000 miles) and I need to try and fix it myself. Now when I hit the button to lower the top the drivers side starts to move back on the sunroof function but the passengers side does not move! So I stop the process immediately to prevent further damage. I hit close and the drivers side closes right up fine and the passenger side is still closed.
Anyone have any experience, diagrams or such that could help me with fixing this myself.
I really want to tackle this myself as I just paid this car off and don't want to throw $3K at a dealer.
Thanks,
Mike
Houston, TX
Anyone have any experience, diagrams or such that could help me with fixing this myself.
I really want to tackle this myself as I just paid this car off and don't want to throw $3K at a dealer.
Thanks,
Mike
Houston, TX
#33
12-14-2008, 08:18 PM
Top-fixer
I had an '05 and now an '07 - My top in the '05 had the same issue, and maybe this will help.
1) open the sun roof
2) sit in the seat closest to the "stuck" side
3) hold the button to open the top just long enough for the metal latches to open.
4) Did the latch open on the stuck side? If no, the STOP. If yes, then "help it open by gently (or not so gently) pushing up on the corner of the roof as you try to retract it with the button.
5) if it is no longer stuck, with your help, then it may be the same problem I had - the corner has a small metal post attached to the roof that drops into the mount over the windshield to help align it when closed. Over time that post will come loose and will stick when you try to retract. A small allen key is all you need to tighten it back up.
#34
12-14-2008, 09:08 PM
1st Gear
Join Date: Dec 2008
Location: Pearland, TX
Posts: 15
Likes: 0
Received 0 Likes
on
0 Posts
Thanks,
Mike
#35
12-15-2008, 06:16 AM

This past September I had the same problem on my 2005 Mini. It was still under warranty, so I took it into the dealer. They replaced a "failed sunroof casette" (per the repair order) under warranty. That fixed the top but then i had a rattle over the drivers side. Took that in twice, last time only last week and it seems to be fixed now. This time they "adjusted top to factory spec and applied felt tape to area".
I can't tell you what the cost was as it was all done under warranty.
I can't tell you what the cost was as it was all done under warranty.
#36
12-16-2008, 07:23 PM
1st Gear
Join Date: Dec 2008
Location: Pearland, TX
Posts: 15
Likes: 0
Received 0 Likes
on
0 Posts
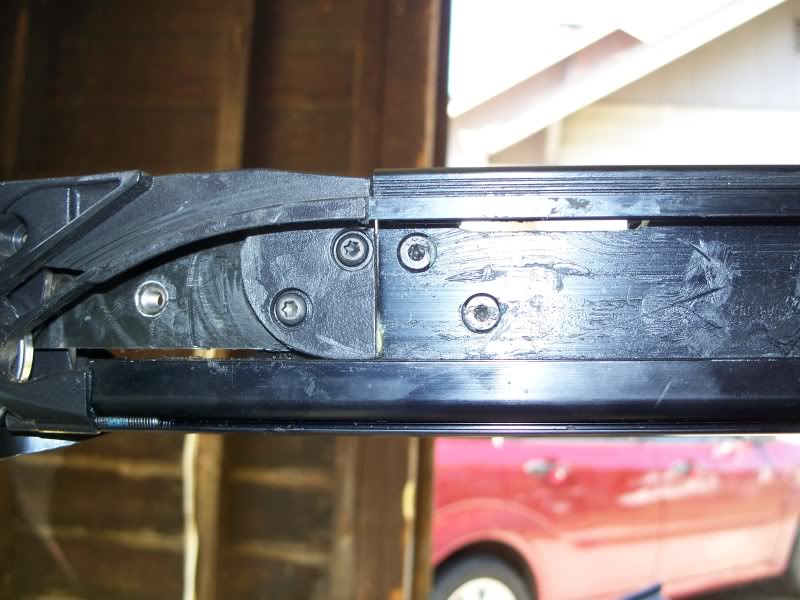
Some pics
Ok, I've started to dig into this. Only I can not get the right side mechanism to slide back at all! It is not being pulled by the cable drive. It appears to have become unattached from the cable at the bottom edge of it where the cable slides through the track and secures to an end anchor?

Sad Sight
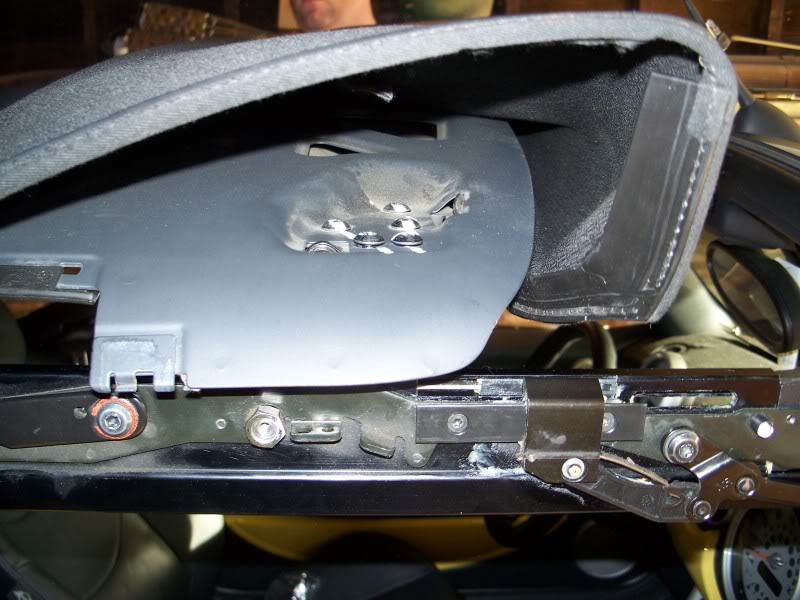
The stuck side looks like this

The side that still moves looks like this

Anyone know how to get this all apart? I can't get the cassette on the right side to move back. If I could get it apart I might be able to remove the rail and reattach the cable or replace the rail / cable.
Anyone have any advice? I know the cable comes from the motor in the center of the roof.
I think I might have to remove the whole fabric cover to get to motor to replace the cable if needed. But the right side cassette must be moved somehow?
Thanks,
Mike
Sad Sight
The stuck side looks like this
The side that still moves looks like this
Anyone know how to get this all apart? I can't get the cassette on the right side to move back. If I could get it apart I might be able to remove the rail and reattach the cable or replace the rail / cable.
Anyone have any advice? I know the cable comes from the motor in the center of the roof.
I think I might have to remove the whole fabric cover to get to motor to replace the cable if needed. But the right side cassette must be moved somehow?
Thanks,
Mike
#37
12-20-2008, 01:46 PM
1st Gear
Join Date: Dec 2008
Location: Pearland, TX
Posts: 15
Likes: 0
Received 0 Likes
on
0 Posts
FIXED
ITS FIXXED !
Well after about 10 hours of labor to tear apart and put back together it is fixed.
It required $406.00 worth of parts from the dealership after 15% discount.
The parts only come in pairs for both left and right sides. (I used only my right side parts) It is pretty difficult to do this the first time. (And I hope to never do it again)
See pictures with some explanations here:
http://community.webshots.com/album/...host=community
Thanks for the help everyone. Happy motoring!
Mike
Pearland, TX

#39
03-27-2009, 02:00 PM

Not My Baby Butters Too!
ITS FIXXED !
Well after about 10 hours of labor to tear apart and put back together it is fixed.
It required $406.00 worth of parts from the dealership after 15% discount.
The parts only come in pairs for both left and right sides. (I used only my right side parts) It is pretty difficult to do this the first time. (And I hope to never do it again)
See pictures with some explanations here:
http://community.webshots.com/album/...host=community
Thanks for the help everyone. Happy motoring!
Mike
Pearland, TX
Well after about 10 hours of labor to tear apart and put back together it is fixed.
It required $406.00 worth of parts from the dealership after 15% discount.
The parts only come in pairs for both left and right sides. (I used only my right side parts) It is pretty difficult to do this the first time. (And I hope to never do it again)
See pictures with some explanations here:
http://community.webshots.com/album/...host=community
Thanks for the help everyone. Happy motoring!
Mike
Pearland, TX
I stopped at the daycare to get my daughter & while I put the top up to go into sunroof mode I heard a loud POP & my heart dropped.
The exact same side as yours. So, I went through all the pictures & realized it is beyond my capability or time allotment, so I took Butters to the dealership after calling everywhere else that repairs convertible tops...everyone said "Dealer needs to take care of it."
So early next week I should get a call (when the part comes in) to schedule an appointment & see how much it will cost --- out of warranty ---
...why can't I find a crying emoticon?
*face palm...tear down cheek*
Last edited by Not4no1; 06-09-2009 at 08:56 AM.
#40
04-16-2009, 12:08 PM
So, I'm gonna do it myself
Okay, so, “Early Next Week” turned into 3 weeks later. I called the dealer (Dreyer & Reinbold) when I was told the part would be in & he stated that the part is backordered & it will be another week. So I wait 2 weeks & still no call, so I go ahead & ring them up.
The part came in (who knows when) & I was quoted a price of $921 for the part alone. "WHAT!" Labor will, obviously, be additional…I wasn’t prepared for the quote. He still couldn’t tell me how much labor will be, but that is a moot point now.
So I am now going to order the part from ECS Tuning http://www.ecstuning.com/stage/edpd/pagebuild_v2.cgi?gkww=54347174761
The OEM part will cost $272.44 & 4-7 day shipping is just under $15. Now I’m off to find/write some detailed instructions on how to repair this issue. If anybody else has fixed this issue themselves, I would appreciate any pictures or instructions...thank you TXNemo AKA Mike.
Incase you are interested, The part I ordered is number 14 on the image below.
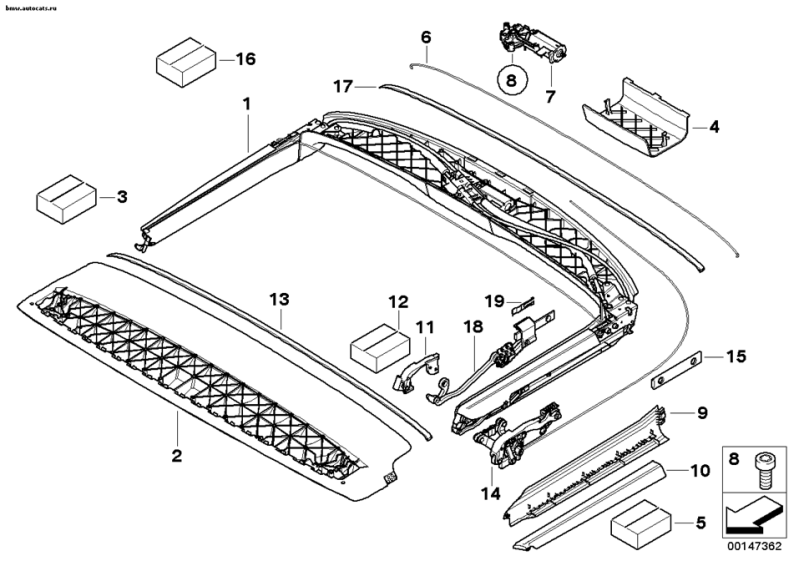
I will do my best to remember to take pictures of each step in the operation & I hope the instructions will help anyone else that has this issue out of warranty. So, hopefully, when I update this post I will have a set of instructions, a happy car & be a happy owner. *crosses fingers & prays*
The part came in (who knows when) & I was quoted a price of $921 for the part alone. "WHAT!" Labor will, obviously, be additional…I wasn’t prepared for the quote. He still couldn’t tell me how much labor will be, but that is a moot point now.
So I am now going to order the part from ECS Tuning http://www.ecstuning.com/stage/edpd/pagebuild_v2.cgi?gkww=54347174761
The OEM part will cost $272.44 & 4-7 day shipping is just under $15. Now I’m off to find/write some detailed instructions on how to repair this issue. If anybody else has fixed this issue themselves, I would appreciate any pictures or instructions...thank you TXNemo AKA Mike.
Incase you are interested, The part I ordered is number 14 on the image below.
I will do my best to remember to take pictures of each step in the operation & I hope the instructions will help anyone else that has this issue out of warranty. So, hopefully, when I update this post I will have a set of instructions, a happy car & be a happy owner. *crosses fingers & prays*
Last edited by Not4no1; 06-16-2009 at 06:07 AM. Reason: Broken Picture link repaired
#41
04-16-2009, 12:17 PM
3rd Gear
Join Date: Mar 2008
Location: Madison, MS
Posts: 180
Likes: 0
Received 0 Likes
on
0 Posts
Not4no1:
Still waiting for mine to kick. The good thing, if there is one, I was tracing all sorts of MINI issues the other night at home and came across an entire post w/ photos of every step it takes to replace that part. The post shows the old part, that breaks, and the new remanufactured part. I know it's out there and I'm almost positive it was on NAM, but could have been on flicker. Will post again later tonight if I find the link. Sorry.
Still waiting for mine to kick. The good thing, if there is one, I was tracing all sorts of MINI issues the other night at home and came across an entire post w/ photos of every step it takes to replace that part. The post shows the old part, that breaks, and the new remanufactured part. I know it's out there and I'm almost positive it was on NAM, but could have been on flicker. Will post again later tonight if I find the link.
Sorry.
#42
06-15-2009, 05:59 PM

collecting information on convertible top cable problems
Hi. My convertible top cables snapped at about 50,300 miles. The repair is very expensive ($3000 USD). I'm out of warranty by 8 months, and MINI USA says that's too long for a good will gesture. I've searched online and found 24 other folks who have had the same cable problem with their Minis, almost all within the first 50,000 miles. In order that I might make a stronger case with Mini USA that this is a design flaw (and that others might do the same with MINI UK or MINI USA), I'm collecting information from others about the year of their MINI and mileage when the cables snapped. I'm happy to make this information available to you after I get it. Please send me an e-mail at dschultz@umbc.edu, and I'll send you the Excel sheet with the information.
Dave
Dave
#43
06-15-2009, 06:00 PM
Hi. My convertible top cables snapped at about 50,300 miles. The repair is very expensive ($3000 USD). I'm out of warranty by 8 months, and MINI USA says that's too long for a good will gesture. I've searched online and found 24 other folks who have had the same cable problem with their Minis, almost all within the first 50,000 miles. In order that I might make a stronger case with Mini USA that this is a design flaw (and that others might do the same with MINI UK or MINI USA), I'm collecting information from others about the year of their MINI and mileage when the cables snapped. I'm happy to make this information available to you after I get it. Please send me an e-mail at dschultz@umbc.edu, and I'll send you the Excel sheet with the information.
Dave
Dave
#44
06-17-2009, 10:40 AM

Sunroof latching
Okay, so, �Early Next Week� turned into 3 weeks later. I called the dealer (Dreyer & Reinbold) when I was told the part would be in & he stated that the part is backordered & it will be another week. So I wait 2 weeks & still no call, so I go ahead & ring them up.
The part came in (who knows when) & I was quoted a price of $921 for the part alone. "WHAT!" Labor will, obviously, be additional�I wasn�t prepared for the quote. He still couldn�t tell me how much labor will be, but that is a moot point now.
So I am now going to order the part from ECS Tuning http://www.ecstuning.com/stage/edpd/pagebuild_v2.cgi?gkww=54347174761
The OEM part will cost $272.44 & 4-7 day shipping is just under $15. Now I�m off to find/write some detailed instructions on how to repair this issue. If anybody else has fixed this issue themselves, I would appreciate any pictures or instructions...thank you TXNemo AKA Mike.
Incase you are interested, The part I ordered is number 14 on the image below.

I will do my best to remember to take pictures of each step in the operation & I hope the instructions will help anyone else that has this issue out of warranty. So, hopefully, when I update this post I will have a set of instructions, a happy car & be a happy owner. *crosses fingers & prays*
The part came in (who knows when) & I was quoted a price of $921 for the part alone. "WHAT!" Labor will, obviously, be additional�I wasn�t prepared for the quote. He still couldn�t tell me how much labor will be, but that is a moot point now.
So I am now going to order the part from ECS Tuning http://www.ecstuning.com/stage/edpd/pagebuild_v2.cgi?gkww=54347174761
The OEM part will cost $272.44 & 4-7 day shipping is just under $15. Now I�m off to find/write some detailed instructions on how to repair this issue. If anybody else has fixed this issue themselves, I would appreciate any pictures or instructions...thank you TXNemo AKA Mike.
Incase you are interested, The part I ordered is number 14 on the image below.
I will do my best to remember to take pictures of each step in the operation & I hope the instructions will help anyone else that has this issue out of warranty. So, hopefully, when I update this post I will have a set of instructions, a happy car & be a happy owner. *crosses fingers & prays*
Tom
#45
06-17-2009, 12:21 PM
Repairing my 2005 Cabrio Broken Cable
I will be using this post to edit & organize my instructions untill I get them finalized. Then I will keep a copy on this post & start a new post in the propper repair section of NAM. That way I don't get a bunch of PMs from others who find this post & no instructions...not that I mind
I am using any pictures I can find, these are not all my car (most are).
check out TXNemo's Link for more pictures & breif explanations.
http://community.webshots.com/album/...host=community
If anyone wants their picture removed. I will do so.
I appreciate any help I can get too.
Also, if anyone notices errors, I take criticism well.
This may be choppy, I am doing this from memory & on my work breaks.
I don't have any pictures of the roof rails attached, I will try to.
I first removed the trim pieces on both sides of the roof structure.
You will open the door & look up into the rail & you will see some screws. Remove those & one of the panels comes off. That should reveal more screws that will release the other side of the rail panel. You might have to wiggle them loose, but there are not clips holding them on.
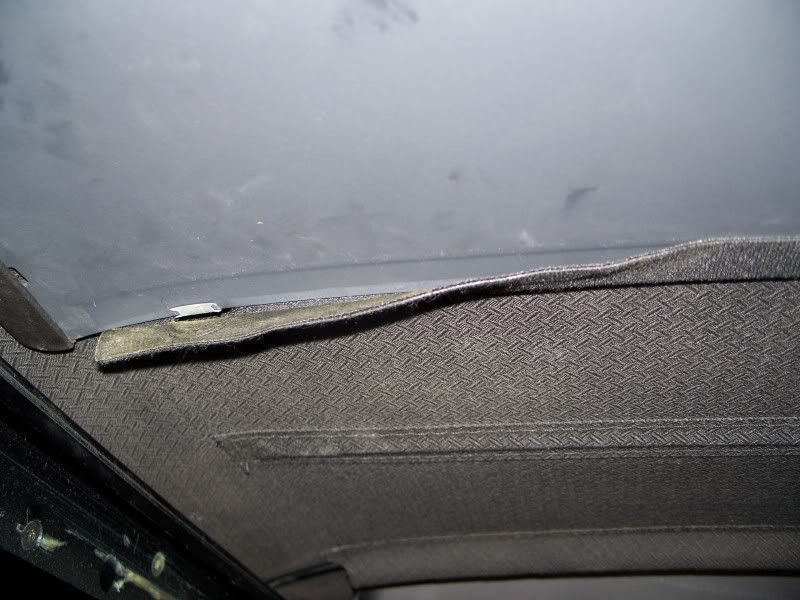
When you are sitting in the front seat, top closed, look straight above you. There is a plastic piece that runs along the whole edge of the interior metal piece that the front of the top is attached to…I will try to take a picture later. That is what needs to be removed. It just pulls off.
Under the plastic is a fabric strip that is glued (double sided tape) all the way across & a couple of metal clips that were holding on the plastic strip (caution the clips are sharp…cut my wrist, so you might want to cover with tape or be more careful). Wash your hands before you start removing the fabric (so you can reuse the tape) Start on one side & peel away. Take your time. A heat gun may help, it was pretty warm on the day I did this so that wasn’t necessary. This will release the slack you will need to get to the screws that attach the front of the top.
Now you will need to open the motor door in the middle of the top/interior. This door is held on by 2 loose fabric straps. It will probably fall off while you are working on your top. Mine did & so did someone else’s whom I talked to, but it snaps right back on. You just have to remember next time that if you open that motor door again, it might drop down & hit you.
Now you have to lift up your back seat up & remove the hand crank under there (check your user’s manual)
Slowly crank back the top. Just crank enough to get to the screws. Only one side will move (or these aren’t the instructions for you) This will allow some slack so you can get to some screws that are holding the front panel of the top to the sliding mechanism. I had to pull the plastic edging back along the edge to reach the screws. Opening the boot's reverse hinge will give you slightly more slack in the front.
The working side is very easy to access the screws & remove the top. The broken side will take some pulling to get enough fabric to allow a screwdriver access. If you have a right angle screwdriver, it will make the job much easier.
Once the top panel is removed, you can lift the front of the top up and fold it back over the car so you have a clear view of the side rails.
Now compare the broken/locked side with the working side & you will see how to unhook & slide the broken piece back.
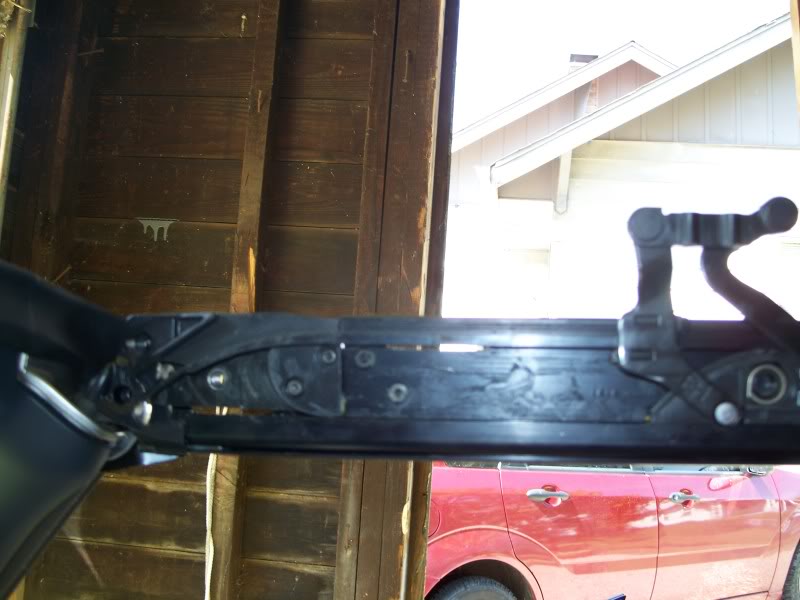
Once you slide that cassette back, you will be able to access the screws that release the front of the rails.
Remove the 2 allen(sp) screws on the front most piece. Now wiggle/lift the rail to slide the front most piece off that you just unscrewed. Now you can access the broken cable that should be running along the bottom edge of the rail. Before you pull the cable & mechanism out, you have to access the mid-roof motor.
Open the mid-roof motor door (if you closed it) and disconnect the power from the motor (just a small plug) Now unscrew the motor (3 screws) Hold the motor in place, it is heavy & will fall down once the last screw is removed. Place aside.
Now that the motor is out, you should be able to slide the cable & mechanism out of the rail. If you can’t reach the cable, look where the mid-roof motor was & you should see where the motor connects with the cables. Use a flat head screwdriver to slowly push the broken cable down the rail & you will be able to grab the end poking out of the roof rail.
Once the cable & mechanism is out, the new one slides in exactly the same as the one you just removed. If you forget between the steps, look at the working side. The trickiest part for me was lining up the new cassette mechanism with the old working one. It took a bit of trial & error, I also ended up taking the motor in & out several times until everything was parallel.
I am using any pictures I can find, these are not all my car (most are).
check out TXNemo's Link for more pictures & breif explanations.
http://community.webshots.com/album/...host=community
If anyone wants their picture removed. I will do so.
I appreciate any help I can get too.
Also, if anyone notices errors, I take criticism well.
This may be choppy, I am doing this from memory & on my work breaks.
Hopefully Helpfull Instructions
I don't have any pictures of the roof rails attached, I will try to.
I first removed the trim pieces on both sides of the roof structure.
You will open the door & look up into the rail & you will see some screws. Remove those & one of the panels comes off. That should reveal more screws that will release the other side of the rail panel. You might have to wiggle them loose, but there are not clips holding them on.
When you are sitting in the front seat, top closed, look straight above you. There is a plastic piece that runs along the whole edge of the interior metal piece that the front of the top is attached to…I will try to take a picture later. That is what needs to be removed. It just pulls off.
Under the plastic is a fabric strip that is glued (double sided tape) all the way across & a couple of metal clips that were holding on the plastic strip (caution the clips are sharp…cut my wrist, so you might want to cover with tape or be more careful). Wash your hands before you start removing the fabric (so you can reuse the tape) Start on one side & peel away. Take your time. A heat gun may help, it was pretty warm on the day I did this so that wasn’t necessary. This will release the slack you will need to get to the screws that attach the front of the top.
Now you will need to open the motor door in the middle of the top/interior. This door is held on by 2 loose fabric straps. It will probably fall off while you are working on your top. Mine did & so did someone else’s whom I talked to, but it snaps right back on. You just have to remember next time that if you open that motor door again, it might drop down & hit you.
Now you have to lift up your back seat up & remove the hand crank under there (check your user’s manual)
Slowly crank back the top. Just crank enough to get to the screws. Only one side will move (or these aren’t the instructions for you) This will allow some slack so you can get to some screws that are holding the front panel of the top to the sliding mechanism. I had to pull the plastic edging back along the edge to reach the screws. Opening the boot's reverse hinge will give you slightly more slack in the front.
The working side is very easy to access the screws & remove the top. The broken side will take some pulling to get enough fabric to allow a screwdriver access. If you have a right angle screwdriver, it will make the job much easier.
Once the top panel is removed, you can lift the front of the top up and fold it back over the car so you have a clear view of the side rails.
Now compare the broken/locked side with the working side & you will see how to unhook & slide the broken piece back.
Once you slide that cassette back, you will be able to access the screws that release the front of the rails.
Remove the 2 allen(sp) screws on the front most piece. Now wiggle/lift the rail to slide the front most piece off that you just unscrewed. Now you can access the broken cable that should be running along the bottom edge of the rail. Before you pull the cable & mechanism out, you have to access the mid-roof motor.
Open the mid-roof motor door (if you closed it) and disconnect the power from the motor (just a small plug) Now unscrew the motor (3 screws) Hold the motor in place, it is heavy & will fall down once the last screw is removed. Place aside.
Now that the motor is out, you should be able to slide the cable & mechanism out of the rail. If you can’t reach the cable, look where the mid-roof motor was & you should see where the motor connects with the cables. Use a flat head screwdriver to slowly push the broken cable down the rail & you will be able to grab the end poking out of the roof rail.
Once the cable & mechanism is out, the new one slides in exactly the same as the one you just removed. If you forget between the steps, look at the working side. The trickiest part for me was lining up the new cassette mechanism with the old working one. It took a bit of trial & error, I also ended up taking the motor in & out several times until everything was parallel.
Last edited by Not4no1; 06-22-2009 at 06:35 AM. Reason: Thank you all for your patience :) It is appreicated
#47
07-13-2009, 09:13 AM
Part ordering
Thanks much for the instructions. I have gotten the top back, the slider removed, and am ready to order.
My question is: was the part you ordered only for one side or is it a pair (one for each side)? In the diagram it is for the left side and mine is one the right. I wasn't sure from your photos if you had a failure on left or right. TXNemo bought a pair from someone else but the price was higher. ESTuning didn't have much info for me when I called.
Tom
Okay, so, �Early Next Week� turned into 3 weeks later. I called the dealer (Dreyer & Reinbold) when I was told the part would be in & he stated that the part is backordered & it will be another week. So I wait 2 weeks & still no call, so I go ahead & ring them up.
The part came in (who knows when) & I was quoted a price of $921 for the part alone. "WHAT!" Labor will, obviously, be additional�I wasn�t prepared for the quote. He still couldn�t tell me how much labor will be, but that is a moot point now.
So I am now going to order the part from ECS Tuning http://www.ecstuning.com/stage/edpd/pagebuild_v2.cgi?gkww=54347174761
The OEM part will cost $272.44 & 4-7 day shipping is just under $15. Now I�m off to find/write some detailed instructions on how to repair this issue. If anybody else has fixed this issue themselves, I would appreciate any pictures or instructions...thank you TXNemo AKA Mike.
Incase you are interested, The part I ordered is number 14 on the image below.
I will do my best to remember to take pictures of each step in the operation & I hope the instructions will help anyone else that has this issue out of warranty. So, hopefully, when I update this post I will have a set of instructions, a happy car & be a happy owner. *crosses fingers & prays*
#48
07-14-2009, 06:13 AM
Sorry for the delay. The part only comes in pairs. So you will get both the left & right side.
If you are going to replace both sides, I would recommend doing one side & line it up with the working side, then replace the other side.
It just makes it easier to line everything back the way it is supposed to be.
If you are going to replace both sides, I would recommend doing one side & line it up with the working side, then replace the other side.
It just makes it easier to line everything back the way it is supposed to be.
#49
07-14-2009, 03:46 PM

1st Gear
Join Date: Jul 2009
Location: Arcata, CA
Posts: 13
Likes: 0
Received 0 Likes
on
0 Posts
#50
07-14-2009, 06:13 PM

Might have a chafed harness going up the top frame on the driver's side....