
Navigation & Audio Budget hi-end stereo upgrade project


I'm in the process of trying to add the Axxess ASWC in my GP. The build date on my box is 3/12 so it sounds like it should be current, but still it's not auto detecting. I've tapped the signal wire at the steering wheel plug in the column. On my Boost radio harness the same color wire is not there. In the pin 9 location it's white withe a gray strip and yellow/butterscotch dots.
Any advice???
Any advice???
I turned out that there was a problem with me stealing the +12v feed from the radio harness. I ended up needing to run a new power feed from fuse 10 in the interior fusebox. I used an "add-a-circuit" and I haven't had problems since. I ended up running a new ground cable as well just because I wasn't having any luck with it.
@Socially Distorted: Are you getting and indication that the device is getting power/is the LED indicating anything? What stereo receiver are you using?
I have a little update if anyone is interested. I was able to put some time into the install over the weekend.
Most importantly, I improved the door speaker mounts with more screws to make them very rigid. This took care of a little rattle I had been hearing from the passenger door. While I had the door panels off, I applied some FatMat sound deadening material as well.
Here is my "custom" tweeter mount I mentioned earlier

This is what the FatMat looks like after I installed it in the doors

I also applied some on the trim panels as an added barrier, not to kill resonance

I put it in the hatch as well

Overall I do notice a significant benefit from the FatMat, I hope it will be more dramatic once I finish. I'd like to do from the rear seats to the back and the wheel wells. I'm also ready for the smell of the stuff to wear off, it's not offensive, just not exactly pleasant.
Most importantly, I improved the door speaker mounts with more screws to make them very rigid. This took care of a little rattle I had been hearing from the passenger door. While I had the door panels off, I applied some FatMat sound deadening material as well.
Here is my "custom" tweeter mount I mentioned earlier
This is what the FatMat looks like after I installed it in the doors
I also applied some on the trim panels as an added barrier, not to kill resonance
I put it in the hatch as well
Overall I do notice a significant benefit from the FatMat, I hope it will be more dramatic once I finish. I'd like to do from the rear seats to the back and the wheel wells. I'm also ready for the smell of the stuff to wear off, it's not offensive, just not exactly pleasant.
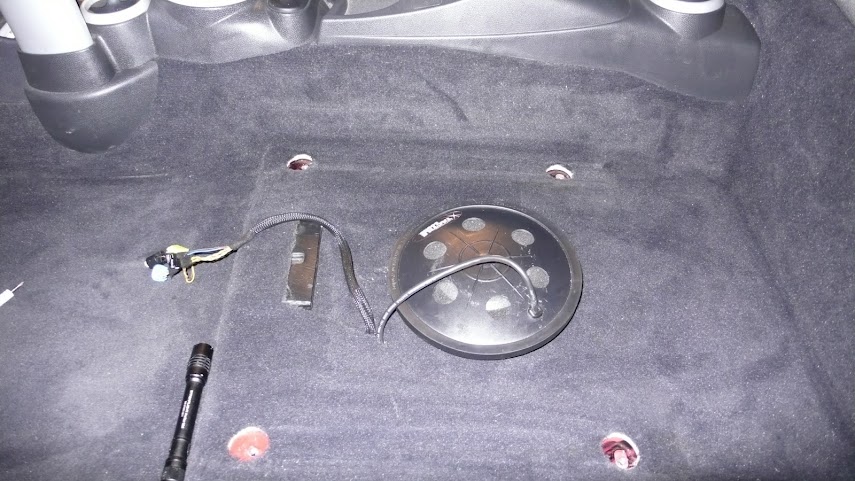
I also thought it might be helpful to post my implementation of the add-a-circuit for power for the metra ASWC. After speaking with Metra tech support, they informed me that there is no accessory power in the factory radio harness (which is obviously not the case because the deck is powered from it.
Anyway, here it is...Fuse 10 (ACC/Radio) and the add-a-circuit. The photo was at the early stage of installation as you can tell from the dangling wire.

Anyway, here it is...Fuse 10 (ACC/Radio) and the add-a-circuit. The photo was at the early stage of installation as you can tell from the dangling wire.

hope that helps
Amp install update
Well I've made some progress on the system installation and it's sounding pretty good. Here are some photos:
Here is the vent for the false floor I built, the finished product looks much nicer

Here is the trim for the false floor

Mounting the amp

FatMat installation for the rear

FatMat on the sides...I also did as much as I could reach behind the speaker on the exterior and interior parts

Here is the vent for the false floor I built, the finished product looks much nicer
Here is the trim for the false floor
Mounting the amp
FatMat installation for the rear
FatMat on the sides...I also did as much as I could reach behind the speaker on the exterior and interior parts
Testing the amp before fitting it into it's final position..Sounds great!

Cable routing before closing up the interior panels

Installed in the car....I have cleaned up the cables since these photos


Left to do:
-build support legs for the false floor to keep it from sitting on the amp.
-Run a new ground for the HU - I plan to ground to the amp's grounding point to address some alternator noise. Glad I thought ahead here and ran some 16/4 with the cables in case of an issue like this.
-Remove driver's seat and install the Clark Synthesis T429. I already ran the cabling for it, so once it's installed I'll just have to plug it in.
-Match output for speakers with SPL meter
-order replacements for all the yellow clips I broke off of the rear interior trim on the passenger side (oops)
Cable routing before closing up the interior panels
Installed in the car....I have cleaned up the cables since these photos
Left to do:
-build support legs for the false floor to keep it from sitting on the amp.
-Run a new ground for the HU - I plan to ground to the amp's grounding point to address some alternator noise. Glad I thought ahead here and ran some 16/4 with the cables in case of an issue like this.
-Remove driver's seat and install the Clark Synthesis T429. I already ran the cabling for it, so once it's installed I'll just have to plug it in.
-Match output for speakers with SPL meter
-order replacements for all the yellow clips I broke off of the rear interior trim on the passenger side (oops)
Last edited by skucie; Apr 30, 2012 at 07:01 AM.


Neutral
Joined: Aug 2012
Posts: 1
Likes: 0
I'm eager to see how you install and power your transducers.
I have a pair of silver's that i want to install in my son's cooper.
Am I correct in assuming the Sony Mobile ES XM-7557 is going to power the transducers?
Does the amp your using allow you to vary the output to the transducer?
I have used several different types of transducers in home theater applications, and depending on the audio track, it ends up being useful in having some flexibility in turning the transducers up or down.
Great thread! Keep posting!!
Ok, so after a very long wait and an exhausting evening, the T429 transducer is installed. I spent about a half hour cruising around tonight listening and messing with the EQ and I'm very impressed.
I mounted the T429 under the driver's seat using the supplied bracket and took a couple photos.
This was my initial attempt at the mounting bracket. It did not clear the seat, so I had to move it over. I'll try to take the time and edit the photo so the final position is visible, but ideally it should be more in the center of the seat and slightly back towards the rear of the car. I used 8mm bolts and washers on the top and bottom, with silicone sealant to prevent rust...big issue here in MN.

Under the carpet there is a little area under the seat with some foam in it (not visible in the photos) which I put back in place and just punched a hole in it with the mounting bolt. A little slice through the carpet and the mounting bolt protruded the perfect amount for mounting.
Here is the final location of the transducer. Ideally, I would have moved it about 2" further back. As it sits I can't put the seat all the way back without hitting it. I am 6'3" and I can still put the seat back further than I do when I drive, but I'll have to be aware in case someone else ever needs to adjust my seat for some reason.
I set a high-pass filter on the speakers at 62Hz and low-pass on the transducer at 85 Hz. I'm sure I'll experiment with other settings but I got too excited and just wanted to listen.
heartsurgeon: The XM-7557's subwoofer channel is powering the T429, and the amp has the following adjustable settings for the subwoofer channel:
-Boost/Low-cut Frequency
-Boost Level
-Level (gain)
-low pass (50-200Hz)
there is also a setting for direct mode and a setting for which channels to pull the subwoofer signal from
I sat in the passenger seat for a part of my listening time, and if you have a pair of silvers, I'd recommend doing one under each seat as the effect was less noticeable from the passenger seat, but still improved.
I'll post more impressions as I have more time to listen and tune the system. I was thinking I'd need to upgrade the morel maximos to something higher in their line or try another brand because I was a bit unhappy with the bass. Since I have set the high-pass filter, i'm thinking that's no longer the case but I haven't decided for sure.
I mounted the T429 under the driver's seat using the supplied bracket and took a couple photos.
This was my initial attempt at the mounting bracket. It did not clear the seat, so I had to move it over. I'll try to take the time and edit the photo so the final position is visible, but ideally it should be more in the center of the seat and slightly back towards the rear of the car. I used 8mm bolts and washers on the top and bottom, with silicone sealant to prevent rust...big issue here in MN.
Under the carpet there is a little area under the seat with some foam in it (not visible in the photos) which I put back in place and just punched a hole in it with the mounting bolt. A little slice through the carpet and the mounting bolt protruded the perfect amount for mounting.
Here is the final location of the transducer. Ideally, I would have moved it about 2" further back. As it sits I can't put the seat all the way back without hitting it. I am 6'3" and I can still put the seat back further than I do when I drive, but I'll have to be aware in case someone else ever needs to adjust my seat for some reason.
I set a high-pass filter on the speakers at 62Hz and low-pass on the transducer at 85 Hz. I'm sure I'll experiment with other settings but I got too excited and just wanted to listen.
heartsurgeon: The XM-7557's subwoofer channel is powering the T429, and the amp has the following adjustable settings for the subwoofer channel:
-Boost/Low-cut Frequency
-Boost Level
-Level (gain)
-low pass (50-200Hz)
there is also a setting for direct mode and a setting for which channels to pull the subwoofer signal from
I sat in the passenger seat for a part of my listening time, and if you have a pair of silvers, I'd recommend doing one under each seat as the effect was less noticeable from the passenger seat, but still improved.
I'll post more impressions as I have more time to listen and tune the system. I was thinking I'd need to upgrade the morel maximos to something higher in their line or try another brand because I was a bit unhappy with the bass. Since I have set the high-pass filter, i'm thinking that's no longer the case but I haven't decided for sure.
I'm eager to see how you install and power your transducers.
I have a pair of silver's that i want to install in my son's cooper.
Am I correct in assuming the Sony Mobile ES XM-7557 is going to power the transducers?
Does the amp your using allow you to vary the output to the transducer?
I have used several different types of transducers in home theater applications, and depending on the audio track, it ends up being useful in having some flexibility in turning the transducers up or down.
Great thread! Keep posting!!
I have a pair of silver's that i want to install in my son's cooper.
Am I correct in assuming the Sony Mobile ES XM-7557 is going to power the transducers?
Does the amp your using allow you to vary the output to the transducer?
I have used several different types of transducers in home theater applications, and depending on the audio track, it ends up being useful in having some flexibility in turning the transducers up or down.
Great thread! Keep posting!!

5th Gear
Joined: Jul 2011
Posts: 909
Likes: 3
From: New York, NY
I also thought it might be helpful to post my implementation of the add-a-circuit for power for the metra ASWC. After speaking with Metra tech support, they informed me that there is no accessory power in the factory radio harness (which is obviously not the case because the deck is powered from it.
Anyway, here it is...Fuse 10 (ACC/Radio) and the add-a-circuit. The photo was at the early stage of installation as you can tell from the dangling wire.
Anyway, here it is...Fuse 10 (ACC/Radio) and the add-a-circuit. The photo was at the early stage of installation as you can tell from the dangling wire.
https://www.northamericanmotoring.co...-fuse-box.html

Yes, its just on top of the carpet. Its very snug and stays in place because it makes contact on both sides and has grooves cut into the board for the tie down points.

Thread
Thread Starter
Forum
Replies
Last Post
molala
MINIs & Minis for Sale
1
Oct 2, 2015 01:53 PM
Mini Mania
Drivetrain Products
0
Sep 3, 2015 10:29 AM