When you click on links to various merchants on this site and make a purchase, this can result in this site earning a commission. Affiliate programs and affiliations include, but are not limited to, the eBay Partner Network.
I bought this 2017 JCW Clubman All4 at the end of the summer last year, after my 2017 Civic hatch was totalled by a Tahoe driver who apparently didn't agree with my decision to stop for an ambulance.
At any rate, I've been loving this car so far.
But yesterday, I was driving to work in the morning, and suddenly I got a yellow "Engine temperature: Drive moderately" alert in my gauge cluster display.
Then it turned into a red "Engine overheated. Stop carefully". and the car was in limp mode. I pulled into a gas station, and let the car sit for about 30 minutes.
At this point I was skeptical anything was truly wrong, but I had let it sit for 30 minutes - fortunately had a Teams meeting, I joined on my phone, let everyone know I was stuck. Then I started it, and drove it home - shortly into driving, I got the same thing. Now I'm thinking this IS a real problem... yikes. Fortunately I wasn't far.
When I pulled back into the driveway, I definitely noticed a pretty big wet spot on the driveway under the front of where I park, which hadn't fully dried (I wasn't gone long, hadn't made it far).
I checked the reservoir, and could see both the MAX and MIN - and nothing at all below it. Fortunately I had some blue coolant, so I added about a half bottle to bring it back to just below MAX (after idling a few min).
I think that means it wasn't TOTALLY empty, but the source of the leak is a mystery and I need to find and fix that.
Last night, I parked in the garage so I could see if it leaked without running the car, and I did find a wet spot, under the right side of the motor -
I know there's a roadside engine cover, and I haven't had a chance to look closer yet, it's possible this is just where it's dripping out from the cover and not indicative of where the leak actually is:
Basically I'm looking for likely suspects and where to find them. Although I've been wrenching on all my cars myself for my past 35 years of driving, I really haven't ever had a need to do any cooling system troubleshooting or repairs (besides proactively replacing the thermostat when I replaced the plastic housing with an aluminum one on my 06 R52 S). I didn't see anything in the 3rd gen FAQs related to cooling or coolant.
So I don't own a pressure tester - hopefully I won't need one to find the culprit.
I did see that this gen also has a plastic thermostat housing, but it looks like unlike my 1st gen, nobody makes an aluminum one. And I don't even know if it's a problem - I'm assuming if it was a common problem, there would be one. I didn't even find one for any B48 in any BMW, so maybe that's not a likely candidate anyway.
Youll definitely want to get under there and take off the lower engine cover. Any leaks that find their way to the cover will migrate and mask their true location.
Youll definitely want to get under there and take off the lower engine cover. Any leaks that find their way to the cover will migrate and mask their true location.
I forget, how many miles are on the car?
It's not quite 60k miles, but we're just coming out of winter here in Buffalo - our winters aren't brutally cold but importantly (and actually tied to how/why we get so much snow) - the temperatures cycle up and down, mostly below freezing but then a few days above freezing before going below freezing again.
Call me a cynic but for all the famed "German engineering", when it comes to materials, it seems like it's not applied to wire insulation material, engine plastics, or engine gasket materials... At least not BMW.
I'm saying that now, BEFORE I lift the front end and get that panel off to see what's ACTUALLY leaking.
A known weak area is the oil filter housing, (yep, plastic). plastic breaks around the mating surface gaskets requiring replacement. Plenty of info on the forums. There is a metal part available.
Interesting that you say that, because I was just about to explore what it means if I'm seeing lots of wetness around the oil filter housing and the bottom of the oil pan (and a sensor that I can only assume is that %#@$! oil level sensor that robbed us of a dipstick and therefore the ability to check level while changing the oil), but I'm not seeing wetness above it - and not seeing wetness below the radiator or hose:
And the hairy cardboard engine cover was ludicrously saturated as you can see , and also I saw residual wetness right near "directly underneath", as well as my spotting some drips here on the ground after removing the panel and adding coolant again:
Seems a likely culprit. 🧐
Fun fact:
I changed the oil right before winter, first oil change of my ownership. My 36mm socket was too deep to fit the filter housing and clear the radiator support - I had to skip the filter change, ordered a new, shallow socket and put the filter on the shelf for spring.
I have put on about 3500 miles over winter - time to change the oil AND the overdue filter...
I'll do that right now, and maybe while I have the filter off, I can spot something more.
Any suggestions for fast shipping on a metal replacement?
And huge thanks already.
ECS carries the Bremman Parts metal replacement oil filter housing, BUT>>>>>>>>>>>>>>> it looks to out of stock till August. I guess search the net.Mfg Part #11428585235MECS Part #ES#4623857Brand
Ugh.
I can't be more disappointed at this moment. It's exactly times like this when you NEED the upgrade part available.
It's not an appealing thought, specifically in such MY location in the country with all our fluctuations above and below freezing, to have to install a plastic part and face inevitable future failure.
It's maybe more unappealing to install a cheap part as a temporary measure, since it doesn't look like a particularly easy install - in addition to paying twice to buy and install the temporary, and then buy and install the metal part when it becomes available.
But who knows - I guess I'll find out shortly, I'll look up the install. Maybe there's clearance for the bolts and maybe it'll slide straight down and the new one align itself without removing the radiator.
Are there other alternatives for upgrade? Is the ECS Bremmen the only one on the market?
I'll head there right now. Thanks for that heads up.
I also found this one, and at least according to ChatGPT these part numbers DO cross with my car:
$228 is nearly double what the Bremmen one costs at ECS, but I can get it now: https://www.bimmerworld.com/Engine/B...m-B46-B48.html
We'll see if any Ebay listings offer next-day shipping. I'm seeing listings on there for $60-$120, which is way cheaper than this one. Unfortunate that I need it quick.
I did decide to also order the HICU water pump with the metal impeller, and a thermostat since 60K seems to be about when it should be replaced anyway - and since it is plastic and I'll have everything apart, it's the right time to do it.
Fingers crossed I can get a metal housing by Tuesday so I can make this a one-and-done.
After spending about $100 extra in next day shipping at ECS across two orders, I would have ended up spending another $70 on top of a $230 part price.
The Ebay listing for the $60 one had hundreds of positive reviews (including "fast shipping"), so I decided to cut the bleeding a little and buy that one. Said it would arrive between the 11th and 14th.
I do have my R52 S summer car to drive, so I suppose I don't NEED to have it fixed by my Wed office commute.
But oddly on page 2, in explicitly bold font, it says "Do not drain engine oil from the engine oil pan."
Part of me is thinking that's just to facilitate the repair without requiring an oil change.
However, part of me is concerned that there might be something more to it, and I wouldn't want to jeopardize the repair.
I suppose the "better safe than sorry" option is to do the repair, then do the oil change, but I was hoping to just drain everything, do the job, then refill everything.
Anyone know why this exceptionally bold mandate is in this procedure?
That article is genuine BMW Service information. Don't see what difference it makes, unless you just changed the oil, I would just dump it all up front before removing anything.
After spending about $100 extra in next day shipping at ECS across two orders, I would have ended up spending another $70 on top of a $230 part price.
The Ebay listing for the $60 one had hundreds of positive reviews (including "fast shipping"), so I decided to cut the bleeding a little and buy that one. Said it would arrive between the 11th and 14th.
I do have my R52 S summer car to drive, so I suppose I don't NEED to have it fixed by my Wed office commute.
But oddly on page 2, in explicitly bold font, it says "Do not drain engine oil from the engine oil pan."
Part of me is thinking that's just to facilitate the repair without requiring an oil change.
However, part of me is concerned that there might be something more to it, and I wouldn't want to jeopardize the repair.
I suppose the "better safe than sorry" option is to do the repair, then do the oil change, but I was hoping to just drain everything, do the job, then refill everything.
Anyone know why this exceptionally bold mandate is in this procedure?
All I can think is they want to save money on not replacing the oil and having to reset the service counter. If you are doing the work, I would 100% drain and refill the oil - make sure there isn't any coolant in the pan.
After spending about $100 extra in next day shipping at ECS across two orders, I would have ended up spending another $70 on top of a $230 part price.
The Ebay listing for the $60 one had hundreds of positive reviews (including "fast shipping"), so I decided to cut the bleeding a little and buy that one. Said it would arrive between the 11th and 14th.
I do have my R52 S summer car to drive, so I suppose I don't NEED to have it fixed by my Wed office commute.
But oddly on page 2, in explicitly bold font, it says "Do not drain engine oil from the engine oil pan."
Part of me is thinking that's just to facilitate the repair without requiring an oil change.
However, part of me is concerned that there might be something more to it, and I wouldn't want to jeopardize the repair.
I suppose the "better safe than sorry" option is to do the repair, then do the oil change, but I was hoping to just drain everything, do the job, then refill everything.
Anyone know why this exceptionally bold mandate is in this procedure?
I read through that entire procedure. I could understand not draining the oil prior to performing the replacement...but the procedure should conclude with an oil change. FWIW, when replacing the oil filter housing on the Gen II platform, they do advise to change the oil and filter after the service......
For what its worth, I just pdf'd the procedure from NEWtis. This procedure is MUCH more detailed than that TSB document. Notice, this procedure has the oil pan drained and emptied.
For what its worth, I just pdf'd the procedure from NEWtis. This procedure is MUCH more detailed than that TSB document. Notice, this procedure has the oil pan drained and emptied.
Thanks for sharing this, Nik -
May come in handy on the daughter's F54S in the future LOL.
We just have the plastic ones right now, sold out of the metal and not coming in for a while. :(
I would get the plastic and run it, should last a while, we have lifetime replacement. Much better the the original genuine that seem to fail all the time.
For what its worth, I just pdf'd the procedure from NEWtis. This procedure is MUCH more detailed than that TSB document. Notice, this procedure has the oil pan drained and emptied.
I can't thank you enough for that attachment. Thanks so much.
I've been trying to get my hands on that NewTIS but it's tough. Not like a site to download it from or anything. Apparently BMW themselves shut down the old TIS so... 🤬
We just have the plastic ones right now, sold out of the metal and not coming in for a while. :(
I would get the plastic and run it, should last a while, we have lifetime replacement. Much better the the original genuine that seem to fail all the time.
Rt 66 trip sounds absolutely epic, especially this time of year. Lucky!
I did actually order the plastic one of your house brand, and also a new thermostat, and also a new water pump - the one with the metal impeller. And new intake manifold seals since I'll pull that ...and a coolant refill tool to help refill without air pockets.
I did find an aluminum oil filler housing from an eBay vendor, so we'll see how that looks - with luck it'll be good enough so I can use that rather than the plastic one, and make this a "one and done" job. I want this car to be reliable through some more above-and-below freezing fluctuating winters here.
I think I'll try to capture some photos of the repair in this thread to help future fixers - but glancing through that PDF - it's got ALL the detail anyone could ask for. A truly professionally considered process, fully illustrated with arrow-augmented photos.
No questions on "Do I need to take this off to get to that?", in just going to do exactly what that says. Huge thanks again.
Something interesting here though -
I had already started unclipping the hoses, lines, and harnesses from the intake manifold, assuming I'd have to get that out of the way.
This is my "How it should be" photo of before-i-start, but I added a small orange arrow so you can orient yourself to where I am in the close up photo:
When I got those unclipped and tied up out of the way, I spotted this -If you look at this photo, I have an orange arrow pointing at the same spot, and I drew two circles around items of concern:
The red circle looks like a pool of oil. I'm hoping "no big deal" since believe that's the PCV line running above? I still wouldn't expect it to leak, so maybe that's an issue?
The green area I'm really scratching my head on. Looks like white shavings, super thin and flaky, I feel like if I sneezed I'll blow them all away - I can't imagine what it would have come from...?
Nothing on the hoses and lines seems to correspond, or under the engine cover. But it's flaky and light and seems it would have blown away just driving around, and gentle breeze under there - then again, maybe air really doesn't move around in there. Odd.
Could be oil, could be water? Any signs of leaking or weeping from the hoses / tubes that were about that spot?
Keep in mind too, that air comes through the radiator and brings all sorts of dust and debris. As you get dead spots in the airflow, the dust will settle out. I wouldn’t get too caught up in all the little bits of dust and dirt.
I appreciate you documenting all this, as I am keeping an eye on my oil filter housing to see if it will need replacing too.
A little photo dump here.
Again, I'm following that PDF that was attached earlier - so good.
So these photos are to capture a wider frame or a detail that's tricky:
Removing the air box was easy and opened the first big space:
The clips holding the radiator fan were fragile and tricky.
The first one was trickier, and the diagram didn't help much.
Be gentle. I used a screwdriver to pull the bottom off the tab forward slightly. It's not hinged, so be careful. Just pull it forward and the shroud up.
The other side is easier to do - tougher to photograph.
The arrow is pointing at the tab, this one is on the back side of the shroud. I could push it with my finger to release it pretty easy.
The arrow is also pointing towards the front side of the car, to help orient you with this photo, tough to take a pic of the back of the the shroud.
I was able to squeeze the shroud out without removing that upper radiator hose.
I was able to get the intake manifold off - there's only 5 bolts across the top? How odd.
That definitely opens up space.
This detail was also tricky.
The TIS document shows a vague "make sure this is clipped", but it took me a sec to find what clip, and how to do it.
First off, they are easy. You pull the wire away from the intake, and that end will just go "click". It also UNclicks pretty easy.
Second off, there's not just one, there's two. You have to pull both until they are clicked, then the intake slides right out.
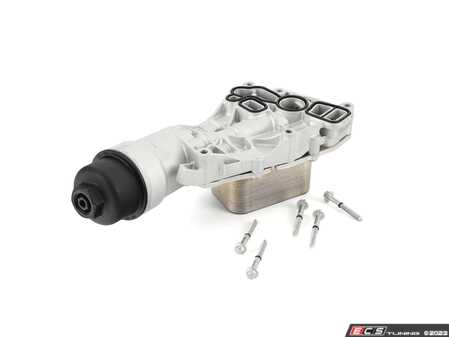
I also rented a pressure tester, and did a crazy kludge to make it work from the overflow - I'm not sharing that pic, and I almost got the rubber fitting that I inverted permanently stuck in the overflow bottle... But I got more coolant to leak, and it did seem to confirm it's coming from this oil fill housing.
I didn't see a specific leak "point" but this whole thing was wet - tough to photograph, but that's what the red arrow is pointing to
I drew the blue arrow just so you can see this is the oil filter assembly - that's the oil cooler, the rectangular part of the assembly:
I'll have it off tonight, and we'll see what it looks like.
I can't figure out for the life of me how or where to drain the coolant - that was actually pretty close to the START of tonight's work, and suddenly the pictures in the manual seem to be of a completely different motor.
I mean : I can't even identify an item in the bottom 3 photos to even identify if this photo was taken from the top or the bottom:
For real:
The red arrows are pointing to the lower radiator hose (which is importantly stacked above the intercooler, so I don't think the photos were from below - there's nothing down there but an oil cooler).
The blue arrow is pointing to a smaller coolant hose. It comes off the same water pump, it looks like (under the alternator), and goes to that round device with the wire harness plug and the round black plastic cap-shaped thing. That doesn't resemble anything in the photos.
I could just unclip the lower radiator hose but I have no controlled draining then - plus I'm just pouring coolant straight onto (into?) my AC compressor. What a mess.
I should have taken a picture of the oil cooler from below... I can't tell for sure, but it appears there's a coolant line going to it. That would make sense I suppose.
(It's also not in those photos in the PDF)
If that's a coolant line, I could unclip it and pop it pretty easily to drain.
Does anyone know how to drain the coolant?
I'm not finding guides or videos, YouTube - nothing specific to this '17 JCW... Has me wondering if these parts are different than the S?